Grow · plant bare root wallflowers autumn uk
Plant Bare-Root Wallflowers in Autumn in UK Gardens
Plant leafy bare-root bedding wallflowers in a UK autumn border, with root soaking, spacing, planting depth and a plan for ground that is too wet or frozen.
Published Last updated
In this guide
- Plant for spring while the ground is still workable
- Identify bedding wallflowers and inspect the bundle
- Prepare a sunny bed that releases winter rain
- Set out spacing before exposing the roots
- Rehydrate roots and deal with a planting delay
- Spread the roots and keep the stem base at grade
- Check anchorage and moisture through winter
- Carry the planting into its spring display
- Steps
Plant for spring while the ground is still workable
Plant bare-root bedding wallflowers promptly into a sunny, freely draining bed, protecting the exposed roots until each plant is in the soil. These leafy autumn bundles are intended to establish before their spring display. Prepare the site before opening them, briefly soak the roots, spread them into a suitable hole and settle the soil firmly around them. Planting into frozen or saturated ground defeats that sequence.
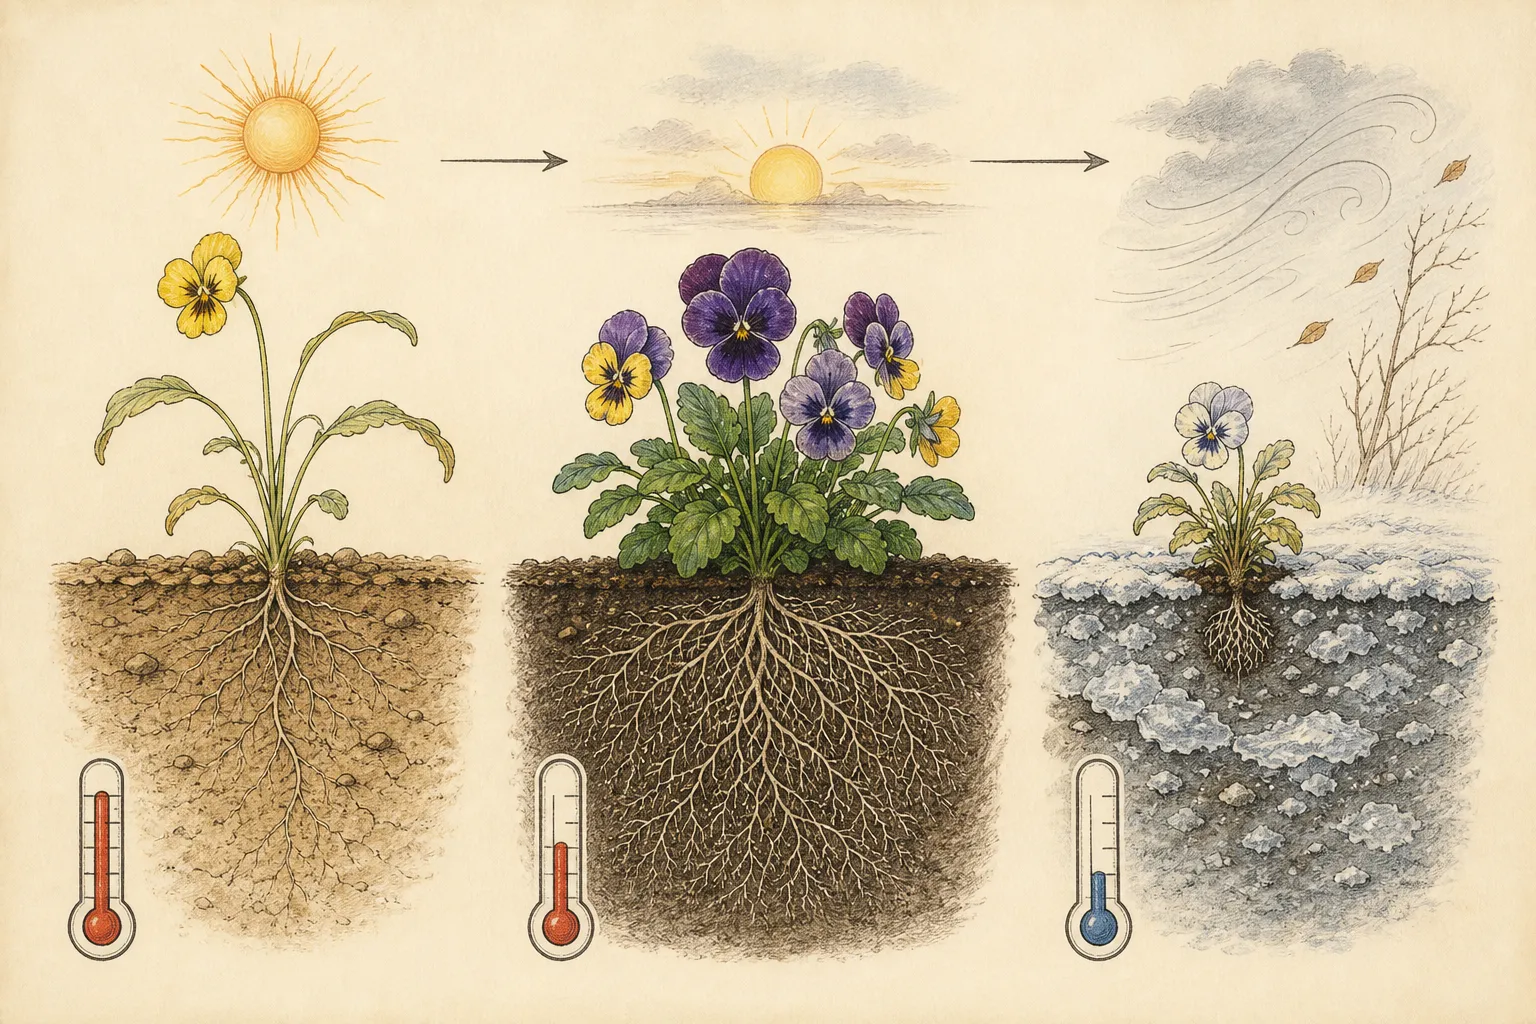
For a UK garden approaching mid-November, the decision starts with the bed. RHS lists wallflowers among the spring bedding that can still be planted in November, describing this as the last opportunity. Love The Garden places the preferred planting period earlier, in September or October. Those recommendations fit together: autumn is the normal season, while a late planting depends on workable conditions and sound plants. November is not a promise that every exposed or sodden site remains suitable.
Choose ready-grown bedding plants when the aim is flowers next spring. Sowing seed now is a different project from planting a nursery-grown bundle that has already spent the summer developing. Likewise, a flowering perennial wallflower in a large pot is different stock with a different care cycle. Check the label before applying a bare-root planting sequence to everything sold under the common name.
Identify bedding wallflowers and inspect the bundle
The traditional spring bedding wallflower is Erysimum cheiri, also listed as Erysimum × cheiri and under the older name Cheiranthus cheiri. NC State describes it as a perennial subshrub often grown as a biennial or annual. In the familiar bedding cycle it grows in one season and provides the main flower display in the next. Calling it a biennial describes how it is used; it does not require every individual plant to die precisely after flowering.
These are the wallflowers offered in bundles lifted from nursery ground, with foliage attached and roots exposed. They are not dormant woody whips, dry bulbs or a packet of root pieces. Keep a cultivar label with each bundle because height, color and recommended spacing affect the eventual bed. A mixed-color purchase is useful when you want a varied drift; a named color is easier to repeat deliberately alongside spring bulbs.
Separate the plants gently enough to see their individual root systems. Look for a sound stem base, some branching roots and leafy shoots that can be supported in the planting hole. Put plants with crushed bases, extensively broken roots or suspiciously soft tissue aside for the supplier to assess. A floppy leaf after transport is less informative than the condition of the whole plant, so inspect before deciding whether the bundle is usable.
Perennial selections such as 'Bowles's Mauve' belong to a separate category. Love The Garden distinguishes those long-flowering perennials from the traditional spring bedding types and favors spring planting for them. Their summer cuttings and postflowering pruning instructions are not instructions for a newly unpacked E. cheiri bundle. Keep the stock distinction visible through the job, especially if you are buying several kinds of Erysimum together.
Prepare a sunny bed that releases winter rain
Choose open sun for the UK spring bedding display. RHS's wallflower planting activity specifies plenty of sun and well-drained soil. A low patch that remains wet after autumn rain is a poor substitute for that site, even if its position suits the color scheme. Check the intended root area after rain and look for standing water, smeared soil or a surface that stays saturated. A prepared raised bed can be an alternative when its soil actually drains.
NC State emphasizes very good drainage and tolerance of poor, rocky soils, while Love The Garden recommends a more fertile, moisture-retentive bed for bedding displays. Both leave waterlogging outside the plant's needs. In a home border, start with soil that holds enough moisture for establishment but releases surplus rain. Improve a poor bed across the planting area as needed; a rich pocket in a persistently wet depression leaves the main problem intact.
Clear weeds before the plants arrive. Work from the edge of the bed when you can, breaking large clods into a texture that will fall between small roots. Soil that coats tools in a smooth wet layer or closes into sticky lumps is telling you to pause. Walking and pressing repeatedly over such ground makes it harder to place the fine roots well. Keep the planting area level enough that rain cannot collect around a buried stem base.
Feeding advice also needs a seasonal boundary. Commercial wallflower guides recommend feeds for growth and flowering, but RHS's November advice says to stop feeding at this late stage, and NC State warns against excessive fertilizer. An autumn planting needs sound roots, contact with the soil and appropriate moisture first. Skip an automatic liquid-feed program during winter; review any nutrient need when growth resumes, in the context of the bed and its preparation.
Set out spacing before exposing the roots
Use the spacing supplied for your cultivar. Love The Garden gives about 30 cm (12 in) for bedding wallflowers, while D.T. Brown gives 25–30 cm (10–12 in) for bare-root planting. RHS's simple plug-plant activity uses 20 cm (8 in). These are different planting recommendations, not competing measurements of one fixed plant. For an ordinary bare-root bedding group, 30 cm centers is a useful working layout when no closer cultivar instruction is supplied.
Measure from the center of one plant to the center of the next. The narrow foliage of an autumn bundle can make a correctly spaced patch look empty. That open soil is not a reason to squeeze in the spare plants; the spring stems and flowering branches will occupy more of the bed. Mark positions with small sticks before unpacking so the exposed roots spend little time waiting while the pattern is adjusted.
For example, a 90 × 120 cm rectangle can hold twelve positions in three columns and four rows at 30 cm centers. Put the first and last centers 15 cm inside each edge: the three column centers fall at 15, 45 and 75 cm across the width, and the four rows at 15, 45, 75 and 105 cm along the length. This is a layout calculation for that chosen spacing, not a universal planting density.
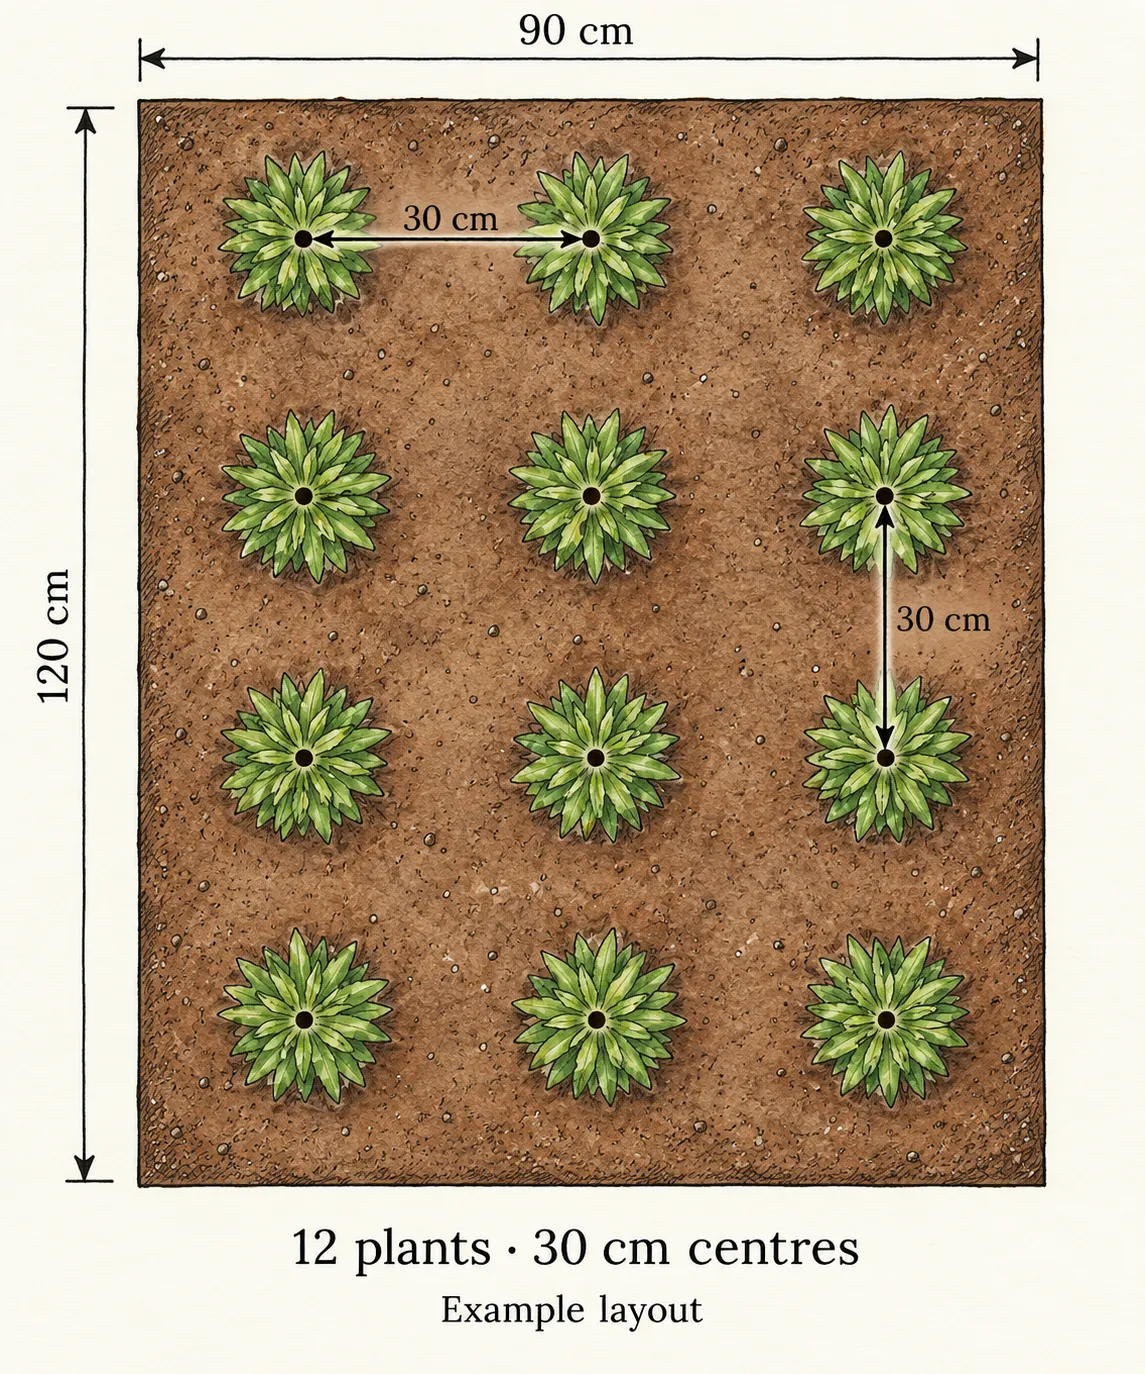
The plan shows wallflowers alone so every position is countable. If you want tulips or another spring companion in the same patch, draw their positions before buying the wallflowers and allow room for both sets of foliage. Plant fewer wallflowers when the companion occupies their intended space. A bare strip beside a path also needs enough setback for the cultivar's mature growth; the illustrative 15 cm margin is not a guarantee that every variety stays inside that edge.
Rehydrate roots and deal with a planting delay
Open the package when it arrives and keep the plants upright while you assess them. Once roots are uncovered, organize the work so only the plants being planted are exposed at any one time. Keep the remainder shaded with their roots protected by damp wrapping. The damp material belongs around the roots; it should not compress the leafy shoots into a wet bundle.
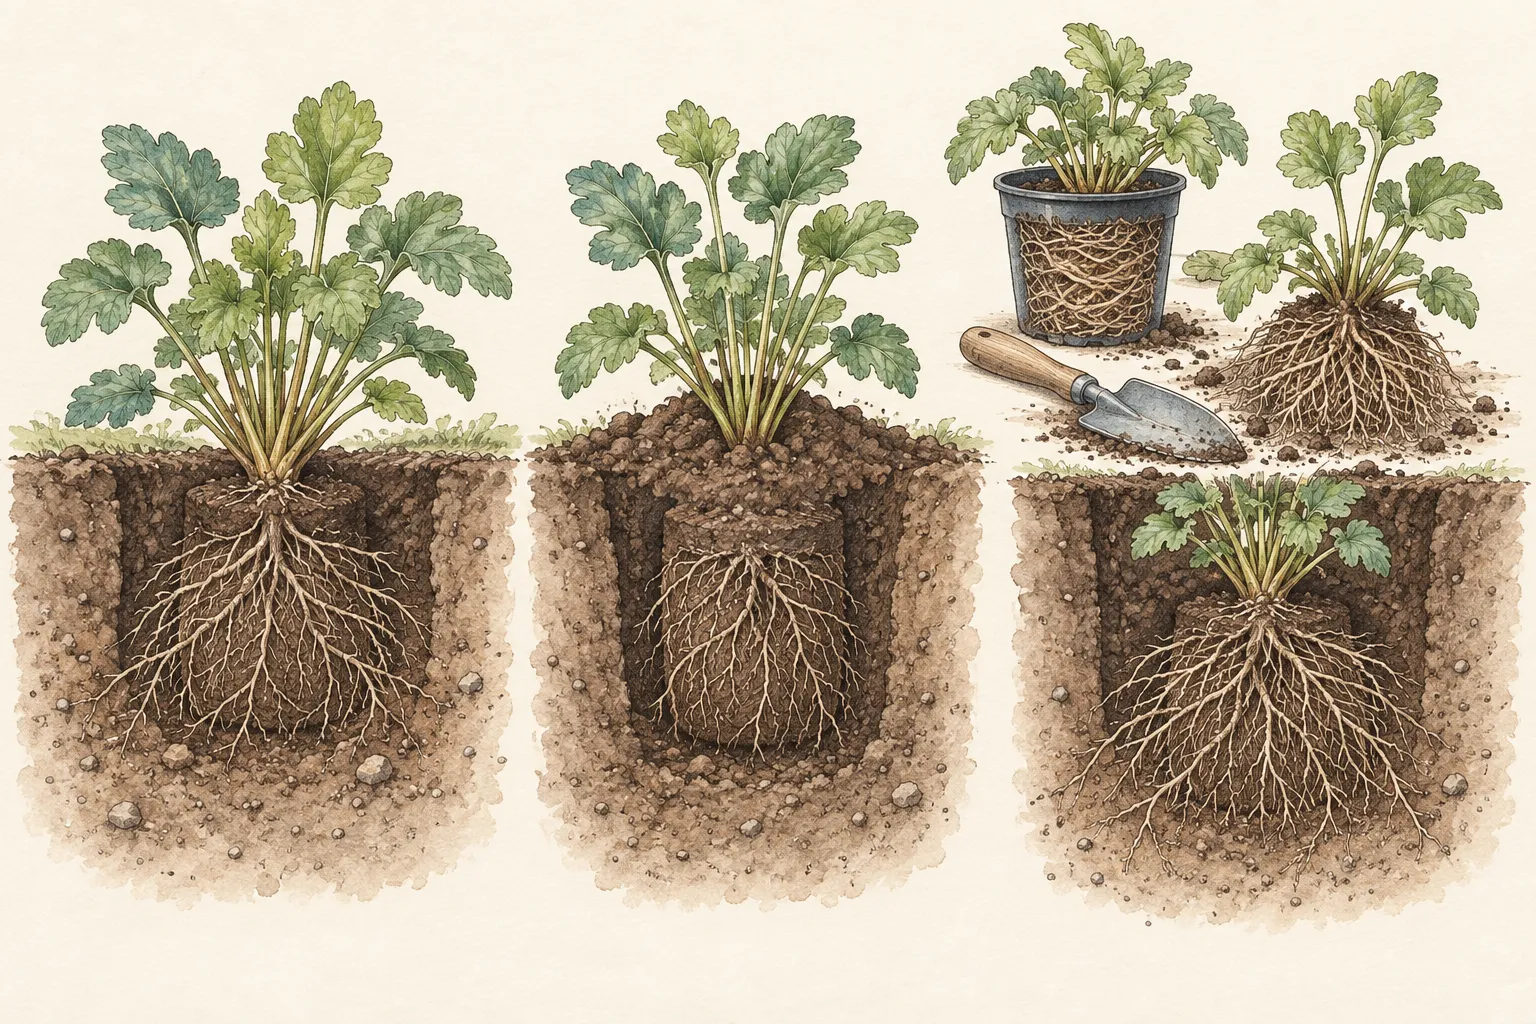
Love The Garden recommends soaking bare-root wallflower roots in water for 20–30 minutes before planting. Use a bucket deep enough for the root portion and keep the leafy tops clear. This is a short preparation step for fresh nursery stock. Leaving the whole bundle submerged for days is not a holding method, and a soak cannot repair roots that have been badly damaged. Prepare the bed and labels while the roots take up water.
If the permanent bed is temporarily unavailable but another patch of ground is workable, D.T. Brown recommends heeling the plants in. Make a temporary trench large enough for the roots, place the plants together, cover all the roots with soil and firm it into contact. Keep the foliage above ground and mark the group. Water as needed to settle the roots, then move the plants to their final positions as soon as conditions permit.
Heeling in still needs suitable ground. A frozen or waterlogged holding patch has the same limitations as the intended bed. If neither area is usable, keep the roots protected from drying and ask the supplier promptly about a suitable temporary potting arrangement for the stock and weather you have. Before ordering, arrange delivery for a time when planting or a sound holding place is available. Open-ended storage of leafy bare-root plants is a poor plan for a spring display.
Spread the roots and keep the stem base at grade
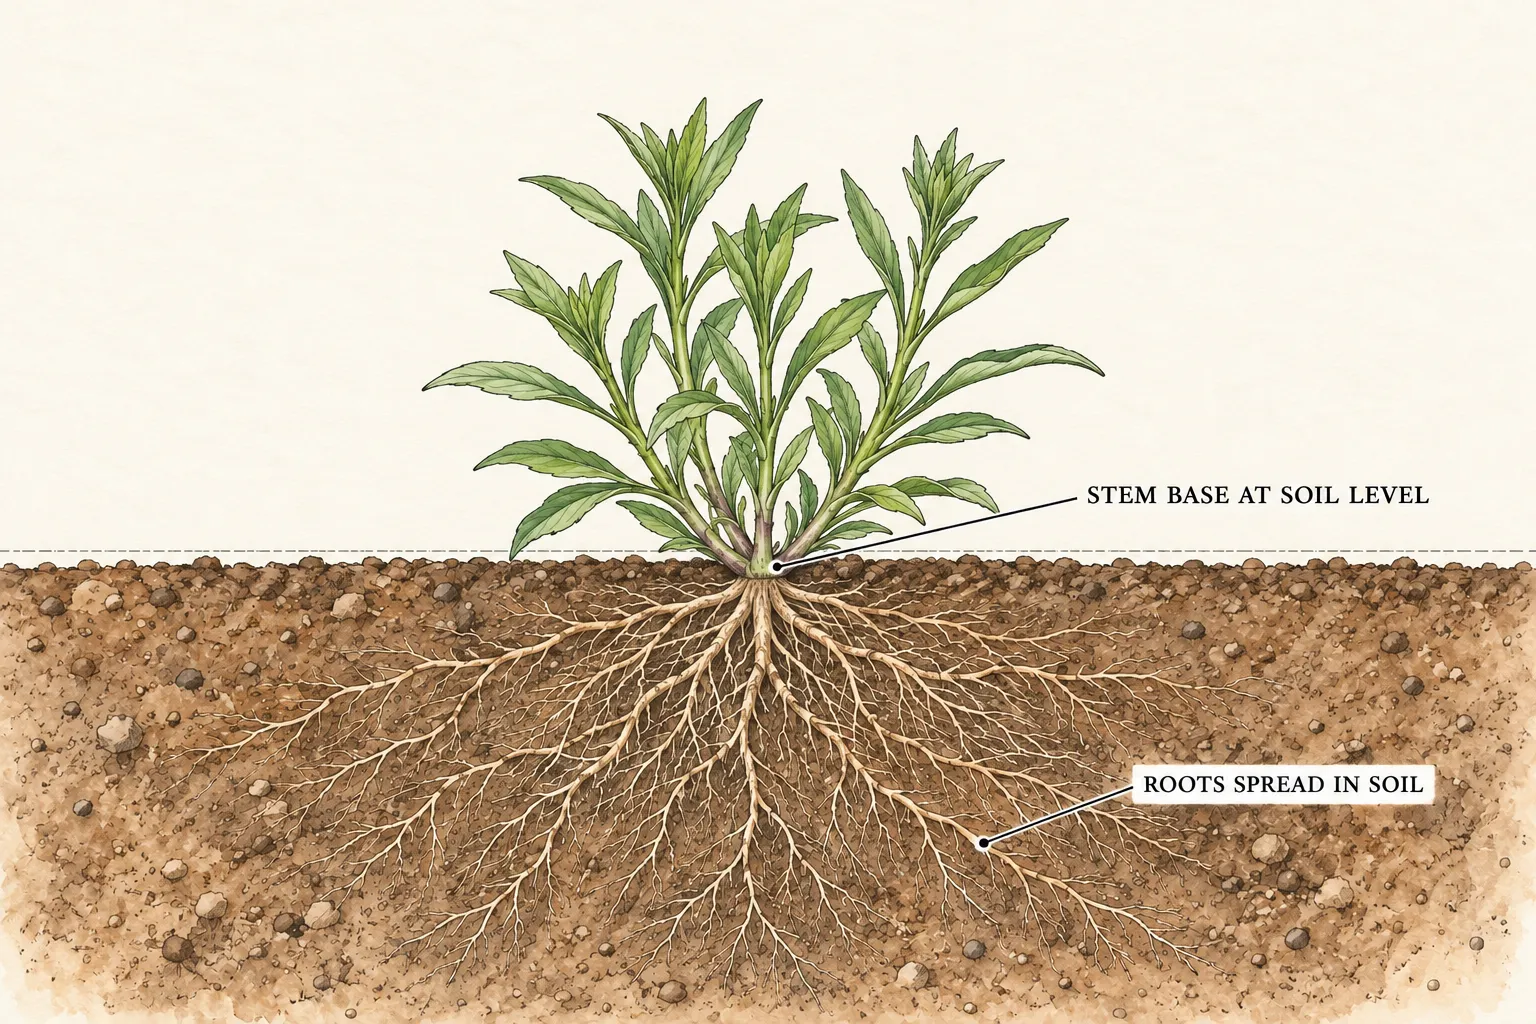
Make the hole fit the root system you actually received. It must be broad and deep enough for the roots to spread naturally, with no need to double them upward or force the whole bunch into a narrow slot. Support the plant while arranging the roots and return soil around them. The aim is close root-to-soil contact over the root system, not a tidy-looking upright shoot above a hidden air pocket.
Set the base of the stem at the finished soil surface, with the roots covered and the leafy shoots clear. RHS states this level explicitly for wallflower plugs; the same stem-base reference is useful when placing a bare-root bedding plant. Where the nursery soil mark is visible, use it to help orient the plant, and follow any more specific instruction supplied with the stock. A long root changes the size of the hole, not the amount of leafy stem to bury.
Hold the plant at that level as you add soil in small amounts, working it among the roots. Press the soil with your hands until the plant is steady, keeping the surface at its intended level. Firming closes gaps and helps the roots make contact; pounding wet soil flat is a different operation. If the stem is pulled downward while backfilling, lift and reset the plant before the hole is completely firm.
Water the newly filled root area thoroughly enough to settle the soil, allowing it to soak in. Then check the level again. Add soil over newly exposed roots, or reset a plant that has sunk so its base is covered. The section drawing shows a completed planting with soil around the roots throughout. The visible roots are a cutaway convention, not an instruction to leave them uncovered on the surface.
Check anchorage and moisture through winter
After the first watering, use the soil condition to decide when another is needed. A rainy week may keep the bed moist, while a sunny, windy spell can dry the newly occupied root area. Inspect beside a plant with a fingertip or trowel; surface color alone gives a poor view of the root area. The root area should remain moist during establishment while surplus water drains away.
Look again after strong wind or a freeze followed by a thaw. A plant that rocks in a widening hole has lost some of the firm contact created at planting. When the soil is workable, gently restore soil around the roots and press it into place, checking the stem-base level as you go. If water has washed soil away, address the runoff as well as covering the exposed roots.
Clear fallen leaves that flatten the little leafy plants or hide the soil around their bases. Keep that inspection practical: a wallflower bundle is planted with living foliage, so the plants need visible, unburied shoots through the establishment period. A thick covering that conceals them makes it harder to see whether a plant is loose, buried, damaged or sitting in standing water.
If one plant wilts, compare its soil and anchorage with those of its neighbors before reaching for feed. Dry soil, saturated ground and root damage can require different responses, and a single pale leaf cannot distinguish them. Where decline continues, lift a failing specimen for inspection and seek advice with photographs of both roots and foliage. Keep obviously suspect stock separate and resolve its condition before using it to fill gaps among healthy plants.
Carry the planting into its spring display
Spring growth is the point to assess the shape of the planting. Retain the cultivar labels so that unexpected height or flower color can be traced to the stock you bought. NC State describes the familiar flower clusters as fragrant, four-petalled blooms in a range centered on yellow and orange, with other colors available in cultivars. An autumn bundle can be entirely leafy at planting and still be the right stock for this later spring display.
Remove spent flower heads during the display if you want to limit developing seedpods and encourage continued flowering, as Love The Garden recommends for bedding wallflowers. Judge watering from the weather and root-zone moisture as stems grow. Established plants and newly transplanted bundles have different demands, so the autumn instruction to keep roots moist should not become a habit of maintaining a sodden bed throughout spring.
Decide what happens to the patch after its main flowering season. A temporary bedding scheme can be cleared for summer planting; a plant retained as a short-lived perennial needs space and care appropriate to that choice. Leave neither decision to an assumption that the word wallflower guarantees years of the same display. For the next autumn planting, the useful record is which cultivar, spacing and part of the bed gave well-anchored plants and good spring flowers.
Steps
- Level
- easy
- Time
- About an hour for a small prepared bed, plus establishment checks
- Tools
- Trowel or small spade, Bucket for a short root soak, Watering can, Measuring tape and temporary spacing markers
- Materials
- Healthy bare-root bedding wallflowers with cultivar labels, Damp wrapping to protect waiting roots, Prepared sunny, freely draining ground
- 1Check the bed and the stock
Confirm that the plants are bedding Erysimum cheiri supplied as leafy bare-root stock. Inspect the intended bed for sun, drainage and workable soil before opening the bundle. If the ground is frozen or saturated, arrange a suitable temporary holding place or delay delivery. Clear weeds and mark the final planting area while the roots are still protected.
- 2Lay out the planting centers
Read the cultivar spacing first. For the worked 30 cm layout, mark three columns and four rows in a 90 × 120 cm patch, leaving 15 cm between the outer centers and each edge. Adjust the plan for other plants and mature overhang beside a path. Use markers during planning so the wallflower roots can stay wrapped.
- 3Unpack and soak the roots briefly
Open the bundle, separate plants gently and retain the labels. Put questionable or badly damaged plants aside for assessment. Soak the root portions of sound bare-root plants for 20–30 minutes, keeping the leafy shoots above the water. Work in small groups afterward, with the remaining roots covered by damp material until their planting holes are ready.
- 4Place each root system at the right level
Open a hole large enough to accommodate the roots naturally. Spread them through the hole while supporting the plant with its stem base at the finished soil surface. Return soil among and around the roots, keeping leaves above ground. Press gently into firm contact and check that the plant has stayed at the intended level before watering.
- 5Settle the soil and inspect the result
Water the filled root area, allowing water to enter the surrounding bed. Check for settlement, exposed roots and a buried stem base after the water drains. Correct the level while the planting is still easy to adjust. Make sure the plant is steady and the label is readable, then repeat across the marked positions while keeping waiting roots protected.
- 6Revisit after weather changes
Check soil moisture and anchorage during establishment, particularly after drying wind, heavy rain or thawing ground. Restore loose soil contact when the bed is workable and keep fallen leaves from flattening the foliage. Investigate persistent decline before feeding or replacing plants. In spring, review the cultivar and spacing against the flowering display and plan the patch's next use.
Related reading
Sources
- November: Flowers. Royal Horticultural Society. Source record · Accessed 2026-10-31.
- Wallflowers. Royal Horticultural Society. Source record · Accessed 2026-10-31.
- Erysimum x cheiri (Wallflower). NC State Extension. Source record · Accessed 2026-10-31.
- How to plant, grow and care for Wallflowers (Erysimum). Love The Garden. Source record · Accessed 2026-10-31.
- How To Grow Wallflowers. D.T. Brown. Source record · Accessed 2026-10-31.