Grow · overwinter potted bougainvillea indoors
Overwinter Potted Bougainvillea in a Bright Indoor Space
Choose a bright winter position for potted bougainvillea, distinguish bract loss from leaf loss, reduce watering and preserve the woody framework and roots.
Published Last updated
In this guide
- Choose the bright winter route before adjusting care
- Separate the coloured bracts from leaves and true flowers
- Move the framework with its root ball intact
- Put useful light and temperature around the whole canopy
- Reduce frequency while keeping each watering effective
- Use leaf loss as evidence, not a diagnosis
- Renew growth and structure when the season changes
- Steps
Choose the bright winter route before adjusting care
Give a potted bougainvillea a bright indoor position with a measured minimum night temperature of 10°C, or 50°F, for the RHS winter-care route. After the flowering display ends, reduce watering frequency and stop feeding. From November, the RHS advises occasional but thorough watering. Let the mix become drier between applications, then allow excess water to drain. Preserve the supported woody framework and keep routine root work for a suitable growing-season opportunity.
The aim is to carry a living plant through lower winter light. A few remaining coloured bracts are a bonus; continuous winter colour is not the measure of success. Florida guidance describes particularly generous winter flowering in its warm landscape conditions. A plant beside a window in a cold-region home has a different light and temperature history. Those outdoor displays are therefore a poor standard against which to judge an indoor November plant.
A cooler storage option exists, but it changes the expected appearance and care. Illinois Extension describes dormant overwintering in a cool, dry place. The RHS likewise allows storage above freezing with relatively dry compost, while warning that leaves will drop. That is a separate route from the bright, 10°C-minimum method here. A bare vine in cool storage and a leafy vine near a bright window need their moisture assessed according to their actual state.
Choose the arrangement you can maintain through cold nights, not just on the day the pot comes inside. By late November, plants in cold districts should already be protected; in a milder garden the final move may be more recent. Bring any remaining outdoor pot into appropriate shelter before damaging cold. The local forecast and the conditions beside the plant take priority over a shared calendar date or the description frost-free on a greenhouse catalogue.
Separate the coloured bracts from leaves and true flowers
Bougainvillea’s large coloured structures are papery bracts: modified leaves surrounding the small true flowers. Clemson describes the actual flowers as white and tubular. Ordinary foliage is green, or partly cream on a variegated selection, and has a different texture and role. Look at what is falling before deciding that the plant has lost its whole leafy canopy. A carpet of faded pink bracts can mark the end of a display while green leaves remain on the stems.
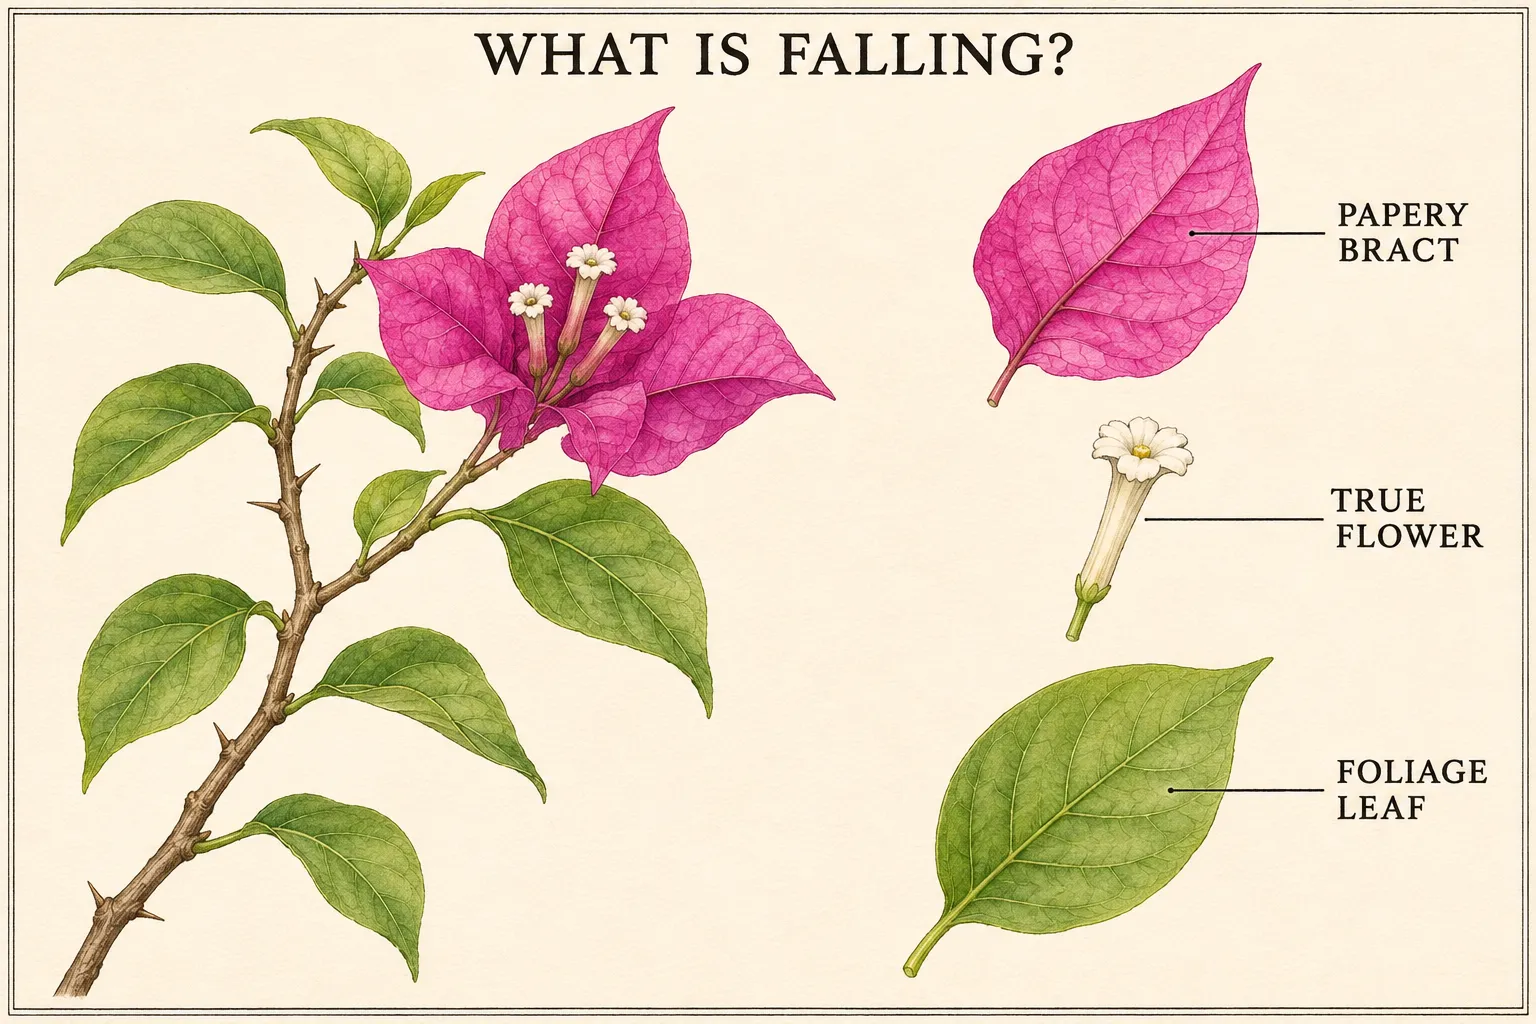
Keep the cultivar label with the plant. RHS identifies B. glabra and B. × buttiana as useful container choices because they flower young; many plants in commerce are named hybrids. A compact bush, hanging basket and vigorous trained climber can all be bougainvilleas, but their winter footprints differ. Plan for the existing plant’s framework and consult its supplier if the label specifies conditions more protective than the general winter route.
Photograph the green foliage, remaining bracts and bare sections before moving the pot. That gives you a starting comparison after several weeks indoors. Examine the stem tips and older woody branches separately. This is a woody plant with a framework worth retaining, so the disappearance of its decorative bracts is not a reason to cut every stem to the compost. Leave sound growth in place while checking the conditions around it.
The distinction also matters in spring. Bougainvillea produces its display on current-season growth, as the RHS explains. New shoots and developing bracts belong to that renewed cycle; an old papery cluster does not need to remain indefinitely. Clear loose fallen material from the pot surface so it is easier to inspect moisture and notice fresh leaf loss. Keep any trimming tied to the condition of the actual stem, not simply to the colour of its last bracts.
Move the framework with its root ball intact
Trace the branches before lifting the container. Long shoots may have reached through a balcony rail, snagged on neighbouring plants or become attached to an outdoor support. Bougainvillea is thorny, so handle it deliberately and wear heavy gloves, as UF/IFAS recommends. Release external ties and free accessible branches gently. If an awkward shoot cannot be moved safely, make a limited cut with the retained structure in view and collect the clipping.
Check that the portable trellis is stable and fits through the doorway with the pot. A support attached to the container can travel with it, while wires fixed to a greenhouse wall cannot. Secure loose shoots with forgiving ties and keep the plant clear of the route while you work. Lift by the container or use a suitable trolley with help for a heavy specimen. Pulling on branches or the trellis transfers the moving load to parts that are there to support growth.
Keep a sound root ball intact during the autumn move. Illinois specifically cautions against damaging bougainvillea roots and against frequent repotting; it notes better flowering when plants become pot-bound. That is a reason for restraint, not an instruction to keep a failing plant permanently trapped in a broken pot. If the container drains properly and the plant is stable, a larger pot is rarely the first task needed simply because winter has arrived.
Inspect a failing vessel or persistent drainage problem on its own merits. A necessary container rescue differs from scheduled repotting. Support the existing ball, minimise disturbance and obtain nursery advice where roots are badly compromised. For routine work, the RHS places repotting, when needed, in early spring. Mark the issue for that review and keep the ordinary winter move gentle on the roots and framework.
Put useful light and temperature around the whole canopy
Choose the brightest suitable position available to the retained foliage. RHS asks for bright, sunny conditions, with protection from strong direct sunlight under glass. In winter, check where light actually reaches the pot’s top, middle and lower branches. A high window can illuminate the upper shoots while leaving the base of a tall trellis in shade. Arrange the framework so its leaves occupy the useful light, with access behind it for inspection.
Place a minimum–maximum thermometer near the plant and read it after cold nights. For this route, maintain at least 10°C overnight, with daytime conditions a few degrees warmer as the RHS advises. A thermostat on the other side of the room gives less useful information than a reading beside a glazed door. Keep foliage clear of cold panes and direct heater output, and reassess the position when outside temperatures fall sharply.
The colder, leaf-dropping storage alternative should stay a deliberate choice. The general word frost-free is less specific than the 10°C night minimum used to help retain foliage. A shed that merely stays above freezing does not reproduce that environment. If the available place cannot meet the selected conditions, reconsider the storage method and its expected leaf loss before trying to compensate with more watering or feeding.
Leave space for ventilation and for the plant to be reached. A dense row of winter pots can hide the rear of the bougainvillea and block light that reached it when the room was empty. Make adjustments while they are still easy to do. During suitable weather, ventilate the growing space while keeping temperatures appropriate. The purpose is a workable winter station that can be checked, not a tightly packed display that can only be viewed from the front.
Reduce frequency while keeping each watering effective
After the main bract display ends, reset the watering routine. RHS specifically calls for less frequent watering as autumn progresses, with the mix becoming drier between applications. This is a change from active summer care. Use the actual end of the display and slowing growth to choose the changeover; flowering can finish at different times. By November, the usual indoor routine is occasional thorough watering with checks in between.
Inspect accessible mix below the immediate surface before watering. For a manageable pot, its changing weight can help you judge how much moisture remains. Keep the plant seated while doing this; disturbing the roots is unnecessary for an ordinary check. If the mix is still wet, wait and inspect the drainage route. A fixed weekly dose can repeatedly wet a pot that is using very little water in its new position.
When water is needed, wet the root zone thoroughly and let the surplus escape. Empty the tray or outer container afterwards. The sequence shown below separates checking, watering and drainage because each decision matters. A decorative cover can hide retained water even when the original pot has open holes. Make the base accessible before the vine’s thorny framework makes every inspection awkward.
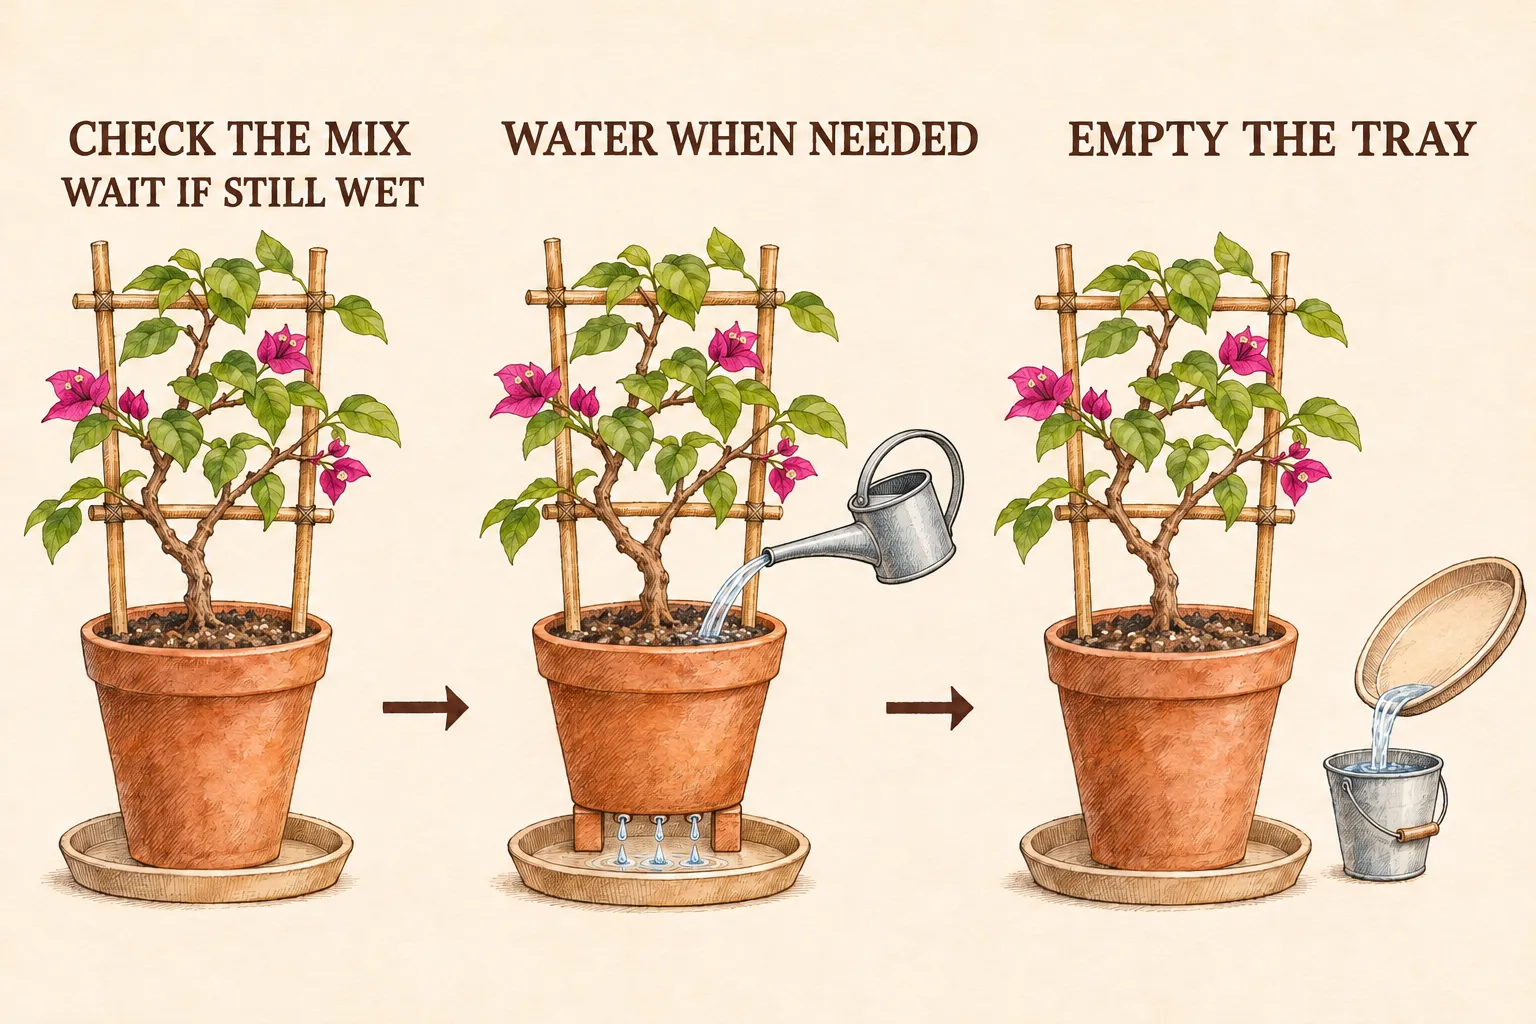
Keep reduced winter watering separate from an attempt to force flowering through extreme drought. Clemson describes drought resistance in established plants, but an indoor container has a limited root volume and a different environment. The winter instruction is to let the mix become drier between appropriate waterings. A leafy plant that is repeatedly allowed to wilt severely is not following a precise flowering treatment. Check moisture, temperature and light together before changing the interval again.
Stop routine feeding after flowering ends, following the RHS autumn-and-winter sequence. UF/IFAS notes that excessive nitrogen can favour leaves over blooms, but a winter vine also needs suitable light and root conditions before fertilizer can be useful. Retain any product and cultivar directions for spring. Feeding a declining or sparsely leaved plant simply because its summer colour has gone adds another intervention before the cause has been identified.
Use leaf loss as evidence, not a diagnosis
First identify the fallen material, separating ordinary foliage from spent bracts. Then compare the change with the move date and the thermometer record. RHS links lower winter temperatures with leaf drop and recommends the 10°C minimum to reduce that risk. Some loss does not establish that every stem or root is dead. Keep firm retained wood and examine the remaining leaves while correcting a verified cold exposure.
Water use must be reconsidered after substantial foliage loss. A plant with little leaf area in a cool position is a poor match for its previous summer watering schedule. Feel the mix and check the tray before another application. Leaf loss accompanied by persistent wetness, softening tissue or continuing dieback calls for closer assessment. Those observations can justify separating the pot and seeking advice, but they cannot name a pathogen by themselves.
Inspect leaf undersides, young shoots and sheltered branch junctions for pests. The RHS lists whitefly, mealybugs, aphids and red spider mite; Clemson also records scale and leaf-spot diseases. Unusual deposits, visible insects or fresh damage deserve identification before treatment. Keep a suspect plant apart from nearby foliage while investigating, and photograph the affected part as well as the whole plant. An automatic spray on every arriving pot skips that decision.
Judge whether the plant stabilises after the obvious problem is corrected. A thermometer reading below the chosen minimum, a tray that repeatedly fills with water, or a shaded lower canopy gives you a specific condition to change. Keep the remaining care steady enough to see the response. Repeatedly warming, chilling, drenching and cutting the plant makes both recovery and interpretation harder.
Renew growth and structure when the season changes
Plan the main pruning for late winter or early spring, just before growth begins, following RHS guidance and Illinois’s container advice. Remove dead or poorly placed growth and shape a framework that will fit the next season’s support. Clemson also allows major pruning after its summer flowering period in South Carolina; that regional description is not a requirement to cut an indoor November plant hard. Match the cut to the plant’s flowering and growth cycle.
Bougainvillea flowers on current-season growth, so the spring task is to provide space and support for new shoots. Check old ties as well as the branches, and retain a manageable structure that can be moved again next autumn. Choose individual cuts according to the bougainvillea’s own framework and growth. The shape of a compact cultivar, a standard and a long trellised vine will require different individual cuts.
Reassess repotting only if it is needed as growth resumes. Illinois’s caution about root damage and frequent repotting still applies, while the RHS recommends peat-free, loam-based compost such as John Innes No. 3 for containers. Keep the ball supported and choose the next pot for an actual root or drainage need. A modest, healthy plant in its existing container may need less intervention than its winter appearance first suggested.
Increase water as improving light and temperatures produce active growth. The RHS places this transition around February–March in its UK guidance, with stronger growing-season feeding later as growth becomes vigorous. Local conditions and the plant’s response decide the pace. Return a container to its summer outdoor position only when cold risk has passed and suitable warmth is dependable, introducing the stronger exposure gradually. Winter survival and next season’s colour remain separate stages of care.
Steps
- Level
- moderate
- Time
- About 30 minutes to prepare a manageable plant, plus winter moisture and temperature checks
- Tools
- Heavy gloves for thorny stems, Minimum–maximum thermometer, Secateurs for necessary cuts, Watering can, Suitable trolley or lifting help for a heavy container
- Materials
- Bright indoor winter space with a dependable night minimum, Stable portable support and soft ties, Accessible drainage tray
- 1Select and measure the winter arrangement
Choose the bright indoor route with a minimum night temperature of 10°C and room for the whole supported plant. Read the cultivar label, measure the doorway and reserve access to the compost and tray. Treat cooler dormant storage as a different option with expected leaf loss. Arrange the winter position before moving the container.
- 2Release and support the thorny framework
Wear heavy gloves, trace shoots that reach fixed structures and undo external ties. Free branches gently and make only necessary cuts for the move. Secure retained shoots to a stable portable support. Keep the root ball seated and lift by the container with suitable help, checking that branches can pass through the doorway. Check the back of the support for caught stems before the pot leaves its outdoor position.
- 3Record the plant’s starting condition
Distinguish coloured papery bracts from ordinary foliage and small true flowers. Photograph the plant, inspect leaf undersides and branch junctions, and clear loose debris from the pot. Separate suspicious pest activity for identification. Place the thermometer near the canopy and confirm the overnight minimum in the actual winter station.
- 4Check moisture before each watering
Reduce watering frequency after the bract display ends and stop routine feeding. Assess the mix and accessible tray before adding water. When the pot needs it, water thoroughly, allow drainage and empty the runoff. Reassess demand if many leaves fall or the temperature changes; keep a still-wet pot out of an automatic watering cycle.
- 5Review winter changes and resume care in stages
Use leaf loss alongside temperature, root moisture and pest observations. Correct the condition you can verify, then watch whether the plant stabilises. Keep main pruning and necessary repotting for late winter or early spring as growth returns. Increase water with renewed activity and move outdoors gradually only when suitable warmth and freedom from cold risk are established.
Related reading
Sources
- How to grow Bougainvillea. Royal Horticultural Society. Source record · Accessed 2026-11-10.
- Bougainvillea. University of Illinois Extension. Source record · Accessed 2026-11-10.
- Bougainvillea. Clemson Cooperative Extension. Source record · Accessed 2026-11-10.
- Bougainvillea. University of Florida IFAS Gardening Solutions. Source record · Accessed 2026-11-10.
- Moving Houseplants Indoors & Outdoors. Clemson Cooperative Extension. Source record · Accessed 2026-11-10.
- Phylogeny and Taxonomic Synopsis of the Genus Bougainvillea (Nyctaginaceae). Plants — Bautista et al. (2022). Source record · Accessed 2026-11-10.