Grow · dahlia tuber storage
Lift and Store Dahlia Tubers After Frost
A careful post-frost method for labeling, lifting, drying, packing, and starting dahlia clumps into cool frost-free storage without broken necks or trapped rot.
Published Last updated
In this guide
Define the post-frost job
This is the autumn handoff from a frost-blackened dahlia plant to a sound, labeled clump entering storage. It is not a spring planting guide and it does not replace a separate midwinter inspection routine. The immediate objectives are narrower: let the plant finish its season, lift without snapping the vulnerable necks between crown and tuber, remove sources of decay, shed surface moisture, and establish a storage environment that is cool without freezing and humid enough to prevent severe shriveling without becoming wet.
Use lifting where dahlias are not reliably hardy in the ground or where a valued cultivar is worth carrying over. A light frost may blacken the top while the underground clump remains usable. The Royal Horticultural Society recommends lifting after foliage is blackened; the American Dahlia Society also emphasizes allowing roots to mature late in the season. Neither point is permission to wait through saturated soil, a hard ground freeze, or weather that makes careful excavation impossible. Choose a dry working window after top growth has been checked by frost and before the soil freezes hard.
If a bed stays mild enough for tubers to overwinter in place, lifting may be unnecessary, but that is a climate and drainage decision rather than a universal rule. Wet winter soil can be as consequential as low temperature. For this method, assume the clump will be stored above ground. Prepare the destination before digging: confirm that it remains frost-free, generally within the cool range recommended by the cited sources, and that boxes can be checked without being moved through repeated temperature swings.
Label before the stems disappear
Cultivar identity is easiest to preserve while the plant is still standing in its original position. Write the cultivar name, color or bed code on a durable label and attach it low on the cut stem or place it with the clump immediately. The American Dahlia Society treats labeling as part of lifting, not a later clerical task. Once five muddy, leafless clumps are on the bench, visual memory is unreliable. If the name is genuinely unknown, label the useful traits you can verify rather than inventing a cultivar identification.
Cut the blackened stems down to short handles, roughly within the range the RHS gives for lifted plants, but do not use those handles as lifting levers. Hollow stems can admit rain and can split away from the crown. On a wet day, loosely cover the open stem ends only until the clump reaches shelter; do not seal a damp crown in plastic. Remove stakes, ties, and surface weeds so they cannot snag the fork or carry diseased debris into the work area.
Before digging, estimate the clump diameter from the outer stems and mark a generous circle beyond it. Older plants may have tubers extending farther than the visible crown suggests. Clear enough soil surface to see where stems enter the crown, but avoid scraping into it. This short inspection changes the operation from a blind upward pry to a controlled excavation, and it creates a place to insert labels that will stay with each clump through drying and packing.
Lift the clump from beneath
Insert a garden fork vertically well outside the expected tuber spread. Work around the plant in several positions, easing the soil upward a little at a time. Do not make one forceful pry against the crown. Illinois Extension notes that wounds become entry points for pathogens, while the dahlia-specific concern is the narrow neck that joins each storage tuber to the crown. A plump tuber detached at that neck cannot contribute a viable eye on its own, so intact architecture matters more than making the clump look clean.
When the soil has loosened on all sides, slide the fork underneath and support the clump with a second hand beneath the root mass. Lift it as a unit. If it resists, set it down and loosen farther out; resistance usually means roots or tubers are still anchored, not that more pulling is needed. Keep the short stems upright only as guides. Never swing, drag, or carry the weight by them.
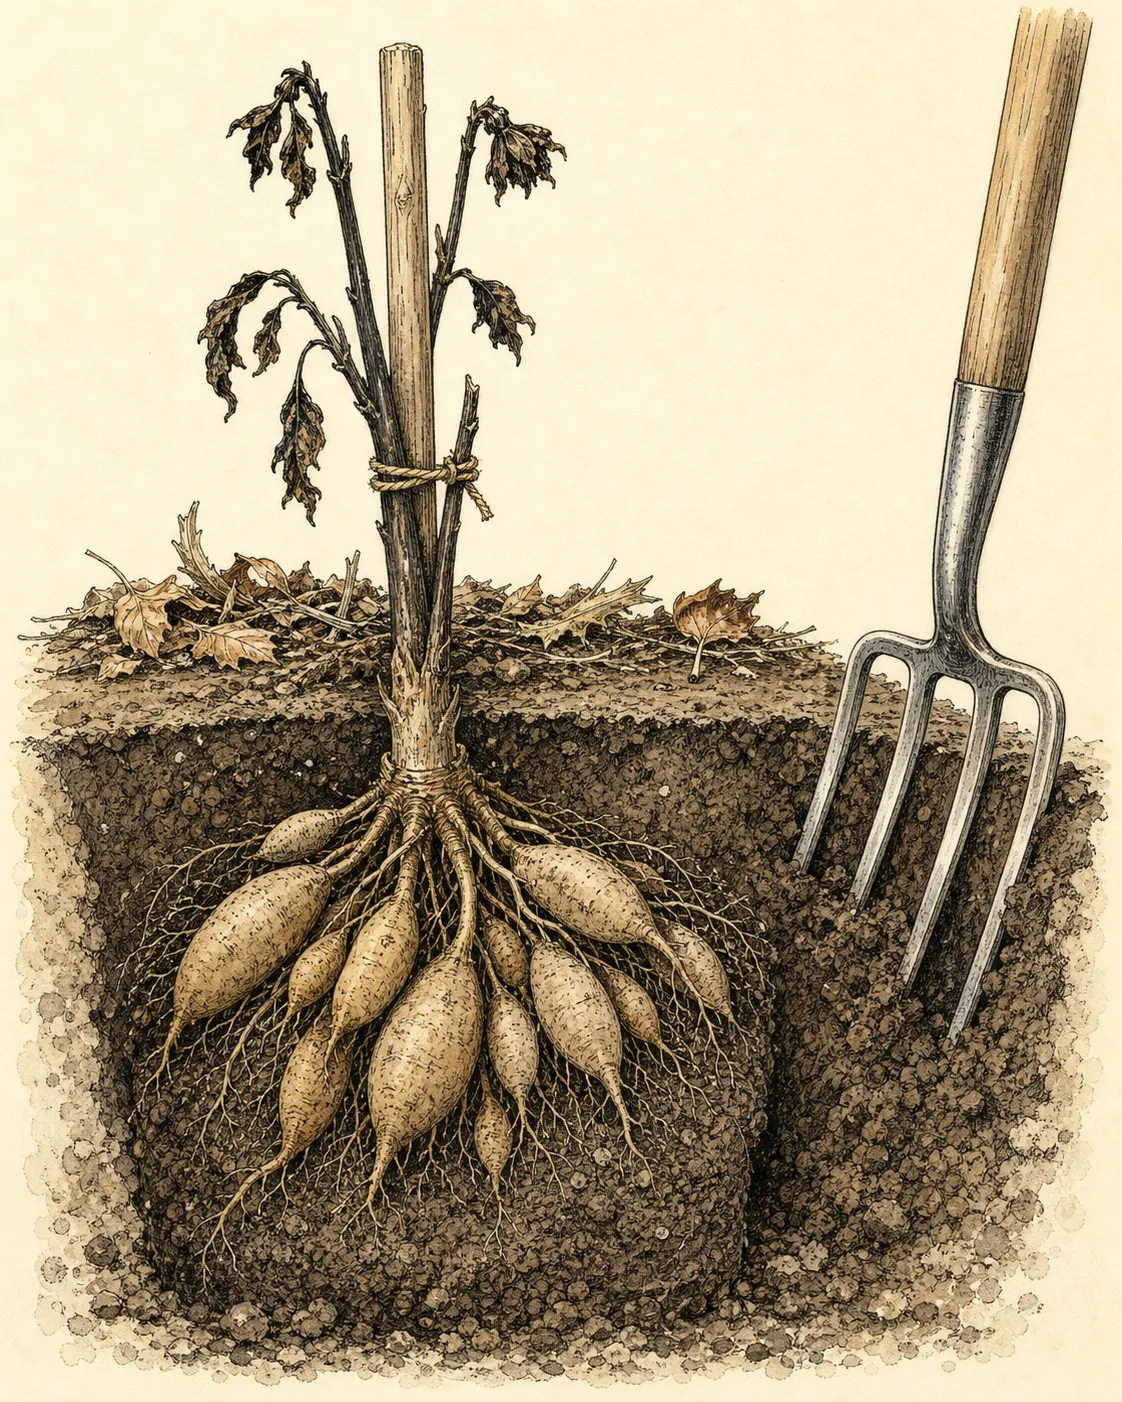
Set the clump on soil, burlap, or a shallow tray rather than dropping it onto concrete. Let loose earth fall naturally. In heavy clay, patient teasing with fingers or a blunt stream of water may expose damage, but washing adds water that must later leave. In a cool humid autumn, a dry clean with a soft brush is often easier to manage. Whatever method is chosen, handle each clump independently so labels cannot migrate and broken pieces cannot be confused with intact crown-bearing divisions.
Sort damage without over-dividing
Examine the crown, necks, and tuber bodies in good light. Sound tissue should feel firm for the cultivar, not glassy, collapsed, foul-smelling, or water-soaked. Trim away stem debris, threadlike roots, and clearly damaged tissue with clean pruners, leaving a clean margin. Disinfect cutting tools between suspect clumps. A superficial skin scrape is different from a crushed neck or soft rot; keep minor wounds exposed during drying so they can be observed rather than hidden in packing medium.
Autumn division is optional, not a requirement of storage. The RHS favors dividing in spring, when eyes are easier to locate, while the American Dahlia Society describes several successful workflows. To keep this operation low-risk, store manageable clumps whole or in large crown-bearing sections unless size makes that impractical. A valid division needs a portion of crown with a viable eye and an attached tuber; a loose tuber body without crown tissue is not equivalent. Never cut merely to fit a box if a larger box will preserve more necks.
Discard material with advancing soft rot, pervasive mold, or severe crown destruction away from the compost stream if local disease guidance calls for that precaution. Do not dust every clump reflexively with an unlabeled chemical. The storage system should depend on sound tissue, sanitation, airflow, and monitoring. If one prized clump has a small questionable area, isolate it in a separate labeled container so a failure does not expose the rest of the collection.
Let surface moisture leave
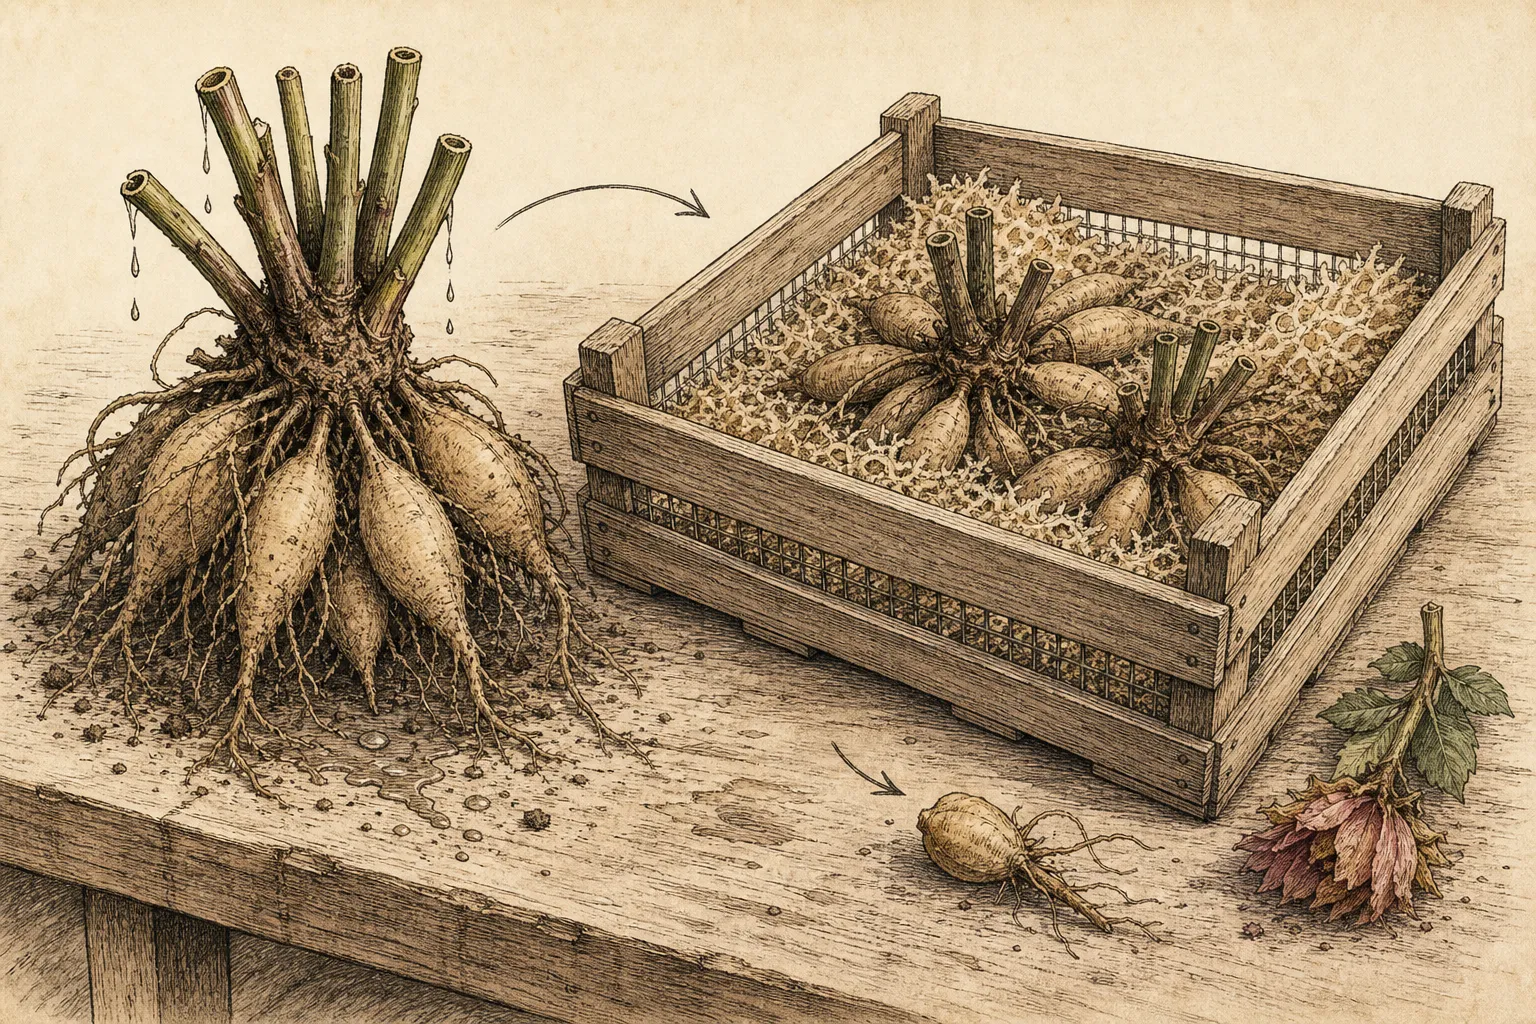
Move lifted clumps to a shaded, rainproof, well-ventilated place that cannot freeze. Arrange them in a single layer with air around the crowns. The RHS describes drying lifted dahlias upside down for a period before storage, whereas Illinois Extension gives shorter general curing guidance for summer-blooming underground structures. Those recommendations describe different scopes and conditions, so do not average them into a rigid number. The operational endpoint is a dry surface and sealed minor cuts, not a calendar deadline.
Turning a clump crown-down for part of this interval helps water drain from hollow stems, but support it so necks are not carrying the weight. Check daily in damp weather. Surface soil should brush away, cut stem ends should no longer glisten, and no enclosed pocket should feel wet. At the same time, do not leave tubers for weeks in warm moving air until they wrinkle. Drying is a preparation for balanced storage, not an attempt to desiccate living tissue.
This is the first useful stop point for disease detection. A cut that darkens and firms is behaving differently from a wet lesion that expands, softens, or smells sour. Re-trim a small localized lesion into sound tissue with sanitized blades and extend the airy interval; discard a clump when decay continues into the crown. Do not pack a questionable clump tightly between healthy ones simply because the planned drying time has elapsed.
Pack for cool, buffered storage
Choose shallow boxes or crates that breathe and can be opened without disturbing every clump. Place a modest layer of clean, dry packing medium around the tubers, then separate clumps so they do not press heavily against one another. Illinois Extension describes breathable boxes and materials such as peat moss, vermiculite, or wood shavings, while the RHS includes dry spent potting mix, sand, straw, or newspaper. The medium buffers moisture; it should not be wet enough to clump or leave droplets on the container.
Keep the crown label visible and record the box contents outside as a second identity check. Do not use an airtight plastic sack around freshly lifted material. Airless, wet storage favors decay, while a completely exposed clump in a dry heated basement may shrivel. The American Dahlia Society explains storage as a moisture-exchange problem and reports cool temperatures above freezing, often around 40 to 45°F for successful collections; Illinois gives a broader 40 to 50°F range. Treat those as supported ranges, then observe your actual room with a thermometer.
Place boxes off bare concrete and away from exterior doors, heating ducts, boilers, and sunny windows. A stable frost-free cellar or insulated outbuilding can work if it stays within range. A garage that freezes is not protected merely because it has walls. Equally, a living room is usually too warm and dry. Make one labeled test box easier to reach so early checks reveal how quickly packing medium and tubers are exchanging moisture in that particular space.
Calibrate the storage room before leaving it alone
Measure temperature at the actual box height for several days, including a cold night and a milder afternoon. A thermometer beside the door may miss a freezing floor pocket, while one near the ceiling may hide warmth around the tubers. Move boxes inward or onto an open shelf if the readings swing. Do not place them inside an insulated chest without ventilation merely to solve one cold reading; correct the room location while keeping the storage system inspectable.
Notice local humidity through evidence on the clumps and container, not by guessing from how the room feels. Condensation on a lid, damp packing at the crown, or a musty enclosed odor signals too little air or too much moisture. Rapid skin wrinkling across several sound tubers signals the opposite. Check more than one cultivar because tuber size and skin condition vary. Correct the shared environment first, then isolate a single clump only if its response differs from the rest.
Protect the collection from non-climate hazards. Keep crates off floors that may flood, shield them from mice without sealing them in plastic, and leave aisles so a box can be removed without toppling others. A simple shelf map listing cultivar, box number, and date packed reduces unnecessary opening. These precautions belong to the initial storage setup: they make the first inspection meaningful and keep an otherwise sound cool room from failing because the collection became inaccessible.
Establish the first inspection rhythm
Recheck the boxes within the first week or two, when concealed moisture and lifting injuries are most likely to declare themselves, then move into a periodic winter routine. Open the lid, smell the air, feel several tubers, and look at crowns without excavating every piece. Remove a localized rotting tuber with sanitized tools if the remaining crown is sound, and isolate any clump that needs repeated attention. One failing piece should never be allowed to collapse against several healthy clumps.
If sound tubers begin to wrinkle noticeably, the room or packing system is too dry; adjust the medium very slightly and reassess rather than pouring water onto crowns. If condensation, spreading mold, or softness appears, increase ventilation, remove wet medium, and correct the temperature or moisture source. These are directional corrections, not invitations to alternate between soaking and baking. Stable cool conditions and small measured changes preserve more tissue than dramatic rescue attempts.
Stop this article’s workflow once labeled, sound clumps are stable in their winter environment and the first check confirms balance. Detailed midwinter triage belongs to the separate stored-bulb inspection task, and eye identification, division, and planting belong to spring. That boundary prevents three seasonal jobs from being compressed into one long session and keeps the autumn decisions focused on intact clumps, dry surfaces, cool storage, and recoverable monitoring.
Steps
- Level
- moderate
- Time
- About 30 minutes per clump, plus a sheltered drying interval
- Tools
- Garden fork or long-handled spade, Clean bypass pruners, Soft brush, Permanent marker
- Materials
- Cultivar labels, Shallow ventilated crates or boxes, Dry spent potting mix, vermiculite, or clean wood shavings, Clean paper for wrapping only if the chosen storage method requires it
- 1Prepare labels and a frost-free destination
Confirm a cool storage space that remains above freezing, set out ventilated boxes and dry packing medium, and label each cultivar while it is still identifiable in the bed.
- 2Cut frost-blackened top growth
Shorten stems to practical handles, remove stakes and debris, and protect hollow cut ends from rain. Do not pull, lift, or carry the clump by those stems.
- 3Loosen a wide circle
Insert a fork outside the estimated tuber spread and work around the plant in several passes. Ease soil upward gradually until the whole root mass releases without force.
- 4Support and lift the whole clump
Slide the fork beneath the roots, cradle the mass from below, and move it to a padded tray. Keep every label attached and let loose soil fall away gently.
- 5Remove only clear damage
Inspect crowns, necks, and tubers; trim soft or crushed tissue with sanitized pruners. Keep clumps whole or in large crown-bearing sections unless size truly requires division.
- 6Dry under cover to a physical endpoint
Arrange clumps with ventilation in a shaded frost-free shelter, supporting them crown-down when useful. Pack only when surfaces and minor cuts are dry but tubers remain firm.
- 7Pack, measure, and check
Nest labeled clumps in a breathable box with conditioned medium, store near 40 to 50°F without freezing, and inspect soon for softness, condensation, or rapid shriveling.
- 8Map boxes and measure at tuber height
Record which cultivars occupy each container, place boxes off flood-prone or freezing floors, and monitor the shelf itself through a cold night and mild afternoon. Relocate the collection if readings leave the supported cool frost-free range.
- 9Correct the shared environment first
If several clumps show condensation or shriveling, adjust ventilation, packing moisture, or shelf position in small increments. Do not soak individual crowns or seal a wet box merely to chase a single reading.
- 10Isolate failures without disturbing sound clumps
Move an unusual soft, foul, or repeatedly wet clump into its own labeled container and sanitize tools after trimming. Keep stable boxes closed and accessible for the separate periodic winter inspection routine.
- 11Confirm the autumn handoff
Before ending the session, verify that every clump is labeled twice, every box can breathe, and no surface or hollow stem remains wet. Record the first recheck date so early decay or moisture imbalance is found while it is still localized.
Related reading
Sources
- How to grow dahlias. Royal Horticultural Society. Source record · Accessed 2026-08-20.
- Digging, Dividing, and Storing Tubers. American Dahlia Society. Source record · Accessed 2026-08-20.
- Give summer-blooming bulbs a second chance, store them over winter. University of Illinois Extension. Source record · Accessed 2026-08-20.