Grow · autumn perennial border editing
Edit a Perennial Border for Winter Without Cutting Everything Down
Prepare an ornamental perennial border for winter by leaving healthy stems and seed heads, removing disease and unwanted seeding, and planning a careful spring reset.
Published Last updated
In this guide
- Start with the border's job before the first cut
- Make three piles: keep, edit, remove
- Read plant condition, not the calendar
- Keep healthy stems and seed heads standing
- Remove disease, pests, and unwanted seed before they travel
- Protect crowns while clearing the working edge
- Cut each stem at a purpose-specific boundary
- Make a small border look intentional
- Let early spring finish the cleanup
- Know when the leave-it-standing rule changes
- Steps
Start with the border's job before the first cut
In early September, an ornamental perennial border is usually still working. Late flowers may be feeding visitors, green leaves may be returning energy to crowns, and dry stems may already be holding the outline that will carry the bed through winter. The first job is therefore an inspection, not a full haircut. Walk the border from the path and from inside its working edge, and decide what needs to remain visible, what is becoming a problem, and what can wait.
A good autumn edit has three outcomes: healthy structure remains, material that can spread disease or unwanted seed leaves, and the crowns and access routes are not buried under wet collapse. This is different from leaving every fallen leaf or stem in place. Healthy stems, dried flowers, and seed heads can shelter wildlife and protect crowns, while diseased or pest-infested material deserves removal after it has naturally died back. The decision belongs to the condition and role of each plant, not to a single cleanup date.
Use the coming two weeks to mark the decisions while the border is legible. Photograph the groups that look good at full height, note plants that are still green, and flag any foliage with a clear disease pattern. If a late-flowering perennial is still making flowers, do not cut it merely because the calendar says autumn. The border will tell you when a stem has finished; your work is to preserve the useful evidence long enough to read it.
Make three piles: keep, edit, remove
Start with a simple three-way sort. Keep healthy stems, dried flower heads, and grasses that still stand upright and contribute food, shelter, or winter form. Edit material that blocks the path, leans across a crown, crowds a neighboring plant, or has finished a particular visual job. Remove material that is diseased, pest-infested, aggressively seeding where it is not wanted, or collapsed into a wet mat that smothers the plant below.
Keep and remove are not opposites of neat and untidy. A dry coneflower head can be more orderly in a winter border than a bed of bare soil, while a gray, mildew-coated stem can be both unattractive and a poor material to leave around next year's shoots. The useful question is whether the plant is healthy, whether its standing form has a job, and whether its remains will create a problem in this particular bed.
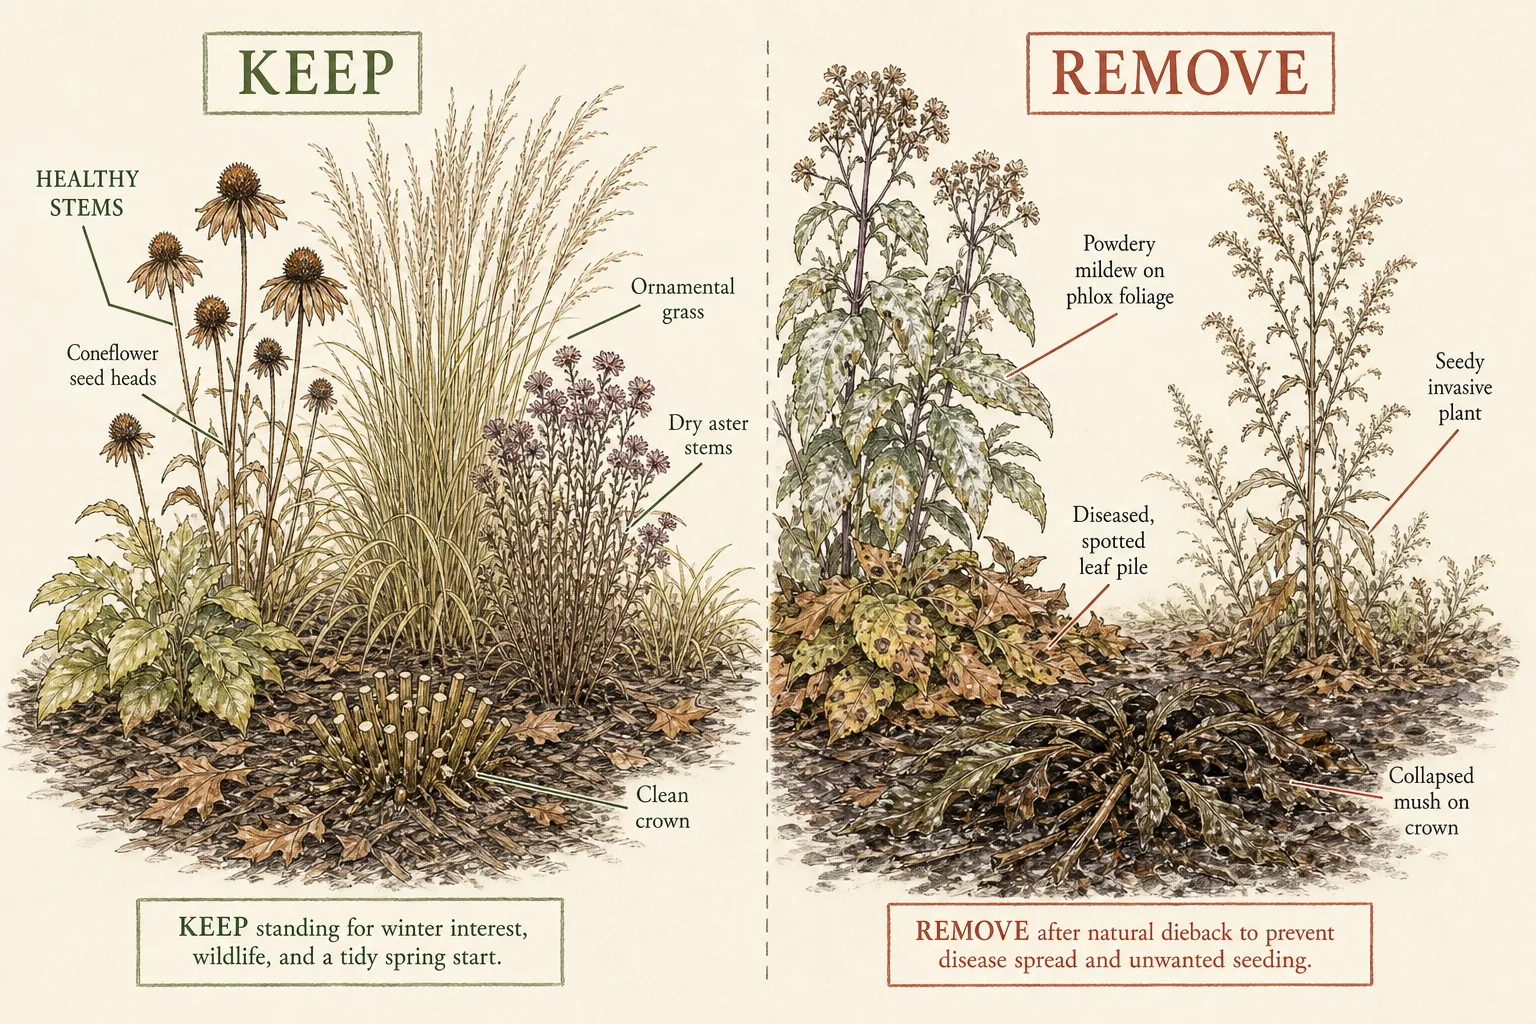
Set a tub or tarp at the border edge for material that must leave, and keep healthy cuttings separate from suspect debris. Do not make the whole border into one heap before you decide where each piece belongs. A brief sort prevents the common mistake of carrying diseased leaves into a compost pile or removing the seed heads that would have given the winter planting its strongest vertical rhythm.
Read plant condition, not the calendar
Green leaves are still doing work. They may look tired after a long summer, but healthy foliage continues to capture light and return resources to the crown or underground storage organ. If you cut a plant while its foliage is green, you are making a physiological decision, not simply improving its appearance. Wait until the leaves yellow, brown, or collapse naturally unless disease, a safety issue, or a regional management rule requires earlier action.
The same restraint applies to a plant that flowers late. Asters, sedums, chrysanthemums, and many grasses can still be carrying their seasonal role when other plants have finished. Remove only broken or clearly diseased pieces during this phase. Let the main stems complete flowering and move into dormancy; a single autumn date cannot describe a border in every climate, exposure, or year.
Frost is a useful visual signal but not a command to cut everything. After a first freeze, inspect again. Some stems will remain dry and upright, some will bend without touching a crown, and some will turn to mush. The first two can often stay. The third may need prompt removal if it holds moisture against living tissue. Work on firm soil when possible; walking a wet bed to achieve a cosmetic finish can compact the very root zone you are trying to protect.
Keep healthy stems and seed heads standing
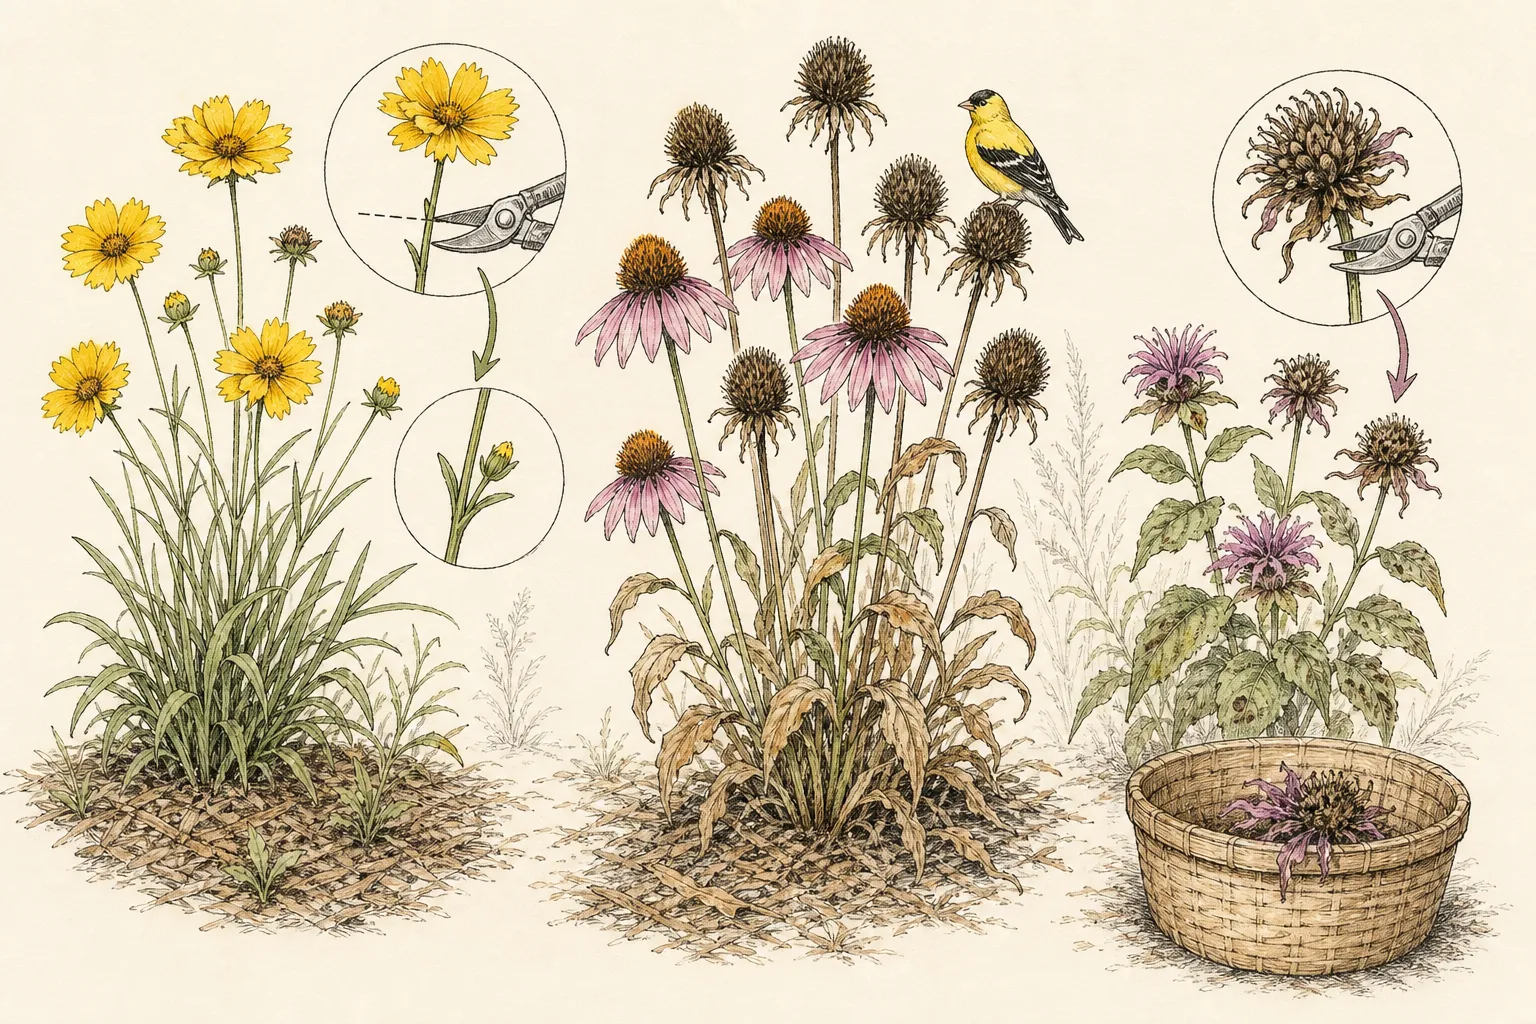
Healthy standing material gives a perennial border winter structure at several heights. Coneflower and black-eyed Susan heads hold small dark discs above the bed, ornamental grasses catch low light and movement, and dry aster stems keep a fading planting from becoming a flat plane. Seed heads can also provide food for birds, while stems and leaf litter create sheltered places for beneficial insects and other wildlife. The result is not neglect; it is a different seasonal composition.
Some stems are hollow or pithy and can be used by insects during the cold season. Leaving them in place keeps that habitat where the plant grew, but it does not require every stem to stand at its original height. If a front edge needs a clearer line, shorten selected stems only after they are dormant and leave a quieter group deeper in the border. A few intact drifts usually look more intentional than an even cut across the whole bed.
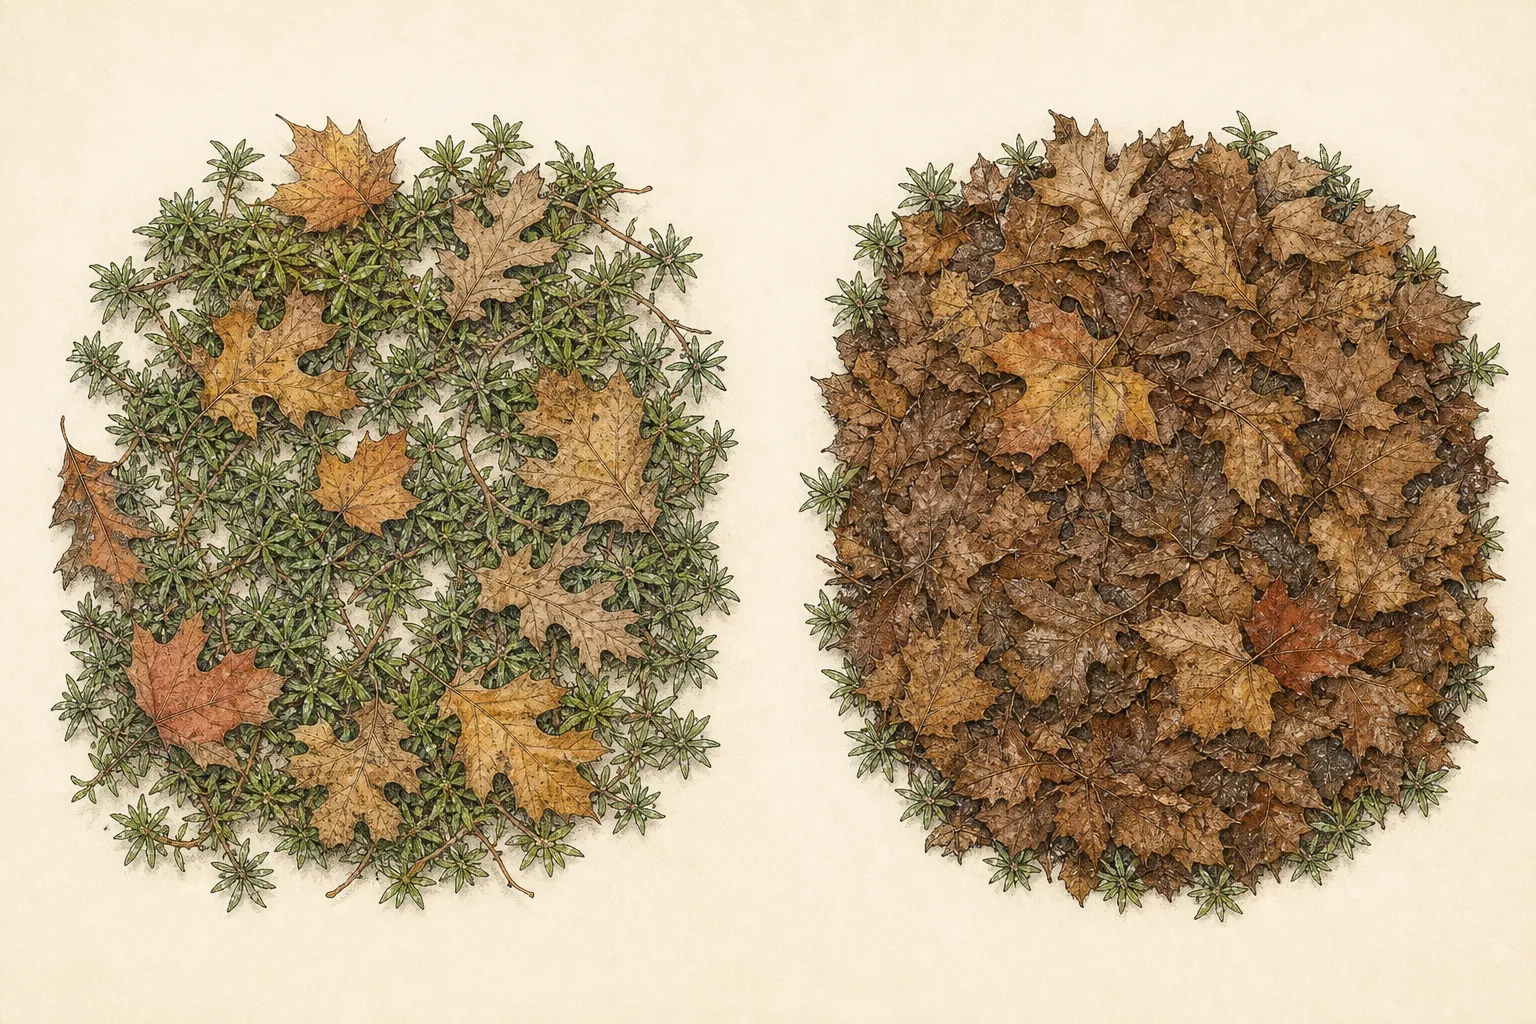
Keep healthy leaves on the soil when they are not smothering crowns or paths. Leaves beneath a shrub or perennial can moderate winter exposure and form a useful litter layer, but a thick wet blanket can bury a low crown. Move excess material to a leaf-mold bay or another suitable bed instead of blowing every leaf off site. The border's winter value comes from a balanced layer of stems and leaves, not from maximum accumulation.
Remove disease, pests, and unwanted seed before they travel
Disease is the clearest reason to change the leave-it-standing rule. Mark foliage that had a strong, confirmed problem during the growing season: heavy powdery mildew on bee balm or phlox, a leaf-spot pattern that repeatedly advances, or another diagnosis for which sanitation is part of management. After the affected tissue has died back, cut and remove it instead of laying it under a healthy crown. Do not treat every autumn blemish as a diagnosis; when the pattern is unclear, seek a local plant clinic or extension service before choosing a control.
Remove aggressive seed sources when the plant is known to spread beyond the intended planting. Cut the seed heads before they shatter, gather them without shaking the seeds through the bed, and check whether the plant is invasive in your region. This exception is about preventing a known management problem, not about making every native or well-behaved plant sterile. Healthy coneflower, Joe-Pye weed, bee balm, and black-eyed Susan seed heads can remain when their seedlings are welcome or easy to edit.
Keep suspect material out of ordinary home compost unless you have a system that reliably reaches the required temperature and duration for the material in question. Bag it for the local yard-waste stream or dispose of it according to regional guidance, and clean tools before moving to a healthy clump. Gloves protect skin from rough stems and contaminated debris; eye protection is sensible when dry stems spring back during cutting.
Protect crowns while clearing the working edge
The crown is the place where the plant's future shoots begin, so clearing around it should expose the plant's condition without leaving it bare and vulnerable. Remove material that is pressed into the crown, but do not excavate healthy soil or rake aggressively across shallow roots. Where a stem is still upright and clean, it can continue to catch leaves and soften wind. Where a fallen stem forms a wet lid, lift it away and leave a breathable surface around the crown.
Separate the bed from the path with a narrow, visible working edge. A crisp front line makes a less-tidy interior look deliberate and keeps leaves from sliding onto paving. Inside the bed, use the spacing between groups as access instead of stepping on the soil. If a perennial has outgrown its space, record it for division or relocation in the appropriate dormant window instead of solving the problem by cutting away half its canopy.
Mulch is a later layer, not a substitute for diagnosis. After frost, a modest mulch can buffer temperature changes, but wood mulch or leaf litter should not be piled against a crown. Do not use mulch to conceal diseased leaves, a saturated pocket, or a plant that has collapsed. The living base needs air, the soil needs to drain, and the marker for each plant should remain findable when the border is dormant.
Cut each stem at a purpose-specific boundary
When a healthy plant has naturally died back and you have decided to cut it, work from its anatomy instead of a universal height. Herbaceous perennials that produce leaves and flowering stems from below ground can usually be cut close to the soil once the top is fully dead. Leave a clean, recognizable crown and avoid gouging it with the blade. A plant that still has basal green growth needs a lighter edit or more time.
Borderline-hardy perennials with woody or semi-woody stems are a different case. Their old stems may help protect the crown from frost, so leave the framework until the regional frost risk has passed unless the material is diseased or collapsing. Evergreen perennials and sedges should not be treated like plants that disappear to ground level; remove dead leaves selectively when they are dry enough to pull free and keep the living tuft intact.
Asters and upright sedums can be shortened more lightly if their basal shoots are already forming, while grasses often provide their best winter structure when left until late winter or early spring. If you do need to shorten healthy hollow stems in autumn for access, avoid turning the entire bed into stubble. Leave a varied height, retain a few undisturbed stems, and place the cut material somewhere it can continue to offer shelter without lying on a crown.
Make a small border look intentional
The visual test is simple: can you see a pattern of decisions from the path? Repeat the same treatment through a group instead of cutting one plant in every clump at random. Leave a drift of coneflower heads together, allow a grass to hold the rear line, and make the removal of diseased material look like a clean gap that can be replanted or observed. Repetition turns selective care into composition.
Keep the first foot or two inside a heavily used path relatively open when that suits the border. A clear foreground frames taller stems and gives hands a place to reach without crushing foliage. Deeper in the bed, the standing plants can be looser. This is especially useful in a small garden where a completely cut-back border reads as an empty rectangle from the house, while a dense wall of stems hides the path and catches wet leaves.
Do not tie every plant into a bundle for the sake of order. Tight bundles trap moisture, change the plant's natural silhouette, and can make spring inspection harder. Instead, remove only stems that obstruct a route or press into a crown, then let the remaining material make its own winter outline. A durable label or simple map at the edge is more useful than a uniform cut because it tells you what should return, what was removed for sanitation, and what needs a spring decision.
Let early spring finish the cleanup
The autumn edit is only the first pass. Many healthy stems and grasses are best left through winter and cut in late winter or early spring, before new growth becomes difficult to see. Choose a dry day, inspect each stem for emerging shoots or occupied habitat, and cut above the new growth instead of sweeping a blade through the entire crown. If the soil is too wet to walk without leaving footprints, wait; a delayed tidy-up is kinder to the bed than compacted soil.
Spring is also when the border's winter record becomes useful. Compare the plants that stood well with those that collapsed, note where leaves collected too deeply, and check whether any disease returned on the new growth. Cut healthy stems into manageable pieces and leave some cut material in a discreet, dry bundle if that fits your habitat plan; otherwise use a suitable compost or municipal green-waste route. Keep diseased material separate from this healthy stream.
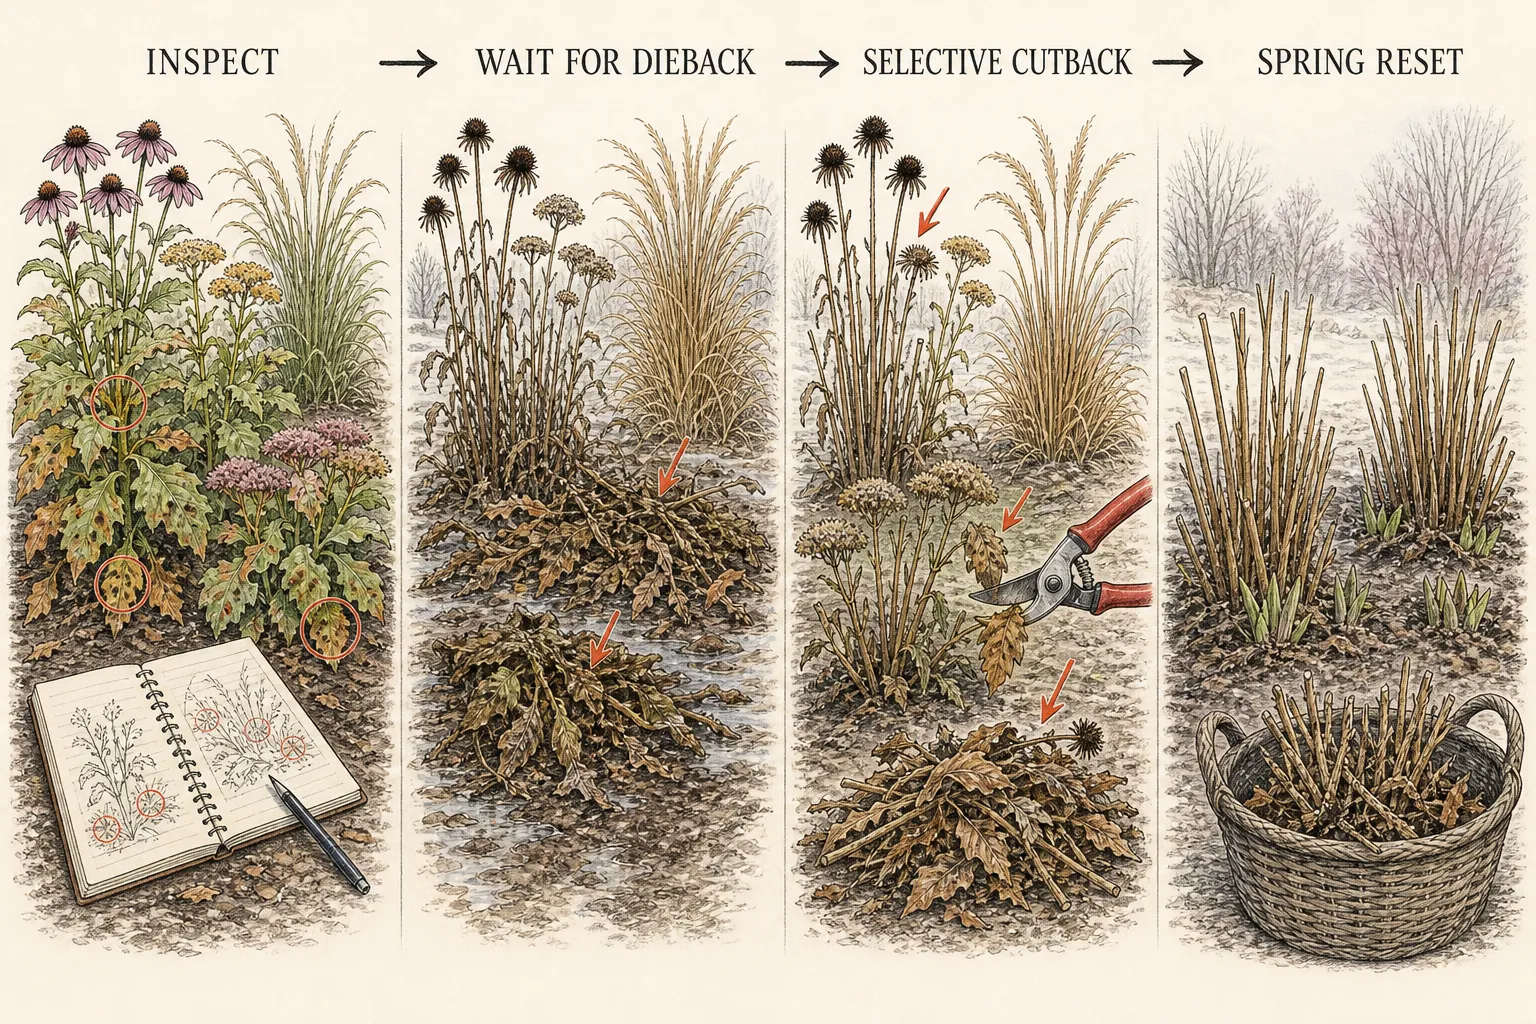
Do not wait for a perfect bare-bed moment. Insects can become active as weather warms, and new shoots can be damaged by hurried clearing. A staged reset—front edge first, then the middle, then the rear grasses—keeps the garden accessible while preserving shelter for as long as possible. The final look should be a living border coming back through an edited layer of winter stems, not a clean slate that has erased the evidence of how the plants grow.
Know when the leave-it-standing rule changes
A healthy, ornamental perennial border can carry standing stems and seed heads through winter, but no single practice fits every site. In a wet region, a stem that remains upright may be harmless while a mat that stays against the crown can cause loss. In a fire-prone area, local defensible-space rules may require a wider clearance. In a formal public-facing bed, a narrow front edge and selected groups may provide the needed order without clearing every plant.
Plant identity matters too. An evergreen tuft, a semi-woody borderline perennial, a self-seeding annual, and a diseased herbaceous clump have different autumn instructions. Use the plant label and regional guidance where the general rule stops. If you cannot tell whether a symptom is disease or normal senescence, preserve a clean sample and ask for diagnosis before spreading a guess with the pruners.
The practical finish is a border with fewer forced decisions. Leave what is healthy and useful, wait for natural dieback before cutting, remove what carries a known problem, keep crowns and paths functional, and schedule the final reset for a dry early-spring window. That sequence protects winter form and habitat while giving next year's growth a cleaner, more legible place to begin.
Steps
- Level
- easy
- Time
- About two to four hours for a small border, split between autumn inspection, selective cleanup and a spring reset
- Tools
- Notebook, garden map or phone camera, Clean hand pruners or secateurs, Gloves and eye protection, Tarp, tub or paper yard-waste bags, Weatherproof plant labels, Rake used lightly around crowns
- Materials
- Healthy perennial stems and seed heads to leave standing, A separate disposal route for diseased or invasive material, A modest regional mulch for use after frost if needed, Marker or map for plants retained until spring
- 1Map the border before cutting
Walk the border from the path and inside the working edge. Photograph the groups that still have healthy green foliage or useful flowers, mark confirmed disease patterns, and note stems that block access or lean onto crowns. Treat September as an inspection window unless a specific problem needs earlier action.
- 2Sort plants into three decisions
Assign each group to keep, edit or remove. Keep healthy stems, seed heads and grasses that provide structure, food or shelter; edit only what obstructs a path or crown; remove diseased, pest-infested, aggressively seeding or collapsed material after natural dieback where possible.
- 3Wait for green growth to finish
Leave healthy leaves and late flowers until they yellow, brown or die back naturally. A first frost is a signal to reassess, not a command to clear-cut. Work only on firm soil so a cosmetic cleanup does not compact a wet root zone.
- 4Remove the problem stream
Cut out confirmed diseased or pest-affected material, gather aggressive seed heads before they shatter, and keep all suspect debris away from ordinary home compost. Clean tools between healthy and affected clumps, and use the local trash or green-waste route for material that should leave the garden.
- 5Cut by plant habit
Cut fully dormant herbaceous tops near the soil without nicking the crown. Leave semi-woody borderline perennials and healthy grasses when their stems protect the base or hold winter form. Treat evergreen tufts and plants with new basal shoots as selective-tidy subjects instead of ground-level cuts.
- 6Keep crowns and access open
Lift wet collapse away from living crowns, maintain a clear working edge beside the path, and move excess leaves without stripping the whole bed. After frost, use only a modest regional mulch and keep it off crowns. Leave labels visible so dormant plants are not dug by mistake.
- 7Repeat the visual pattern
Leave healthy groups together instead of scattering random stubble through the bed. Keep a few full-height stems, avoid tight bundles that trap moisture, and use the foreground edge to frame the standing interior. Record what was removed and what remains for spring.
- 8Finish in a dry spring window
In late winter or early spring, inspect for emerging shoots and habitat before cutting retained stems. Work from the front edge back, cut above new growth, and keep healthy trimmings separate from diseased material. Use the spring view to revise spacing, drainage and next autumn's edit.
Related reading

Sources
- Managing Fallen Leaves and Fall Cleanup. Iowa State University Extension and Outreach. Source record · Accessed 2026-09-01.
- Perennials: Selection, Planting, and Care. University of Maryland Extension. Source record · Accessed 2026-09-01.
- Perennials: cutting back. Royal Horticultural Society. Source record · Accessed 2026-09-01.
- Leave the Leaves for Natural Pest Control. University of Maryland Extension. Source record · Accessed 2026-09-01.
- Fall Garden Chores. Penn State Extension, Adams County Master Gardener Program. Source record · Accessed 2026-09-01.