Grow · hose winterization
Drain and Store Garden Hoses and Watering Tools Before Freeze
Disconnect hoses from the house-side plumbing, empty every trapped pocket of water, dry removable drip parts and nozzles, and store the full watering kit where spring setup stays legible.
Published Last updated
In this guide
- Freeze damage starts where water is trapped, not where plastic looks thick
- Disconnect the house side before you work the hose side
- Use gravity and layout to empty every hose
- Drain attachments and removable drip components separately
- Store coils, fittings, and repairs where spring setup stays readable
- Turn winter shutdown into next season's watering inventory
- Steps
Freeze damage starts where water is trapped, not where plastic looks thick
A hose can look harmlessly empty and still hold enough water to split a weak point, trap a fitting shut, or leave a wand full of ice by morning. That is why winter storage begins with the idea of trapped pockets rather than with the appearance of the coil. Oregon State University Extension answers the simplest question directly: a hose may remain outside only if all the water has been drained from it. The real job, then, is proving that the water is actually gone.
That principle expands beyond the hose wall itself. Illinois Extension's cold-weather guidance reminds homeowners to disconnect garden hoses and shut off and drain water from pipes leading to outside faucets so that the short run just inside the house is less likely to freeze. In other words, the vulnerable system begins inside the wall, crosses the spigot, and continues through every attachment left holding water. A winter workflow that only coils the hose but ignores the supply side is incomplete.
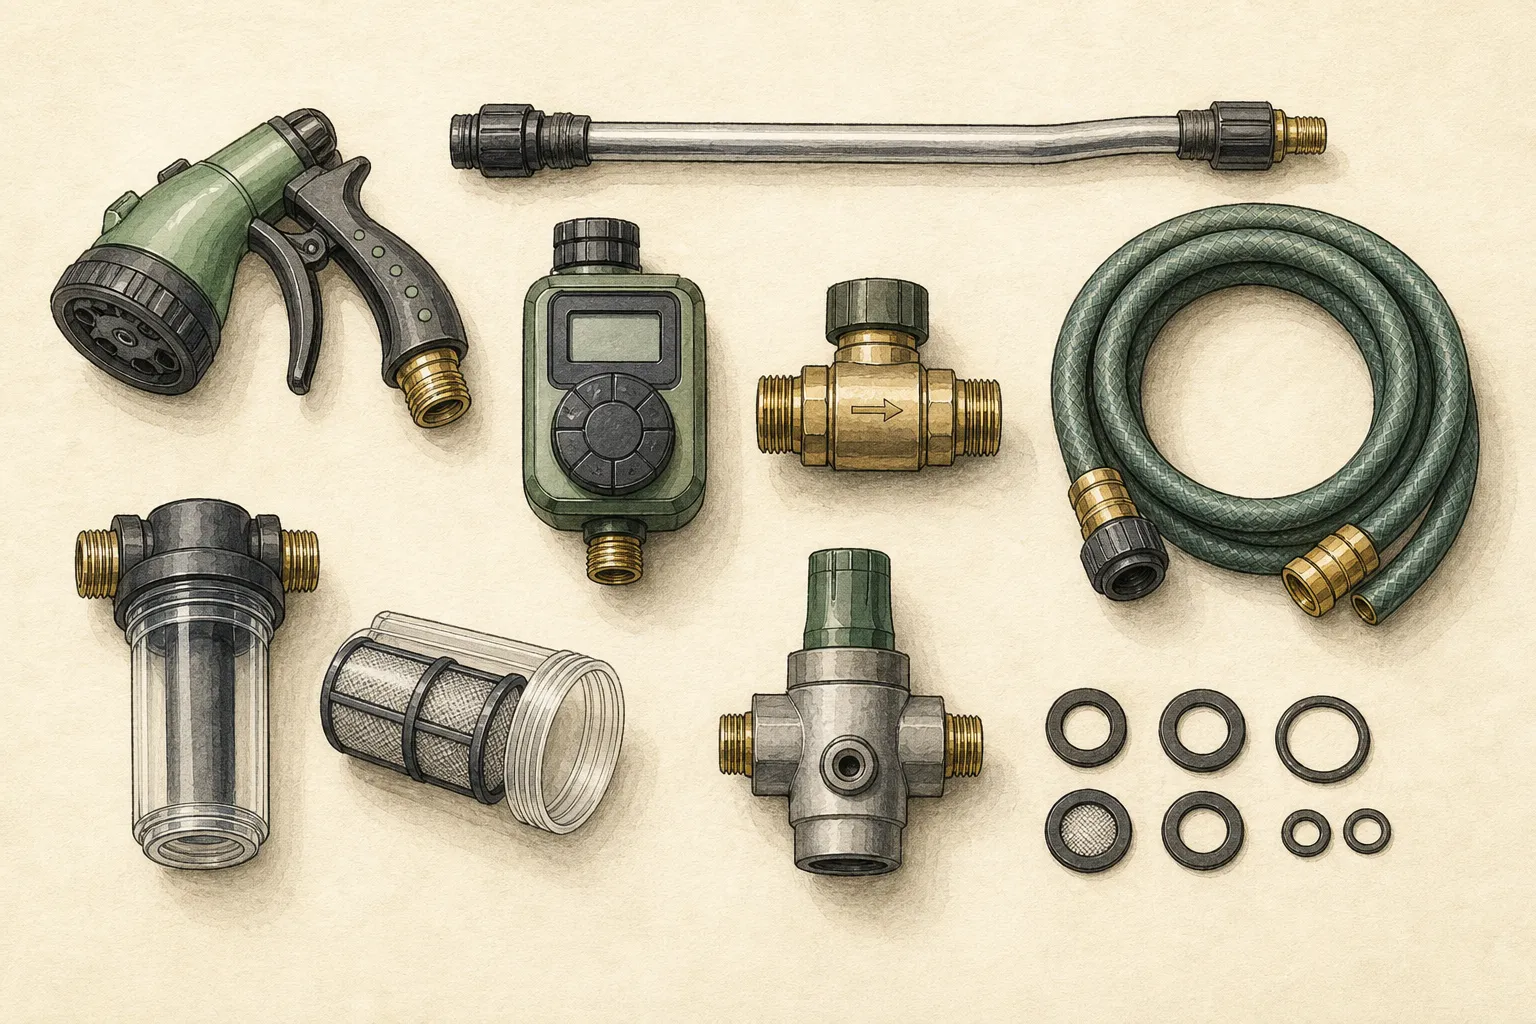
The same logic applies to drip systems and accessory fittings. Illinois Extension's drip-irrigation guidance says winterizing is necessary because freezing water damages parts, and it names the removable backflow preventer, filter, and pressure reducer as components that should be removed, dried, and stored inside. That recommendation is useful even if your setup is simple. The more small chambers and hard-plastic transitions a watering system contains, the more places water can hide and expand.
Think in terms of zones rather than objects. There is the house-side plumbing zone, the main hose zone, the attachment zone, and any low-pressure irrigation zone made up of tubing and fittings. Each zone drains differently. Each zone stores differently. Winter preparation stays reliable when you handle those zones one by one instead of assuming that one open hose end has emptied the entire watering system.
Disconnect the house side before you work the hose side
Begin at the faucet, not the reel. Illinois Extension's frozen-pipe guidance is explicit: disconnect the garden hose and shut off and drain water from the pipes leading to outside faucets before cold weather. That order matters because it relieves pressure on the short pipe section nearest the wall and prevents a trapped hose or accessory from disguising the state of the supply line.
This step is also the right moment to separate attachments. Remove spray nozzles, wands, timers, Y-connectors, quick-connect fittings, and anything else screwed or snapped to the hose before you start draining the line. Leaving them attached creates local low points where water can sit, and it prevents you from seeing whether the hose end and washer are sound. A winter workflow that keeps attachments connected for convenience usually stores water by accident for the same reason.
University of Vermont Extension folds inspection into this stage by advising gardeners to check hoses for leaks and drain remaining water before coiling and storing them. That is useful because the leak you ignore in December is the leak you re-diagnose under pressure in April. Once the hose is detached and the accessories are off, inspect couplings, washers, thread wear, abrasions, and crushed sections while the system is still quiet and dry enough to read.
Do not treat a stuck connection as a winter afterthought. If a fitting has seized to the faucet or to the hose end, solve it now while the assembly is out of service. Illinois Extension's summer reminder about fused hose connections is relevant here too even though the season differs: the longer a connection stays ignored, the harder it becomes to separate cleanly. Winter storage is easier when every component can be opened, dried, and stored as an independent piece.
Use gravity and layout to empty every hose
Draining a hose is a physical layout problem, not a squeezing contest. Oregon State Extension recommends running the hose over a tall place so gravity forces water to exit the line. Gilmour's winter-care guidance offers two practical variations on the same idea: place the hose on an elevated surface and let the end drop, or stretch it out and pull it hand over hand so water keeps moving toward the outlet. The point is to create a continuous downhill path for the water.
Choose the method that matches your space and hose length. A picnic table, bench, or other elevated surface can provide a gravity break that encourages the water column to move. A long driveway or path can support the hand-over-hand method. What matters is that the hose is not left coiled while you hope the remaining water finds its own way out. Coils create repeated low spots. Low spots become ice pockets.
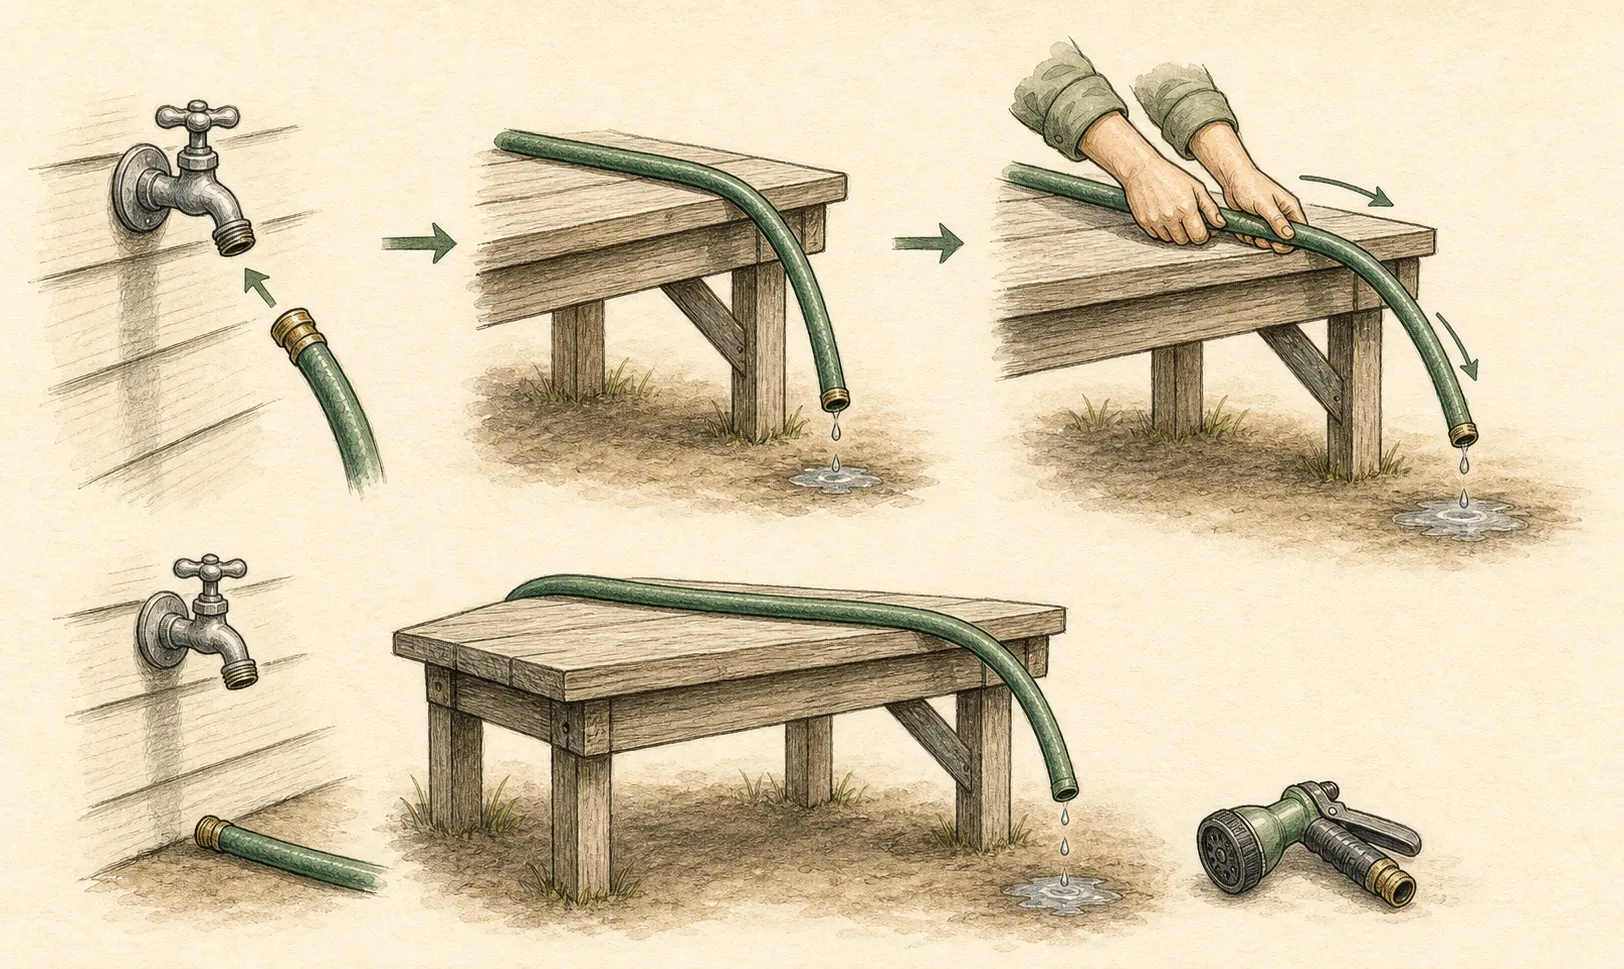
The final section near the female and male couplings deserves extra attention because water likes to sit in those heavier ends. Walk the hose out slowly and lift it enough that each segment becomes the new high point. When the last visible flow stops, repeat the pass once more with attention to bends, flattened sections, and hose memory from reel storage. A hose that drains freely when straight may still hold water when it returns to a tight winter coil.
Keep the claim narrow and honest. A fully drained hose can survive outdoor storage, as Oregon State notes, but storage indoors or in a dry covered place remains the better protection when you have the option. The article title promises storage before freeze, so the practical standard here is not simply survival. It is to reopen a hose in spring without cracks, permanent kinks, stiff frozen residue, or forgotten water in the ends.
Drain attachments and removable drip components separately
A nozzle, wand, timer, or filter should never be assumed empty because the hose has been drained. These pieces create their own chambers, valves, and abrupt diameter changes. Gilmour's tool-cleanup guidance specifically says to drain nozzles and hoses well before winter storage, and Illinois Extension's drip-irrigation article says any hard plastic fitting left outside needs to be clear of water to prevent cracking. The attachment zone is its own drainage job.
Start with hand-watering accessories. Open trigger nozzles fully, shake out trapped water, and hang or stand them so the outlet points downward while they finish draining. Extend watering wands and move any shutoff lever through its range while the wand is tipped to encourage hidden pockets to empty. If you store these tools lying flat immediately after detaching them, you surrender the one chance gravity had to finish the job.
Next handle drip-system parts that are designed to be removed. Illinois Extension names the backflow preventer, filter, and pressure reducer as components that should be removed before a freeze, dried, and stored inside. If your system includes manual valves, timers, or specialty connectors, treat them with the same logic: open, drain, dry, and store where they cannot refill with condensation or rain. The article's scope is home-garden watering, not permanent irrigation infrastructure, so stay within components you can safely detach and identify.
Finally drain the low points of any tubing left in place. Illinois Extension recommends opening the lowest part of the irrigation line so gravity can move water out, and notes that an air compressor can be used where appropriate. Even if you never use compressed air, the low-point principle is the critical one. Water left in a hard-plastic elbow or pressure-reduced section can crack a fitting that looked robust enough from the outside.
Store coils, fittings, and repairs where spring setup stays readable
Once the line is dry, storage shape matters. University of Vermont Extension advises coiling the hose and storing it on a hose rack or placing it on a flat surface. Gilmour warns against hanging a coiled hose on a long nail because that can create permanent kinks. Those instructions point to the same outcome: support the full coil broadly enough that winter storage does not build a new problem into a hose you just protected from freeze damage.
Use the drying pass to make repair decisions while the defects are visible. Split jackets, crushed couplings, worn washers, or recurring leak points are easy to tag now and strangely easy to forget by the time planting and watering become urgent again. A hose that needs a mender kit or a new washer should not return to the same rack looking finished. Label it or keep it in a separate spring-repair group so the storage area tells the truth.
Small parts deserve named storage, not an anonymous bucket. Group washers, replacement nozzles, spare hose-end fittings, drip filters, pressure reducers, and timers by system or by bed, then note where they belong. Illinois Extension notes that filters may need periodic rinsing during the season; winter is the moment to start the next season with them visibly clean and locatable. A neatly drained filter hidden in the wrong drawer is still operationally lost.
Protect the reopening sequence as much as the material itself. Store the hose with its most likely service attachments, keep specialty drip parts together, and leave a quick note if one zone was shut down differently from the others. Spring irrigation is slower and messier when the gardener remembers only that there used to be a reducer somewhere and that the west bed required a different connector. Storage should conserve system memory.
Turn winter shutdown into next season's watering inventory
The most useful final step is written, not mechanical. University of Vermont Extension recommends making note of what needs replacement, and the same principle applies to watering equipment. Record which hoses remain sound, which couplings leaked, which beds used drip rather than hand watering, and which removable parts went indoors. The record can be a shed card, a phone note, or a garden journal entry, but it should tell you what to buy and what to reconnect before weather forces rushed decisions.
This is also the moment to record differences in performance, not only failures. Did one hose kink every time it was dragged around a corner? Did one low-pressure zone need an extra valve or a different route? Did a watering wand become too short for deep containers once the season matured? These are next-year design questions hiding inside a winter shutdown task. Writing them now is easier than trying to reconstruct them after months away from active irrigation.
Oregon State's answer about outdoor hose storage works because it is bounded: the hose must be truly drained. Keep that bounded mindset for the rest of the system as well. A hose may be sound while a timer is not. The mainline may be drained while one reducer still holds water. The reel may be fine while the house-side shutoff procedure remains unclear. Inventory separates those truths instead of flattening the entire system into one vague memory of having put things away.
When the shutdown is done well, spring startup becomes orderly. The house-side faucet line has already been protected, the hose opens without crackle or split fittings, the removable drip parts are dry and grouped, and the replacement list is waiting. That is the real point of draining and storing before freeze. It is not merely to avoid one dramatic winter failure. It is to preserve a watering system that can return to work without rediscovering its weak points from scratch.
Steps
- Level
- easy
- Time
- About 45 to 75 minutes depending on hose length and the number of attachments or drip zones
- Tools
- hose rack or broad hanger, clean towels or rags, bucket or tray for fittings, labels or marker, optional simple hand tools for hose-end repairs
- Materials
- replacement washers or hose-end repair parts if inspection shows wear, dry storage bin for removable fittings, indoor storage space for vulnerable drip components
- 1Shut down the faucet side first
Disconnect hoses from outdoor faucets before the first hard freeze and, where your setup allows it, shut off and drain the short supply section leading to the faucet. This protects the house-side plumbing before you begin coiling or sorting the garden-side tools. Remove timers, splitters, and quick-connect fittings so each part can be drained on its own.
- 2Separate hoses from every attachment
Take off nozzles, watering wands, shutoff valves, Y-connectors, and any drip-system starter assembly. Inspect washers, couplings, and threads while the system is quiet and dry. A cracked fitting or flattened washer is easier to identify now than under spring pressure. Place each accessory in the group where it actually belongs rather than in a mixed bucket.
- 3Drain each hose by gravity
Use an elevated surface, a long straight run, or a hand-over-hand pull so water moves continuously toward the open end of the hose. Repeat the pass with attention to both heavy couplings and any section that keeps the memory of a tight reel. A hose is not finished when the outside looks dry. It is finished when layout and gravity have emptied the last pocket.
- 4Empty nozzles and wands separately
Open trigger nozzles fully, shake them free of trapped water, and leave them pointed downward while they finish draining. Extend watering wands and move shutoff levers through their range while the tool is tipped so hidden chambers can empty. Store only after the accessory has had time to drip clear rather than when the hose itself is already done.
- 5Remove and dry low-pressure drip components
Take off removable backflow preventers, filters, and pressure reducers before freezing weather, dry them thoroughly, and store them indoors. Open low points in the irrigation line so gravity can drain water from tubing and hard fittings left outside. The goal is simple: any hard plastic part that remains outdoors must be free of water that could freeze and crack it.
- 6Coil and support the hose correctly
Once dry, coil the hose in a broad curve and store it on a real hose rack or on a flat supported surface. Avoid hanging the full coil on a narrow nail or hook that can force permanent kinks into the jacket. If the hose must remain outdoors, keep it fully drained and protected from standing water, snow load, and avoidable abrasion.
- 7Tag repairs and missing parts now
Label any hose that needs a new washer, repair fitting, or replacement section before it rejoins the ready group. Do the same for accessories with cracked housings, sticky triggers, or missing gaskets. Winter storage is only partly about protection from cold. It is also the best chance to sort ready equipment from spring-repair equipment while the evidence is still in front of you.
- 8Record the spring reopening plan
Write down which hose belongs to which bed or zone, which drip parts were brought indoors, and what replacement purchases are needed before irrigation restarts. Keep that note with the watering kit or in your garden records. A short written shutdown log is what turns careful winter drainage into a faster, cleaner spring setup.
Related reading
Sources
- Can I leave my garden hoses outside this winter?. Oregon State University Extension Service. Source record · Accessed 2026-08-19.
- Smart Garden Tool Storage. University of Vermont Extension. Source record · Accessed 2026-08-19.
- Cold weather, frozen pipes? Extension gives you all you need to know. Illinois Extension. Source record · Accessed 2026-08-19.
- Drip irrigation in the home garden. Illinois Extension. Source record · Accessed 2026-08-19.
- Find the Best Garden Hose for You - Types, Materials and Sizes. Gilmour. Source record · Accessed 2026-08-19.