Grow · leaf mold bin setup maintenance
Build a Leaf-Mold Bin Before Autumn Leaves Fall
Set up a ventilated leaf-mold bay before the main leaf drop, sort what belongs in it, and manage moisture until the pile becomes useful mulch or conditioner.
Published Last updated
In this guide
- Build the container before the leaves arrive
- Keep leaf mold separate from ordinary compost
- Choose the site and container before leaf drop
- Sort by condition and decomposition speed
- Choose deliberately between whole and shredded leaves
- Fill in damp, ventilated lifts
- Maintain moisture without turning it into a schedule
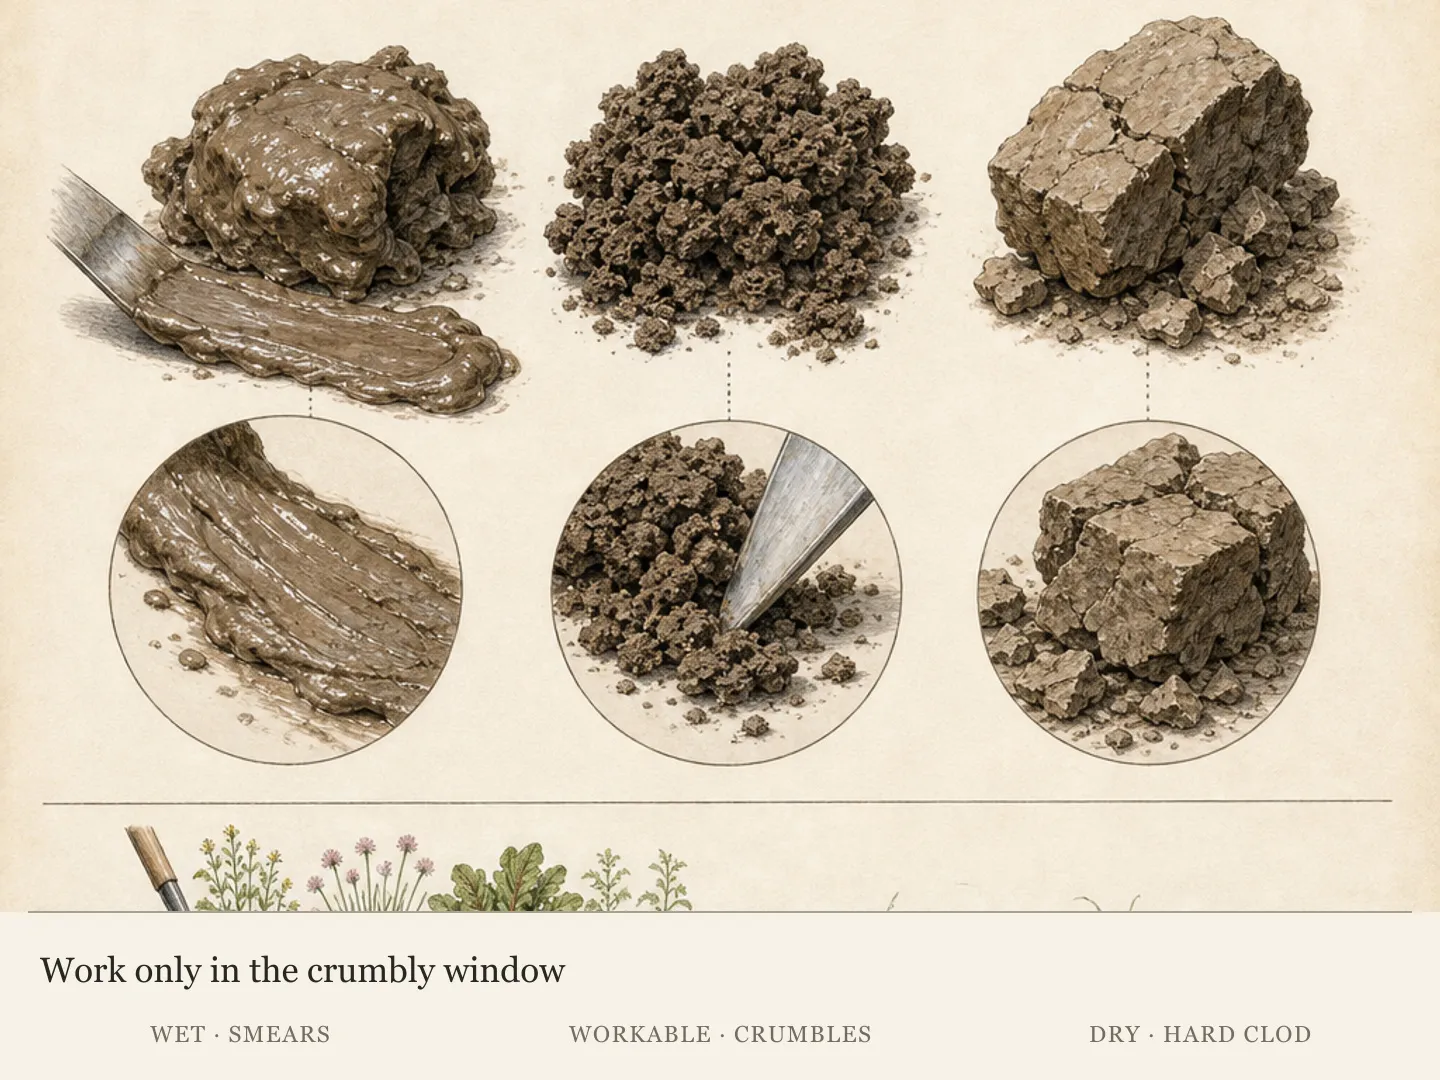
- Read readiness by texture and intended use
- Turn one autumn pile into a repeatable system
- Steps
Build the container before the leaves arrive
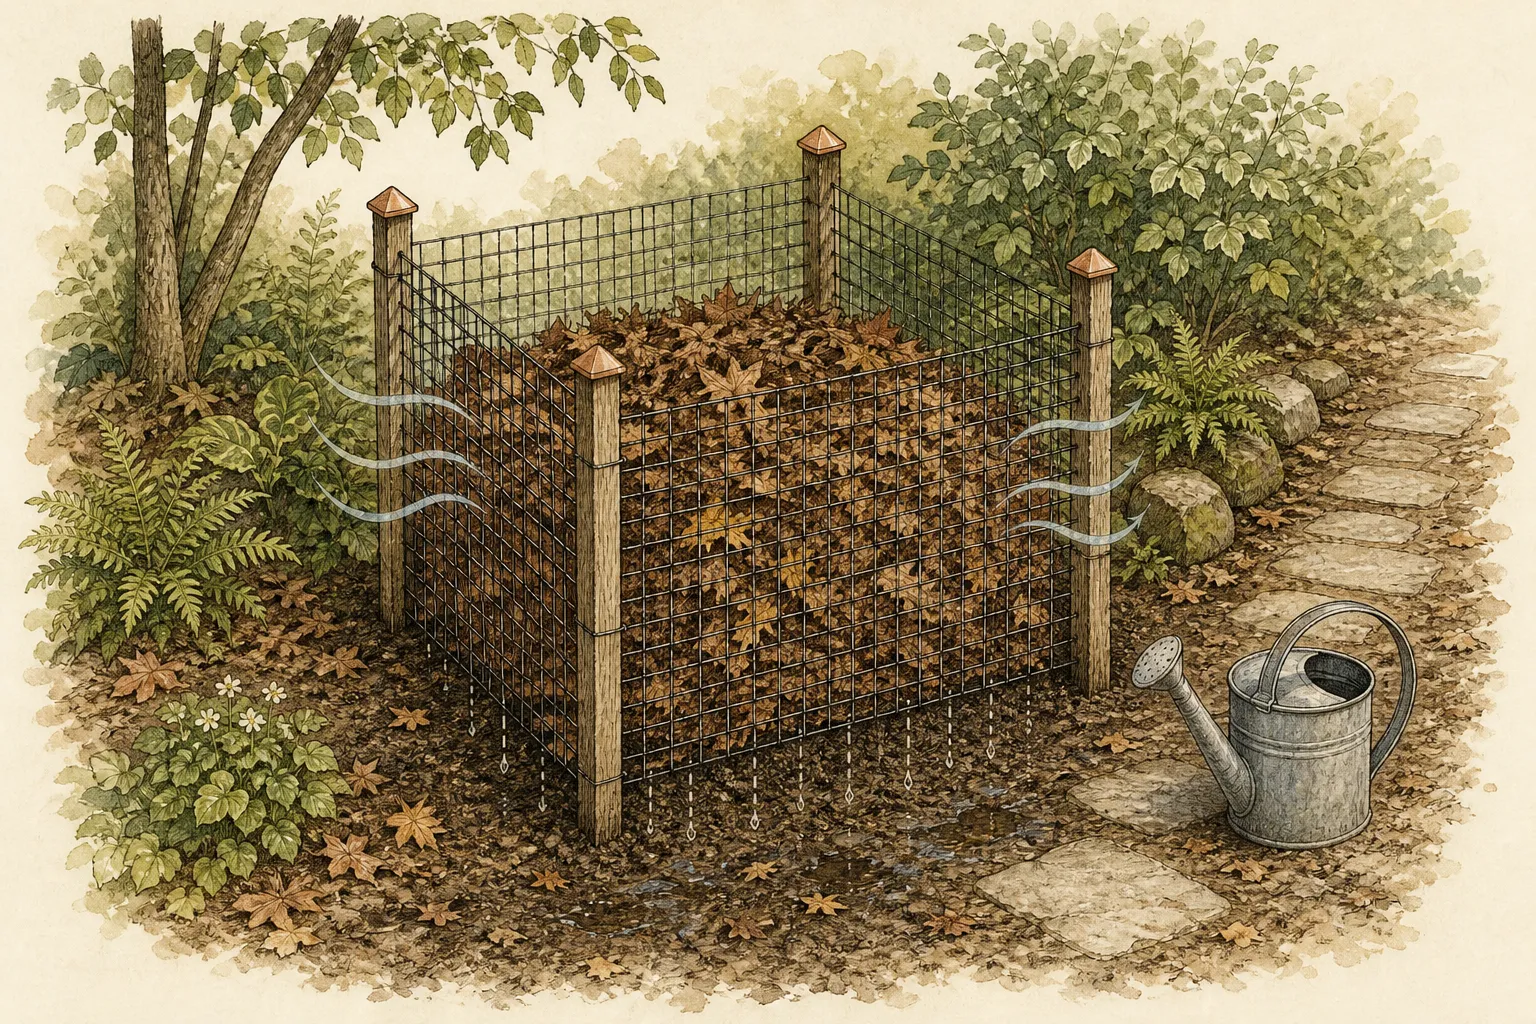
Set up a ventilated holding place before the main autumn leaf drop: a simple wire-mesh cage in a cool, sheltered part of the garden, or perforated bags where a cage will not fit. Fill it with suitable fallen leaves, moisten them as the pile grows, and give the material time. Leaf mold is not a fast, hot compost recipe. It is the slow fungal decay of leaves, and the practical controls are containment, air, moisture, leaf texture, and patience.
The advance work matters because a loose cubic yard of leaves does not wait politely while stakes, mesh, and access are improvised. Once the lawn and paths are covered, the easiest response is often an overfilled compost bin, sealed plastic sacks, or a wet heap placed wherever there is momentary space. A finished bay establishes the route before the volume arrives: leaves retained in beds stay there, leaves collected from circulation areas go to the bay, and unsuitable material goes to the locally approved waste stream.
Expect a long conversion. The Royal Horticultural Society reports that shredded leaves can produce usable fine-textured material in roughly six to twelve months, while whole leaves are coarser and slower. Its practical maturity range is about a year for partly decomposed mulch and two or more years for a finer conditioner or potting-mix ingredient. Those are planning ranges, not promises; leaf species, moisture, climate, and particle size decide what is actually in the bin.
Keep leaf mold separate from ordinary compost
A leaf-mold bay receives leaves and moisture. It does not need the alternating nitrogen-rich and carbon-rich ingredients used to run an active compost pile. Keep kitchen scraps, manure, grass clippings, spent annuals, and fresh hedge trimmings in the compost system that is managed for them. Mixing those materials into the leaf bay changes its behavior, can create compressed wet pockets, and makes it harder to judge the slow leaf-only product you intended to make.
This separation also solves an autumn storage problem. Leaves often arrive in one short surge, while a balanced compost pile can accept only a limited share of them at once. Penn State Extension recommends stockpiling leaves separately, then either allowing the reserve to become leaf mold or drawing some of those stored brown materials into the compost pile when fresh green materials arrive later. A dedicated bay is therefore useful even when the garden already has a working compost system.
Do not treat collection as a command to strip every bed. Whole leaves lying at a natural depth beneath shrubs and among sturdy perennials can protect soil and provide winter habitat. Penn State's fall-cleanup guidance favors retaining healthy leaf litter where it can remain without smothering vulnerable crowns or blocking drains. Collect from lawns, paving, gutters, access routes, and places where heavy mats create a genuine horticultural or safety problem; preserve deliberate habitat patches instead of feeding the bin indiscriminately.
Choose the site and container before leaf drop
Choose a cool, partly shaded position that is close enough to the leaf source and water supply to remain convenient. Constant sun and wind dry the edges repeatedly; a low hollow that stays flooded removes the air the pile also needs. Leave room to approach with a rake, mower bag, or tub, and keep the gate or front accessible when the contents have settled below the first load. The best hidden corner is not useful if every refill requires carrying wet leaves through a planted border.
For a garden with a substantial deciduous canopy, use stakes and open mesh to make a broad cage that can accept a large, airy load. Penn State gives a generous reference range of three to six feet in diameter and at least three feet high, but the leaf volume and available space should determine the final footprint. Make the enclosure stable, leave the base unpaved so excess water can escape, turn sharp wire ends inward, and provide a removable front or one opening large enough for inspection and removal.
For a small garden, perforated reusable sacks or ventilated lidded cans can hold separate batches. The holes and loose closure matter because an airtight bag is storage, not a well-aerated decay system. Label each container with the fill season and leaf type, then stand it where leaks will not stain paving or drain into a doorway. A bag is easier to fit than a cage but harder to inspect; do not pack it so tightly that no dampening water or air can move through the mass.
Sort by condition and decomposition speed
Use fallen deciduous leaves that are free of litter and obvious contamination. Remove sticks thick enough to hold the pile open unevenly, stones that could meet a mower blade, plastic, pet waste, and sweepings from salted or chemically contaminated surfaces. Home piles do not reliably sanitize every input. Oregon State University Extension notes that weed seeds and plant-disease organisms commonly survive home composting, so isolate leaves involved in a serious diagnosed disease or regulated pest and follow current local Extension or municipal disposal advice.
Leaf texture predicts how much preparation will help. Birch, beech, maple, hazel, hornbeam, and many oaks can form useful leaf mold, while thick, leathery, or waxy leaves such as sycamore, plane, sweet chestnut, and many evergreens take longer. The RHS recommends shredding resistant leaves to open more edges and reduce dense wet mats. Mix a modest share with thinner leaves or give the slow batch its own dated bay so it does not disguise the readiness of everything else.
Keep conifer needles and coarse evergreen hedge clippings separate. Needles can take two to three years to decay in the RHS account and may be managed as their own slow, acidic batch; woody hedge clippings belong in a compost or woody-material system suited to them. Separation is more useful than a complicated formula. It lets a gardener use a fine deciduous batch when ready, continue aging a coarse batch, and avoid spreading half-finished needles simply because both entered the yard in autumn.
Choose deliberately between whole and shredded leaves
Shredding speeds decomposition by reducing the leaf size and helping tough surfaces break down more evenly. It is most useful for thick leaves, a small bin that must receive a large volume, or a gardener who needs a usable coarse product within the following year. Mow when the leaves are dry enough to cut cleanly and spread thinly enough that the machine does not choke. Remove branches, wire, stones, and other hard objects first, and follow the mower manufacturer's operating instructions.
Whole leaves ask for less work and preserve more of their original structure, but they settle slowly and can knit into broad wet sheets. Loosen handfuls as they enter the bay and alternate leaf types when one species forms a particularly dense layer. Whole leaves are a reasonable choice where space is generous and the finish date is flexible. A cage of intact leaves may need the two-year route; that is a storage decision, not evidence that the system failed.
Do not shred the entire garden merely to accelerate one bin. Penn State's wildlife guidance points out that eggs, caterpillars, cocoons, and other small animals use intact leaf litter. Reserve whole-leaf habitat under suitable shrubs and in managed bed pockets, then shred only the material that must leave lawns and circulation areas. The useful compromise is spatial: quiet garden cover remains structurally intact, while collected surplus is processed for a contained horticultural product.
Fill in damp, ventilated lifts
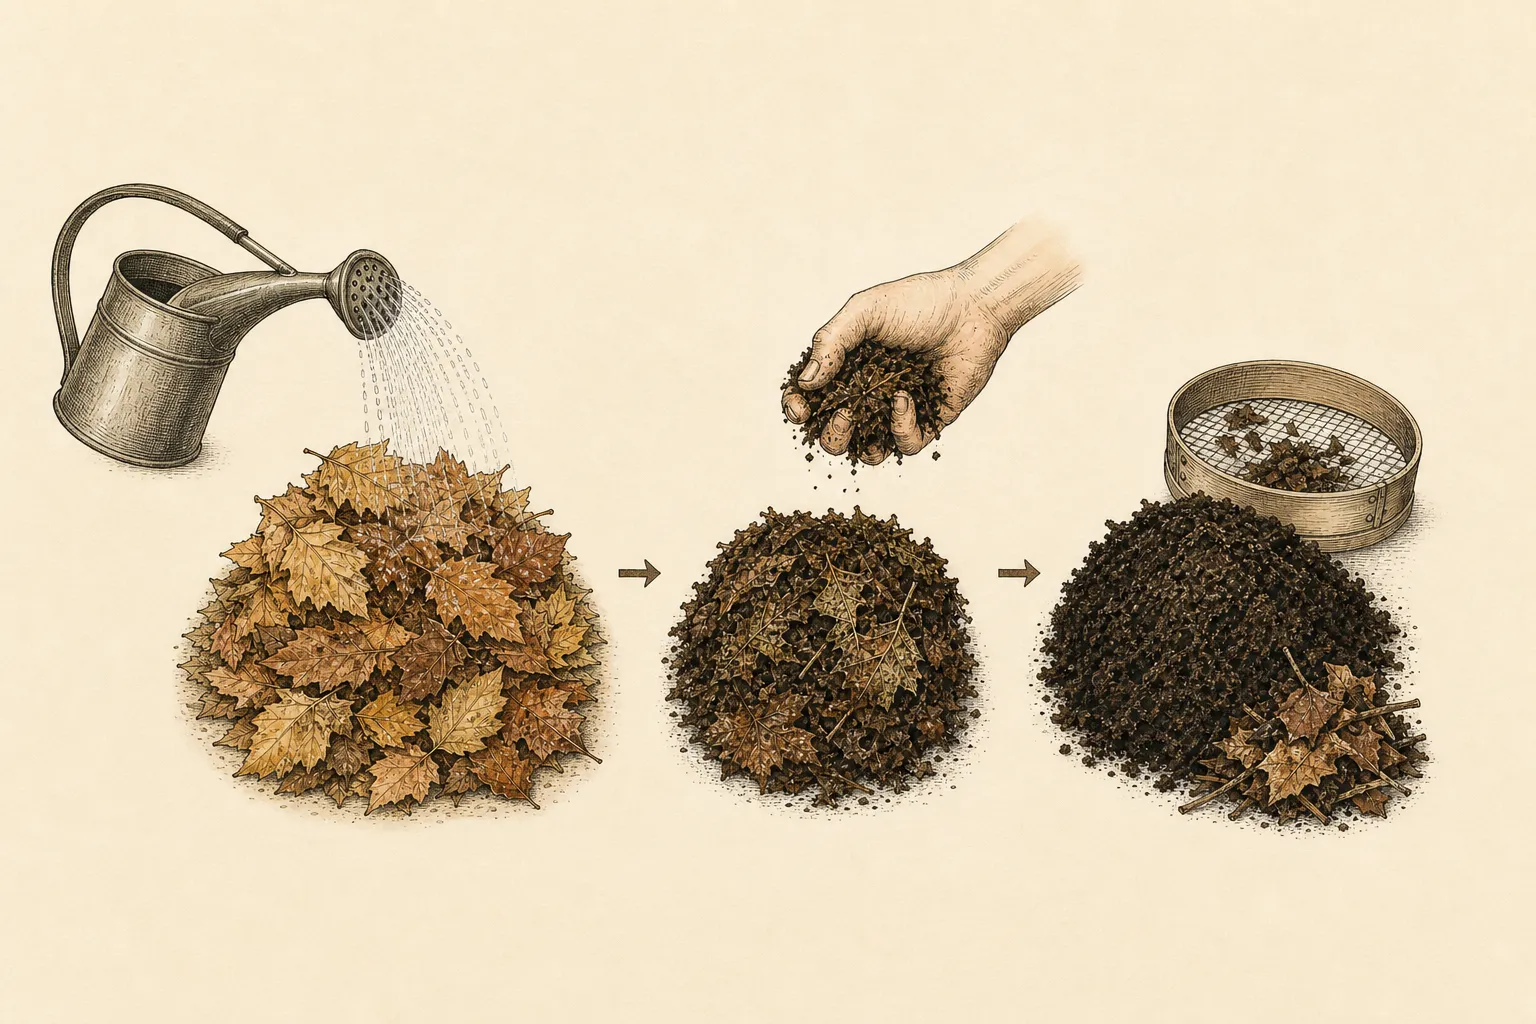
Add leaves in manageable lifts and moisten each dry layer before the next arrives. The aim is uniformly damp material, not a water-filled cage. Press a handful after watering: it should feel moist throughout but should not release a stream. Dry leaves can sit almost unchanged; saturated leaves collapse into airless mats. If rain has already soaked the collection, mix and loosen it as the bay fills instead of adding more water automatically.
Settle the pile enough to keep leaves from blowing away, but do not ram it into a solid block. A mesh enclosure can remain open to ordinary rain in a climate where that maintains moisture. In a very wet period, a loose top cover can shed the heaviest rainfall while leaving the sides open; in a dry climate, the same cover can reduce evaporation. Treat a cover as a moisture control, not as a seal. Recheck the center after weather changes because the surface alone gives a poor reading.
The first load will shrink sharply, leaving space for later leaf falls. Add new material in the same damp lifts and mark the last fill date. If a second autumn's fresh leaves are poured over a nearly mature batch, the finish becomes difficult to judge and remove. Where annual volume justifies it, use two bays: fill one this season and leave the other to mature. In a small setup, separate old and new sacks instead of reopening the oldest batch.
Maintain moisture without turning it into a schedule
Leaf mold does not require frequent turning. The RHS describes it as a low-intervention process, while Penn State notes that occasional turning, watering, shredding, or covering can shorten the wait. Choose effort according to the deadline. A patient whole-leaf bay can remain mostly undisturbed; a shredded batch intended for next year's mulch benefits from an occasional opening that breaks compacted zones and confirms that the center remains damp.
Inspect after long dry weather, prolonged heavy rain, or a visible collapse. Brittle recognizable leaves and a dusty center need water distributed through the mass, not a splash across the top. Slick compressed sheets and a stagnant odor call for opening the front, teasing layers apart, and letting excess water drain. Add no fertilizer to rescue a slow pile. The leaf bay is working at a fungal pace, and more nitrogen would turn it toward a different composting process.
Keep the perimeter functional. Pull windblown leaves away from paths, keep the top below a height the enclosure can safely contain, and repair loose mesh before winter weather enlarges the problem. Check that runoff still leaves the base and that the cage has not leaned as the center settled. These are brief structural corrections. A good system should survive months of ordinary weather without weekly rituals, elaborate temperature measurements, or repeated complete rebuilding.
Read readiness by texture and intended use
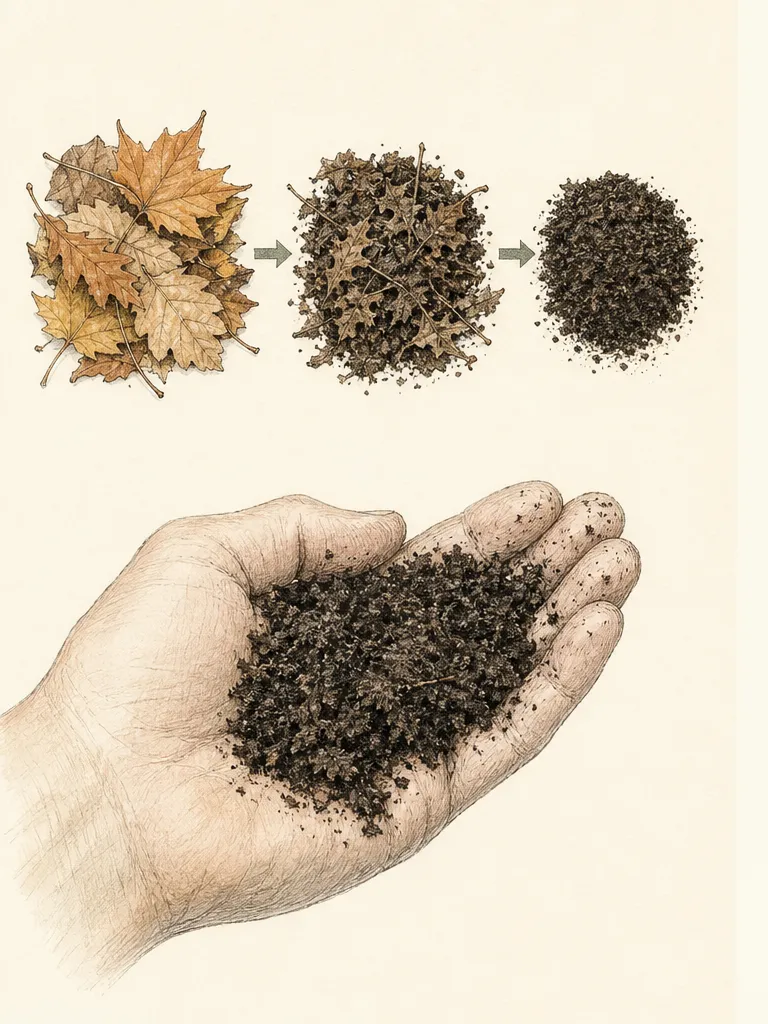
Open the oldest batch and inspect material from the center, not just the dry outer skin. Young leaf mold still shows veins and recognizable pieces, yet it can be dark, softened, and easy to pull apart. The RHS places this partly decomposed stage at roughly a year and uses it as mulch. Keep it on the soil surface, and follow the plant-clearance and depth decisions in a job-specific mulching guide; coarse young material is not the same as a fine seed-sowing ingredient.
Older finished material is dark, loose, earthy-smelling, and crumbly, with few recognizable leaf blades. Two or more years is a common route for whole leaves, while shredded material may reach a useful fine texture sooner. Screen only when the intended use needs a uniform fraction, and return coarse pieces to the active bay. A printed date starts the inspection; texture decides whether the batch is ready for the specific job.
Use leaf mold for physical conditioning and surface moisture management, not as a substitute for a fertility diagnosis. Oregon State describes partially decomposed deciduous leaves as a near-neutral material with a high carbon-to-nitrogen ratio that falls as decomposition advances.
The RHS likewise characterizes leaf mold as low in nutrients. Apply it where its structure is useful, test soil when nutrient or pH questions are involved, and keep unfinished high-carbon material on the surface instead of burying it into an occupied root zone.
Turn one autumn pile into a repeatable system
Record the tree mix, whether the leaves were shredded, the final fill date, and any period when the bay became unusually dry or wet. The notes explain why two batches from the same garden can mature differently. They also make the next decision simple: use the finished fraction, return coarse material, clean and repair the emptied enclosure, then assign the bay to the new leaf fall. A durable label is more useful than guessing from color across several similar piles.
Match next year's collection to actual capacity. If the cage overflowed, preserve more leaves safely in beds, mulch-mow a suitable thin layer into the lawn, add a second bay, or use ventilated reserve sacks. Do not solve a volume mismatch by piling leaves over drains, tree trunks, crowns, or existing habitat layers. Penn State distinguishes mowing a thin leaf layer into turf from piling whole leaves for leaf mold; both can be useful when each is assigned to the surface that can receive it.
Success is not a full bin. It is an autumn route that keeps paths and lawns functional, retains appropriate habitat, stores surplus leaves without anaerobic mats, and produces a material with a known age and use. Build the physical system before leaf fall, then let the season supply the volume. The work becomes lighter each year because the container, sorting rules, and moisture checks already exist when the first serious rake load arrives.
Steps
- Level
- easy
- Time
- About two hours to site and build one bay, then brief moisture checks over one to two years
- Tools
- Tape measure and marker, Mallet or post driver suited to the stakes, Wire cutters and pliers, Rake and collection tub, Hose or watering can, Mower or leaf shredder if shredding is chosen
- Materials
- Three or four stable stakes, Open wire mesh and durable fasteners, Stake caps where upright ends remain exposed, Weatherproof batch labels, Perforated reusable sacks for overflow or a small-space alternative
- 1Assign leaf routes
Mark healthy leaf litter that can remain in beds for soil cover and habitat. Identify leaves that must leave lawns, paving, gutters, and access routes, and estimate whether the collected volume needs a cage, ventilated sacks, or both. Keep diseased, regulated, contaminated, and litter-mixed material out of the bay under current local guidance.
- 2Choose a sheltered working site
Select a cool, partly shaded place with drainage, access from the main leaf source, and a practical route to water. Avoid a flooding hollow, constant drying wind, a blocked drain, or a corner that can be reached only by crossing planted soil. Leave room to open the enclosure and remove mature material.
- 3Build a ventilated enclosure
Set stable stakes around the chosen footprint, attach open mesh securely, turn sharp ends inward, and cap exposed upright ends. Leave the base unpaved and create a removable front or generous access opening. For a small garden, perforate reusable sacks or cans and label each one by fill season.
- 4Sort and prepare leaves
Remove sticks, stones, plastic, pet waste, and contaminated sweepings. Separate conifer needles and woody evergreen trimmings. Keep thin deciduous leaves whole when time and space allow; shred thick or waxy leaves, or a collected surplus that must fit a small bay, after clearing hard objects from the mower route.
- 5Fill and moisten in lifts
Add manageable layers, loosen clumps, and damp each dry lift before the next arrives. The center should feel evenly moist without releasing a stream when squeezed. Settle leaves lightly to contain them without ramming the mass solid, and record the last fill date so fresh material is not confused with the maturing batch.
- 6Correct weather extremes
After long dry weather, test the center and distribute water through brittle material. After prolonged rain, open compacted sheets and restore drainage and side airflow. Use a loose top cover only to moderate excessive rain or drying; never seal the bay. Repair leaning stakes, loose mesh, and leaf spill before winter.
- 7Inspect by texture
At about one year, examine the center for dark, softened, partly recognizable material suited to surface mulching. Continue aging any batch that remains leathery or matted. Fine finished leaf mold is loose and crumbly with few recognizable blades; whole leaves may need two or more years, while shredded leaves can mature sooner.
- 8Use and reset the bay
Match the fraction to the job, keeping young coarse material on the surface and returning unfinished pieces to the pile. Record the result, repair the empty enclosure, and route the next autumn's leaves according to available capacity. Add a second dated bay or separate sacks if mature and fresh batches would otherwise be mixed.
Related reading

Sources
- Making the Most of Fallen Leaves. Royal Horticultural Society. Source record · Accessed 2026-08-30.
- Leaves Are Treasure, Not Trash. Penn State Extension. Source record · Accessed 2026-08-30.
- Improving Garden Soils with Organic Matter. Oregon State University Extension Service. Source record · Accessed 2026-08-30.
- Nurturing Nature: Fall Cleanup Strategies. Penn State Extension. Source record · Accessed 2026-08-30.