Plant problems · tomato blossom end rot
Diagnose Tomato Blossom-End Rot Before Adding Calcium
Identify the sunken lesion at the blossom end, then correct the water and root conditions that interrupt calcium delivery instead of treating every dark tomato spot alike.
Published Last updated
In this guide
- Begin with the lesion position and texture
- Separate blossom-end rot from other dark fruit injuries
- Understand why calcium can be present but unavailable to fruit
- Reconstruct the water pattern before changing products
- Protect roots and moderate growth
- Use the next fruit set as the verdict
- Audit a container as a complete root environment
- Use soil and media tests for the questions they can answer
- Account for weather and cultivar without surrendering control
- Close the season with a root-zone record
- Diagnosis
Begin with the lesion position and texture
Blossom-end rot begins at or near the blossom end, opposite the stem attachment. The earliest area may look pale tan or water-soaked, then enlarges into a brown to black, sunken, leathery patch as the fruit grows. That sequence matters more than darkness alone. Photograph the whole fruit from the side and the blossom end, and keep the stem end in frame so the location cannot be confused later.
Inspect fruit at several sizes on the same plant. The disorder often becomes visible while fruit is still green, and affected fruit may ripen early. A single soft black tomato lying against wet soil may have secondary decay rather than the characteristic physiological lesion. Choose attached fruit for the first comparison, note whether the affected tissue is firm and depressed or soft and spreading, and leave one representative fruit in place long enough to document progression.
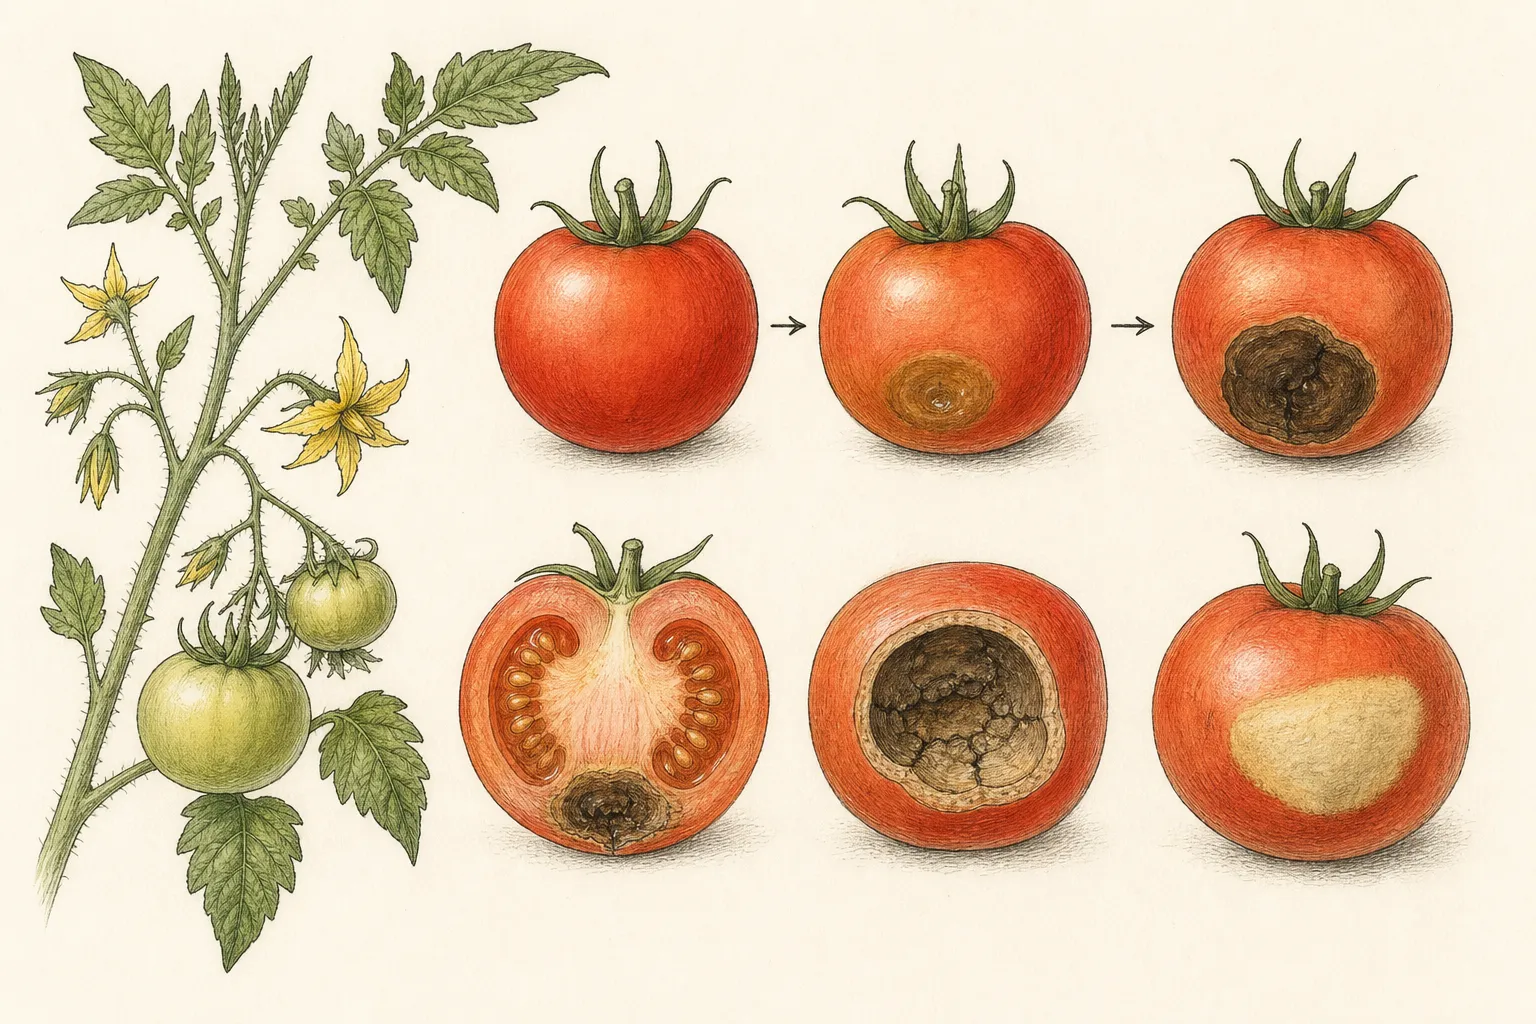
Do not cut open every affected fruit at once. External position and development usually carry the useful field pattern, while cutting can invite decay and destroy the next comparison. If the lesion is not centered toward the blossom end, if it begins at a crack or feeding wound, or if spots are scattered across leaves and fruit, keep the diagnosis open and compare those symptoms through a separate route.
Separate blossom-end rot from other dark fruit injuries
Sunscald usually occurs on the exposed shoulder or side where intense light reaches fruit after leaf loss. The injured area may bleach, blister, or become papery before secondary organisms darken it. Its exposure pattern and position differ from a lesion originating at the blossom end. Map whether affected sides face the same direction and review recent pruning, wind damage, or defoliation before calling every pale or black patch a calcium disorder.
Cracks begin as splits in the skin, often around the stem or in rings and radial lines, and decay follows the broken surface. Anthracnose and other fruit rots can produce sunken spots, especially on ripening fruit, but their distribution and surface detail differ. Insect feeding leaves punctures or irregular wounds. Preserve one fresh fruit and photographs of leaves, stems, and the whole plant when several lesion types occur together.
Secondary fungi and bacteria can colonize tissue already damaged by blossom-end rot, making an old lesion wet, fuzzy, or irregular. That does not erase the original disorder, but it can make a late specimen harder to read. Base the diagnosis on the earliest attached fruit you can find, not the worst fruit on the ground. Remove decaying fruit after documenting it so it does not become the visual standard for all later symptoms.
Understand why calcium can be present but unavailable to fruit
Blossom-end rot reflects inadequate calcium in rapidly developing fruit tissue, yet the garden soil often contains sufficient calcium. Calcium moves with water through roots and the plant. When water uptake fluctuates, roots are damaged, growth is unusually rapid, or salts interfere with uptake, the fruit can receive too little during a critical stage even though a soil test does not show a broad calcium shortage.
This distinction prevents a common mistake: adding lime, gypsum, eggshells, or foliar calcium on the basis of one dark fruit. Lime changes soil pH as well as adding calcium, and gypsum is not a universal repair. Finely crushed shells break down slowly. Foliar sprays do not reliably move calcium into the developing tomato fruit. Test soil and follow local recommendations before amending; do not use the symptom as a substitute for measurement.
The affected patch will not heal. The management target is fruit that is still developing or has not yet set. Mark healthy new fruit and watch it after correcting the root-zone conditions. Improvement appears as later fruit maturing without the characteristic lesion, not as the black area turning green again. This forward-looking checkpoint keeps products and watering changes tied to an observable result.
Reconstruct the water pattern before changing products
Probe the root zone at several points and depths. A dry surface can cover moist soil, while a wet spot beside an emitter can sit next to dry mix inside the original root ball. In containers, check the center and lower drainage zone as well as the rim. Record recent irrigation, rainfall, heat, and any interval when the plant wilted. The sequence of drying and rewetting matters more than a single reading made after the problem appears.
Correct toward even moisture, not constant saturation. Water deeply enough to wet the active root zone, then let air remain in the pore spaces. Adjust frequency to weather, plant size, soil texture, and container volume. A heavy daily splash that wets only the top can produce shallow cycles; repeated soaking in a poorly drained pot can injure roots and create the same delivery problem through oxygen shortage.
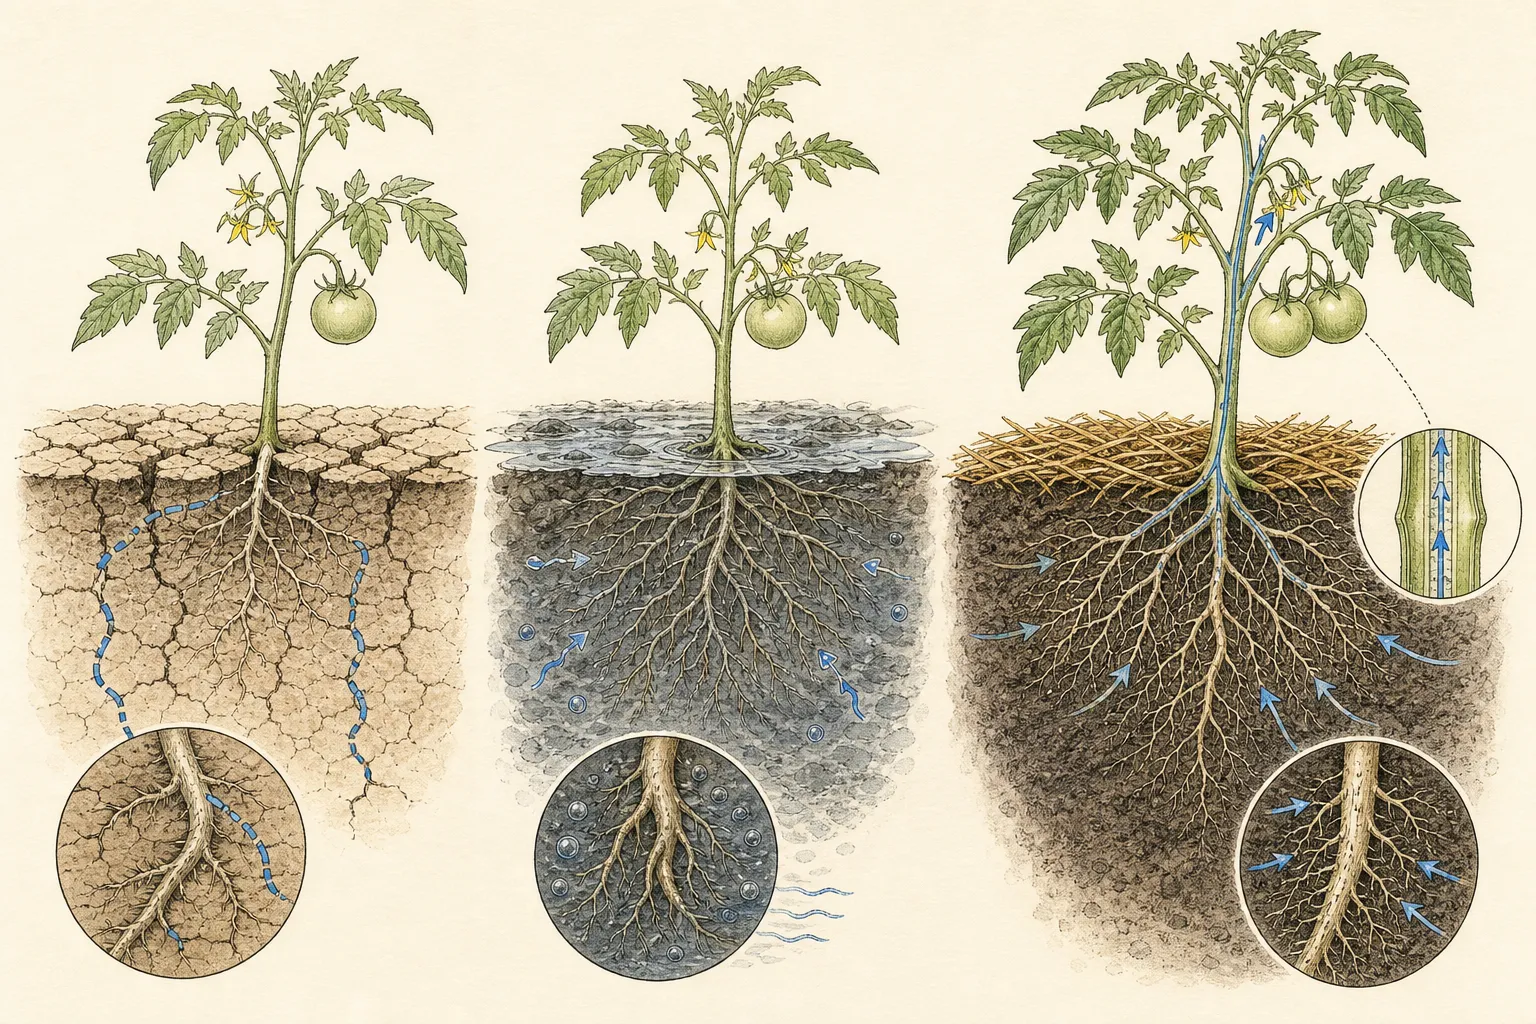
Apply an appropriate organic mulch over established bed soil to moderate evaporation and temperature, keeping it away from the stem. In a container, shade the pot wall or move a dark pot out of reflected heat when roots are overheating, but preserve the tomato canopy’s light. Mulch and shade are tools for reducing abrupt root-zone swings. They do not replace checking whether water reaches the full root mass and exits the container correctly.
Protect roots and moderate growth
Recent cultivation, transplanting, root binding, or damage from driving a support can reduce the roots available to move water and calcium. Stop hoeing close to the stem and do not stab additional stakes through a mature root ball. In containers, confirm that drainage holes are open and that the plant is not a large vine confined to a small volume that dries within hours. Correct structural limitations where practical without tearing apart an actively fruiting plant.
Avoid a sudden high-nitrogen feeding response. Excess nitrogen can drive rapid leafy growth and increase competition for water while encouraging a canopy that is harder to support. Continue only the measured fertility program appropriate to the soil or potting mix. If growth is already lush and dark, adding more fertilizer because damaged fruit looks undernourished is especially unlikely to address the actual transport problem.
High soluble salts from overfertilization can impair water uptake. White crust on a pot, repeated fertilizer additions, or root-tip injury makes the irrigation history incomplete without a product history. Follow container and local Extension guidance for correcting salts, and do not combine several remedies at once. A clean change in water consistency and fertilizer restraint gives the next fruit set a readable test.
Use the next fruit set as the verdict
Remove badly affected fruit so the plant does not continue allocating resources to unusable tissue, but leave enough labeled fruit to compare stages until the diagnosis is secure. Mark three healthy young fruits with loose tags and photograph them weekly from the blossom end. Note weather and irrigation changes. The sample should include more than one truss because one fruit can be injured while neighbors remain sound.
If later fruit develops normally after moisture becomes steadier and root stress is reduced, continue the corrected routine without adding unnecessary calcium. If the characteristic lesion continues across multiple new trusses, review whether the root ball is actually being wetted, whether the container is undersized, and whether a laboratory soil or media test supports a pH, salinity, or calcium concern. Escalate with the record rather than stacking remedies.
End the blossom-end rot route when lesions begin elsewhere, spread softly from wounds, or accompany a wider leaf and stem disease pattern. Submit a fresh attached fruit and plant photographs to a local diagnostic service when the field pattern no longer fits. The value of this diagnosis is its narrowness: a blossom-end lesion, a plausible transport disruption, and a clear test on fruit that develops afterward.
Audit a container as a complete root environment
Container tomatoes can move from wet to dry much faster than plants in open ground, especially when a large vine occupies a small dark pot. Measure the container rather than calling it large, confirm that water can leave every drainage opening, and check whether roots have formed a dense circling mass. A saucer that remains full, a perched pot that blocks holes, or a dry core that sheds water can each interrupt uptake while the surface still looks routinely watered.
Apply water slowly in stages when dry potting mix has pulled from the sides. The first pass may run down the gap and out without wetting the root ball. Pause, repeat, and verify moisture in the center. If the mix stays saturated for long periods, improve drainage and watering frequency instead of adding another layer of mulch. The useful container routine wets the root volume evenly and then allows air to return.
Do not make a disruptive midseason repot the automatic answer. Moving a fruiting tomato can break roots and worsen the transport interruption before it helps. Stabilize irrigation, shade an overheating pot wall, and support the canopy first. Repot only when the container problem is clear and the move can preserve the root ball. Otherwise, record the limitation and choose a larger final container before planting next season.
Use soil and media tests for the questions they can answer
A laboratory soil test can identify pH and measured nutrient conditions in an in-ground bed; a suitable media or pour-through test may be needed for containers. Choose the service and sampling method for the growing environment. A retail pH strip or improvised calcium remedy cannot describe salt load, root damage, or whether recent irrigation actually reached the roots during rapid fruit expansion.
Request amendment recommendations for tomatoes and provide the management history. Report lime, gypsum, compost, fertilizer, and irrigation additions, because the same number has different meaning in an untreated mineral soil and a repeatedly fertilized potting mix. If calcium is adequate and pH is in range, accept that result. The next work belongs to water consistency, root function, temperature, and growth rate rather than searching for a product that confirms the original hunch.
When a test does show a correctable deficiency or pH problem, follow its rate and timing. More amendment is not faster correction, and lime applied to raise pH can overshoot. Some changes are best made before the next crop rather than around active roots. Separate long-term soil preparation from the immediate goal of protecting current fruit. One result can inform both, but it does not make every amendment suitable in midsummer.
Account for weather and cultivar without surrendering control
Hot, dry, windy weather can accelerate water loss, while heavy rain after dryness can create another abrupt swing. Weather does not make management irrelevant; it changes how often the root zone must be checked and how slowly water should be delivered. Use a rain gauge and below-surface observations. A brief shower may wet foliage and leave the root ball dry, while a prolonged storm can saturate a poorly drained bed.
Cultivars differ in susceptibility, fruit shape, growth habit, and timing. Early fruit may be affected while later fruit is sound after roots expand and conditions stabilize. Record the cultivar and which trusses show lesions. Do not remove a useful variety after one episode without comparing the water and root history. Repeated loss under good management may justify selecting a less susceptible locally recommended cultivar next season.
Expect the response to lag behind the correction. Fruit already injured internally may show a lesion after the watering routine improves. That delayed appearance does not prove the change failed. Mark fruit by stage on the correction date and judge only fruit that developed substantially afterward. A dated tag turns a vague impression of continuing loss into a fair test of the repaired conditions.
Close the season with a root-zone record
At final harvest, compare the proportion of affected fruit before and after the correction rather than remembering only the worst cluster. Note container volume or bed location, cultivar, planting date, first lesion date, heat events, irrigation method, and any fertilizer or amendment. Include whether the root ball was dry, saturated, compacted, or physically damaged. This short record identifies the most plausible preventable pressure for next year.
Inspect roots when the plant is removed. Healthy fine roots, dense circling roots, blackened decayed roots, and a dry untouched core tell different stories. Do not diagnose a specific root disease from color alone, but photograph the pattern and seek local help if decay was extensive. Dispose of diseased material according to local guidance and clean reusable containers before the next crop.
Prepare the next planting around the evidence. Increase container volume, restore drainage, position emitters to wet the planted root ball, apply test-based amendments before planting, and install support without later root injury. Keep the useful mulch and monitoring practices. The goal is not a calcium ritual; it is a root environment that delivers steady water and nutrients while each new tomato fruit is forming.
Diagnosis
A pale or water-soaked patch begins at the blossom end of an attached green tomato, then enlarges into a brown to black, sunken, leathery lesion while the stem end remains unaffected.
- Check
- Photograph attached fruit from the side and blossom end, include the stem attachment, and compare several fruit sizes. Confirm that the earliest patch begins opposite the stem, becomes depressed and leathery, and recurs on developing fruit. Probe the root zone at several depths and reconstruct irrigation, heat, fertilizer, and root disturbance before choosing a correction.
- Cause
- Blossom-end rot is disrupting fruit tissue because calcium delivery did not keep pace during early expansion. Fluctuating water, restricted or injured roots, rapid growth, heat, salinity, or an undersized container may contribute even when soil calcium is adequate.
- Action
- Remove severely affected fruit after recording it, then stabilize moisture through the whole root zone, correct blocked drainage, protect roots, moderate excess nitrogen and salinity, and mulch suitable bed soil. Do not add lime, gypsum, eggshells, or foliar calcium without test-based need. Judge the change on several marked young fruits because existing lesions cannot heal.
A bleached or papery patch develops on the exposed shoulder or side of fruit after canopy loss or intense sun, and similarly oriented fruit shows injury on the same exposure.
- Check
- Map which side of each fruit faces strongest light and look for bleaching, blistering, or papery tissue on shoulders and sides. Review recent leaf removal, storm breakage, or disease defoliation. The absence of a blossom-end origin and a consistent exposure gradient support the sunscald route.
- Cause
- Sunscald has injured fruit directly exposed after pruning, wind breakage, sparse foliage, or an abrupt change in light. Secondary decay may darken the original bleached patch.
- Action
- Preserve enough foliage to shade fruit, support broken branches, and avoid abrupt additional pruning. Where practical, use temporary shade that does not trap heat or block needed air movement. Existing papery tissue will not recover, so track only newly exposed fruit and correct the event that removed canopy protection.
Skin splits radiate from the stem or form concentric cracks, with soft decay beginning along the broken surface after a change in water availability.
- Check
- Inspect for a physical split as the starting point, record recent heavy rain or irrigation after dryness, and compare cracks around the stem with the intact blossom end. Separate firm cracked tissue from soft secondary decay and protect the remaining canopy while moisture is made more even.
- Cause
- Growth cracking has opened the skin after the fruit expanded faster than the surface could accommodate it, commonly following uneven moisture. Organisms can then colonize the split.
- Action
- Make irrigation more consistent without keeping roots saturated, maintain mulch where appropriate, and avoid forcing growth with excess fertilizer. Harvest cracked fruit promptly when sound and safe for its intended use, and discard decaying fruit. New cracks, not the appearance of old splits, are the management checkpoint.
Several small sunken spots appear on ripening fruit away from the blossom end, or a dark lesion begins at a puncture, feeding wound, or soil-contact injury.
- Check
- Retain a fresh attached specimen and photograph leaves, stems, and the whole plant. Note whether lesions are multiple, begin at wounds, or occur mainly on ripe fruit. Seek local diagnosis when spots spread, become soft or fuzzy, or accompany foliar symptoms rather than treating them as blossom-end rot.
- Cause
- A fruit rot, insect injury, mechanical wound, or soil-contact decay is following a different route. Position, lesion number, surface detail, and accompanying plant symptoms must guide identification.
- Action
- Close the blossom-end rot route. Remove decaying fruit, keep water off fruit where practical, avoid wounds, and obtain a fresh diagnosis before applying a disease or insect product. Follow local guidance and every pesticide label; lesion color alone cannot choose a treatment.
Blossom-end lesions continue on fruit that began expanding after irrigation was stabilized, and the plant occupies a small container with rapid dry-down, blocked drainage, dense roots, salt crust, or a dry core that sheds water.
- Check
- Measure container volume, clear and observe drainage holes, probe the center and lower root zone before and after a slow staged watering, and review fertilizer additions. Tag fruit by development stage on the correction date. At season end, inspect the intact root ball for circling, dry pockets, or broad decay and retain photographs when a diagnostic review is needed.
- Cause
- The container root environment is still interrupting water uptake through inadequate volume, uneven wetting, overheating, salt accumulation, root binding, or poor drainage. The symptom can persist even when water is applied frequently because delivery and root function remain uneven.
- Action
- Wet dry media slowly in repeated passes, allow excess to drain, shade an overheating pot wall, moderate fertilizer, and avoid tearing apart an actively fruiting root ball without a clear benefit. Use an appropriate media or laboratory test when salts, pH, or nutrients remain in question. Plan a larger, freely draining final container and reliable emitter placement before the next crop.
Related reading

Sources
- Growing Vegetables: Managing Blossom-End Rot. University of New Hampshire Extension. Source record · Accessed 2026-08-19.
- Tomato Blossom-End Rot. University of Connecticut Integrated Pest Management. Source record · Accessed 2026-08-19.
- Tomato disorders. University of Minnesota Extension. Source record · Accessed 2026-08-19.
- Blossom-end rot of tomatoes. Oregon State University Extension Service. Source record · Accessed 2026-08-19.