Grow · post bloom potted bulb transplanting
Move Potted Spring Bulbs into the Garden After Bloom
Keep post-bloom foliage working, identify forced and hardy bulbs, transplant sound root systems into compatible garden soil, and mark the future colony.
Published Last updated
In this guide
Identify what is actually in the pot
Identify the bulbs and how the pot was produced before promising a garden return. A nursery pot of hardy daffodils grown for outdoor sale is different from forced tulips brought rapidly into winter bloom indoors. Keep the label, botanical name, hardiness, and forcing history. Iowa State notes that forced daffodils can often be saved, while forced tulips, hyacinths, and many other spring bulbs commonly fail to bloom again.
Identify whether the plant is a hardy true bulb, tender bulb, corm, tuber, or rhizome before applying spring-bulb guidance. The storage organ determines planting depth, dormancy, and winter survival. An amaryllis or tender paperwhite should not be transferred automatically into a cold garden because it appeared beside hardy daffodils at the store.
Check whether the cultivar is perennial in the local climate. Some hybrid tulips decline even when planted correctly, while daffodils and many species bulbs persist more reliably. A plant outside its hardiness range belongs in a seasonal container or protected collection. Transplanting cannot change its genetics or replace a winter chilling requirement.
Screen for disease and irreversible decline. Keep bulbs with firm bases, healthy green leaves, and roots that hold the potting mix. Isolate yellow mosaic, soft bulbs, foul odor, or spreading basal rot and seek diagnosis before introducing the clump to a permanent bed. A faded flower is normal; a collapsing storage organ is not.
Ask whether the pot was acclimated for outdoor weather. A bulb forced in a warm house may have tender leaves even when the species itself is hardy. Give such foliage a gradual move through sheltered shade and mild nights before permanent planting. A pot sold from an outdoor nursery bench may already be hardened. Treat the condition of the current leaves separately from the winter hardiness of the dormant bulb below.
Keep leaves working after flowers fade
Remove the spent flower head after bloom so the plant does not invest in seed unless seed is an intentional project. Leave the entire green leaf blade and flower stalk tissue that remains photosynthetic. University of Minnesota and Iowa State both explain that post-bloom leaves continue supplying the underground bulb. Cutting or tying them early reduces the reserves available for future growth.
Give the pot strong appropriate light while leaves remain green. A bright cool window, protected outdoor position, or greenhouse bench may suit the species and weather. Move an indoor-forced pot outdoors gradually so leaves are not scorched or frozen. Keep post-bloom foliage in useful light until its physiological work is complete.
Water enough to keep active roots from drying, then reduce only as leaves naturally yellow. Let excess drain from the pot and empty saucers. Constant saturation encourages bulb rot, while a bone-dry root ball ends leaf function prematurely. Remove the decorative sleeve and use pot weight plus below-surface moisture to guide watering.
Feed only when the retained source and species program call for it. RHS guidance feeds container bulbs with a high-potassium product during active growth and stops as foliage dies; Iowa State offers a regional bed-fertilization rate, not a universal pot prescription. Use one source-appropriate fertilizer schedule. The label, soil test, and whether the bulb is being retained determine the decision.
Keep the bulb's whole leaf season in one location when possible. Repeated moves from a dim room to hot sun and back again interrupt photosynthesis and water balance. Choose a bright cool holding place, turn only enough for even light, and protect the pot from late hard freezes. The foliage is not decorative waste after bloom; it is the temporary engine rebuilding the storage organ for dormancy.
Choose a compatible garden destination
Choose a destination that matches the named bulb's light, drainage, soil, and summer moisture needs. Most spring bulbs prefer free drainage, but woodland bulbs, tulips, and daffodils have distinct soil, light, and summer-moisture requirements. Observe the bed after rain and through canopy closure. A low wet pocket or dense summer shade can erase the benefit of careful post-bloom foliage care.
Reserve a place where leaves can finish naturally next spring. The front edge of a clipped border may invite early removal of yellowing foliage; a mixed bed can hide it behind later-emerging perennials without shading it too soon. Keep enough access to deadhead, monitor, and divide future clumps without stepping on emerging shoots.
Check winter and summer behavior together. A bulb that needs a dry summer dormancy may rot beside an irrigated moisture-loving perennial, while a bulb that keeps active roots may suffer in a baked strip. Match companion root needs, not only flower color. If the garden cannot supply the cycle, keep the bulb in a managed container or decline the transplant.
Prepare the whole planting area before lifting the pot. Loosen compatible soil across the future group, identify buried utilities and irrigation, and set labels. Prepare a broad compatible bed because narrow rich pockets collect water in compacted clay. Improve broad bed conditions or use a draining raised bed; the planting hole must connect to garden soil.
Consider animal and household exposure in the destination. Many ornamental bulbs are not edible and risks differ by genus and plant part. Use the exact botanical identity to check current poison guidance, then site or decline the planting accordingly. A generic `spring bulb` label is not enough for a bed used by pets or young children, and choose a safe permanent location from exact species guidance.
Move the root system with minimal disruption
Move actively growing bulbs on a cool, calm day when the destination soil is workable. Water a dry pot in advance so the root ball holds together, but let it drain before handling. Support the pot and foliage together. Pulling the leaves or flower stalk can detach them from the bulb or tear the basal plate.
Slide the root mass out and inspect the outside without dismantling a healthy rooted clump. Tease only roots that are tightly circling or trapped against a pot edge. Preserve active roots and postpone major separation until dormancy. Root and foliage continuity matter more than perfect spacing during the first move.
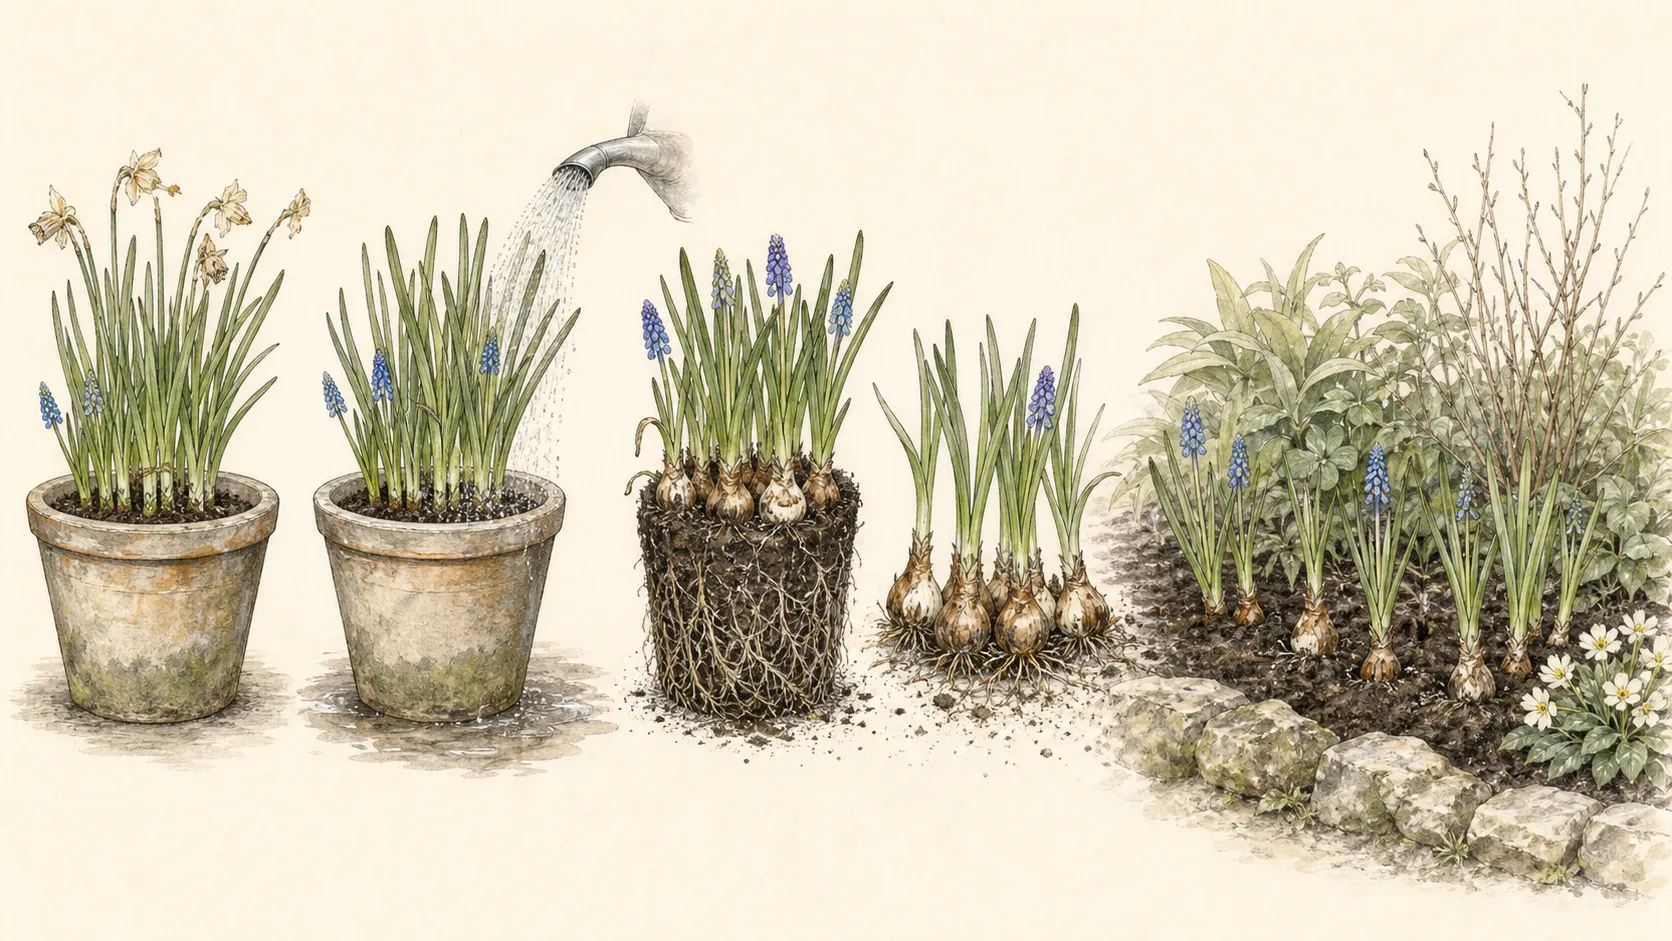
If the pot contains bulbs packed at display density, choose between planting the intact group temporarily and waiting until dormancy to divide, or gently separating only distinct loose offsets. Forcing containers are often closer than sustainable garden spacing. Mark the group so it can be lifted and divided after foliage dies if crowding reduces future vigor.
Read the potting medium at the interface. Peat-rich nursery mix can dry faster than surrounding soil after transplanting, while a dense wet plug can remain saturated inside a draining bed. Tease only enough of the outer medium to connect roots with garden soil, then monitor both zones. Water should reach the original root ball without turning it into a permanent wet pocket.
Match planting depth and grade
Restore the depth required by the named bulb, measured from the bulb base or top according to the source. RHS general guidance uses about three times the bulb's height for many true bulbs in open ground, while container displays may be shallower. Set the permanent depth from the named bulb's in-ground guidance.
Set pointed bulbs upright and basal plates down when individual orientation is visible. For an intact rooted clump, keep the existing orientation and place soil beneath the root ball so the bulbs finish at correct grade. Lift a high clump, adjust its base, and recheck bulb depth while green leaf bases remain clear.
Backfill with compatible site soil, working it gently around the root mass without compacting wet ground. Water once to settle a dry planting and reveal voids. If the bed is already moist, avoid flooding. Correct bulbs that rise, sink, or lean while the move is fresh, and keep the surface level enough to drain with a surface that drains freely.
Mark the exact group with a low durable label and a simple map. Leaves will disappear, and autumn digging nearby can destroy dormant bulbs. Record species, cultivar, pot source, transplant date, depth convention, and whether the bulbs were forced. That information explains later non-return more accurately than a generic note that spring bulbs were planted there.
Depth corrections are easiest before the first watering. Measure at several points in a crowded clump because bulbs may sit at different levels inside the display pot. If one bulb is exposed while another is buried appropriately, separate only when roots allow a clean adjustment; otherwise set the average rooted group safely and mark it for dormant correction and schedule any major correction for dormancy.
Place groups where foliage can finish
Arrange several pots as varied loose colonies, but keep each rooted group at the spacing its mature foliage needs. Repetition looks natural when group sizes and gaps vary. It does not require mixing unidentified bulbs in one hole. Labels can remain at the back of each colony while the visible surface stays quiet.
Use companions that emerge late enough to screen yellowing leaves without smothering them during the recharge period. Hostas, ferns, or perennials may work in appropriate sites, but their roots and water needs must match the bulb. Avoid a dense groundcover that hides early shoots, steals moisture, or makes future division impossible.
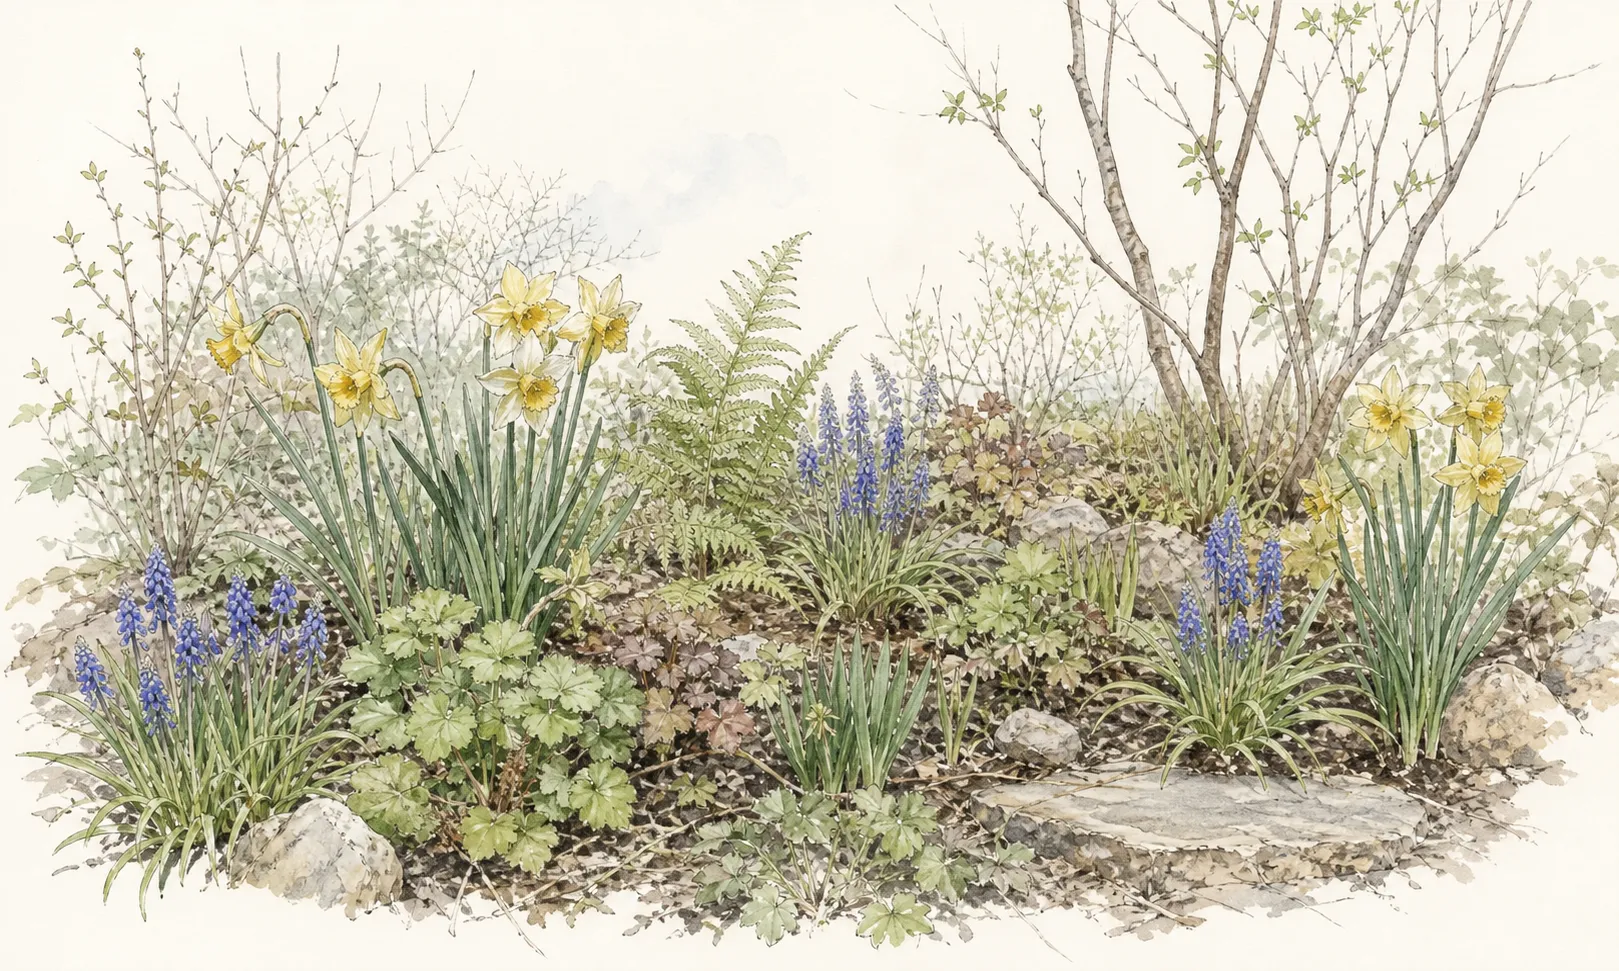
Protect the foliage window during routine maintenance. Keep mowers, string trimmers, pets, and foot traffic outside the marked group until leaves are fully yellow and brown. Keep leaves open to light until natural dieback. When they detach easily and no green tissue remains, remove them cleanly and allow the bulb to enter dormancy.
Design the group for its leaf phase, not just its flower week. Space companions so spring light reaches every leaf and later growth screens the fading clump without flattening it. A narrow mown edge or crowded annual display will pressure the gardener to remove leaves early. Moving the bulbs one foot deeper into a mixed bed may matter more to future bloom than adding another cultivar to the composition.
Judge return over more than one season
Judge success over more than the first transplant season. The immediate signs are intact foliage, stable grade, and no rot; the stronger test is emergence and bloom in the next appropriate season. A forced tulip that returns only as leaves may still be behaving as Iowa State warns. Diagnose one missed bloom from forcing history, light, depth, drainage, and foliage duration before intervening.
If foliage returns without flowers, check species persistence, forcing history, planting depth, post-bloom leaf duration, light, crowding, and summer drainage. A bulb planted too shallowly or cut green may need another recharge cycle, while a short-lived hybrid may not perennialize. Diagnose the likely limit before replacing the whole colony.
After leaves die, divide congested groups only if needed. Iowa State allows immediate replanting or drying and cool storage until autumn; forced daffodils can also be dried after foliage withers and planted in fall. Choose one source-bounded route, keep bulbs labelled, discard damaged material, and return healthy bulbs at the documented regional planting time.
Set a realistic evaluation horizon. Outdoor-ready daffodils may settle and bloom the following spring, while forced tulips or hyacinths may have limited future display quality, and some bulbs need more than one cycle after forcing. Keep the bed marked even after a missed bloom if healthy foliage returns. Remove the group only when identity, persistence expectation, disease status, and several seasons of response support that decision.
At dormancy, verify that labels remain readable and the bed stays undisturbed. Replace tall stakes with a low map reference, clear dense wet debris, and keep animal digging from exposing bulbs. If the clump needs division, wait for the documented dormant window and retain firm healthy bulbs. The following spring's emergence should test one controlled planting decision, not a sequence of unrecorded moves.
Steps
- Level
- moderate
- Time
- 30–60 minutes per pot
- Tools
- hand fork, trowel, labels
- Materials
- water, compatible garden soil
- 1Identify and screen
Identify every bulb, cultivar, hardiness range, and whether it was forced indoors or grown for outdoor sale. Reject soft or foul bulbs, isolate mosaic or basal rot, and reserve perennial garden claims for correctly identified durable bulbs.
- 2Finish post-bloom growth
Remove spent flowers but keep all green leaves working in strong appropriate light. Water active roots with full drainage and reduce moisture only as foliage yellows naturally. Follow one source-appropriate feeding program, not several overlapping schedules.
- 3Prepare the garden group
Choose a draining garden site that matches the bulb's light, soil, hardiness, summer moisture, and foliage window. Prepare the full group before handling the pot and mark utilities, irrigation, spacing, and future access.
- 4Move intact roots
On a cool workable day, slide out a moist but drained root ball while supporting foliage. Preserve healthy root contact, separating only loose offsets or correcting severe circling; delay major division of a tightly rooted display until dormancy when practical.
- 5Restore depth
Set the bulbs at their named in-ground depth and orientation, not automatically at the shallow forcing level. Support intact clumps from beneath, backfill with compatible site soil, settle only as needed with water, and keep the surface draining.
- 6Protect the foliage window
Label and map the group, then protect leaves from mowing, tying, foot traffic, and early removal until they are fully yellow or brown. Use compatible later-emerging companions without hiding the crown or crowding the roots.
- 7Record future return
Record next-season emergence and bloom. If return is weak, check forcing history, bulb longevity, leaf retention, light, depth, crowding, and drainage before feeding or digging. Divide and replant healthy dormant bulbs only at the species' documented time.
Related reading
Sources
- How to grow bulbs. Royal Horticultural Society. Source record · Accessed 2026-08-30.
- Caring for spring blooming plants. University of Minnesota Extension. Source record · Accessed 2026-08-30.
- Growing bulbs indoors. University of Minnesota Extension. Source record · Accessed 2026-08-30.
- Care of Spring-Flowering Bulbs after Bloom. Iowa State University Extension and Outreach. Source record · Accessed 2026-08-30.
- Is it possible to save tulip bulbs that have been forced indoors?. Iowa State University Extension and Outreach. Source record · Accessed 2026-08-30.