Grow · indoor dahlia tuber starting
Start Dahlia Tubers Indoors Without Rotting the Crown
Inspect the crown and eyes, pot dormant dahlia tubers shallowly, hold water until growth begins, and prepare stocky plants for a frost-free move outside.
Published Last updated
In this guide
Decide whether an indoor start helps
Start stored dahlia tubers indoors only when earlier rooted growth is useful in the local season. Dahlias are tender and must remain frost-free; RHS guidance pots dormant tubers in spring, while Oregon State uses a one-gallon pot and moves plants outside after frost when soil is about 60°F or warmer. A bright frost-free place and a realistic transplant date are prerequisites, not optional aftercare.
Count backward from safe outdoor soil, not from the first warm indoor week. A tuber started too early can become tall, root-bound, and difficult to harden while the garden remains cold. If there is no strong light or protected transition space, planting the dormant tuber outside at the regional time may produce a better plant than maintaining weak indoor growth for months.
Reserve the final site before potting. Most dahlias need sun, fertile free-draining soil, and at least about two feet of spacing; tall and large-flowered cultivars commonly need stakes. A starter pot hides that eventual scale. Install or mark support at planting so the rooted crown is not pierced later when stems and tubers are concealed.
Keep tubers frost-free throughout the indoor phase. A warm room cannot substitute for light, and a cold wet room invites rot. The useful indoor start ends with a compact rooted plant, visible healthy shoots, and enough time to harden before transplanting. It is not measured by the first shoot appearing as early as possible.
Keep direct outdoor planting as the simpler alternative. RHS guidance allows dormant tubers to go into their final position in spring where soil will not freeze around them before shoots emerge. The indoor method is justified by season length, propagation, or health inspection. It should not become a compulsory ritual for a gardener whose climate and soil already provide a safe timely start.
Read the crown before dividing or potting
Find the crown before dividing or potting. Dahlia eyes form on the crown around the old stem, not along the swollen storage tuber. Oregon State describes the eye as a bump that becomes a sprout. A large detached tuber without crown and eye cannot produce a replacement stem, even when it remains firm and plump.
Keep tubers that are firm, connected by sound necks, and attached to viable crown tissue. Reject spreading soft rot, foul odor, extensive collapse, and broken necks that separate storage tissue from the crown. A small dry scar can be monitored; wet advancing damage should be cut away to firm tissue or the affected division discarded.
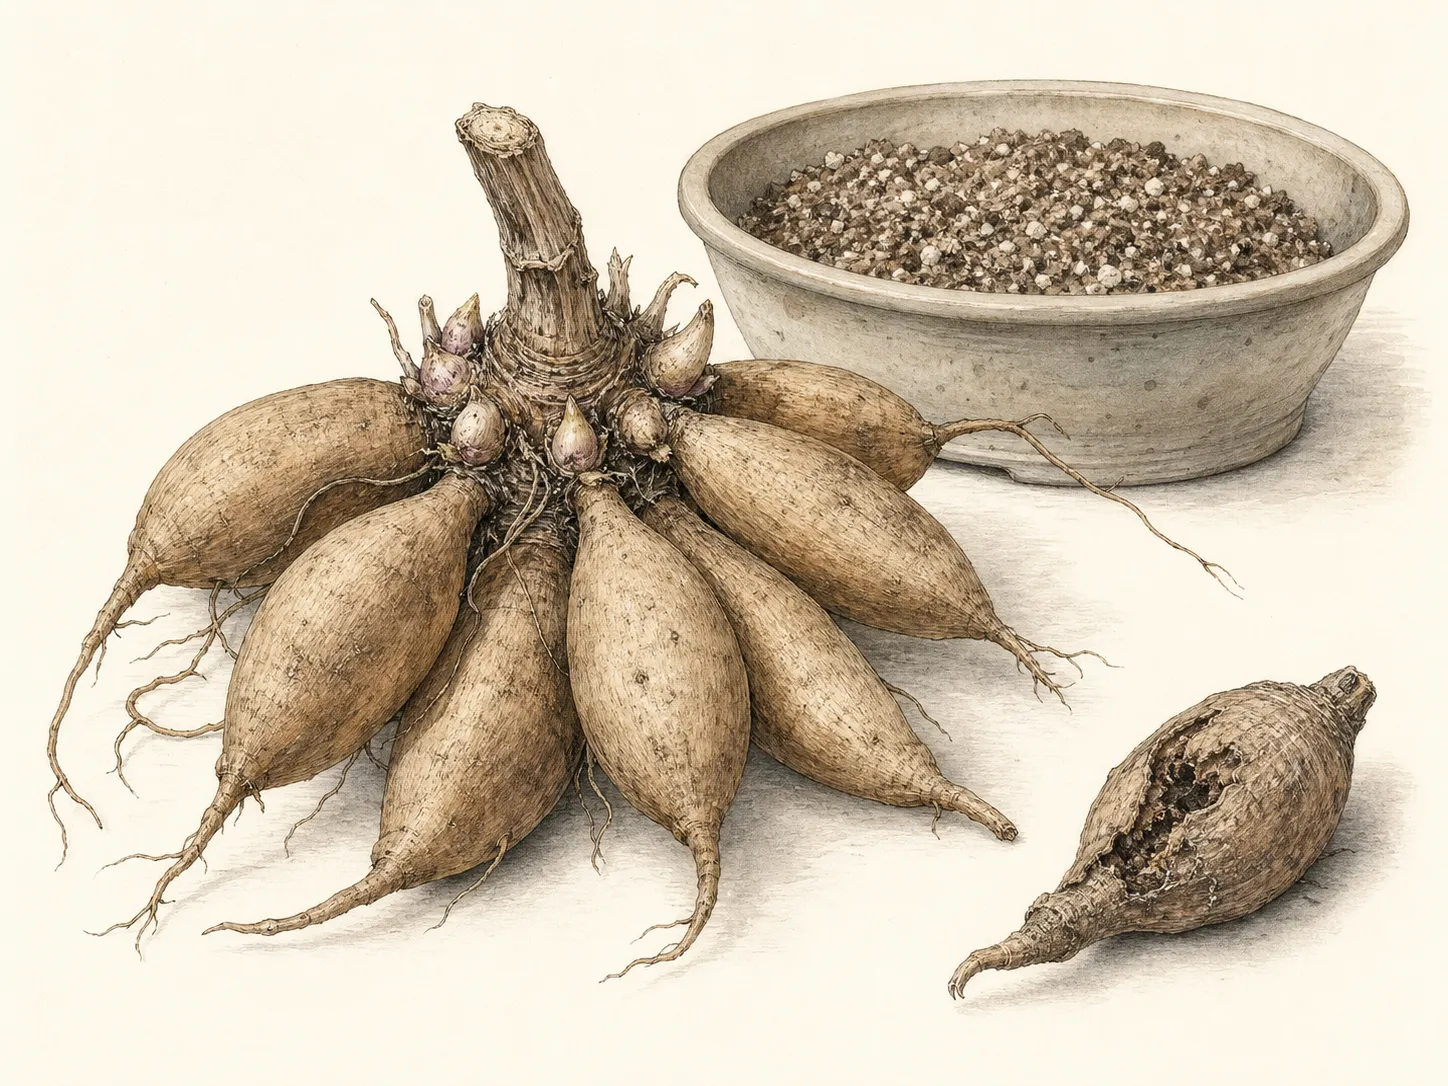
Divide only when every resulting piece has a visible eye, sound crown, and attached storage tuber. Use a clean sharp knife and make the fewest cuts needed. If eyes are not yet visible, hold the clump frost-free under the source's recommended conditions until buds declare themselves until visible buds guide every division.
Eyes often become easier to see as spring approaches. Oregon State moves stored clumps into a somewhat warmer 40–50°F location to encourage visible sprouts before division. Keep that waking stage separate from hot active growth: the purpose is to reveal viable buds while the clump remains manageable, allowing cuts to follow real crown anatomy and real crown anatomy.
Choose a pot that drains
Use a pot with open drainage holes and enough depth for the tuber cluster without bending necks. Oregon State recommends a one-gallon container for an early indoor start; RHS uses pots of multipurpose compost. A narrow shallow pot forces the crown against the rim and becomes unstable once shoots gain height.
Fill with fresh, free-draining container medium; garden soil compacts in pots. New or appropriately sanitized potting mix reduces compaction and avoids carrying last year's disease into warm indoor conditions. Moisten very dry mix before planting, then let it drain. A saucer can protect the surface below but must not keep the dormant crown standing in water.
Label cultivar, division date, eye count, and expected height. Dahlia tuber size does not predict flower size, and dormant clumps are difficult to distinguish. A durable label prevents tall cultivars from being planted without support and keeps questionable stock from being mixed with healthy plants before leaf symptoms can be compared.
One useful division per pot keeps roots, moisture, and health readable. Crowding several crowns in a small container produces a tangle that must be torn apart at transplanting. When indoor space is scarce, start fewer priority cultivars with adequate light. Dormant sound tubers can follow the direct outdoor schedule.
A one-gallon starter is not the final container for every dahlia. Dwarf cultivars may finish in a large display pot, while standard border dahlias need garden soil and support. Keep enough headspace to water without uncovering the crown and enough weight to resist a top-heavy shoot. Repot only when roots fill the starter and outdoor planting is still genuinely delayed.
Set the crown near the surface
Lay the tuber cluster with the old stem and crown uppermost. Spread long tubers horizontally or at a natural angle without snapping their necks. RHS guidance positions the old stem just below the compost surface because shoots emerge from the crown. Keep the crown near the surface and cover the storage tubers with airy mix.
Cover lightly so the crown is near the surface and the tubers are surrounded by mix. The exact amount depends on pot shape and source guidance, but the orientation does not: eye and crown up, storage tubers supported below. Leave an already emerged shoot exposed. Press mix gently enough for contact without compacting the air spaces needed by dormant tissue.
Install a label and, for a tall cultivar, a temporary support position without driving through the tuber cluster. A cane can sit at the pot edge while the tubers remain visible. When the plant moves outside, place the permanent stake beside the planting hole before the root ball is set, preserving the exact location of crown and tubers.
Water lightly once only if the mix needs settling, then drain completely. A planted dormant tuber has little leaf area and therefore little water use. Note the pot's weight and moisture below the surface. A dark wet crust is not proof that the root zone is healthy, and a dry top centimeter is not an automatic reason to soak the whole pot.
Keep the old hollow stem dry where possible. Water directed repeatedly into an open stem can carry moisture toward the crown, especially when the pot is cool. Apply water to the medium around the tubers, not into the stem remnant. If the crown settles below the surface after watering, reset the level before continued moisture hides the original planting error.
Hold moisture until growth asks for it
Keep the medium only slightly moist until shoots and roots become active. RHS warns that overwatering dormant tubers quickly causes rot. Let moisture beside the crown set the watering interval. If the pot remains heavy, wait; if active shoots wilt and the rooted mix is drying, water thoroughly and let excess escape.
Keep a slow viable eye frost-free, bright, and only slightly moist. Confirm that the crown was viable, the pot is frost-free, and the source's emergence window has passed. Lift only for a specific concern such as softening or odor. Repeated excavation breaks new roots and necks. A firm slow crown can be given time; a mushy spreading lesion needs isolation.
As the first leaves expand, increase water to match active use. Oregon State begins regular watering after the first two leaves and feeds established indoor growth on a schedule in its regional program. Follow the retained product label and local guidance. Fertilizer cannot repair rot, replace a missing eye, or thicken shoots stretched by poor light.
A delayed but firm crown and a rotting crown need opposite responses. Keep moisture restrained while a viable eye is slow; isolate and inspect when softness, odor, or a spreading dark margin appears. Water each dormant pot from its own moisture and activity. Cultivars and storage histories differ, and comparison becomes useful only after crown viability and growing conditions are checked.
Move from warmth to light as shoots emerge
Move the pot into strong even light as soon as shoots emerge. Warmth without light creates pale, weak growth that later scorches or breaks outdoors. Space pots before leaves overlap, rotate only enough to prevent a hard lean, and keep foliage clear of hot glass or lamps. Compact internodes and normal leaf color show that light and temperature are in balance.
If shoots grow faster than roots can fill the pot, reduce warmth or improve light; repeated pinching cannot stabilize weak growth. RHS pinching guidance applies later when a main stem is about 40 cm, or 16 inches, tall and a bushier flowering plant is desired. Apply the planned training cut only to a healthy well-lit shoot at the documented stage.
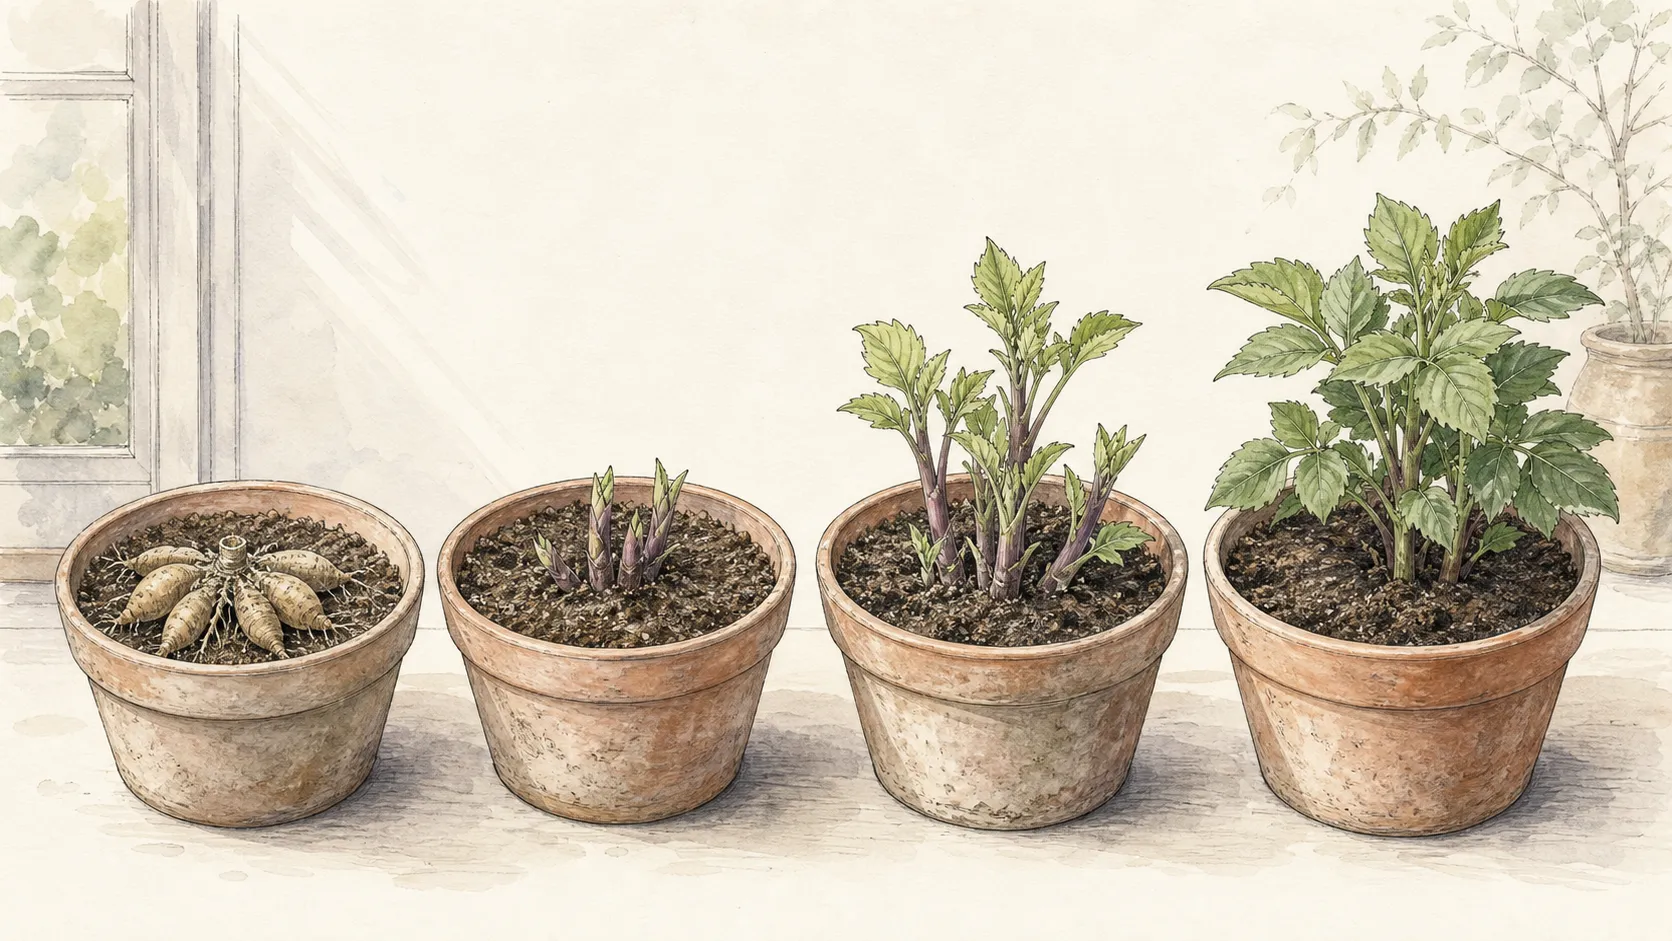
Inspect successive leaves for mottling, rings, distortion, or unusual stunting. Dahlias can carry mosaic and tomato spotted wilt viruses, and warm indoor grouping makes comparison easy. Isolate persistent symptoms and seek diagnosis before taking cuttings or sharing tubers. A single cold mark or mechanical tear should not trigger disposal without a consistent pattern.
Pinching is optional training, not part of emergence. Once a healthy main stem reaches the documented height, RHS guidance pinches just above a leaf pair to promote branching. Make that choice for a bushier border plant or flower program. Leave a weak, recently emerged, or disease-suspect shoot intact until its health and root system are understood.
Harden plants for the garden
Begin hardening only when the regional frost risk is declining. Start with short periods in sheltered shade, protected from strong wind and direct midday sun. Indoor leaves formed under stable conditions and can bleach, tear, or wilt if moved straight outdoors. Extend exposure over several days while returning pots to protection during cold nights.
Watch moisture throughout hardening. Wind can dry a rooted leafy pot faster than it dried indoors, while cool cloudy weather reduces demand. Water from the actual root-zone condition and drain the container. Blackened tissue after a cold night indicates the transition began too early; move the plant back to protection and wait for safe conditions.
Transplant after frost danger when soil is warm enough for active growth. Oregon State uses about 60°F as a regional benchmark. Set the rooted plant at the pot-grown level, maintain spacing suited to the cultivar, and install the permanent stake before placing the root ball. Water in and mulch around, not against, the stems.
Prepare the final soil before carrying plants outside. Dahlias need fertility and moisture but also free drainage; a wet heavy pocket can rot the crown that survived indoor care. Use a soil test for amendments, preserve a broad root zone, and keep the crown at the surface level established in the pot. A deep transplant does not make a leggy plant sturdier.
Use the start as a health check
Use the indoor start as a storage-health audit. Record which clumps had visible eyes, which divisions rooted, and which developed rot or suspect foliage. A failure shared by stock from one storage box points backward to winter moisture or temperature; a failure confined to one wet pot points toward the spring medium or watering.
Keep cultivar identity attached through bloom. Compare final height, flowering date, stem strength, and health with the start date. If an early plant became root-bound or needed repeated rescue, begin later next year or plant directly outside. If it flowered meaningfully earlier and transplanted without check, the indoor lead time was useful.
Clean tools and pots before they return to healthy stock. Discard confirmed virus-infected plants according to local guidance and route their tubers through local disposal guidance. At season's end, store only healthy undamaged clumps. The next indoor start begins with the quality of the material lifted in autumn, not with how much water is added in spring.
Connect spring notes to the storage container. Record whether a shriveled clump came from dry packing, whether rot followed condensation, and whether a broken neck occurred during lifting. Correct the winter cause before blaming spring potting. A labelled sequence from autumn lift to summer bloom reveals which cultivars tolerate the current storage and which need a different medium, temperature, or handling method.
Steps
- Level
- moderate
- Time
- 20 minutes per clump plus growing time
- Tools
- clean knife or pruners, pots with drainage, labels
- Materials
- peat-free potting medium, clean water
- 1Inspect the clump
Choose indoor starting only when a bright frost-free space and a realistic hardening date are available. Work backward from safe outdoor soil and reserve final spacing and support for the named cultivar before waking the tuber.
- 2Choose the container
Find visible eyes on the crown around the old stem. Retain firm tubers with sound necks, remove only advancing soft rot, and divide with a clean knife so every piece keeps an eye, crown tissue, and an attached storage tuber.
- 3Orient and cover
Use a draining pot, commonly about one gallon, and fresh open potting mix. Lay the cluster with crown and old stem uppermost, support long tubers without bending their necks, and cover so the crown sits just below the surface.
- 4Start barely moist
Settle only dry mix with a light watering, then keep the dormant pot slightly moist and frost-free. Recheck pot weight and moisture below the surface; keep a firm inactive crown lightly moist and unfed.
- 5Give emerging shoots light
Give shoots strong even light immediately. Increase water as roots and the first leaves develop, isolate persistent mottling or distortion, and keep labels attached. Use planned pinching only at the documented growth stage, not as a substitute for adequate light.
- 6Harden gradually
Harden the rooted plant over several days after frost risk declines, then transplant into warm soil at its pot-grown level. Install the permanent stake before setting the root ball, water it in, and preserve cultivar spacing and the crown location.
Related reading
Sources
- How to grow dahlias. Royal Horticultural Society. Source record · Accessed 2026-08-30.
- How to grow bulbs. Royal Horticultural Society. Source record · Accessed 2026-08-30.
- When should I start dahlias indoors?. Iowa State University Extension and Outreach. Source record · Accessed 2026-08-30.
- Dahlias in Oregon: Planting for a Parade of Late-season Blooms. Oregon State University Extension Service. Source record · Accessed 2026-08-30.