Grow · fall cover crops
Sow a Fall Cover Crop That Fits the Spring Garden
Choose a fall cover crop by its winter behavior, spring exit, local sowing window, and place in the vegetable rotation, then establish an even stand with shallow soil preparation.
Published Last updated
In this guide
- Choose the spring crop before the fall cover
- Choose the spring exit before buying the autumn seed
- Decide whether winter should end the crop
- Match species to timing, climate, and rotation
- Build seed contact, not a newly tilled bed
- Sow evenly and make the first week count
- Read the stand before winter
- Make the spring exit before the vegetable arrives
- Keep the first trial small enough to learn
- Steps
Choose the spring crop before the fall cover
A fall cover crop is not simply a packet scattered over an empty bed. It is a temporary crop placed between two food crops, and its best species is the one that protects the soil while preserving the next planting. Begin by naming what will occupy the bed in spring, when that crop normally goes in, and whether it will be direct-sown or transplanted. Those three facts determine how much living cover or surface residue the bed can carry when spring arrives.
An early row of carrots, peas, or salad greens needs a seedbed sooner than a late tomato or pepper transplant. A cover that dies during a reliably cold winter can suit the early row because the remaining mat can be moved aside or allowed to decompose. A winter-hardy grain can protect the bed longer and make more spring growth, but it also stays alive until the gardener ends it. That later exit is practical only when the next crop and calendar leave room for it.
Write a spring exit beside every bed before choosing seed. The entry can be as simple as “oats, expected winter-kill, rake a narrow row in March” or “winter rye, cut and smother before May transplants.” If no realistic exit fits the tools, labor, and planting date, choose a less persistent cover or protect the soil with an appropriate nonliving mulch instead. Leaving the decision until spring turns a useful crop into an avoidable conflict.
Frame the first trial as a bed-scale decision with a limited soil-improvement role. Cover crops can protect soil, take up nutrients, suppress some weeds through competition, and return organic material as they decompose, but one short planting does not repair every structural or fertility problem. The immediate success test is narrower: the soil stays covered, the stand remains manageable, and the following vegetable enters on time.
Choose the spring exit before buying the autumn seed
Start with the next food crop and its planting date, then choose a locally suitable cover whose winter behavior and termination method fit that deadline. Confirm the regional sowing window and actual open area. In spring, distinguish dead residue from active regrowth before preparing the next crop; a cover without a workable exit can become the new planting constraint.
Decide whether winter should end the crop
Winter-killed covers exchange maximum cold-season persistence for an easier spring. Spring oats are a common starting point in cold-winter regions because they grow quickly in fall but are not winter-hardy. Field peas can accompany them where local guidance supports the pairing. Minnesota Extension describes an early-fall oat-and-pea mix that grows through fall, dies over winter, and usually breaks down toward a workable spring seedbed. Maryland and New Hampshire guidance likewise present oats as a manageable choice for gardeners who need an early spring opening.
That outcome is climatic, not guaranteed by the crop name. A cover that winter-kills in Minnesota, Maryland, or New Hampshire may survive farther south or during an unusually mild winter. Even a dead stand leaves residue that may be wet, thick, or slow to break down. Before buying seed, confirm winter behavior with local Extension guidance and decide whether the spring crop can be planted through the residue, receive a cleared row, or needs the material moved away temporarily.
Winter cereal rye makes the opposite bargain. It is very hardy, can be established later than many slower cover crops, and resumes growth in spring. Those strengths make it valuable when a bed will remain empty until warm-season transplants, but they also make termination part of the original commitment. Cutting, mowing, smothering, or incorporating a living rye stand takes time, and a stand allowed to become tall and coarse becomes harder to manage at hand-garden scale.
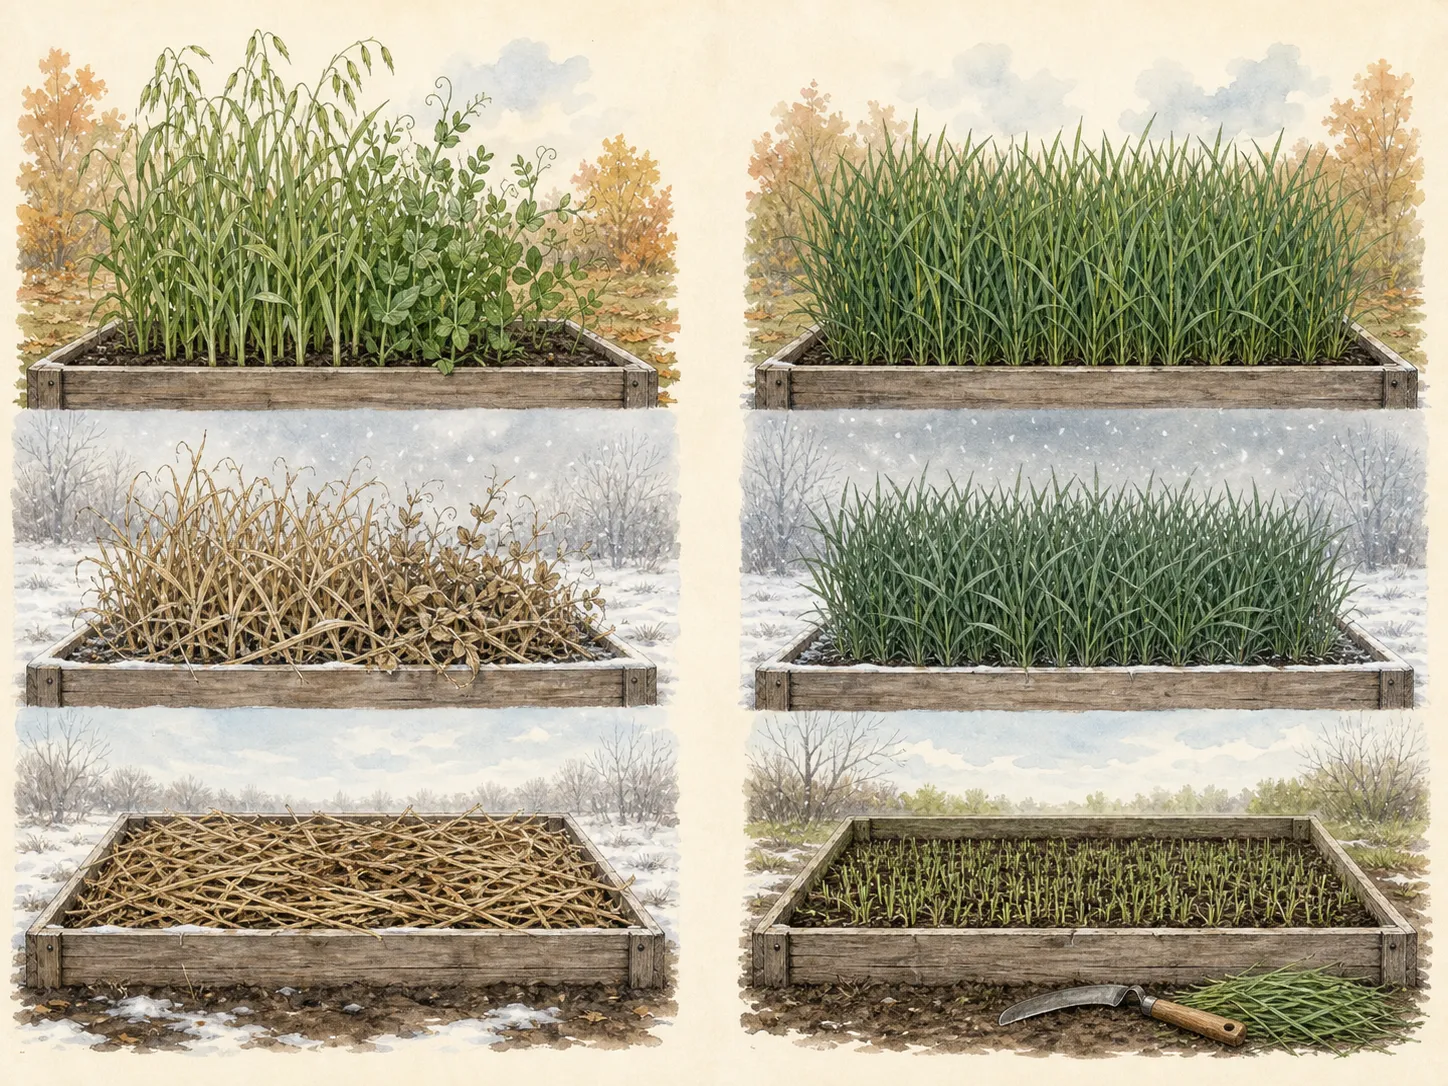
Choose winter rye only after matching an exit method to the bed. In a no-till bed, a gardener might cut it low and use an opaque tarp long enough to stop regrowth; another might incorporate young growth according to local guidance. Either plan needs a margin before vegetable planting. Maryland advises allowing about two weeks for many terminated covers to break down, while the exact interval and method depend on the cover, spring weather, residue, and following crop.
Match species to timing, climate, and rotation
Early September is a useful decision point in many temperate Northern Hemisphere gardens, not a universal planting date. The remaining establishment window changes with latitude, elevation, first-frost pattern, soil moisture, and species. Maryland places its general fall-cover window from mid-August into early October with adjustments for location and weather. New Hampshire notes that slower clovers and vetches need earlier starts than robust winter rye. Use a local calendar or seed supplier guidance to translate the principle to the bed in front of you.
Use the local establishment cutoff as the starting point, then compare it with the day summer crops finish. A species needs enough mild growing time to germinate, root, and cover useful ground before short days and cold slow it. A late, thin stand still consumes seed and spring management while delivering less cover. If the preferred mixture has missed its window, switch to a locally appropriate later-sown species; every component needs its own viable establishment period.
Check the plant family against the vegetable rotation. A forage radish may look attractive for its quick canopy and taproot, but it is a brassica. New Hampshire Extension specifically cautions against following brassica vegetables such as broccoli, cabbage, or cauliflower with a brassica cover because relatives can share pests and diseases. A grass such as oats or rye often creates a cleaner family break after broadleaf vegetables, though the whole garden history and local pest pressure still matter.
Mixtures are useful when their components share a workable sowing window and exit. A grass can provide fast fibrous cover while a compatible legume contributes a different growth habit and, with effective Rhizobium partnership, fixes atmospheric nitrogen for its own growth. A larger species count offers no automatic gain. Different seed sizes, establishment speeds, winter survival, and termination needs make a mix harder to sow and manage. A well-chosen single species remains a legitimate first cover crop.
Build seed contact, not a newly tilled bed
Open the soil surface where the cover will grow. Remove active weeds, pull back thick summer mulch, and take out crop residue that prevents seed from reaching soil. Diseased vegetable debris needs its own crop-specific cleanup decision and must stay separate from the new stand. Sound chopped residue can remain at the side or between unsown areas, but a broadcast cover crop cannot establish evenly when much of its seed lands on leaves, wood chips, or intact stems.
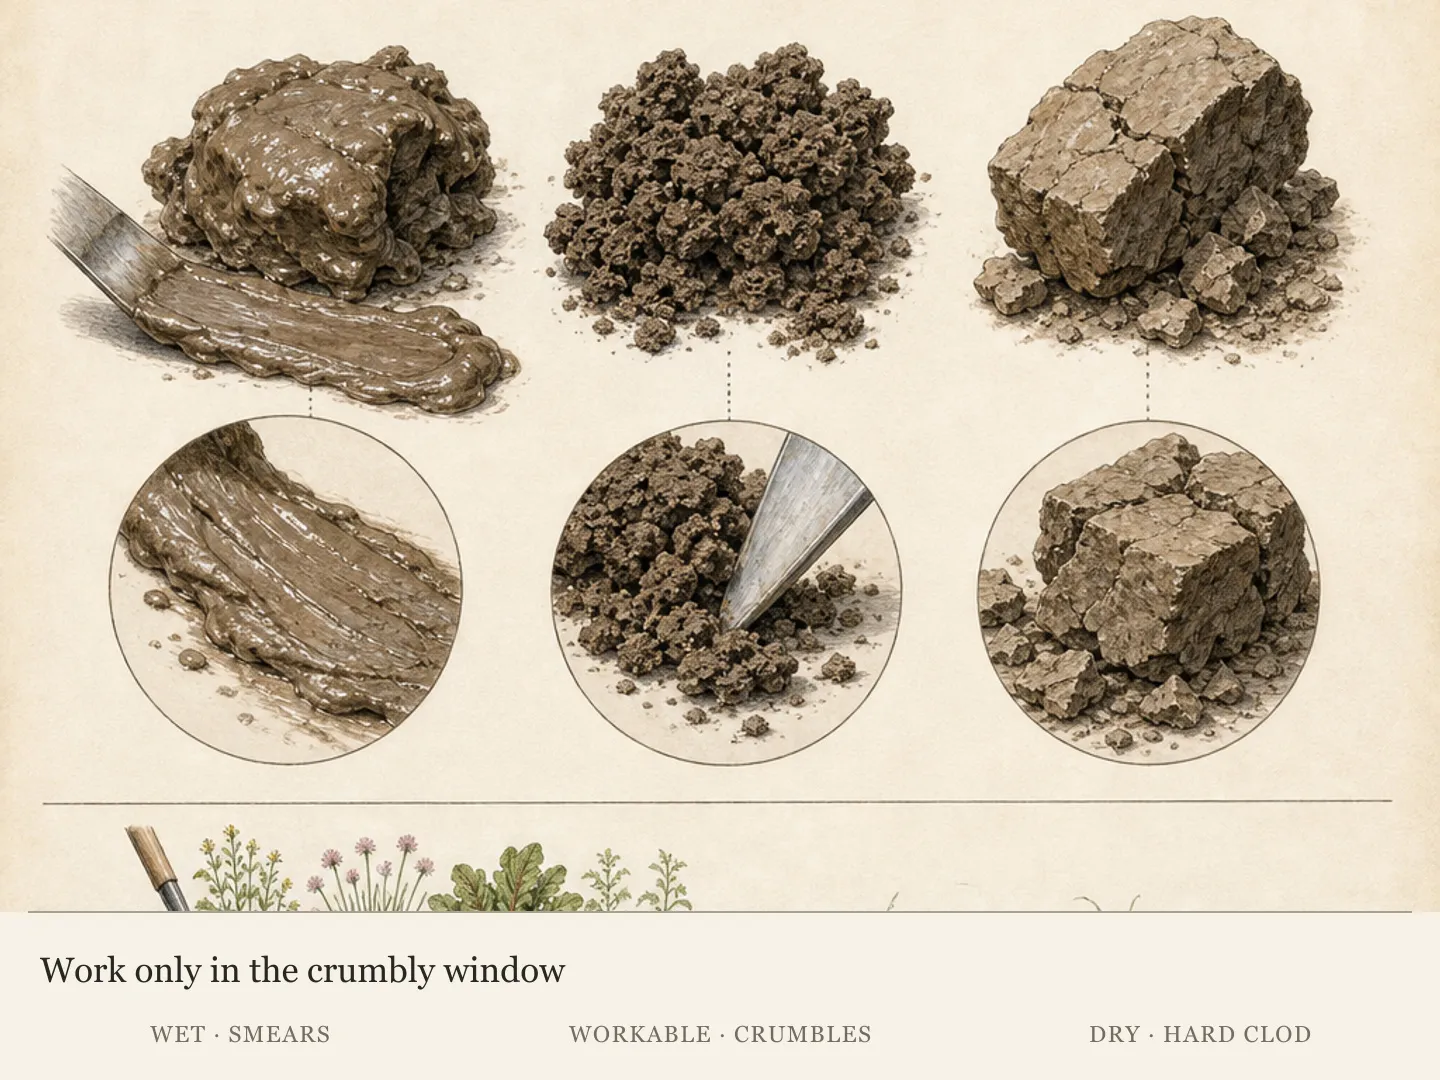
Light preparation is enough for a shallow-sown cover. Both Maryland and New Hampshire guidance describe loosening or scratching the surface, raking it smooth, and firming seed into contact. Deep tillage is unnecessary for this operation and can damage existing soil structure. Correct a hard crust or obvious compaction only enough to create a receptive surface; pulverizing the entire bed adds disturbance with no establishment benefit.
Measure the open area after summer crops and mulch are cleared. A four-by-eight-foot raised bed has a different seed requirement from a bed with half its space still occupied by peppers. Use the seed label or current local recommendation for the actual species and measured square footage. Treat an Extension rate from another climate as a reference only, and leave “a handful” out of the calculation. Too little seed leaves gaps; excessive seed produces weak competition within the cover itself.
For a mixture, choose a published mixture rate, which is lower than stacking the full monoculture rate of every component. Maryland's home-garden guidance uses about 60 percent of each single-species recommendation in a two-species mix, but that is a regional recipe, not a universal formula for every commercial blend. Premixed seed should follow its own label. When assembling a blend, verify compatible proportions and inoculation requirements with a local source before measuring.
Sow evenly and make the first week count
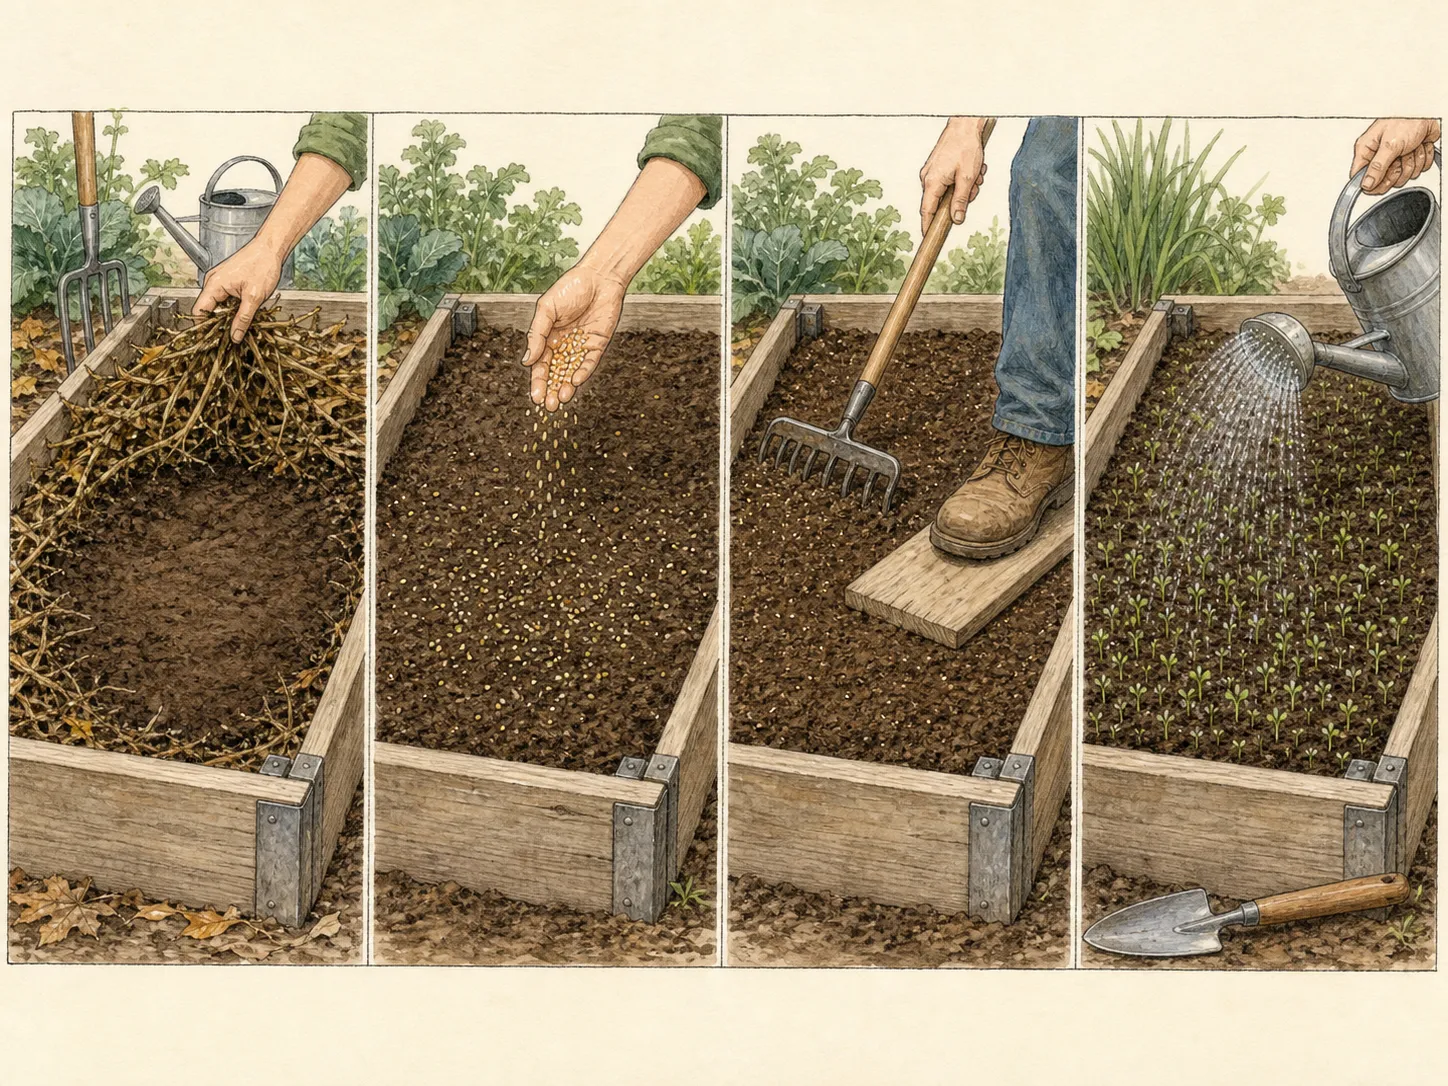
Divide the measured seed into two portions and broadcast from different directions across the prepared area. This simple cross-pattern exposes bare lanes before the seed is covered. Small or mixed seed can be combined with a dry carrier such as clean soil or finished compost when local guidance permits, making distribution easier to see and control. Keep the carrier dry enough to flow; its added volume leaves the measured seed rate unchanged.
Rake lightly so seed settles into the surface, then firm the bed with the back of a rake, a board, or careful foot pressure. The objective is seed-to-soil contact, not deep burial. Maryland Extension explicitly identifies direct soil contact as necessary for germination and recommends pressing after raking. Species and seed sizes differ, so use the packet's depth instruction when it is more specific than a general broadcast method.
Water with a fine rose or sow ahead of suitable rain when the forecast is dependable. Keep the seed zone evenly moist through germination while preventing washout and puddles. A raised bed can dry quickly in lingering late-summer warmth, while cool heavy soil may stay wet. Base each watering on the surface and shallow seed zone. Once roots establish, lengthen the interval according to weather and soil response.
Protect the sowing from ordinary disturbance while keeping it observable. Birds, pets, hard downpours, and irrigation runoff can move exposed seed. A very light, locally appropriate surface covering may help where recommended, but thick mulch defeats contact and emergence. Recheck after the first rain: seed piled in corners, bare streaks, and crusted patches should be corrected promptly while the stand can still become even.
Read the stand before winter
Judge establishment by distribution as well as color. A useful stand has roots and leaves across the intended soil surface, not one lush strip below an irrigation outlet and bare ground elsewhere. Map gaps to a cause before reseeding. Was seed trapped in mulch, washed downslope, eaten, placed too deep, or left dry? Correcting the mechanism matters more than scattering a second full rate over the entire bed.
Continue removing weeds while they are identifiable. A cover crop suppresses weeds through occupation and shade; it does not make existing perennials or large annuals disappear. Pulling competitors early preserves the measured cover-crop density and prevents their seed from joining the spring residue. Distinguish volunteer grain or vegetable seedlings from the intended cover before deciding that every nonuniform leaf is a problem.
Separate moisture observation from fertilizer decisions. The cover is a crop, but its nutrient plan should follow a soil test, species guidance, and local recommendations. Excess nitrogen can change growth and winter behavior, while an unsupported amendment adds cost and can move beyond the root zone. If the stand is pale or weak, first check sowing date, water, compaction, and seed contact before treating appearance as proof of a deficiency.
Before sustained cold, record what actually established and photograph or mark the bed. Note the species, sowing date, measured rate, emergence pattern, and planned spring crop. This is not administrative decoration: it prevents a tan winter-killed mat from being mistaken for weeds and reminds the spring gardener that a green rye bed is intentional but unfinished. The record also shows whether next year's window or preparation needs adjustment.
Make the spring exit before the vegetable arrives
Inspect the bed as soon as spring growth resumes. Determine whether the cover is dead, dormant, or actively regrowing. Winter-killed oats and peas can leave a loose mat that protects the surface; clear only the row or planting pocket the next crop needs, or handle the residue as local guidance and the vegetable's sowing method require. Thick wet material over a direct-seeded row can obstruct placement even when the cover itself is dead.
A living cover is still using light, water, and root space. End it early enough that the next crop does not begin in competition. For rye and other winter cereals, act before the stand becomes tall, stemmy, or headed. Cut it close, incorporate it if that method fits the bed, or combine cutting with complete opaque cover to stop regrowth. A casual trim that leaves an active crown is not termination; inspect beneath a tarp and around edges before calling the bed ready.
Keep cereal rye's effect on germination in the plan. New Hampshire Extension notes that rye's allelopathic compounds can suppress other plants as well as weeds. This is one reason a live rye stand and fresh residue require deliberate timing around a following direct-seeded crop. Use current local recommendations for the termination-to-planting interval and prepare a clear seed row because vegetable emergence through fresh rye residue varies.
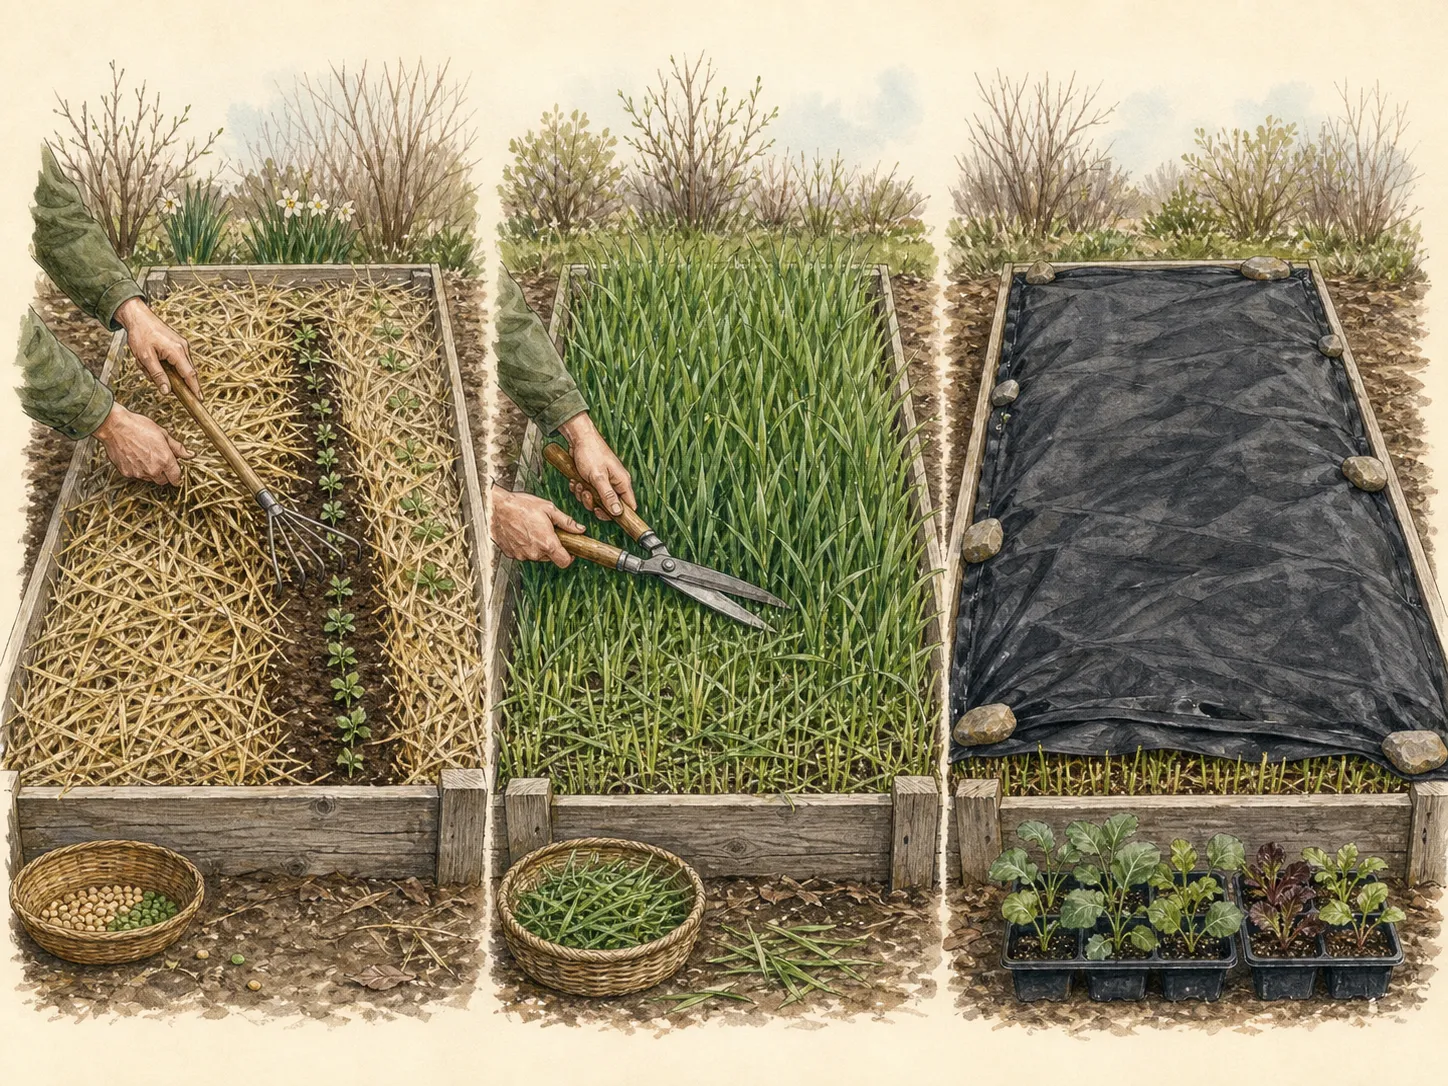
Leave a realistic decomposition margin. Maryland advises about two weeks after terminating many covers before planting, except that winter-killed oats and often daikon residue may allow a different spring approach. Weather, biomass, method, and crop alter the result, so use two weeks as a checkpoint rather than a guarantee. The cover should be dead, regrowth controlled, and the intended seed or transplant zone physically accessible before the vegetable enters.
Use the residue according to its condition and the next crop. It can remain as a surface mulch around transplants, be raked aside for direct seeding, be incorporated where tillage is part of the system, or go to a compost pile if the volume overwhelms the small bed. Keep useful material on site where practical, then relocate enough to give the vegetable the contact, depth, and moisture management it requires.
Keep the first trial small enough to learn
A single raised bed or one section of an in-ground garden is enough for a first comparison. Split the area only when the two treatments can remain clear—for example, winter-killed oats in a bed intended for early greens and winter rye in a bed reserved for May transplants. Start with one or two species in a bounded area while learning how local winter, spring moisture, and hand tools affect the exit.
Evaluate the trial at three points: establishment before cold, soil cover through winter, and readiness for the next crop. A dense autumn stand that delays spring planting is not an unqualified success. Neither is an easy spring bed that remained mostly bare because seed was sown too late. The cover has to work across the whole interval between crops, which is why the spring calendar belongs in the first decision.
Record labor as well as plant growth. Note how long preparation, watering, and termination took; whether the tools reached bed edges; and whether residue fit the next sowing method. These observations guide the next species choice more honestly than biomass alone. A slightly less vigorous cover that one gardener can end promptly may protect a small garden better than a high-biomass stand that survives beyond the available management window.
Change one important variable next season: move the sowing date earlier, adjust the measured rate, select a winter-killed species, or change the spring exit. Holding the others steady makes the result legible. Cover cropping improves with local repetition. The objective is not to collect the longest species list; it is to build a dependable interval in which soil remains occupied and the next vegetable still begins under conditions chosen for it.
Steps
- Level
- moderate
- Time
- About 45–90 minutes to plan and sow one small bed, plus spring termination if the cover survives winter
- Tools
- Rake or hoe, Measuring tape, Kitchen scale or seed measure, Fine-rose watering can or hose wand, Spring cutting or smothering equipment if the cover overwinters
- Materials
- Locally suitable cover-crop seed, Species-compatible legume inoculant when recommended, Opaque tarp and weights only when smothering is the planned spring exit
- 1Assign the next crop and spring date
Write the next vegetable beside each open bed, including its expected planting window and whether it will be direct-sown or transplanted. Decide how much residue that crop can tolerate and how early the bed must become accessible. Mark beds for early seed rows separately from beds reserved for late warm-season transplants. Select a cover only after every trial bed has a plausible spring handoff.
- 2Choose winter behavior and an exit
Use current local Extension guidance to decide whether the cover is likely to winter-kill or survive. Choose oats or a locally supported oat-and-pea mix when an easier early-spring opening is the priority and winter-kill is reliable. Choose winter rye only when later sowing or longer protection justifies a deliberate spring termination. Name the cutting, incorporation, or smothering method and reserve its time now.
- 3Check the local window and rotation
Confirm the species-specific sowing deadline for the location, forecast, and remaining frost-free growth. Switch species if a slow component has missed its establishment window. Compare the cover's plant family with recent and planned vegetables; skip a brassica cover as a routine follow-on to brassica crops where shared pests and diseases are a concern. Keep the first mixture simple enough to sow and terminate as one system.
- 4Measure and prepare the actual opening
Remove active weeds, pull back thick mulch, and clear residue that blocks soil contact. Measure only the area available for sowing. Scratch or loosen the surface lightly and rake it level with shallow surface work. Weigh seed from the packet or current local rate for that area; use a verified mixture rate in place of stacked single-species rates.
- 5Broadcast, rake, firm, and water
Calibrate the hand pattern with two crossing passes over the measured bed, using half the seed in each pass. Finish when no concentrated drifts or empty lanes remain. Follow the packet's covering depth, press the finished surface, and apply a gentle initial watering. During emergence, preserve moisture and repair only the spots disturbed by runoff, crusting, or birds.
- 6Audit the stand before sustained cold
Check whether foliage and roots cover the intended area evenly. Diagnose gaps before spot-reseeding, remove competing weeds, and defer fertilizer until evidence supports it. Record the species, sowing date, rate, establishment pattern, expected winter behavior, and spring exit. Leave a visible marker so dormant or winter-killed residue is not mistaken for an abandoned bed.
- 7Terminate before the next crop competes
Inspect in early spring to distinguish dead residue from active regrowth. Open direct-seeded rows through winter-killed material as needed. Cut, incorporate, or fully smother surviving cover before it becomes coarse, and verify that regrowth has stopped. Follow local guidance for the decomposition interval—often about two weeks for a terminated living cover—then plant only when the intended seed row or transplant pocket is accessible and competition has ended.
Related reading
Sources
- Cover Crops For Gardens. University of Maryland Extension. Source record · Accessed 2026-08-18.
- Preparing Your Vegetable Garden for Fall. University of Minnesota Extension. Source record · Accessed 2026-08-18.
- Cover Cropping for the Home Garden. University of New Hampshire Extension. Source record · Accessed 2026-08-18.