Grow · map sunlight before leafout
Map Garden Sunlight Before Deciduous Trees Leaf Out
Record hourly spring shadows and projected summer canopy shade before assigning ornamental plants to misleadingly bright early-season beds.
Published Last updated
In this guide
- Use the biological cue for pre-leafout sunlight in an ornamental garden
- Read the site and the whole plant together
- Set a visible finish line before beginning
- Prepare the work while every part is still identifiable
- Carry out the central operation in a controlled sequence
- Protect roots, crowns, and new growth after the work
- Diagnose a weak response before adding another treatment
- Leave a record for the next seasonal decision
- Steps
Use the biological cue for pre-leafout sunlight in an ornamental garden
Use a clear pre-leafout day to record where direct sun actually reaches the garden, then repeat the survey after the deciduous canopy expands. Bare branches reveal spring opportunities around bulbs and early perennials, but they cannot represent a leafy summer crown. The two dated layers answer different planting questions and must remain separate on the plan.
Track duration across the day. University of Georgia Extension asks gardeners to establish north, follow the sun's movement, and note how many hours each area receives. A bright patch in one photograph may last only minutes. Several observations from the same position reveal its arrival and departure, distinguishing sustained direct light from open sky brightness or reflected light.
Season changes both the solar path and the obstructions between the sky and a bed. UGA notes that low winter sun can make even a small structure cast a long shadow; deciduous leaves add another warm-season screen. Mark the current canopy state on every observation. Treat the bare-tree record as measured spring evidence and the leafy record as the stronger guide for summer ornamentals. Evergreen crowns and buildings deserve their own outlines because they intercept light during both surveys. A neighboring deciduous canopy may also cast shade from beyond the property line, so include every visible obstruction that reaches the target bed.
Read the site and the whole plant together
Begin with a scaled base map that locates the house, boundary, walls, fences, sheds, paths, and bed edges. RHS recommends measuring fixed objects such as trees from two known points so they land accurately on the plan. Add trunk positions, present canopy outlines, and the north arrow. These features determine where a timed shadow begins and what casts it. Use the same two permanent reference points for every tree and viewpoint. Curved boundaries can be plotted with regular right-angle offsets from a measured line, following the RHS plan method. Accurate fixed geometry keeps a later shadow change from being confused with a redrawn bed edge.
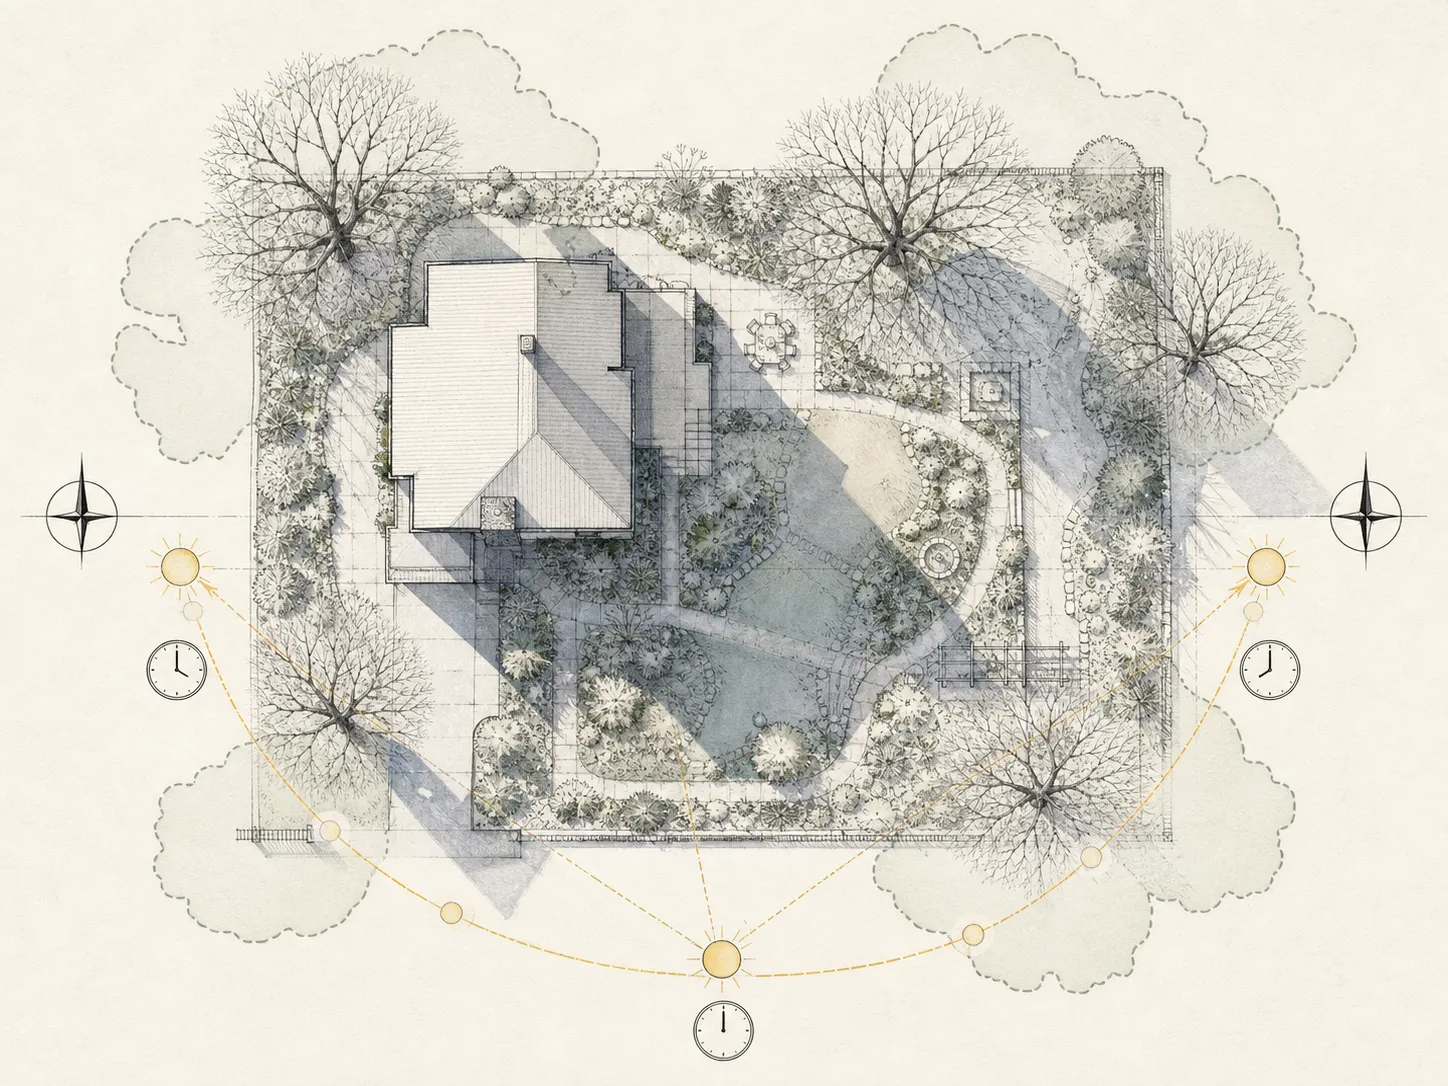
Inventory the existing plants as part of the light survey. Colorado State places established trees and shrubs on the design sketch and asks the gardener to consider mature size. UGA likewise treats large trees as valuable site assets that provide shade and protection. Record their species when known, current crown spread, evergreen or deciduous habit, and any young canopy likely to expand.
Choose observation points from which the whole target bed is visible, and mark each point on the base plan. Include the view from the house or primary path when a building edge cuts across the planting. A stable numbered viewpoint lets photographs align through the day and between seasons. It also keeps the surveyor on firm routes outside emerging crowns and wet soil.
Set a visible finish line before beginning
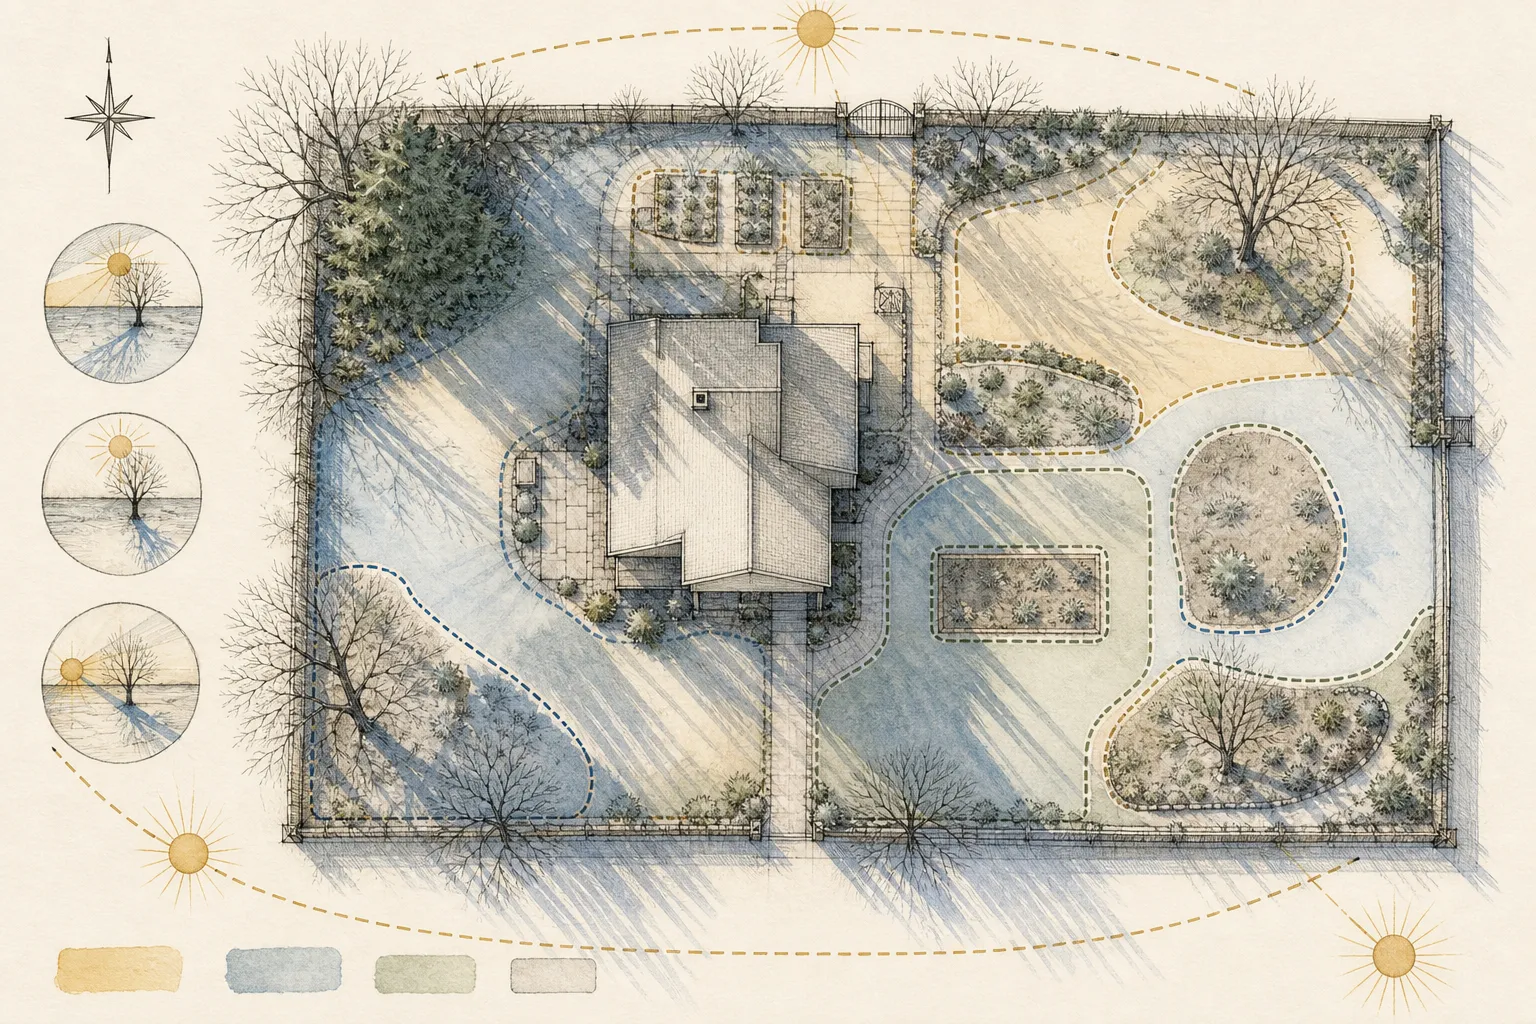
A finished survey gives each bed a dated sunlight duration, the season and canopy state, the observation hours completed, and a confidence note. Use separate linework for direct sun, bright open shade, and the solid shadow of a building or evergreen. A bed with a missing afternoon interval remains provisional even when its morning record is precise.
UGA's Georgia guide uses six to eight hours of direct sun for full-sun plants, four to six hours for partial-sun or partial-shade plants, and fewer than four hours for shade plants. Apply those values as a documented working vocabulary, then check the actual plant's label and regional guidance. Count direct rays in those totals, not general daylight under an open sky. Morning and afternoon exposure can produce different heat and moisture conditions within the same duration. Add a qualifier such as morning sun or late western sun when it will affect plant placement and watering.
Plan for two classifications where the canopy changes sharply: pre-leafout spring and leaf-on summer. Early bulbs may complete much of their cycle in the brighter spring layer, while a shrub or long-season perennial experiences the later canopy. Mark a boundary as uncertain when the available record cannot resolve it. Containers and small movable plants can occupy that area until the second survey is complete.
Prepare the work while every part is still identifiable
Prepare several copies or transparent layers from the same base map, as UGA recommends for different site observations. Colorado State offers a home-garden scale of one inch to four feet. RHS gives 1:50 and 1:100 as common choices for average gardens. Select the scale that keeps bed boundaries and tree trunks legible, then retain it for the leafy-season copy.
Create a simple header on every sheet: date, latitude or locality, canopy state, weather, start time, end time, and viewpoint number. Assign distinct marks to direct sun, open shade, and obstruction shadow. Prepare one color or hatch for each observation time. This prevents several moving shadow edges from merging into an unreadable dark area.
Schedule observations across the part of the day relevant to the garden, including early morning, midday, and late afternoon where access permits. Use a clock for time and a compass for north. Photograph the base view at each visit and trace the shadow boundary immediately. Hourly visits provide a practical first series; add a shorter interval near the moment a major shadow crosses the bed. Write the actual times used, since equal spacing cannot be reconstructed from unlabeled photographs. A clear-day sequence records the trees and structures that actually bound this site.
Carry out the central operation in a controlled sequence
At the first scheduled time, stand at the numbered viewpoint and frame the fixed reference objects. Mark the direct-sun boundary on a fresh layer, write the clock time beside it, and shade the area receiving unobstructed rays. Use a second symbol for luminous open shade. Reflected brightness from pale walls belongs in the notes because it is not direct exposure.
Repeat the same observation through the day. Keep each boundary tied to its own time so moving branch patterns remain visible. When direct light enters or leaves a bed between visits, record the interval as a range. The total is then an estimate bounded by actual sightings, not a false minute-by-minute precision.
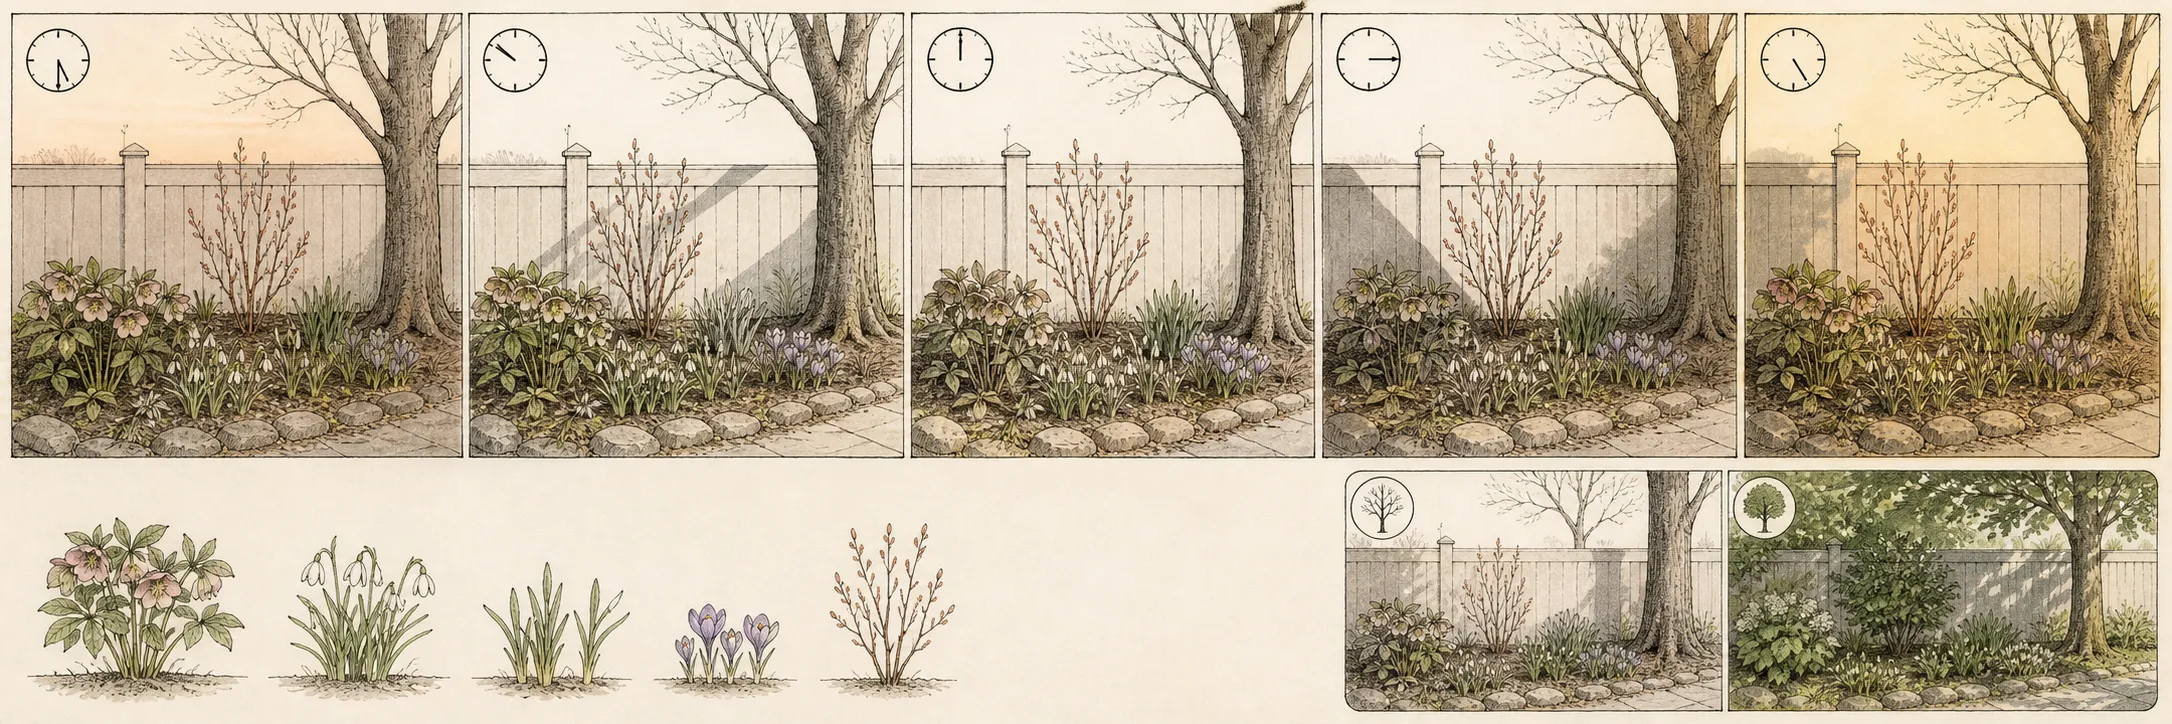
Trace the present outlines of bare deciduous crowns on a separate overlay and mark evergreen or building shadows as persistent obstructions. Projected summer canopy can guide questions, but label it as projection until leaves are present. The later field survey will replace that outline with measured leaf-on shade from the same fixed points.
Close the day's work by totaling direct-sun intervals for each bed segment. Keep morning-only, midday, and late-afternoon exposures distinct even when they add to the same number of hours. When hourly checks bracket a transition, report the duration as a range bounded by those visits. A second clear day can narrow the range if a plant decision sits near a classification boundary. Attach the dated photographs to the matching sheet. Any visit disrupted by cloud receives a missing-data mark and a replacement time on the next clear day.
Protect roots, crowns, and new growth after the work
Repeat the timed route after the principal deciduous trees have expanded their leaves. Use copies of the same base map, identical viewpoint numbers, and a day with comparable cloud conditions. The difference between layers then reflects canopy and seasonal solar change more clearly. Record partial leaf expansion if the tree is still developing its full crown.
Recalculate the duration bands from measured leaf-on observations and revise the confidence note for each bed. A spring full-sun area may become partial shade or shade in summer. Preserve both labels where they explain early geophytes and woodland ephemerals. Compare the actual crown edge with the projection drawn in spring and correct its geometry on the permanent tree layer. That comparison improves future estimates for nearby beds. Long-season shrubs and perennials should be matched primarily to the exposure they receive during active leafy growth.
Use plant performance as a check on the map, not as a substitute for it. Colorado State recommends grouping perennials by environmental and cultural needs, including light and water. Record flowering, stem extension, scorch, and moisture at the mapped location. A response that conflicts with the light layer triggers a broader site check before the exposure is reclassified.
Keep uncertain placements reversible during the first full season. Nursery pots set into decorative containers, movable troughs, and newly planted small perennials can be shifted early when the leaf-on record changes the classification. Reserve permanent woody planting for areas with complete observations and enough room for the mature canopy shown on the base plan.
Diagnose a weak response before adding another treatment
When a measured interval seems inconsistent with the photographs, check viewpoint alignment, clock labels, and the north arrow first. A shifted camera can move a building edge across the bed on paper. An unlabeled daylight-saving change can also offset visits between seasons. Re-anchor the frame to two fixed objects and repeat the disputed time on a clear day.
Cloud, haze, and reflected light create softer errors. Mark a cloud-obscured period as missing and reschedule it. Treat bright reflected sky as open shade unless direct rays reach the bed. Near pale masonry, note additional heat separately from sun duration. These distinctions keep a luminous wall-side planting from being misclassified by appearance alone.
A plant can struggle inside an accurately mapped light band. Dry tree-root competition, compacted soil, poor drainage, wind, and cultivar limits remain separate variables. Colorado State pairs plant selection with light and water requirements, while UGA's site analysis treats water movement and microclimate alongside light. Check soil moisture and rooting conditions before changing the sunlight label.
Update the survey after a tree is removed, heavily pruned, damaged, or enlarged enough to shift a major shadow. Also update it when a new fence, shed, or neighboring structure changes the sky view. Preserve the older dated layer in the archive. It explains past plant performance and shows which site event altered the exposure.
Leave a record for the next seasonal decision
Archive the base map, raw timed layers, summarized duration plan, and matching photographs under one survey date. Include locality, weather, canopy condition, viewpoint key, and the classification thresholds used. Raw boundaries matter because a later gardener may need to recalculate a bed after changing the plant palette or observation interval.
Create a small table for each bed segment with first direct light, last direct light, interrupted shade periods, estimated total, and confidence. Give spring and leaf-on observations separate rows. A range such as four to five hours is more honest when visits were hourly. The confidence field identifies which area needs another clear-day check.
Link every planting decision to a measured layer. Record that spring bulbs use the pre-leafout window, that a summer perennial was selected for the leaf-on band, or that a woody planting awaits another observation. This note keeps seasonal evidence attached to the choice and prevents one annual label from erasing a useful spring niche.
Set the next survey trigger before filing the plan: full leaf expansion, a near-solstice clear day, major tree work, or construction that changes shade. Reuse the numbered viewpoints and base scale. A sequence of comparable maps becomes a record of canopy development and gives future plant moves a specific environmental explanation.
Steps
- Level
- moderate
- Time
- One focused session, followed by scheduled checks
- Tools
- Scaled base plan, Pencil and colored wash or markers, Compass, Camera or phone clock
- Materials
- Tracing paper or transparent digital layers, Weather notes
- 1Build the seasonal base map
Measure the house, boundaries, beds, paths, fixed structures, and tree trunks at a readable scale. Plot fixed trees from two known points, add present crown outlines, and mark north. Number ground-level viewpoints that show each target bed. Print or trace separate copies for the pre-leafout and leaf-on surveys so both seasons share identical geometry.
- 2Schedule a clear-day sequence
Choose a clear day while deciduous branches remain bare and list observation times from morning through late afternoon. Put date, locality, weather, canopy state, viewpoint, and clock time on every sheet and photograph. Assign distinct symbols to direct sun, open shade, and solid obstruction shade. Keep a replacement slot available for any interval interrupted by cloud.
- 3Trace each timed boundary
At every scheduled visit, stand at the numbered point, frame the same fixed objects, and photograph the bed. Trace the edge of direct light, label the time, and mark bright reflected areas separately. Record when sun first enters and finally leaves each segment. Preserve interrupted shade periods so the total reflects the actual sequence.
- 4Calculate a provisional spring band
Total the observed direct-light intervals for each bed segment and attach a confidence range. Under the UGA categories, six to eight hours supports a full-sun label, four to six indicates partial sun or shade, and fewer than four indicates shade. Mark the classification as spring pre-leafout and keep cloud gaps or unobserved hours visible.
- 5Repeat after canopy expansion
Return to the same viewpoints after the principal deciduous trees have leafed out. Repeat the timed clear-day route on matching map copies and note the stage of each canopy. Recalculate the exposure bands from field observations. Retain both seasonal layers, using the leafy record for long-season shrubs and perennials and the spring record for early geophytes.
- 6Attach decisions and updates
File raw boundaries, photographs, duration tables, confidence notes, and the summarized plan together. Link every plant placement to its relevant seasonal band and keep uncertain choices movable through a full growing cycle. Schedule a new map after major tree pruning, removal, canopy growth, or construction changes a shadow. Reuse the same scale and numbered viewpoints for comparison.
Related reading
Sources
- Perennial Gardening. Colorado State University Extension. Source record · Accessed 2026-08-30.
- Drawing a Landscape Plan - Site Analysis. University of Georgia Extension. Source record · Accessed 2026-08-30.
- Creating your garden plan. Royal Horticultural Society. Source record · Accessed 2026-08-30.