Grow · dormant season pruning map
Make a Dormant-Season Pruning Map Before Cutting
Inventory each woody ornamental, preserve flower buds and structural targets, assign a timing lane, and mark professional boundaries before pruning begins.
Published Last updated
In this guide
- Use leaf-off visibility for decisions, not momentum
- Assign an action status before marking a cut
- Recover the plant name and the wood that carries its value
- Give every plant a status before it gets a cut list
- Map what stays as carefully as what may go
- Build separate timing lanes from the inventory
- Draw the professional boundary before tool day
- Turn the map into a short, reversible work order
- Reopen the map after growth makes the response visible
- Steps
Use leaf-off visibility for decisions, not momentum
Dormancy exposes branch structure, old wounds, rubbing stems, suckers, weak unions, and the relationship between a shrub and its path or window. University of Minnesota Extension identifies late dormancy as a useful pruning period for many plants and notes that bare branches make decisions easier. That visibility can also encourage unnecessary cutting: once every crossing line is visible, the whole garden begins to look like a list of defects. A map slows the response and assigns a reason, timing, and limit to each plant before a tool is opened.
Choose a clear winter day and make the first pass without a saw. Draw or print a base plan showing buildings, paths, planting beds, overhead service lines, fences, and each woody ornamental. Give every plant a stable code. Photograph it from the main view and from a position that reveals the base and branch unions. The map remains useful even if no pruning is approved, because it records structure, identity gaps, hazards, and the plants that need observation after leaf-out.
Separate condition from objective. Dead wood, a branch rubbing the roof, a flower display that has become sparse, and a shrub that simply looks larger than expected are different questions. Penn State places size control low among pruning reasons and emphasizes proper plant selection and natural form. Write the objective in a short phrase beside the plant code: protect clearance, remove confirmed dead wood, renew selected old stems, preserve spring bloom, establish young-tree structure, or observe. If the objective cannot be stated, defer the cut.
Assign an action status before marking a cut
Give each identified plant one objective and a status: prune, defer, observe or refer for qualified work. Draw retained structure before selecting removals, and keep flowering-group timing in separate work lanes. An unresolved identity or structural hazard stays off the cutting list. The finished map should distinguish approved work from observations that still need an answer.
Recover the plant name and the wood that carries its value
Identify each shrub at least to the level needed for timing and technique. The map should distinguish a lilac from a panicle hydrangea, a pine from a yew, and a grafted ornamental tree from a multi-stem shrub. Use summer photographs, labels, purchase records, bark, buds, fruit, and branching habit. Mark uncertain identities with an observation symbol and schedule confirmation during leaf or flower. A dormant silhouette alone can produce a confident but wrong pruning window.
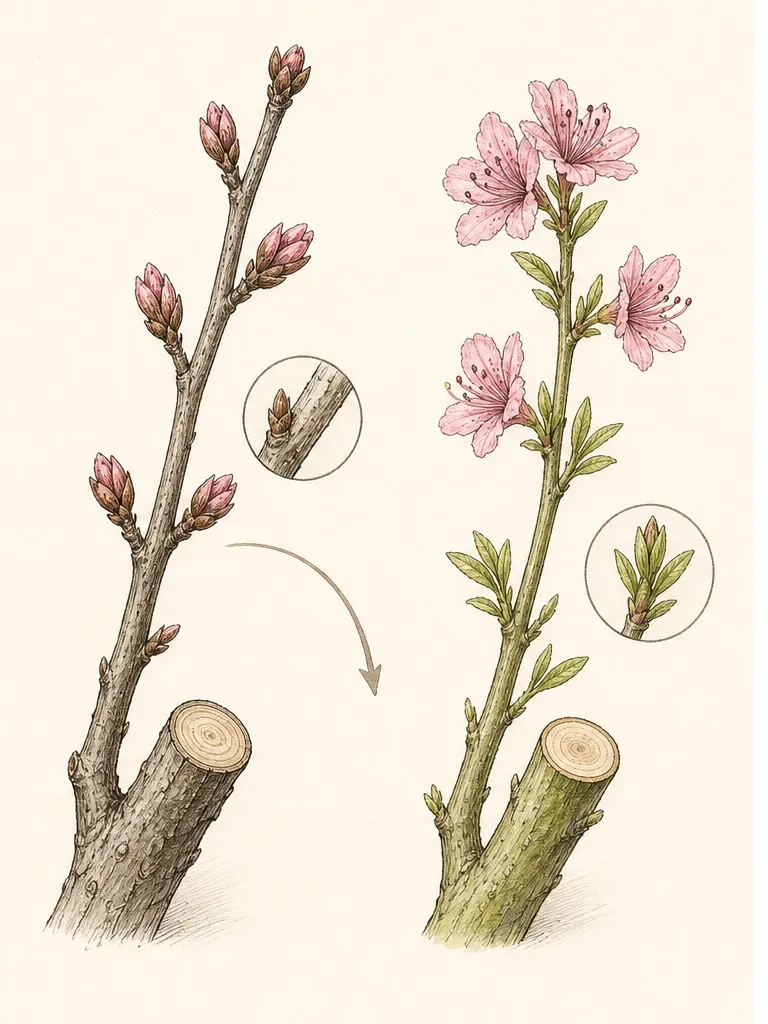
Record what makes the plant ornamental. Early spring-flowering shrubs commonly carry flower buds on growth made the previous year. Penn State lists forsythia, lilac, mock orange, many viburnums, azaleas, and other spring bloomers in the group generally pruned after flowering.
Summer and autumn bloomers often flower on current-season wood and can commonly be pruned in late winter or early spring. Hydrangeas, roses, and named cultivars can break a simple rule, so the botanical name and cultivar remain attached to the timing decision.
Evergreens need their own line on the inventory. Minnesota Extension notes that pines produce a single spring flush and lack lateral buds along old bare sections, while arborvitae, junipers, yews, and hemlocks have different growth patterns and pruning tolerances. A general dormant cleanup date should never place every conifer into the same operation. Mark the leader, live foliage boundary, natural habit, and any previous shearing so the eventual method follows the plant's capacity to regrow.
Give every plant a status before it gets a cut list
Use four map statuses. Blue can mean a small accessible hand-pruning project whose identity, timing, reason, and retained structure are confirmed. Amber means defer to a later biological window, such as immediately after spring bloom. Green means observe because identity, damage, vigor, or the value of a branch is uncertain. Red marks professional assessment for height, weight, decay, utility conflict, unstable limbs, or work requiring a ladder or power equipment. The colors are decisions, not priority levels.
Assign status at the plant level first. A spring-flowering shrub with one dead twig may be amber for shaping after bloom while the clearly dead accessible twig is separately marked for removal. A young tree may be blue for one small competing leader yet green for another union that needs leaf-on assessment. The map should preserve those distinctions rather than making the entire plant a winter pruning target.
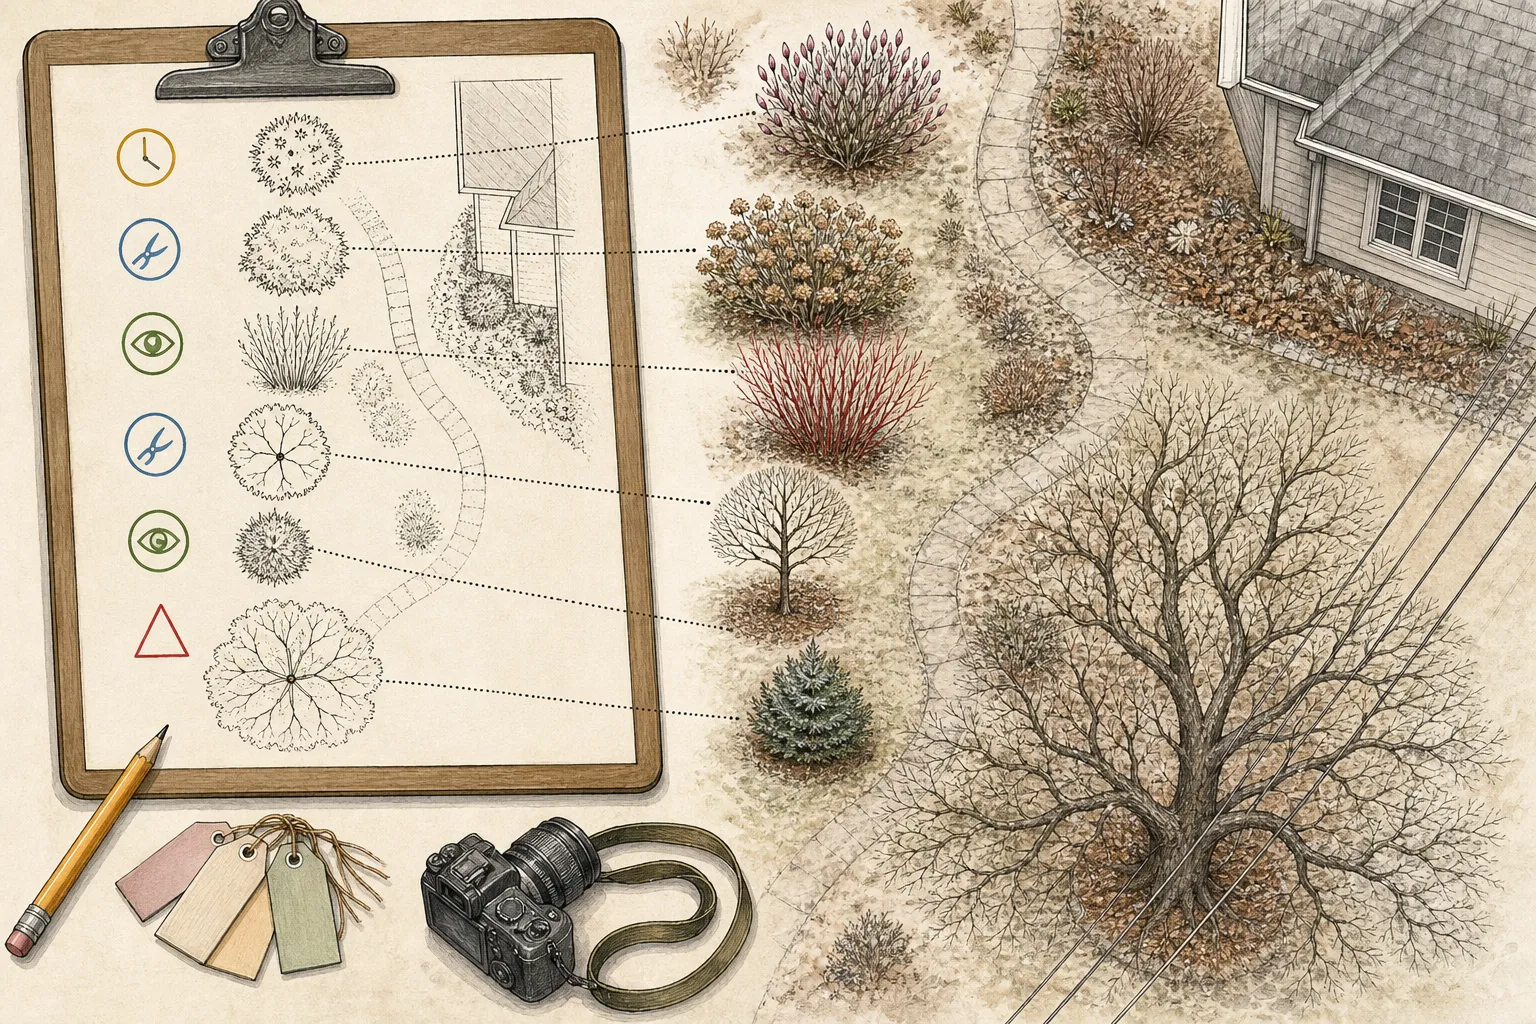
Add a no-action circle around plants that already fit their space and purpose. This is not an unfinished category. It protects a sound natural form from being altered merely because tools are available. A stable map should contain several plants with no approved cut, especially among correctly sited evergreens and recently established shrubs. The winter survey then becomes a garden-management record instead of a quota for branch removal.
Map what stays as carefully as what may go
For every blue-status plant, sketch the main retained structure first. Mark the central leader or selected framework of a young tree, the vigorous younger canes that will replace old shrub stems, the branch that carries the best flower buds, and the live foliage line of an evergreen. Purdue's tree-pruning guidance centers the work on reducing wound impact and plant stress; a retention map prevents a sequence of individually plausible cuts from removing the framework that the plant still needs.
Then mark specific candidates: confirmed dead or broken twigs, rubbing pairs, a branch growing into a path, basal suckers whose origin is understood, or selected old canes in a renewal cycle. Circle the branch union and intended endpoint rather than drawing a slash across a vague area. The USDA Forest Service explains that a proper removal cut preserves the branch bark ridge and collar so only branch tissue is removed. Those anatomical targets should be visible before the cut is scheduled.
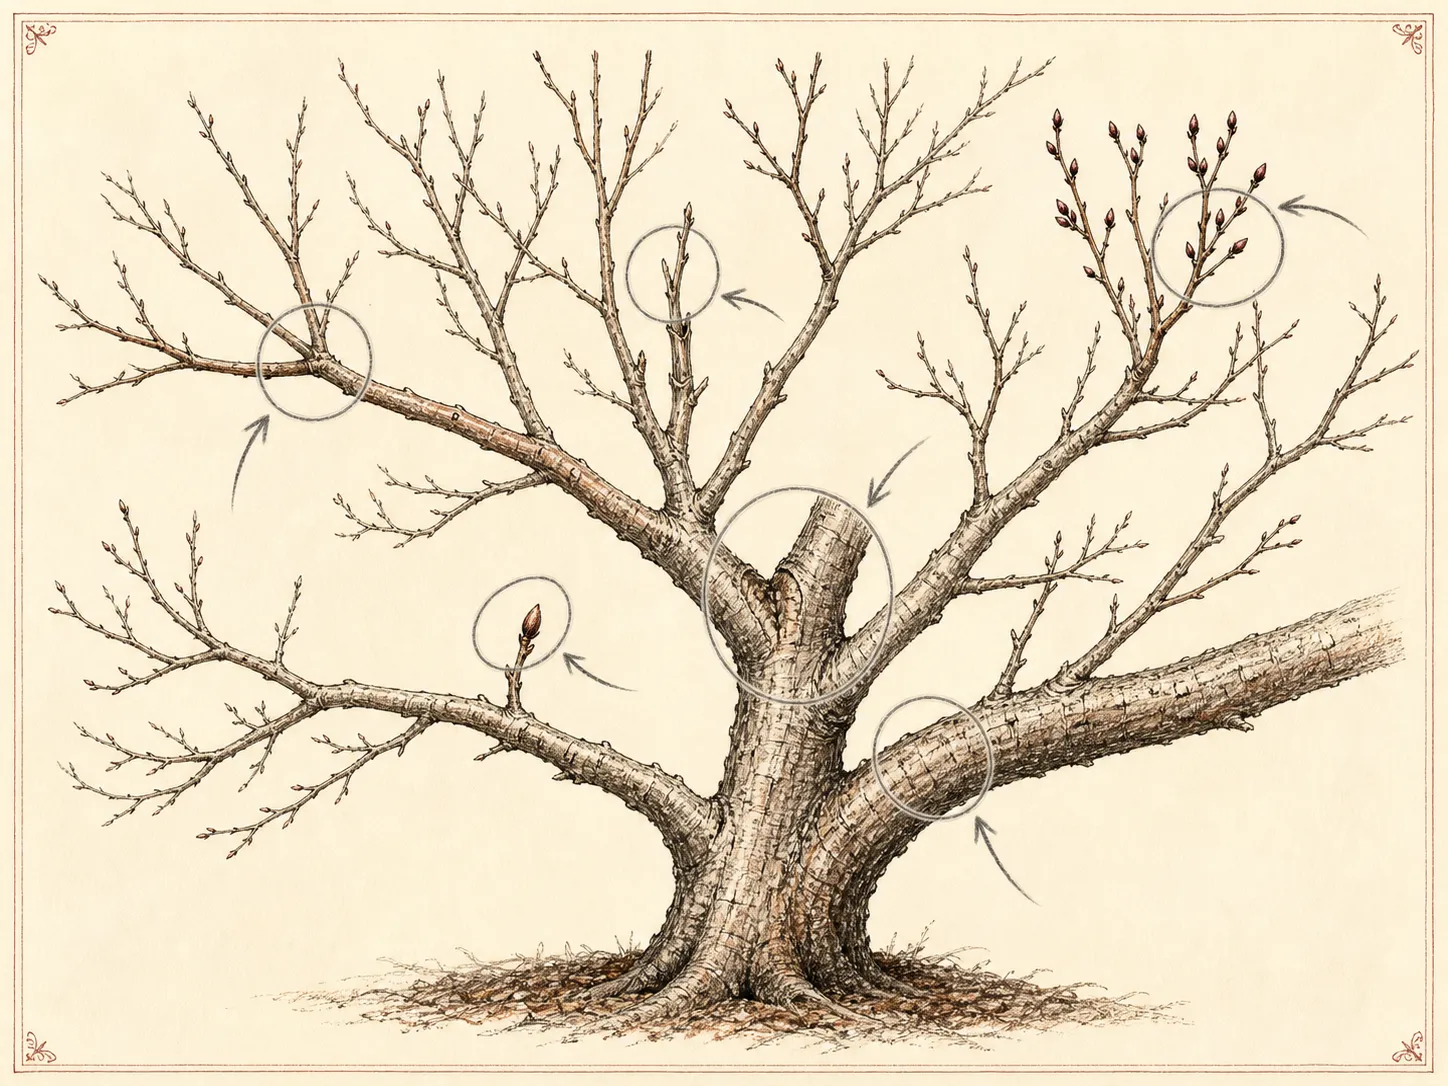
Record existing defects separately. An old flush cut, torn stub, cavity, included union, cracked limb, or previous topping response is evidence, not an invitation to recut a large wound. Photograph it and show its position on the map. If decay, weight, height, or failure consequences exceed a ground-based hand-tool task, change the plant to professional status. The map protects the homeowner from turning an inspection finding into an unsafe repair attempt.
Build separate timing lanes from the inventory
Move approved work into a calendar only after species and purpose are known. One lane holds late-dormant tasks supported for the exact plant: selected new-wood-flowering shrubs, appropriate foliage shrubs, and small structural work on suitable deciduous trees. Another lane holds spring-flowering shrubs until immediately after bloom. A third holds pine candle work or other conifer-specific windows. A fourth remains unscheduled until identity, damage, or local disease restrictions are resolved.
Regional restrictions can override a general late-winter preference. Minnesota Extension, for example, gives a specific seasonal restriction for oak pruning where oak wilt is a concern. Other regions have different disease pressure, weather, and regulations. Attach the local source and review date to the plant record. A calendar copied from another climate is a prompt to verify, not authority to cut.
Coordinate workload with plant response. Renewal pruning of a multi-stem shrub may remove a limited number of old stems in one season, while rejuvenation removes far more and can sacrifice bloom. Penn State and Minnesota sources distinguish gradual renewal from more severe treatment. Put the intended dose and the wood to retain on the map; terms such as clean up or reduce are too vague to control a pruning session once branches begin accumulating on the ground.
Draw the professional boundary before tool day
Map every overhead conductor, roof edge, road, public path, steep slope, glass surface, and target that could be struck by a falling branch. International Society of Arboriculture guidance states that mature-tree pruning involving work above ground or power equipment should be performed by a professional arborist. Minnesota Extension similarly advises leaving large-tree work to qualified professionals and identifies ladder, chainsaw, and potential utility hazards as reasons to obtain help. These are planning boundaries, not challenges to solve with a longer pole tool.
Branch size is only one part of scope. A small dead limb over a doorway can have a serious target; a modest live branch under tension can move unpredictably; a split union can fail during inspection. Keep the survey on the ground, use binoculars and photographs, and close the area if a hanging or unstable limb is present. Contact the utility for work near conductors and a qualified arborist for tree risk and pruning decisions.
For small branches that remain in homeowner scope, match the tool to controlled support. Purdue explains that a branch too large to support by hand needs a three-cut method to prevent bark tearing, but that technique does not make elevated or heavy work safe for an unqualified person. Mark the branch collar and intended retained lateral, then decide whether the whole operation—including access, weight, fall path, and cleanup—fits the professional boundary.
Turn the map into a short, reversible work order
Rewrite each blue plant as a sequence with a stop point. Begin with confirmed dead or broken small wood, then the one rubbing or competing branch whose removal clarifies the structure. Step back to the mapped viewpoint after every meaningful change. If the retained silhouette no longer matches the plan, stop. A short work order makes it possible to leave the rest for another season; a general instruction to shape the shrub tends to expand as the plant becomes more open.
List the cut type beside each target. A removal cut returns to the branch collar or point of origin. A reduction cut returns a leader to an appropriate lateral rather than leaving a stub. A heading cut changes growth below the cut and should appear only when that response is actually intended. The USDA and Purdue diagrams help locate proper branch tissue and collar geometry, while plant-specific shrub guidance controls renewal and bud placement. The map unites those two scales.
Keep the cut list attached to the retention list. Count the important live branches or canes that will remain, mark flower-budded wood that is protected, and include a maximum dose for the session. Purdue advises against removing more than one-quarter of live foliage in one pruning dose for trees; species, age, health, objective, and professional guidance may call for less. The map's job is to prevent cumulative loss from exceeding the plan.
Reopen the map after growth makes the response visible
Photograph every treated plant from the original viewpoints immediately after work and again after leaf-out. Record flower performance, new shoot direction, watersprouts, dieback, wound condition, clearance, and whether the plant still expresses its natural form. Compare with the no-action plants as a control for weather and seasonal growth. A response that differs from the map's expectation should pause further pruning until the cause is understood.
Update timing from observed biology. If a shrub flowered on the wood marked for preservation, the record confirms that decision. If a plant was misidentified, correct the inventory and invalidate its old schedule. If repeated pruning is required to keep a healthy plant inside a space that is too small, open a replacement or transplant decision instead of escalating the annual dose. Pruning is not a durable substitute for mature-size fit.
Carry unresolved green and red statuses into the next plan. Add the arborist's recommendations, the confirmed cultivar, a leaf-on photograph, or a new disease-timing source. The map becomes more useful as uncertainty is resolved without erasing its history. Its measure of success is not how much wood was removed; it is whether each cut had a supported reason, occurred in the right window, retained the intended structure, and stayed within safe scope.
Steps
- Level
- moderate
- Time
- One winter survey plus a short plant-by-plant research session
- Tools
- Clipboard and scaled base plan, Pencil, eraser, and colored pencils, Weatherproof plant labels, Measuring tape, Binoculars for ground-based inspection, Camera or phone, Clean hand pruners for confirming tool capacity only after the map is complete
- Materials
- Plant inventory sheet, Copies of regional pruning references, Flagging ties placed loosely on small accessible targets, Calendar with species-specific pruning windows, Arborist contact record for out-of-scope trees
- 1Draw the fixed site and assign plant codes
Map buildings, paths, utilities, overhead lines, slopes, windows, and every woody ornamental. Give each plant a stable code and take repeatable photographs from the main view and the branch-structure side. Carry closed tools; this first pass records evidence and creates no obligation to prune.
- 2Recover botanical identity and ornamental purpose
Use labels, purchase records, leaf-on photographs, bark, buds, fruit, and flowering history. Record whether flowers form on old or new wood, whether an evergreen has a single flush or continuous growth, and whether the plant's value lies in bloom, colored young stems, foliage, fruit, or framework.
- 3Write one objective for each candidate
Name a specific reader-visible reason such as protect door clearance, remove confirmed dead wood, preserve spring flower buds, renew selected old canes, or establish young-tree structure. Mark sound plants as no action. If the reason is merely that winter is convenient or the shrub looks large, keep it in observation.
- 4Assign prune, defer, observe, or professional status
Use a consistent symbol and color for each status. Apply it to the whole plant, then mark any narrow exception, such as one accessible dead twig on a shrub otherwise deferred until after bloom. Put ladders, overhead work, conductors, heavy limbs, instability, and power equipment inside the professional boundary.
- 5Draw retained structure before removal targets
Mark the leader, framework branches, replacement canes, flower-budded wood, live evergreen foliage, and the silhouette that should remain. Then circle precise small candidates and their branch union, bud, or point of origin. Record old wounds and defects as observations unless qualified assessment approves a treatment.
- 6Move approved work into separate timing lanes
Schedule late-dormant tasks, after-bloom shrubs, conifer-specific windows, and unresolved plants separately. Attach a regional source and review date to disease-sensitive or climate-dependent timing. Add the intended technique, dose, and stop point; clean up and reduce are not sufficiently controlled instructions.
- 7Write a plant-by-plant work order
List the few cuts in sequence, starting with confirmed dead or broken small wood. Identify removal, reduction, or intentional heading cuts and the anatomical endpoint. Pair the cut list with a count of important branches, canes, buds, and live foliage that must remain, then step back after each structural change.
- 8Photograph the response and revise the map
Repeat the mapped views immediately after work, after leaf-out, and after flowering. Record new shoot direction, bloom, dieback, wound condition, and clearance. Correct identity or timing errors, pause when response differs from the plan, and carry unresolved observation and professional statuses forward with their evidence intact.
Related reading
Sources
- Pruning Trees and Shrubs. University of Minnesota Extension. Source record · Accessed 2026-08-20.
- Pruning Flowering Shrubs. Penn State Extension. Source record · Accessed 2026-08-20.
- Tree Pruning Essentials. Purdue Extension. Source record · Accessed 2026-08-20.
- How to Prune Trees. USDA Forest Service. Source record · Accessed 2026-08-20.
- Pruning Mature Trees. International Society of Arboriculture. Source record · Accessed 2026-08-20.