Grow · bare root ornamental perennial arrival inspection
Inspect Bare-Root Perennials on Arrival Before Potting or Planting
Open, identify, and triage dormant bare-root ornamental perennials by crown, roots, buds, moisture, odor, temperature history, and the conditions waiting outside.
Published Last updated
In this guide
Prepare the receiving area before opening
Open bare-root perennials as soon as they arrive. Iowa State makes immediate inspection the first care step because exposed roots are perishable and packing moisture can change in transit. Move the parcel out of direct sun, a hot porch, or a freezing vehicle before opening it. Set up a clean surface, waterproof labels, the invoice, a camera, water, and clean pruners so roots do not lie exposed while supplies are found.
Decide whether the garden is ready before the box arrives. Sound bare roots should be planted promptly, but frozen, saturated, or unworkable soil is not a suitable planting bed. Iowa State permits a short hold near 40°F (4°C) in a cool non-freezing place with the original packing kept damp, while Illinois likewise says delayed dormant perennials should remain cool with moist roots. Prepare that holding place in advance rather than leaving unopened plants at room temperature.
Do not soak the whole shipment on arrival. The retained planting guidance uses a 30-to-60-minute soak immediately before planting, and Illinois gives one hour. Soaking is a timed rehydration step for a sound plant whose hole is ready, not a storage method for disputed, moldy, or decayed material. Keep questionable roots in their labeled packing while they are photographed and reported.
Separate every taxon and cultivar as the package is opened. Bare crowns, rhizomes, eyes, and fleshy storage roots can require different orientation and depth even when they were shipped together. Preserve each nursery label until a permanent garden marker is installed. If a name is unfamiliar, pause before trimming or soaking and obtain the supplier's planting sheet for that exact plant.
Confirm identity and document the parcel
Match the plant name, cultivar, quantity, and size grade to both the invoice and the individual label. Record substitutions before labels are moved between roots. Dormant perennials from different genera may look similar, and a root mass cannot reliably confirm a named cultivar. The supplier label is therefore part of the plant until growth or a resolved claim provides better evidence.
Photograph the unopened box, shipping label, wet or crushed areas, and the arrangement of labeled bundles. Then photograph each plant with its label and packing still beside it. Include a ruler when size or breakage is in dispute. This sequence preserves what arrived before soaking, pruning, potting, or planting changes its appearance. Note the delivery date, expected date, leakage, odor, and whether the parcel felt unusually hot or frozen. These observations do not diagnose living tissue by themselves, but they give the supplier useful context when roots are brittle, mushy, or damaged. Retain the original box and all packing until every plant has been matched and the claim window has been checked.
When identity, quantity, or condition is wrong, contact the supplier before making large cuts. Send the label, whole-root photograph, close view of the concern, and order number. A prompt report can establish whether the plant should be planted, held, or returned. Continue with clearly sound plants so their exposed roots do not dry while one disputed item is reviewed.
Inspect crown, buds, roots, and packing
Iowa State describes a good arrival as firm, heavy roots that are neither dry nor brittle, with green firm buds or growing points. North Carolina Cooperative Extension independently advises that good bare-root stock has moist roots without crushing or breakage. Use those traits as a whole. A dormant crown need not be leafy, but its roots and growing points should feel substantial for the taxon rather than hollow, papery, or detached.
Squeeze the packing separately from the root. Iowa State's useful comparison is a wrung-out sponge: damp, not dripping and not completely dry. Wet packing alone does not prove that the crown is sound, so expose enough of the plant to inspect its growing points and several roots. Replace the damp packing around any sound plant that must return to cool holding.
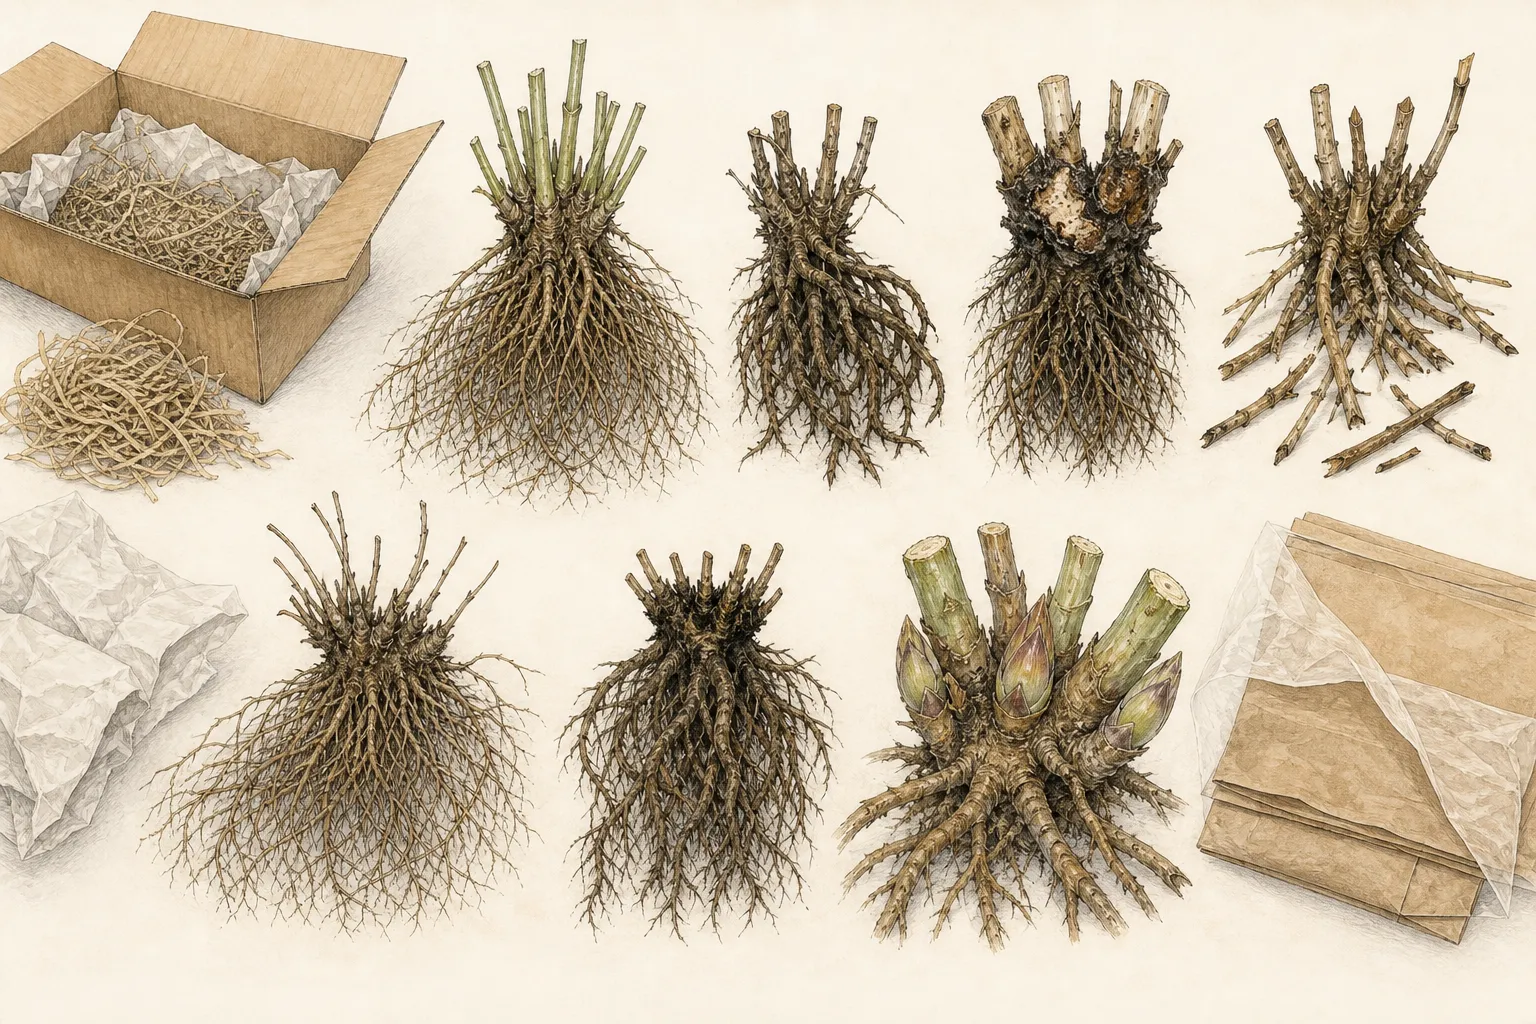
Stop and isolate a plant with mushy roots, foul odor, many broken roots or stems, visible mold, or suspected freezing damage. These are Iowa State's explicit rejection or concern signs. Photograph the complete plant before removing material. A small broken root can be pruned immediately before planting; a collapsing crown or widespread soft tissue needs supplier review rather than cosmetic trimming that erases the extent of damage.
Inspect without cutting through the only crown. Follow roots from their attachment point, locate buds or eyes, and identify the upper and lower sides. Remove packing fibers gently instead of pulling across emerging buds. If roots are tangled with another labeled plant, separate them by easing the bundles apart under damp conditions; do not tear them simply to restore a neat package shape.
Choose plant, pot, hold, or report
Plant a sound perennial promptly when the correct site is prepared and the soil can be worked without smearing or compaction. Keep roots wrapped and shaded until the hole is ready. Time the 30-to-60-minute water soak so planting follows immediately; then prune only broken or damaged root ends with a clean sharp cut. A longer soak is not a substitute for moist packing or a ready planting site.
If planting must wait, return the labeled plant to damp packing and hold it near 40°F in a non-freezing refrigerator, garage, or root cellar as Iowa State directs. Check the packing rather than flooding it. Add only enough water to restore the wrung-sponge feel. Before planting a held root, inspect the crown again and trim only damage that developed or became visible during storage. A plant that has started long pale growth needs faster resolution because a dark holding place no longer matches its active shoot stage.
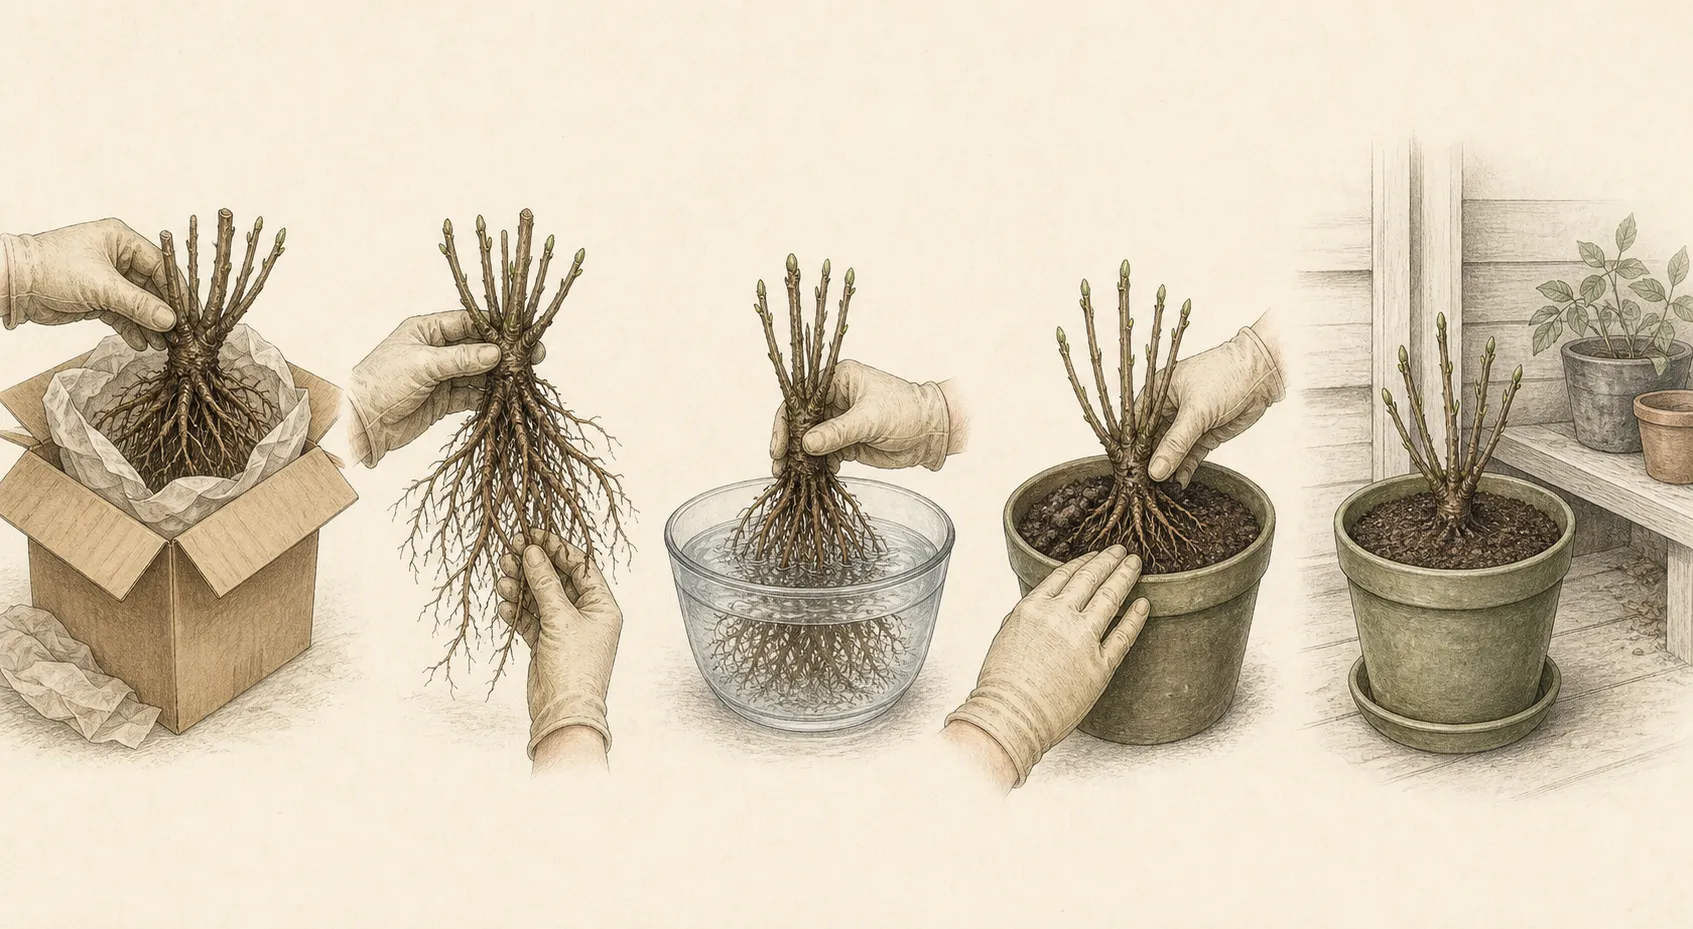
Pot temporarily only when the supplier or taxon guidance permits it and the outdoor delay is longer than a brief cool hold. Use a clean draining container deep and wide enough to spread the roots without coiling. Set the crown at the taxon's planting grade, water once to settle the medium, and keep the pot cool and protected while the outdoor bed becomes suitable.
Keep a suspect plant away from other new stock and report it before soaking or pruning. Do not plant mushy, foul-smelling, moldy, or badly broken material merely to see whether it recovers. The decision endpoint is explicit: sound material enters the supported planting or holding route; disputed or seriously deteriorated material remains labeled and documented for the supplier.
Set the crown at the correct grade
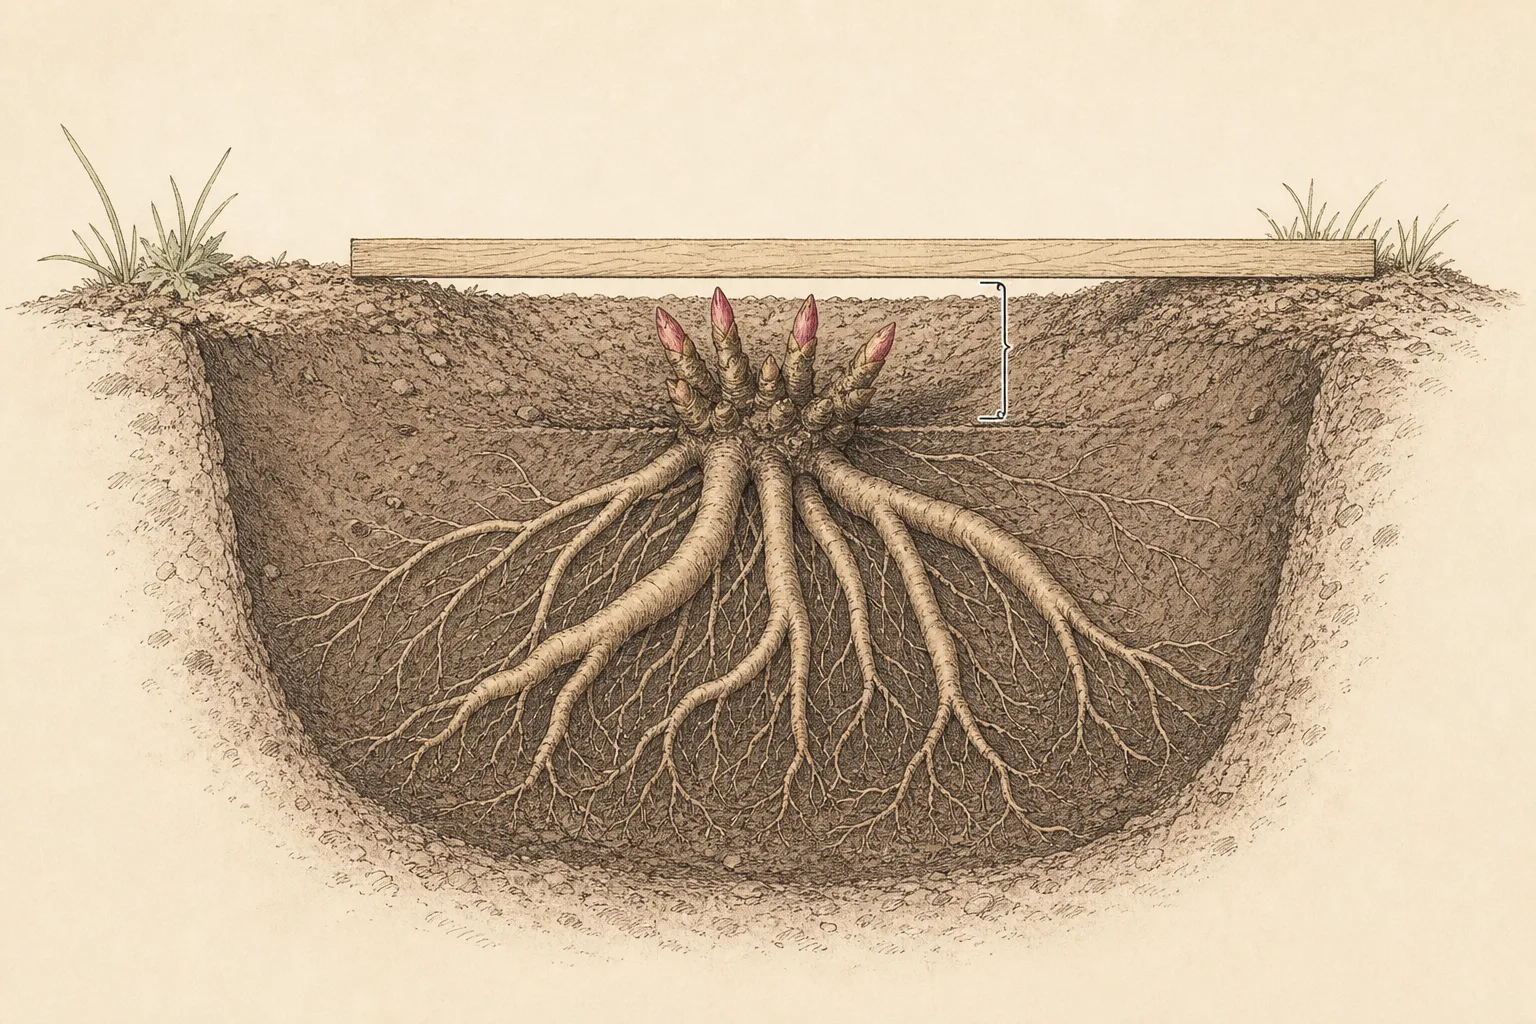
Find the growth point before digging. A typical bare-root perennial has roots attached below buds that form the crown, but rhizomes, fleshy roots, tubers, and named plants such as peonies or irises have more specific instructions. Use the supplier's taxon directions first. Iowa State's fallback is to orient the crown upward and place buds or crown no more than one or two inches below the surrounding surface; it is not a universal two-inch planting rule.
Illinois reinforces the reason for taxon-specific depth: perennials planted too high can dry, while deep planting invites crown rot, and bleeding heart, iris, and peony require shallow placement to flower properly. When the original soil line is visible, restore that grade. Do not bury a pale elongated shoot to make the plant look dormant again; keep the crown at the correct level and protect the emerged growth separately.
Dig a hole two to two-and-a-half times wider than the spread roots, following Iowa State's perennial method. Build a low cone only when it helps the roots radiate outward and downward. Enlarge the hole rather than bending long roots upward. Trim a damaged end cleanly, but retain sound length that can fit naturally in the prepared soil.
Backfill with the soil removed from the hole, working it gently among roots. Firm by hand only enough to remove large air pockets without snapping buds or compressing the root zone. Water thoroughly and mark the location. If mulch is used, Illinois advises leaving air space around the crown; keep the label visible and the growing point free of a wet mound.
Support the first weeks without overcorrecting
Water immediately after planting, then check the soil around the roots once or twice a week. Iowa State says to water when that soil is dry and reduce frequency as establishment progresses. Illinois also emphasizes regular checks that prevent drying. The aim is moist root-zone soil with drainage, not a permanently wet crown. Reopen a blocked runoff path before adding more water.
Iowa State gives two to four weeks as a common emergence interval, depending on weather and soil. Use that as an observation window, not a guarantee for every genus. Keep the marker in place and examine the soil surface without excavating the crown. A dormant plant can build roots before shoots appear, and repeated lifting breaks the contacts established during planting.
Wait at least four weeks before fertilizing under the Iowa State method. Young roots can be damaged by excess fertilizer, and Illinois notes that overfed perennials often make soft growth with fewer flowers. Fertilizer does not correct a buried crown, dry root system, or rotted arrival. Verify grade, drainage, and moisture first if emergence is weak.
Act promptly when the planted crown becomes soft, foul-smelling, or collapses, or when an already questionable plant deteriorates. Keep it separate from unplanted stock and contact the supplier or a local diagnostic service if the cause is unclear. A sound but slow crown stays marked and undisturbed through its reasonable taxon and weather window.
Close the record after establishment
Record the final location, planting grade, soak time, roots trimmed, planting date, first watering, and weather. Photograph the first shoot beside the permanent label. This closes the arrival chain from invoice to established plant and keeps similar dormant cultivars from being confused after the nursery packing is gone.
If a supplier claim was opened, add the planting or disposal outcome without changing the original arrival photographs. A plant that was accepted as sound can still fail later because of site or weather; a damaged arrival can sometimes grow. Keep those stages separate so the record does not assign every later result to shipping.
Leave the crown marker until the plant has enough growth to remain visible during weeding and watering. Remove a temporary pot only when transplanting at a suitable stage, and preserve the root ball rather than returning the plant to bare-root condition. Keep mulch away from the crown as growth expands.
Evaluate establishment after the expected emergence window and again after the first growing season. Note which taxa arrived with firm moist roots, which holding period was actually needed, and whether the chosen depth produced clean crown growth. Those observations refine future delivery timing and receiving supplies without replacing the supplier's taxon-specific planting instructions.
Steps
- Level
- moderate
- Time
- 15–30 minutes per shipment, followed by immediate planting, potting, or supported holding
- Tools
- Clean inspection surface, Camera and scale, Waterproof labels, Clean sharp pruners or knife, Proportionate pots if needed
- Materials
- Fresh potting mix for temporary containers, Clean water, Original invoice and supplier instructions, Separate tray for suspect plants
- 1Receive promptly
Move the parcel out of heat, freezing, rain, and sun, then open it immediately on a clean prepared surface. Keep the invoice, camera, labels, water, and clean pruners within reach. If the garden is not plantable, prepare a cool non-freezing holding place near 40°F before exposing the roots.
- 2Match every label
Match taxon, cultivar, quantity, grade, and substitutions against the order before moving packing between plants. Keep each individual nursery label attached or beside its root. Stop when identity is uncertain; dormant roots cannot prove a cultivar, and the exact name controls orientation, depth, and final site.
- 3Document unopened condition
Photograph the closed parcel, shipping label, leakage or crushing, then each bundle with its plant label and packing. Add a ruler beside disputed size or breakage. Keep the box and packing until all plants are matched and any supplier claim is filed.
- 4Inspect living tissue
Look for firm heavy roots, firm green buds or growing points, and damp packing with a wrung-sponge feel. Isolate brittle or mushy roots, foul odor, visible mold, suspected freezing, and extensive breakage. Photograph concerns before trimming, and never cut through the only crown merely to test it.
- 5Select the next route
Plant sound material promptly when its site is ready. For a short delay, wrap it again in damp packing and hold near 40°F without freezing. Pot only under taxon or supplier guidance. Keep seriously damaged or disputed material labeled, unsoaked, and separate while the supplier reviews the evidence.
- 6Set at exact grade
Soak sound roots for 30 to 60 minutes immediately before planting. Follow taxon-specific depth first; if no narrower direction exists, keep the crown or buds no more than one or two inches below grade. Spread roots in a hole two to two-and-a-half times their width, backfill gently, water, and mark the crown.
- 7Stabilize establishment
Check the planted root zone once or twice a week and water when it is dry, reducing frequency as roots establish. Keep mulch clear of the crown. Leave a slow dormant plant marked and undisturbed through its expected emergence window, and wait at least four weeks before considering fertilizer.
- 8Complete the record
Save the arrival photographs, final location, planting grade, soak time, trimmed roots, first emergence, and supplier response under the cultivar label. Reassess at the end of the first growing season. Separate shipping condition from later site performance when choosing future delivery dates and vendors.
Related reading
Sources
- How to Plant Bare Root Perennials. Iowa State University Extension and Outreach. Source record · Accessed 2026-08-30.
- Selecting Quality Plants for Your Landscape. North Carolina Cooperative Extension. Source record · Accessed 2026-08-30.
- Planting and Care. University of Illinois Extension. Source record · Accessed 2026-08-30.