Grow · harvest cure garlic
Harvest and Cure Garlic Before the Wrappers Break Down
Read the leaves and bulbs together, lift garlic without bruising it, and cure the crop in shade with moving air so sound wrappers protect it in storage.
Published Last updated
In this guide
- Read maturity from several plants, not one yellow leaf
- Let a sample bulb confirm the leaf-stage signal
- Sample a bulb before committing the row
- Prepare the curing place before lifting
- Lift bulbs without sacrificing the wrappers
- Cure by managing air, shade, and spacing
- Sort for storage only after curing is complete
- Store in a stable, ventilated place
- Use the harvest record to improve the next crop
- Handle wet-weather harvests as a separate risk
- Steps
Read maturity from several plants, not one yellow leaf
Garlic is ready near the point when several lower leaves have browned while upper leaves still retain green tissue. Each living leaf corresponds to a wrapper layer around the bulb, so waiting until the entire top is dead can leave too few intact skins for storage. The exact balance varies with cultivar, weather, and local practice. Walk the planting and look for a consistent change across the row before assigning a harvest date from one stressed plant.
Separate normal maturity from premature yellowing. Drought, saturated soil, nutrient problems, onion maggot injury, and disease can discolor leaves before bulbs finish. Tugging at foliage cannot resolve the difference. Compare plant size, leaf pattern, soil moisture, and neighboring plants. If yellowing is patchy, begins unusually early, or accompanies collapse and decay, preserve a sample and seek local diagnosis before treating the whole bed as mature.
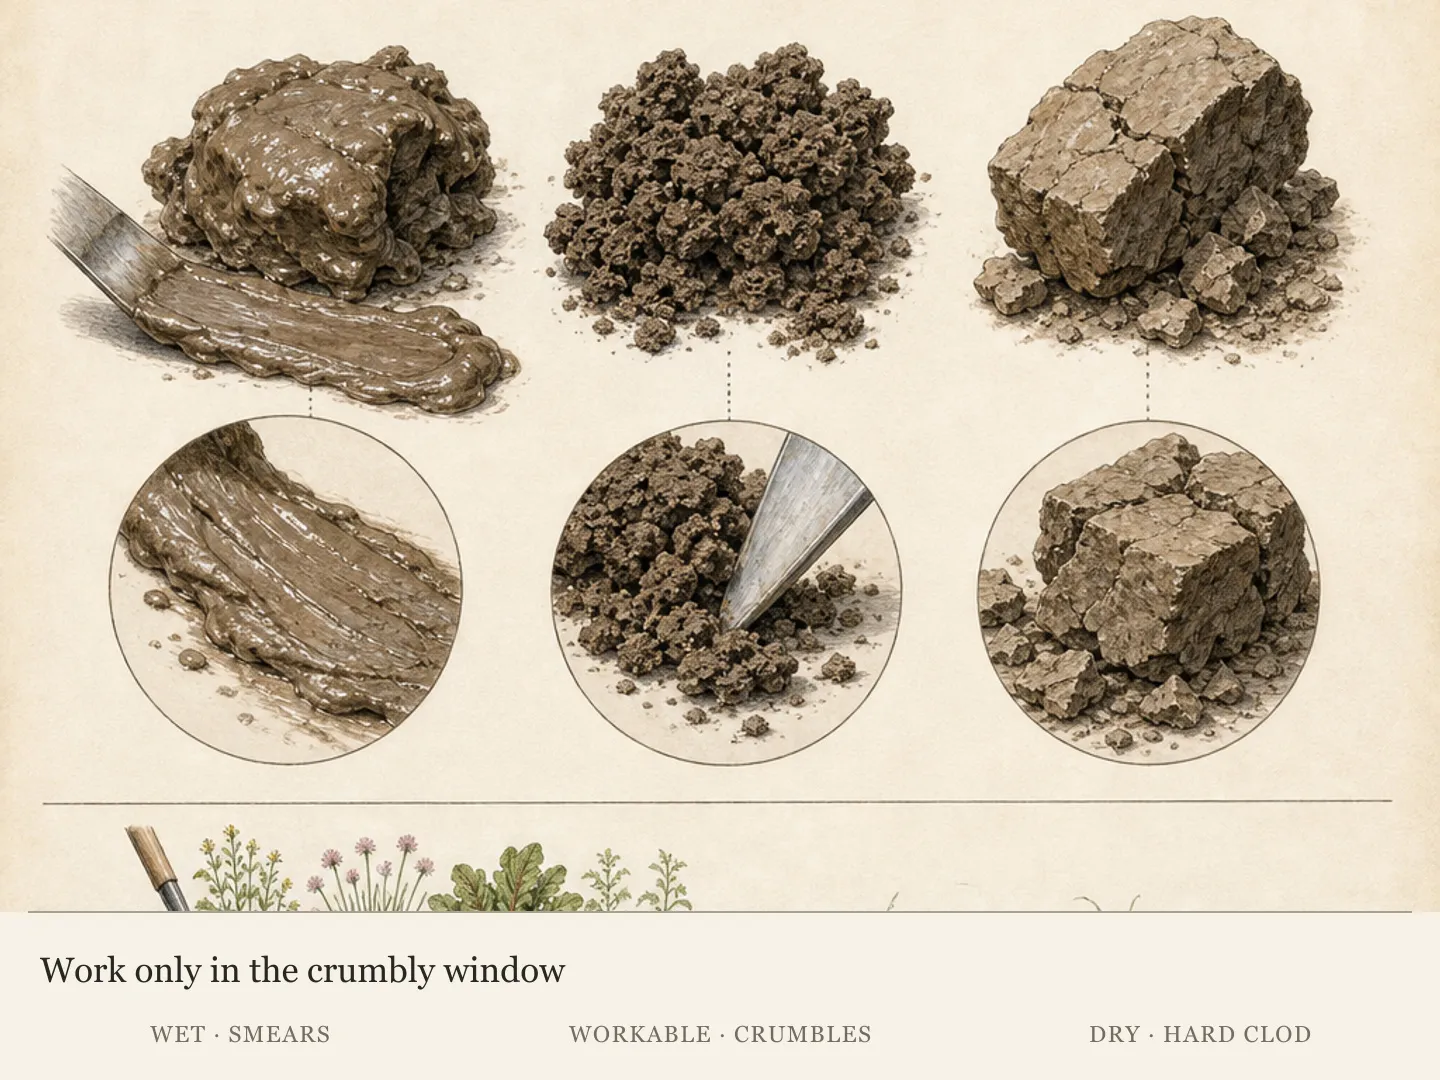
Stop heavy irrigation as harvest approaches only within climate-appropriate guidance and when soil already holds enough moisture to protect roots. The objective is workable soil and dry outer surfaces, not deliberate drought stress. A soaked bed makes curing messier and encourages soil to cling; rock-hard ground increases bruising. Choose a dry weather window when possible, but do not leave mature bulbs in the ground through a long delay merely to obtain a perfect forecast.
Let a sample bulb confirm the leaf-stage signal
Use the changing leaves as a reason to lift a representative bulb and inspect its condition before harvesting the row. Prepare dry shade and airflow before lifting the main batch. Keep curing, sorting and storage inspections distinct, retaining lot labels. Losses later in storage should be compared with harvest conditions, wrapper damage and curing position before the next season's timing changes.
Sample a bulb before committing the row
Loosen one representative plant from the middle of the planting, not the smallest edge plant or the most advanced bulb. Brush away only enough soil to see the bulb. Mature cloves should be distinct beneath intact wrappers, with the bulb filled out rather than narrow and undeveloped. If wrappers are already splitting and cloves separate readily, the crop is beyond the ideal storage stage and should be lifted promptly.
Sample a second area if the bed differs in shade, soil, or water. Garlic beside an emitter may mature differently from garlic at the dry end, and cultivars planted together may not finish together. Harvesting by block can protect both quality and labor. Mark the sampled plants and write down the leaf condition so the visual cue becomes useful next season instead of fading into a memory that harvest happened sometime in July.
Do not peel wrappers to inspect every bulb. The protective layers are part of the crop, and repeated handling creates the damage the sample is meant to prevent. One or two carefully lifted plants can answer whether cloves have formed and wrappers remain sound. If maturity is uncertain, wait a short defined interval and sample again, while watching weather and the rate at which upper leaves are declining.
Prepare the curing place before lifting
Garlic should move out of direct sun soon after harvest. Prepare a shaded, dry, well-ventilated place before the fork enters the bed. A roofed porch, open shed, slatted rack, or suspended bundle can work when air moves around the plants and rain cannot reach them. A sealed hot garage, damp basement, or pile on a solid floor traps heat or moisture and turns a curing plan into a storage problem.
Arrange racks or lines so plants form a single loose layer or small airy bundles. The bulbs should not carry the weight of a deep stack, and leaves should not create a wet mat. Protect the space from rodents and pets without enclosing it in plastic. Provide enough room to keep varieties or harvest blocks labeled, because storage performance and planting-stock decisions lose value if every bulb becomes anonymous.
Have shallow trays for damaged bulbs and a separate waste container. Sorting begins during harvest: cut, bruised, sunburned, soft, or diseased bulbs should not disappear into the sound crop. Do not wash bulbs intended for storage. Dry soil can remain during early curing and be brushed later; adding surface water increases the drying burden and can drive moisture between wrappers.
Lift bulbs without sacrificing the wrappers
Insert a garden fork or spade well beyond the expected bulb radius and angle beneath the roots. Loosen a short section, then lift each plant by supporting the bulb and lower stem together. Pulling foliage against firm soil can tear the neck or strip wrappers, while a fork placed too close can puncture cloves. Work slowly enough to feel the soil release before applying upward force.
Keep bulbs off hard ground and out of a thrown pile. Fresh garlic bruises even when the mark is not immediately obvious. Set plants gently into a shallow crate or directly on the curing rack. Leave roots and tops attached during curing unless local guidance for the cultivar and conditions says otherwise; the intact plant is easier to handle without exposing the bulb through unnecessary fresh cuts.
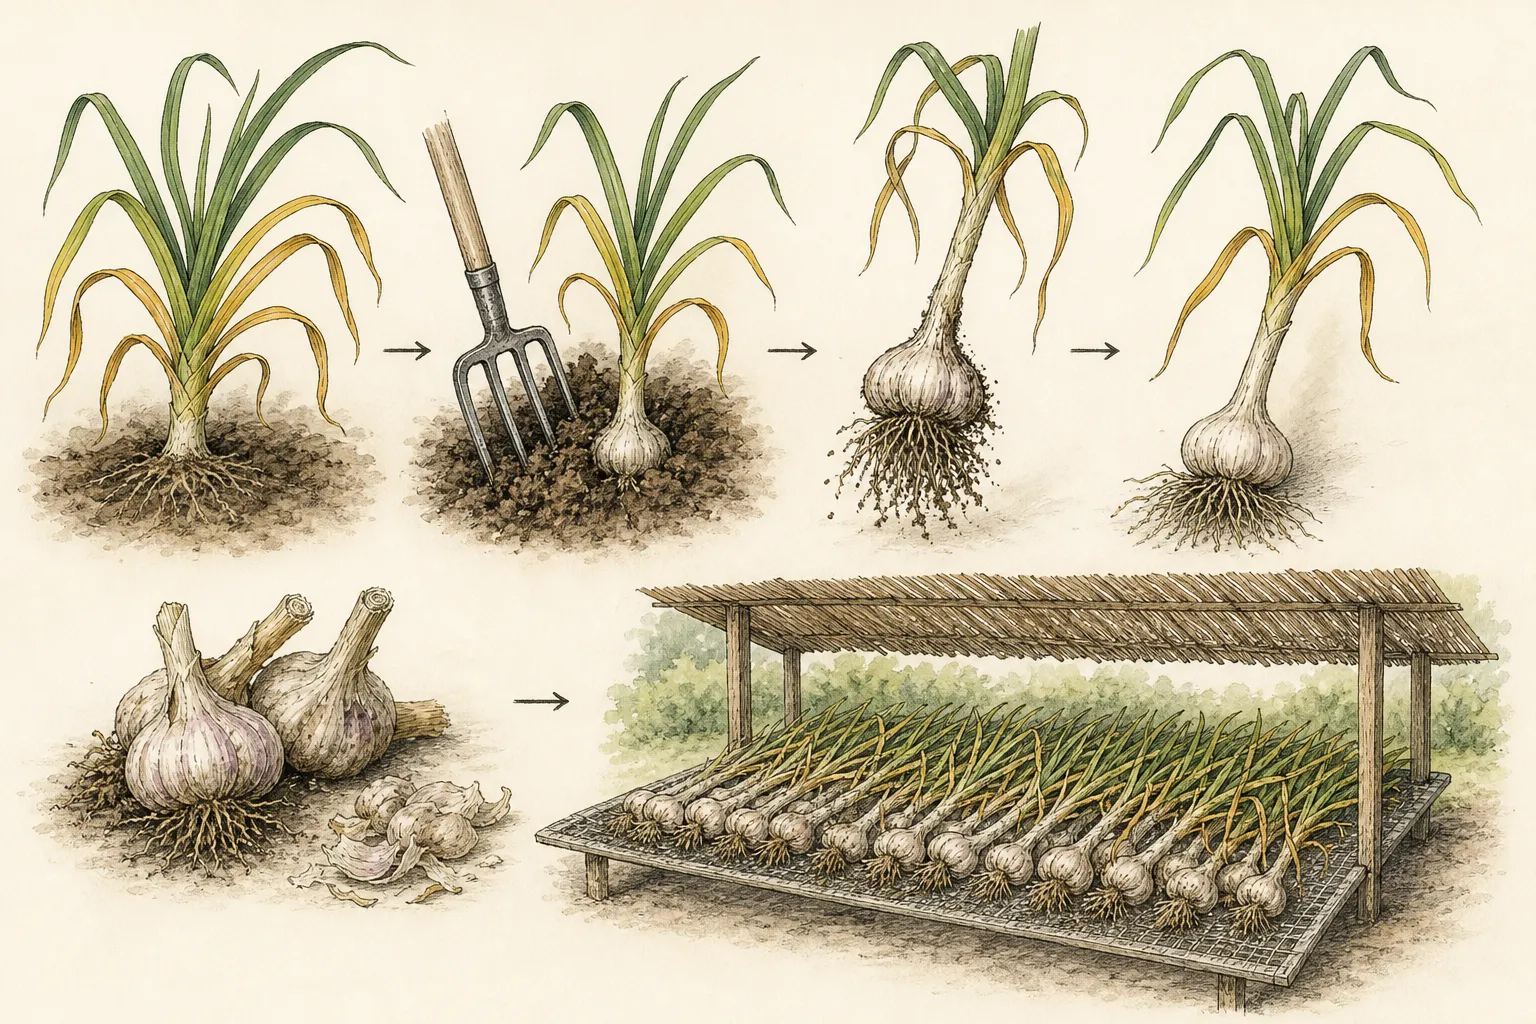
Shade filled harvest containers while work continues. Direct sun can heat and discolor bulbs, particularly when the outer wrappers are damp or thin. Do not use a closed vehicle as temporary storage. If rain interrupts, move the lifted crop under cover with airflow and leave the unlifted plants in place until soil is workable again. Rushing through mud generally causes more wrapper loss and compacted bed damage.
Cure by managing air, shade, and spacing
Spread plants so air reaches bulbs and necks from more than one side. Keep them in shade and protect them from rain. Curing time depends on temperature, humidity, bulb size, and airflow, so use condition rather than a fixed calendar alone. The outer wrappers should become papery, roots dry, and neck tissue lose its fresh moisture before the crop is trimmed and moved to longer storage.
Inspect the rack every few days. Turn or rearrange plants where contact surfaces remain damp, reduce bundle size if inner stems stay moist, and remove any bulb that softens or develops an off odor. Do not aim a heater at the crop or seal it beside a dehumidifier without monitoring. Gentle continuous air exchange is more useful than rapidly baking the outer layers around a moist center.
Keep curing distinct from cleaning. Resist the urge to strip stained wrappers until the bulb looks white. Each removed layer reduces protection. Once soil is dry, rub it away lightly with hands or a soft brush. If a bulb still appears dirty under an intact dry wrapper, accept the natural surface rather than peeling toward market-style brightness that the home crop does not need.
Sort for storage only after curing is complete
A storage bulb should feel firm and have dry papery outer wrappers and a fully dry neck. Trim roots without cutting into the basal plate. Cut tops only after the neck is dry, leaving a suitable stub, or keep softneck garlic braided when the stems remain flexible and sound. Label cultivar and harvest block. The label belongs with the batch, not loose on a shelf where it will be separated.
Set aside bulbs with cuts, missing wrappers, bruises, loose cloves, soft tissue, mold, or suspicious discoloration. Sound but cosmetically damaged bulbs can be used first if the damage does not affect food safety; decaying or diseased bulbs should be discarded. Do not store questionable bulbs beside the best ones. One early failure in a crowded basket can remain hidden until neighboring wrappers are damp.
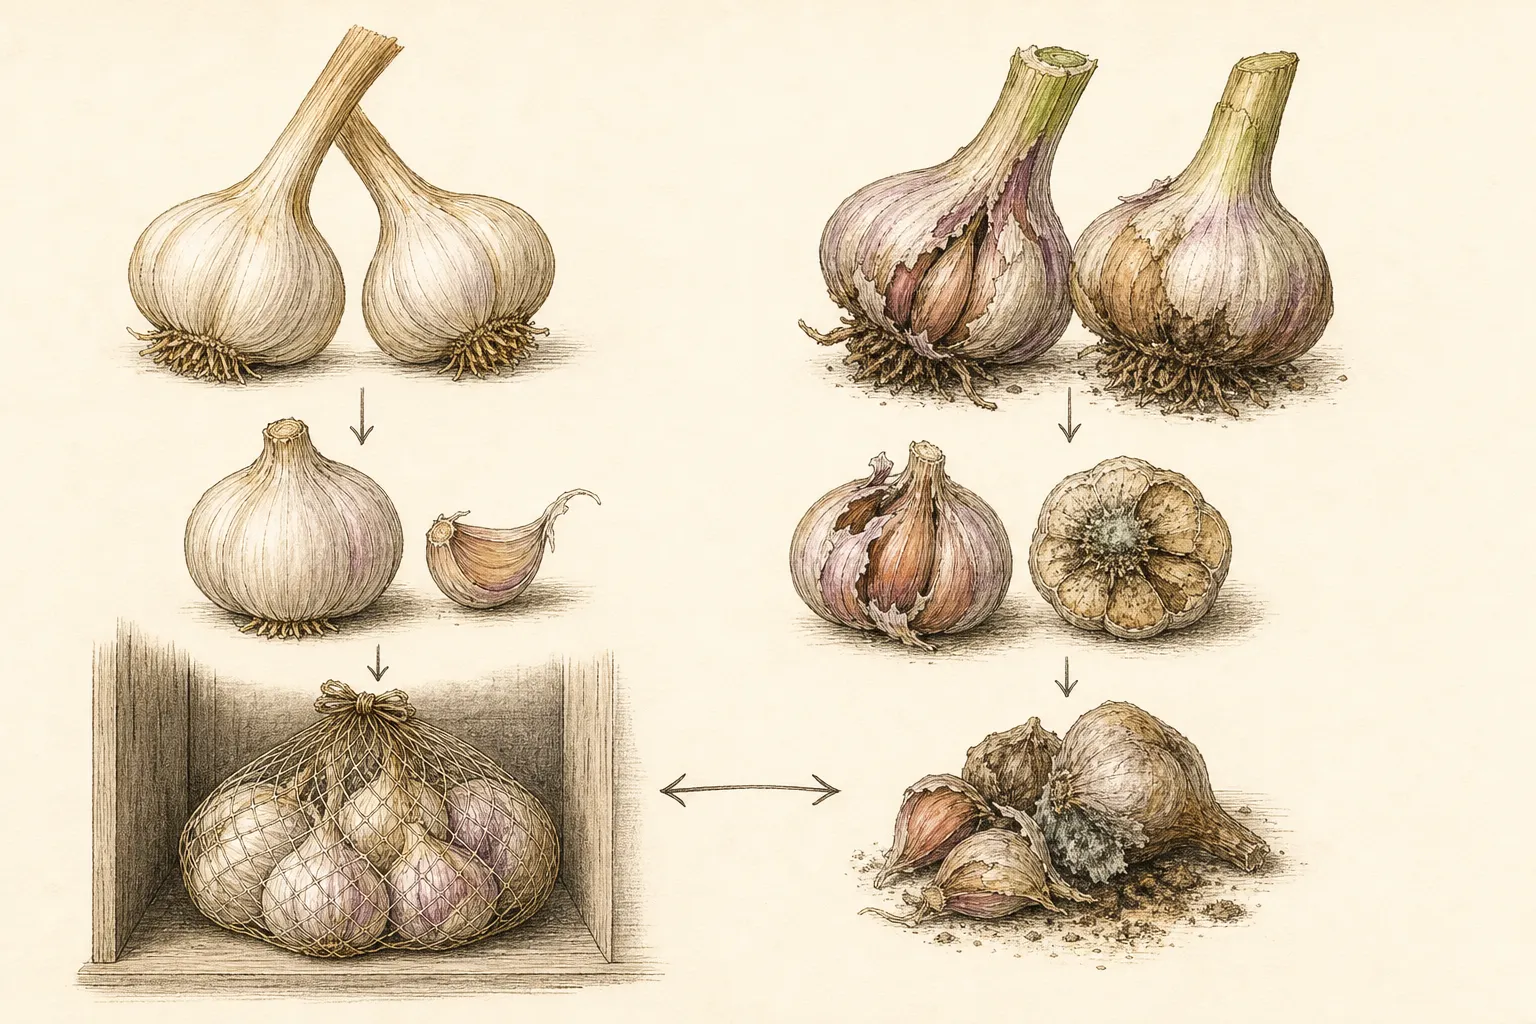
Select planting stock only from healthy, well-formed bulbs with known identity and no disease concern. The largest bulb is not automatically safe stock if it came from a declining patch. Keep planting garlic under the same cool, dry, ventilated conditions recommended for the type, and protect it from kitchen use with a clear label. Local Extension guidance should determine whether home-saved stock is appropriate where specific garlic diseases are present.
Store in a stable, ventilated place
Use mesh, slatted crates, or shallow open containers that allow air movement. Avoid sealed plastic bags and deep bins. Garlic generally stores best in a cool, dry, dark place with stable conditions, but the ideal temperature and expected life differ by type. Household refrigerators can encourage sprouting after removal and may be humid. Use local recommendations for the cultivar and intended storage period rather than one universal number.
Check the crop regularly during the first month and then at intervals. Remove bulbs that soften, sprout, mold, or develop wet necks. Rotate the oldest or least protected sound bulbs into the kitchen first. A storage room that smells strongly of decay or shows condensation needs immediate inspection and more ventilation; fragrance from sound garlic is not a substitute for handling individual bulbs.
Record how long each labeled batch remains firm. Compare wrapper condition at harvest, curing density, cultivar, and storage location. If most bulbs fail together, investigate the shared environment. If only damaged bulbs fail, improve harvest sorting. That distinction guides next season more accurately than assuming the variety stores poorly because a mixed basket contained both intact and bruised bulbs.
Use the harvest record to improve the next crop
Photograph the sampled bulb, the row at harvest, and one cured storage bulb beside the same label. Record planting date, cultivar, leaf condition, harvest date, weather window, curing place, and first storage loss. These few observations connect field maturity with storage performance. They can show that a crop lifted with more green leaves kept better, or that a humid curing corner caused failure despite a sound harvest.
Adjust one major variable at a time. If wrappers split before harvest, sample earlier. If necks stayed damp, reduce curing density or improve airflow. If fork injuries were common, mark planting depth and widen the lifting line. If storage failures began in one container, change the storage vessel. A long list of simultaneous changes makes next year’s crop harder to read, even when the result improves.
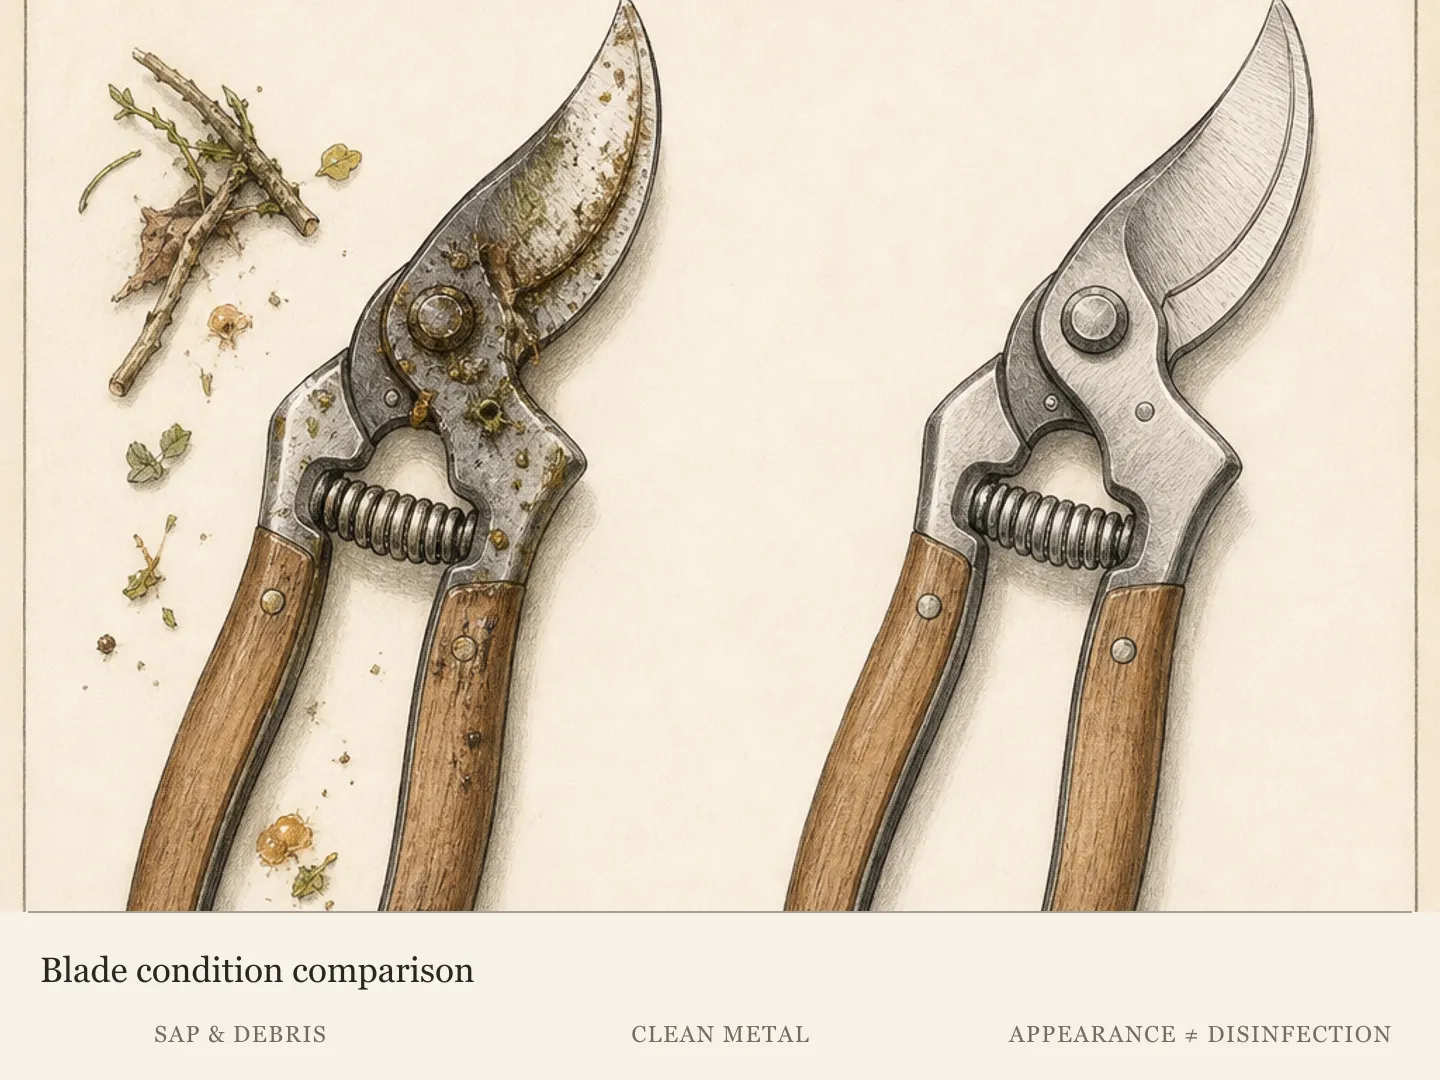
Return healthy garden residue according to local disease guidance and clean soil from tools before storage. Keep suspect garlic debris out of planting-stock areas. The completed job is not a decorative braid; it is a traceable set of sound bulbs whose field timing, handling, curing, and storage all preserved the protective structure the plant had already made.
Handle wet-weather harvests as a separate risk
When maturity arrives during unsettled weather, prioritize intact bulbs and rapid movement to shelter. Wait only until the soil can release without smearing into a dense coating, then lift a manageable block. Spread plants immediately in a single airy layer and increase spacing between damp tops. Do not close wet garlic in crates or assume a fan can rescue a deep pile after hours of trapped field heat.
Inspect wet-harvest bulbs more often during the first days. Soil should dry and release naturally; necks should not become slimy or odorous. Separate any injured bulb at once and avoid mixing the block into garlic lifted under drier conditions until both are cured. Labeling the weather block lets storage results show whether the extra attention worked and prevents one difficult harvest from obscuring the quality of the rest.
Steps
- Level
- moderate
- Time
- One to two hours to lift a small home bed, plus several weeks of passive curing and brief inspections
- Tools
- Garden fork or spade, Shallow harvest crates, Soft brush, Clean pruners
- Materials
- Shaded ventilated curing rack or lines, Batch labels, Mesh or slatted storage containers
- 1Read the row and lift a sample
Look for several browned lower leaves with useful green tissue remaining above. Loosen one representative bulb from each distinct cultivar or bed zone and inspect clove definition and wrapper condition. Delay briefly if bulbs are narrow; harvest promptly if wrappers are splitting. Record the leaf pattern that matched the sample.
- 2Prepare dry shade and airflow
Set up a roofed, shaded, ventilated rack or hanging area before harvest. Arrange enough space for loose layers or small bundles, keep rain and rodents out, and label each variety or block. Avoid sealed rooms, plastic enclosures, deep piles, and direct sun.
- 3Loosen soil beyond the bulb
Place the fork outside the expected bulb radius and lift from beneath the roots. Support bulb and lower stem together, then lay the plant gently in a shallow crate or on the rack. Do not pull against hard soil, strike bulbs together, wash them, or leave them heating in the sun.
- 4Cure the intact plant
Keep tops and roots attached while dry air circulates around bulbs and necks. Inspect every few days, rearrange damp contact points, and remove soft or odorous bulbs. Continue until outer wrappers, roots, and necks are fully dry instead of relying on a fixed number of days.
- 5Clean and sort conservatively
Brush away dry soil without stripping sound wrappers. Trim dry roots and tops, or braid suitable softnecks. Separate cut, bruised, soft, moldy, loose, or heavily exposed bulbs. Use sound damaged bulbs first and discard decay; reserve planting stock only from healthy labeled batches.
- 6Store with ventilation and inspect
Place firm cured bulbs in shallow mesh or slatted containers in a stable cool, dry, dark location appropriate to the garlic type. Check early and regularly for softening, sprouting, mold, or moisture. Remove failures immediately and rotate less protected sound bulbs into use first.
- 7Connect storage results to harvest
Record cultivar, leaf stage, harvest date, curing density, location, and first loss. Compare whole batches before changing the next crop. Move harvest earlier for split wrappers, improve airflow for damp necks, and widen the lifting line when fork injuries repeat.
- 8Manage an unavoidable damp harvest
Lift only when soil releases without smearing, work in small blocks, and move plants directly into shelter. Spread them in a single layer with extra space around damp tops, then inspect daily until surface soil and necks are drying normally. Keep the wet-weather batch labeled and separate; remove bruised, soft, slimy, or odorous bulbs immediately instead of blending them into sound dry-harvest stock. Compare its storage performance with the dry-weather blocks before deciding whether the curing arrangement needs a permanent change. Keep the comparison through the first storage month so delayed neck moisture or wrapper failure is not missed.
- 9Inspect the first stored month
Open each labeled batch weekly during the first month, feel necks and bulbs, and remove soft or moldy failures. Record whether losses cluster by wet-weather harvest, wrapper damage, or curing position before changing storage for the sound remainder.
Related reading
Sources
- Vegetables: Growing Garlic in Home Gardens. Washington State University Extension. Source record · Accessed 2026-08-19.
- Growing garlic in home gardens. University of Minnesota Extension. Source record · Accessed 2026-08-19.
- Garlic Production in California. University of California Agriculture and Natural Resources. Source record · Accessed 2026-08-19.