Grow · hand cut flower bed edge
Cut and Maintain a Crisp Flower-Bed Edge Without a Deep Root Barrier
Lay out a generous curve, cut a clean lawn face, form a shallow bed-side trench and maintain the line before grass crosses it.
Published Last updated
In this guide
- Treat the edge as a maintained soil profile
- Mark and review the line before cutting the turf face
- Choose a line that can be mown and maintained
- Inspect below and beside the proposed cut
- Work when the soil cuts cleanly
- Transfer the curve without adding small errors
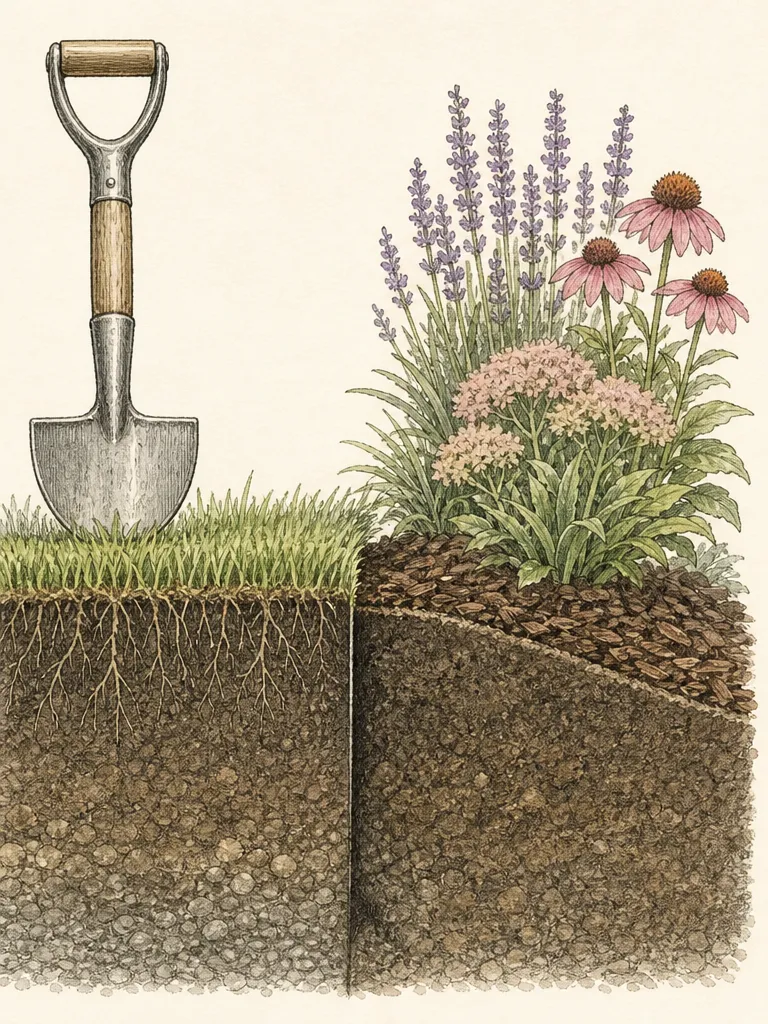
- Cut a firm lawn face and a sloping bed shoulder
- Remove sod without destabilizing the edge
- Finish soil and mulch below the grass crown
- Maintain the line before it becomes a new excavation
- Diagnose a collapsing or ragged edge
- Know when a cut edge is not the right solution
- Steps
Treat the edge as a maintained soil profile
A crisp cut edge is not a hidden wall. It is a visible change in level and angle between rooted turf and cultivated bed: the lawn ends in a firm face, while the bed falls away into a narrow open shoulder. That interruption makes grass crossing easy to see and easy to cut. It also creates a shadow line that reads cleanly from a distance without metal, plastic or a deep underground root barrier.
The method works because the line is renewed. Turf growth, rain, soil movement, mulch and foot traffic gradually soften the profile. University of Illinois and K-State both describe cut or trench edging as a material-free option that needs periodic recutting. Choose it when hand maintenance is acceptable and when a flexible natural-looking curve matters more than a permanent installed strip.
Do not promise that the trench stops all roots. Some lawn grasses spread by aboveground or shallow underground stems and can bridge or enter the bed between maintenance visits. Aggressive groundcovers can cross in the opposite direction. The cut edge is a readable inspection zone, not containment for running bamboo, invasive plants or roots capable of traveling far below a garden spade.
Mark and review the line before cutting the turf face
Lay out a maintainable curve, locate roots and buried conflicts, and wait for soil that holds a clean edge without smearing. Review the complete scored line before lifting the bed-side wedge. Keep mulch and soil below the turf top afterward. When growth bridges the opening, correct that section instead of deepening every part of an already sound edge.
Choose a line that can be mown and maintained
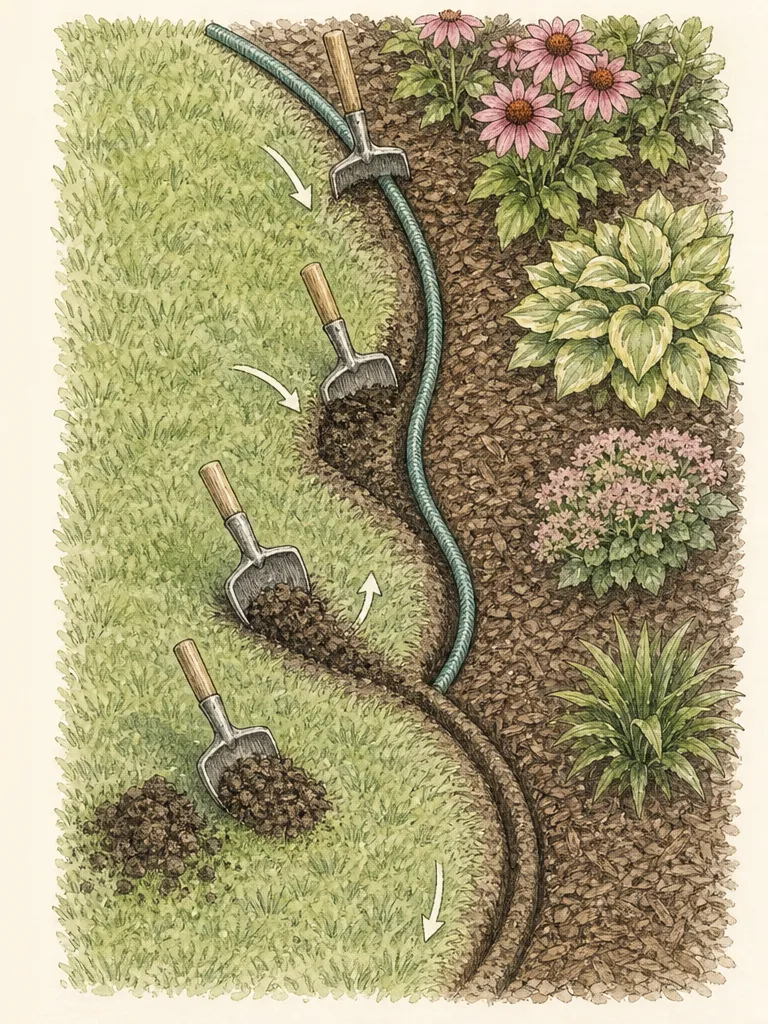
Stand at the primary viewing point and trace the intended border with a hose for curves or a taut string for a straight run, methods recommended by the RHS. Favor long generous sweeps. Small repeated scallops are difficult to mow, exaggerate tiny layout errors and create more edge length than the planting needs. Let the curve respond to a path, tree canopy or planting mass rather than wiggle around individual flowers.
Check access before cutting. A mower should be able to follow the lawn side without one wheel dropping into the bed, and a gardener should be able to reach the entire line for clipping and recutting. Keep the edge away from tree trunks, exposed structural roots, irrigation heads, utility boxes and the crowns of established perennials. A beautiful line that requires repeated root damage is not a workable design.
View the hose or string from both ends, from nearby windows and from the route people actually walk. Mark broad adjustments with stakes, then leave the line for a day if possible. Once turf is removed, corrections take time to heal. A calm curve usually needs fewer control points than expected; straighten minor tremors while preserving the larger movement.
Inspect below and beside the proposed cut
Before inserting an edger, identify irrigation tubing, low-voltage lighting cable and shallow services. Follow local utility-location requirements for any uncertain area, even though this is described as a shallow garden task. Never assume a former owner placed wiring or pipe at a standard depth. Hand tools provide feedback, but they do not make an unknown underground line safe to strike.
Probe carefully for large tree roots and existing plant crowns. Move the bed line around structural roots rather than shaving or severing them to preserve a geometric curve. Where fine feeder roots fill the soil, reduce excavation and work in short sections. Deepening the trench does not improve the appearance enough to justify avoidable root injury.
Identify the lawn type and its direction of spread. A dense bunching turf may hold a cut face differently from a vigorous runner-forming grass. Local extension guidance should set realistic maintenance frequency. Also check the bed side for spreading groundcovers. The line will be easiest to maintain when plants on both sides can be inspected and neither side is allowed to conceal the shoulder.
Work when the soil cuts cleanly
The RHS advises avoiding frozen or very wet ground. Frozen soil resists a clean vertical cut and can damage tools; saturated soil smears, compacts underfoot and collapses back into the trench. Bone-dry hard soil can also be difficult. Choose a day when the ground is moist enough to slice but firm enough to support the lawn face without slumping.
Use a half-moon edger or a sharp square spade for the initial line, plus a hand trowel or narrow spade for removing the bed-side wedge. A flat board can guide a straight edge. Gloves, closed footwear and eye protection appropriate to the work protect against sharp blades and thrown grit. Clean soil from tools and sharpen a dull edge before forcing it with extra weight.
Mow or trim the grass to its normal managed height before assessing the outline, but do not scalp it to make the edge appear lower. Move mulch and loose bed soil back from the proposed line so the actual turf crown is visible. Bag or tarp those materials separately from cut sod if they will be returned later.
Transfer the curve without adding small errors
Lay the hose smoothly and pin only the major turning points. For a string line, establish secure end stakes and keep tension consistent. Dusting flour or another locally acceptable temporary marker can preserve the line after the guide is removed, but avoid materials that harm plants or wash into drains. Often the edger itself can follow the hose if the tool never presses against or cuts it.
Make a light first score rather than driving to full depth immediately. Step back every few feet and confirm that the scored line still reads as one curve. Correct a wobble by joining two smooth points, not by making several tiny counter-cuts. The removed strip should become part of the bed only after the whole outline has passed this visual check.
At corners or path junctions, use a purposeful radius that the mower and edging tool can follow. A perfect sharp point in soil quickly rounds through traffic and rain. If a formal right angle is essential, a constructed material edge may suit that specific junction better, while the rest remains hand cut. The no-barrier method does not require every site detail to use one technique.
Cut a firm lawn face and a sloping bed shoulder
Stand on the lawn side and place the half-moon edger on the scored line. Keep the blade close to vertical so the remaining turf ends in a firm face rather than a thin undercut lip. Press with controlled body weight, withdraw and overlap the next cut slightly. Avoid rocking far into the lawn, which loosens the very edge that must stay rooted.
From the bed side, insert a narrow spade or trowel at an angle toward the first cut and lift a wedge of soil and sod. K-State illustrates a trench with an angled bed side, while Illinois describes a small cliff where turf meets the bed. The exact profile varies with soil and turf, but the visual principle is consistent: a clear lawn face and open shoulder, not loose soil packed level against grass.
Institutional examples use different practical dimensions. The RHS describes a roughly three-inch cut as a useful benchmark, while Illinois and K-State discuss profiles around four inches or a four-to-six-inch trench. Treat these as technique examples, not a mandate to excavate to one depth. Stop at the shallowest profile that holds the turf face, exposes crossing growth and avoids roots, services and unstable soil.
Remove sod without destabilizing the edge
Lift the cut strip in manageable sections. Shake recoverable bed soil from sound turf only where doing so will not spread persistent weeds or unwanted runners. Healthy sod may patch another lawn area if it is moved promptly and watered into prepared soil. Otherwise, compost or dispose of it according to local guidance and the weeds it contains.
Inspect the exposed lawn face. Firm loose turf gently from above, preserving its level with the surrounding lawn. Do not backfill gaps from the bed side up to the grass leaves, because this rebuilds the bridge the trench was meant to interrupt. Where the face tears around stones, trim to sound rooted turf and soften the larger curve rather than preserving a ragged projection.
Break large clods on the bed shoulder and grade them into the bed, keeping the trench open. Avoid throwing excavated soil over nearby perennial crowns or tree flares. If the new edge enlarges the bed, remove all turf crowns from that new planting area before mulching; buried grass can push through and turn a clean conversion into repeated weeding.
Finish soil and mulch below the grass crown
Rake the bed surface so it slopes gently toward, but not into, the open shoulder. Keep finished soil below the top of the lawn face. This preserves the shadow line and reduces soil spill onto grass. Correct low spots farther inside the bed rather than filling the edge trench, and avoid creating a drainage channel that carries stormwater and mulch toward a path or inlet.
Apply mulch to the established bed at a depth appropriate to the material and local guidance, then feather it thinner near the edge. It should not touch grass leaves, bury perennial crowns or sit level with the turf top. K-State notes that the trench can catch mulch, but it still requires cleanup; an overfilled groove becomes a bridge for lawn runners and obscures where recutting belongs.
Sweep soil and mulch off the lawn and paving. Water new plantings independently of the edge rather than flooding the trench to settle it. After the first rain, inspect for slumped soil, exposed turf roots and mulch migration. Repair small failures immediately with hand tools while the intended profile remains easy to see.
Maintain the line before it becomes a new excavation
Clip grass blades that lean over the opening during routine mowing. The RHS describes long-handled edging shears for this top growth. Cutting overhang keeps the line visible but does not remove runners already rooted in the bed, so inspect the shoulder by hand. Pull or cut crossings while they are short and traceable rather than waiting for a green mat to form.
Reinsert the half-moon edger along softened sections when turf begins to bridge the trench. K-State and Illinois both frame recutting as periodic work, often once or twice during a growing season in their contexts, while rapidly spreading turf or long warm seasons may require more frequent attention. Let observed growth and local lawn guidance determine the interval, not a universal calendar.
Pull fallen soil and mulch back into the bed before each recut. Restore the angled shoulder with a trowel and firm the lawn face from above. Light maintenance may take minutes along a short border; delayed maintenance can require lifting another strip of rooted sod. Put edge inspection on the same route as mowing so the work is triggered by visible crossings rather than remembered after the line disappears.
Diagnose a collapsing or ragged edge
If chunks of lawn break away, the face may be undercut, drought-stressed, trafficked or cut through weak thin turf. Stop deepening it. Restore normal lawn care, redirect feet and mower wheels, and recut only after roots knit the surface. A broader gentler curve can reduce wheel drop and handling damage at a recurrent failure point.
If the trench repeatedly fills with mulch, reduce the bed-side pile and examine runoff. A steep bed surface or downspout may be moving material toward the edge. Regrade within safe limits, redirect water appropriately and feather mulch thinner. Making the trench deeper treats the collection point, not the source, and can create a hazard beside a path.
If grass quickly appears throughout the bed rather than only at the line, old turf crowns or spreading runners may have been buried during bed creation. Trace and remove them without disturbing ornamental roots. Confirm the grass species with local extension help if needed. A hand-cut edge remains useful for inspection, but it cannot replace complete initial turf removal or control an aggressive plant from a distant root system.
Know when a cut edge is not the right solution
Choose another edging method where the grade drops sharply, wheelchair or mower wheels need a rigid boundary, loose gravel must be retained, or frequent hand recutting is unrealistic. A shallow visible strip may solve those surface jobs, but it still should not be described as a deep root barrier unless it is engineered for a specific plant and installed to appropriate guidance.
Do not use routine bed edging to manage roots from bamboo, woody plants or invasive running species. Those situations require plant-specific containment or removal advice and may involve underground utilities and neighboring property. Likewise, never cut a ring through major roots around a tree to obtain a perfect lawn circle. Tree health and root flare clearance outrank ornamental geometry.
Where the hand-cut method fits, its advantage is adaptability. A border can expand, straighten or curve without removing installed material, and the exposed soil line makes movement visible. Accept the maintenance as part of the design. Crispness comes from a clear profile, restrained mulch and timely observation—not from an unseen promise that roots have permanently stopped.
Steps
- Level
- moderate
- Time
- One to three hours for a short residential border, depending on soil and turf
- Tools
- Half-moon lawn edger or sharp square spade, Narrow spade or hand trowel, Garden hose or string and stakes, Rake, Long-handled edging shears, Gloves and closed footwear
- Materials
- Tarp or containers for sod and soil, Locally appropriate mulch, Optional temporary line marker
- 1Lay out one generous maintainable line
Use a hose for curves or taut string for a straight run. View the proposed edge from paths and windows, remove small wobbles, and make sure a mower and hand tools can follow it. Keep the line clear of trunks, major roots, plant crowns and fixed garden equipment.
- 2Locate hidden conflicts before cutting
Identify irrigation, lighting and shallow services, following local utility-location rules where anything is uncertain. Probe gently for tree roots and revise the curve around them. Note runner-forming turf and bed groundcovers so maintenance expectations reflect the plants on both sides.
- 3Choose firm, workable soil conditions
Avoid frozen, saturated or extremely hard dry soil. Move loose mulch and soil away until the turf crown is visible, prepare sharp hand tools, and trim the lawn only to its normal maintained height. Stable moist soil makes a cleaner face and limits compaction.
- 4Score and review the complete outline
Make a shallow first pass along the guide, then step back every few feet. Join smooth points to correct any tremor rather than adding tiny reverse curves. At path junctions, choose a radius the mower can follow instead of a fragile point that traffic will immediately round.
- 5Cut the lawn face close to vertical
Work from the lawn side with overlapping edger cuts, keeping the remaining turf firm and rooted. Avoid rocking the blade under the lawn. Adjust depth to the turf and soil, using institutional dimensions only as supported examples and stopping before roots, services or unstable ground.
- 6Lift an angled wedge from the bed side
Cut toward the vertical line with a narrow spade and remove manageable sod sections, forming a clear open shoulder. Shake out reusable soil only when it will not spread runners or weeds. Keep excavated material off ornamental crowns and tree flares.
- 7Grade and mulch below the turf top
Rake bed soil gently away from the lawn face and feather mulch thinner toward the opening. Leave the grass crown, perennial crowns and trunks exposed. Sweep debris from lawn and paving, then inspect after rain for slumping, runoff and material bridging the trench.
- 8Use light maintenance before runners root
Clip leaning grass during mowing, remove visible crossings and pull soil or mulch back from the face. Recut softened sections when growth bridges the opening, adjusting frequency to local turf vigor. Early corrections preserve the line without recreating the original excavation.
Related reading

Sources
- How to Create a Lawn Edge. Royal Horticultural Society. Source record · Accessed 2026-08-19.
- How to Maintain Lawn Edges. Royal Horticultural Society. Source record · Accessed 2026-08-19.
- Bed Edges. University of Illinois Extension. Source record · Accessed 2026-08-19.
- All About Edging. K-State Research and Extension Johnson County. Source record · Accessed 2026-08-19.