Gardens · design shade path groundcovers
Shape a Shade Path with Low Groundcovers and Clear Edges
Compose a shaded path from repeated groundcover drifts, contrasting leaf textures, and open establishment pockets around existing tree roots.
Published Last updated
In this guide
- Read the space before drawing shaded path edged with low groundcovers
- Put permanent structure ahead of seasonal color
- Map light, water, and movement on the same plan
- Compose repeated groups at mature size
- Use contrast to separate neighboring layers
- Leave deliberate room for establishment
- Edit the design as seasons replace one another
- Record the view that the next season must improve
- Design ideas
Read the space before drawing shaded path edged with low groundcovers
Design the path from the wettest walk a gardener will take. Travel it during or just after rain, when leaves bend, stones darken, and low places hold water. Mark the dependable footfall line, the outer sweep of a shoe at turns, and any edge used for balance. Mature foliage needs a visible setback from that line. The garden can feel enclosed while the walking surface remains dry, legible, and free of stems.
Survey the shade as several habitats. University of Minnesota Extension notes that a tree canopy or building overhang can deflect rain and that established woody roots compete for the moisture that arrives. Compare soil beneath the trunk-side canopy, the open outer drip line, a low bend, and any eave shadow. Record direct light before leaf-out and again under full summer foliage. Dense shade, dappled light, dry root-filled soil, and cool moist soil call for different groundcovers.
Plot trunks, exposed flares, major surface roots, existing crowns, stones, drains, irrigation, slopes, borrowed views, and access for tree care. Measure the path at regular intervals and photograph both directions from fixed endpoints. Keep the tree's structural roots and flare visible on the plan. These fixed features determine where individual planting pockets can fit and where leaf mold or an unplanted shoulder is the safer long-term surface.
Put permanent structure ahead of seasonal color
The permanent composition is the path surface, its edge, the tree trunks, and the intervals between them. Groundcovers should reinforce those lines through mass and texture. Illinois Extension describes low groundcovers as transitions, visual guides, and space-defining plants that can soften walks and steps. Give each trunk a generous open reveal and let one foliage drift point toward the next bend. Flowers remain secondary events within that durable geometry.
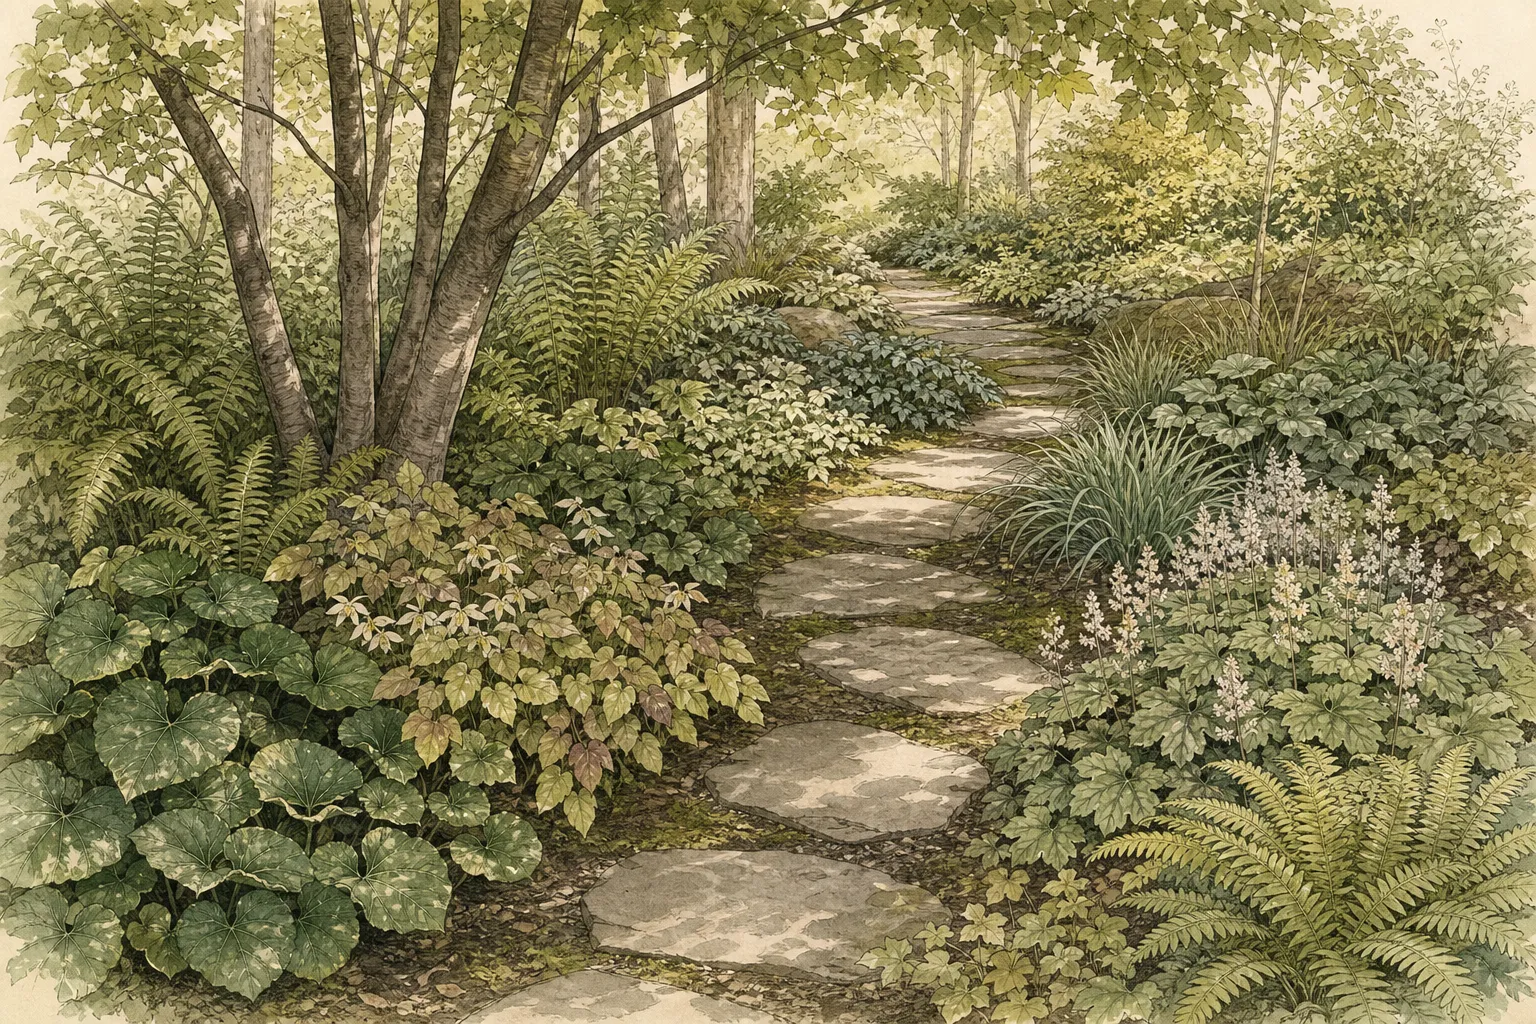
Choose by growth habit and height as carefully as by shade tolerance. Illinois Extension notes that the groundcover category ranges from an inch to 4 feet and includes clumping, running, evergreen, and deciduous plants. A spreading 6-inch mat behaves differently at a step from a 3-foot fern. Draw the mature width, decide where its edge may travel, and assign a reachable boundary for future editing.
Texture changes the apparent width of the route. Illinois Extension explains that small, smooth leaves used in broad curves can suggest spaciousness, while coarse large leaves make an area feel closer. Use the finer texture through the narrowest passage and place the largest leaves where the path opens. Decide how much winter soil may show as well. Herbaceous groundcovers expose more ground after dormancy, whereas locally persistent foliage keeps the edge visible; either result can be deliberate when trunks, stones, and drains remain clear.
Map light, water, and movement on the same plan
Shade and moisture rarely share the same boundary. Draw a light map first, then overlay soil moisture after spring rain and during a midsummer dry period. The deepest shade beside a mature trunk may also be the driest location. A bright gap at the canopy edge may hold more moisture. Assign every drift a paired description such as dry deep shade, moist dappled shade, or seasonally wet low shade.
Add root density to the overlay. Use visual evidence and gentle probing from the path to locate feasible pockets between important woody roots. Retain a broad undisturbed zone at flares and prominent roots. Where a continuous bed would require disruptive excavation, use leaf litter, an existing moss surface, or widely separated clumps. A broken planting rhythm can still feel intentional when the same taxon reappears beyond the root obstacle.
Map movement beyond ordinary walking. Include wheelbarrow width, hose reach, pruning access, fallen-branch removal, and a place to kneel beside each drift. Keep drains and low stones uncovered. On curves, preserve a wider inside shoulder where people shorten the turn. The planted line should guide feet back to the center through clear contrast, not through a physical barrier that catches shoes.
Trial the driest and dampest pockets before filling the route. Plant a small named group in each correct zone and mark its intended mature outline. Follow leaf height, spread, scorch, collapse, winter survival, and recovery for a full growing cycle. Use those results to confirm whether the route can share one dominant groundcover or needs separate plants joined by repeated form.
Compose repeated groups at mature size
Shape three or four irregular drifts that widen at pauses and taper near turns. Illinois Extension recommends staggered or diamond planting and bases spacing on habit, growth rate, cost, and desired coverage time. Use those principles within each drift, then leave a clear gap between plants with incompatible moisture needs. The repeated outer contour supplies continuity while quantities change from one pocket to the next.
Work from the path and open only the individual holes that the root map allows. Keep excavated soil and wet leaves off the tread. Set each container on its exact center before digging, confirm the mature circle still ends behind the safety setback, and keep the full name with that group. A clumping fern, a rooted runner, and a self-seeding groundcover require different future boundaries even when their current pots share a diameter.
Use one dominant leaf shape, one contrasting fine texture, and a few taller fern accents. Repeat the dominant plant on both sides of the route in unequal lengths. Let the fine-textured group carry the eye through a moist bend, then return the first leaf farther along. This controlled recurrence makes root-driven gaps and moisture changes feel like part of the path's cadence.
Use contrast to separate neighboring layers
Broad leaves close to the ground create a continuous dark edge, while upright fronds mark selected pauses. A silver or pale-green fern can lift a damp recess, and a bronze-tinted evergreen mat can hold the dry side through colder months. Keep flower color quiet enough that the path still reads when bloom is absent. Contrast in outline and surface is more dependable beneath changing canopy light.
Place accents where the walker slows, such as a bend, bench, gate, or trunk reveal. Keep them back from the narrowest tread and repeat one smaller echo farther along. The path remains the subject; every plant should strengthen direction, reveal a tree, or distinguish a moisture zone. An isolated novelty hidden between roots adds a maintenance point but contributes little to the journey.
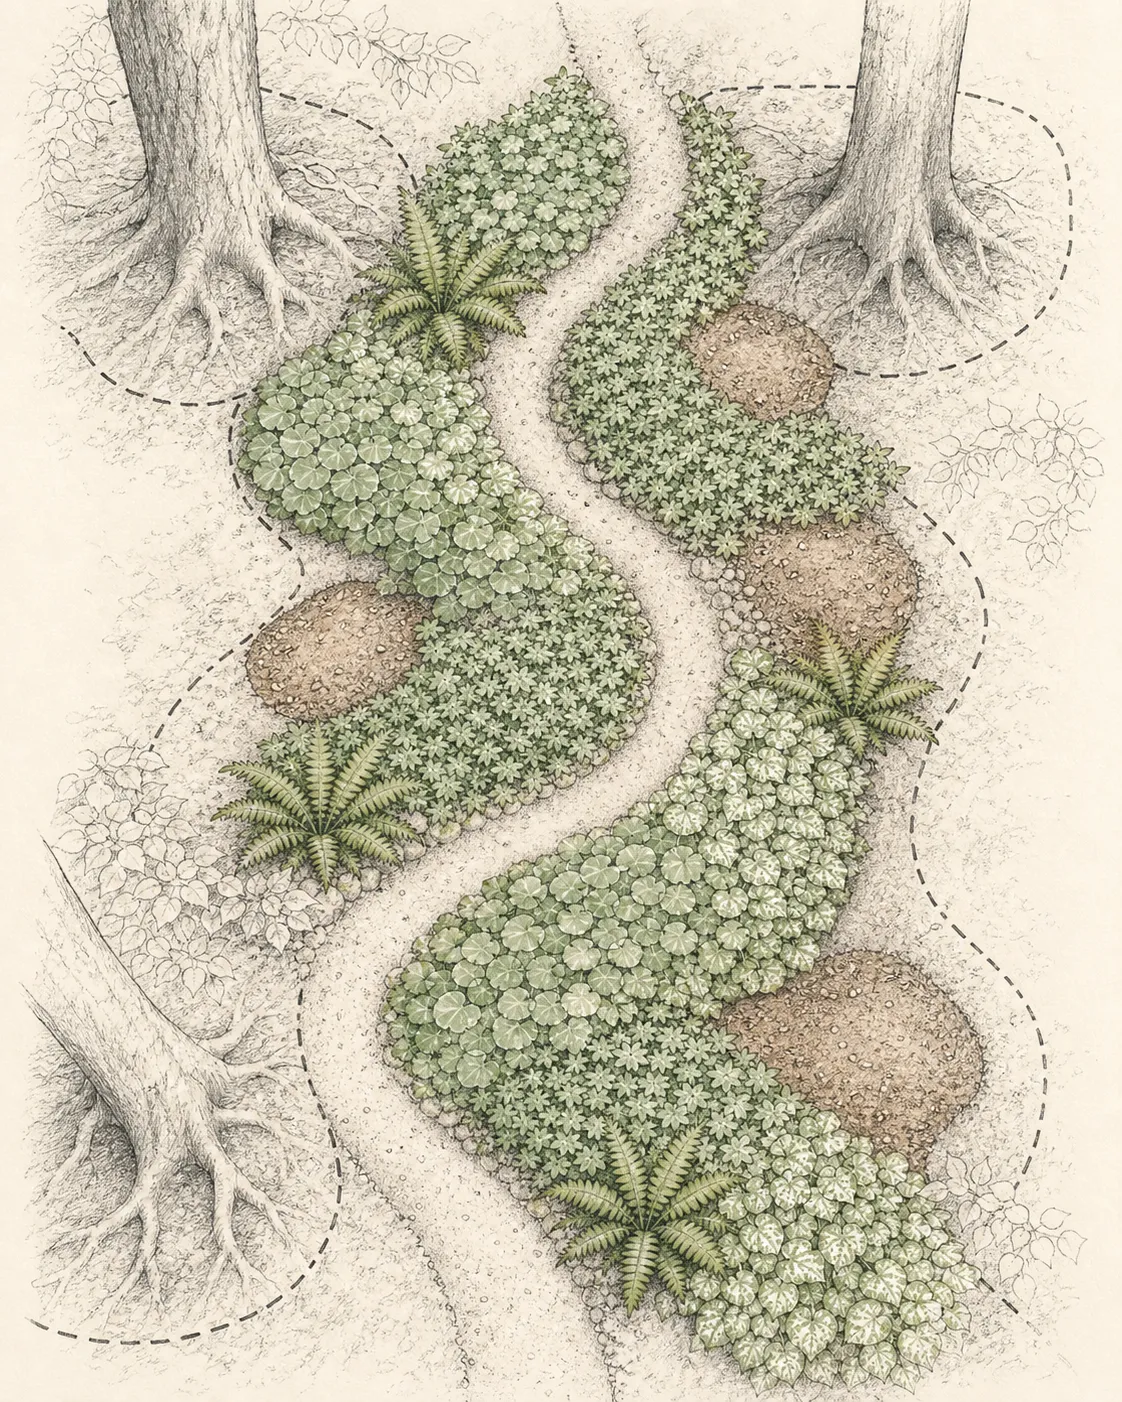
A concrete model is a 32-foot-long, 3-foot-wide stepping path under mature deciduous trees in a cool-temperate Upper Midwest garden. The upper 18 feet are dry, root-filled shade; a lower 8-foot bend receives dappled light and retains moisture; the final 6 feet return to moderate shade. Keep a 6-inch foliage setback from both stone edges and leave 24-inch open collars around visible trunk flares. RHS dimensions are approximate UK values, so local hardiness and spread must be verified before installation.
Along the dry upper side, arrange two seven-plant drifts of Epimedium × versicolor ‘Sulphureum’ at 3-foot centers, using staggered rows where root pockets allow. RHS lists it near 1 foot high with spread to 3 feet, reddish-copper foliage, pale yellow mid-spring flowers, and evergreen habit. Place two Dryopteris affinis accents 9 feet apart and 30 inches behind the groundcover line; each receives a reserved 3-foot circle for its evergreen dry-shade fronds. Break either drift around major roots while keeping its tapered outline visible from the path.
At the moist bend, set two groups of five Tiarella cordifolia at 15-inch centers, beginning 12 inches behind the stone setback. Its fresh heart-shaped leaves and spring flower spikes occupy about 8 inches in height and at least 1 foot in spread. Center three Athyrium niponicum var. pictum 4 feet apart behind them, reserving 3-foot-wide circles for the 1-foot-high silver-grey fronds. Repeat one short patch of Waldsteinia ternata on the final moderate-shade stretch, using its 4-inch height and 2-foot-or-greater spread as a low visual return. These taxa require replacement where local climate, soil, wildlife, or spread behavior makes them unsuitable.
Leave deliberate room for establishment
Prepare each pocket as a permanent planting site and remove perennial weeds before setting groundcovers. Illinois Extension identifies bed preparation as the critical weed-control stage and notes that spring or fall planting is typical, with summer requiring closer watering attention. Preserve the existing tree grade and work within soil that can be opened safely. Set crowns at nursery depth, water the root ball, and keep loose material behind the path edge.
Expect the young layout to look open. Illinois Extension allows one to two growing seasons for full groundcover establishment and recommends wider spacing for faster spreaders. Maintain those gaps through shallow hand weeding and direct moisture checks. A 1-to-2-inch mulch layer can conserve moisture and suppress weeds where it suits the taxa, yet tree flares, perennial crowns, stepping stones, and moss patches remain uncovered.
Water the mapped pockets individually. The dry upper section may need attention during rainy weather because canopy interception and root competition continue. The low bend may need little supplemental water after a storm. Probe near each new root ball and compare the soil beyond it. When one zone stays saturated or repeatedly dries within a day, correct selection or water delivery before extending that drift.
Walk the path while foliage is wet at least once each month during establishment. Lift leaves from stones, record settling, and measure the remaining setback. Redirect a runner while it is young and move an oversized clump during an appropriate transplanting period. Constant edge shearing signals that the mature circle or growth habit was misread.
Edit the design as seasons replace one another
Read the route at four useful moments: early spring before canopy closure, after a soaking rain, at midsummer shade maximum, and after leaf fall. Early light reveals flower and bulb opportunities. Rain exposes unsafe encroachment and drainage. Summer shows the true dry-shade pattern. Leaf fall reveals evergreen continuity, bare crowns, and the shape of the stones. Photograph both directions from the marked endpoints.
Use distribution to diagnose decline. Scorch across the upper dry drift suggests a different problem from collapse restricted to the moist bend. Compare root density, soil moisture, grade, and canopy opening before altering the entire route. Replace only the group whose site match has failed. A healthy gap around a root or trunk can remain part of the composition.
Thin the most vigorous edge before it meets a neighboring drift, lift self-sown plants that obscure the path line, and preserve clear trunk collars. Let successful clumps gain their designed width during the first two seasons. After that point, edit at named boundaries on the map. This keeps broad masses intact while protecting drains, stones, maintenance pockets, and the contrasting texture assigned to each bend.
Use the bright interval before deciduous leaf-out for bulbs only where their foliage can mature safely behind the tread. The Minnesota guidance explains that crocus, scilla, snowdrops, species tulips, and daffodils may receive enough early light beneath open branches, while repeat flowering depends on leaves rebuilding reserves. Map each pocket and keep later groundcover from smothering its ripening foliage. If summer canopy closes too early or foot traffic repeatedly bends the leaves, let the permanent foliage composition carry spring on its own.
Record the view that the next season must improve
Keep a route plan that names every drift, marks planting centers, and distinguishes clumping, running, and self-seeding habits. Add installation dates and the source of mature dimensions. Draw root obstacles and trunk collars on the same sheet. This record protects intentional openings and lets future maintenance identify a plant that has crossed from its assigned moisture zone.
Measure the narrowest wet-weather tread, the distance from foliage to each step, and the outward movement of every running groundcover. Note how long the damp bend holds moisture after rain and how quickly the upper pockets dry. Pair those observations with seasonal photographs. A path that looks unified from one end may contain sharply different root conditions at walking distance.
Substitute for Epimedium × versicolor ‘Sulphureum’ only with a locally dependable dry-shade groundcover that stays near 1 foot high, spreads predictably through the assigned 3-foot patches, and supplies useful foliage beyond a brief bloom. The replacement must remain manageable at tree roots and path edges. A fast mat advertised for every exposure deserves careful local screening, since Illinois Extension warns that unusually broad site claims can signal aggressive behavior.
The moist-bend replacement should preserve two scales: a low spring layer near the stones and a 1-foot-high, fine-textured fern accent behind it. Confirm soil moisture, winter survival, wildlife pressure, and mature spread for exact taxa. Where a fern expands farther than the allotted 3-foot circle or a low plant enters the tread, enlarge the bed or select a naturally smaller form.
Write one action for the next return walk. It might restore a 6-inch stone setback, repeat the dry-shade leaf beyond a root gap, open a clogged drain, divide the damp drift, or leave a successful moss shoulder untouched. Judge the change during the condition that prompted it, using the same direction of travel and the same measured edge.
Design ideas
- Style
- Layered botanical garden with restrained seasonal color
- Space
- a shaded path edged with low groundcovers
- Climate
- The example path belongs to a cool-temperate Upper Midwest garden beneath deciduous trees, with frozen winters, spring rain, summer canopy, a dry root-filled upper stretch, and one moist but draining lower bend. The RHS size and seasonal notes describe UK-grown taxa and remain approximate; local Extension evidence must confirm hardiness, spread, soil fit, and invasive status. Evergreen shade, arid summers, humid frost-free climates, standing water, compacted construction soil, or dense surface roots require different taxa and possibly unplanted leaf-litter or moss zones, while the measured footfall setback and open trunk flares remain fixed.
- 1Draw circulation first
Mark the exact line used by feet on straight runs, curves, and stepping gaps. Widen the planted setback where a walker turns, carries tools, or reaches for balance. Use low leaves to point along the route and reserve a stable shoulder at pauses. The edge should remain obvious under rain-darkened stones and fallen foliage.
- 2Choose the structural layer
Let tree trunks and the path surface provide vertical and horizontal structure. Add only a few fern accents at bends, keeping their mature fronds behind the low border. Broad groundcover drifts then connect those markers. Open soil, leaf litter, or moss around major roots can serve as deliberate breathing space within the sequence.
- 3Taper each drift
Start a foliage mass broad beside a pause, narrow it as the route moves past a root obstacle, and let it disappear before another texture begins. Bring the same leaf back farther along for recognition. Unequal drift lengths and repeated tapering create direction while accommodating the true pattern of plantable pockets.
- 4Match plants to gradients
Give the dry trunk-side stretch a restrained, slow-moving mat and place moisture-responsive foliage at the lower bend. Echo color or leaf scale across the transition so the change feels composed. Irrigation markers can sit at the back of each zone, allowing separate checks while keeping equipment out of the view.
- 5Plan the declining season
Combine one winter-persistent ground layer with spring flower spikes and summer fern texture. Keep bulb or ephemeral foliage behind the walking setback until it ripens. After leaf fall, the remaining mat, trunk openings, and clean stone outline should still form a complete route, even where deciduous clumps have disappeared.
- 6Edit from fixed views
Photograph the full path from both ends after rain and at midsummer canopy. Include a marked stone in each frame for scale. Circle one place where foliage blocks the next step, a drift loses continuity, or a moisture boundary becomes visible. Change that location alone and compare it under the matching condition next year.
Related reading
Sources
- Gardening in the shade. University of Minnesota Extension. Source record · Accessed 2026-08-30.
- Shade planting: annuals, bulbs and perennials. Royal Horticultural Society. Source record · Accessed 2026-08-30.
- Ground Covers. Illinois Extension. Source record · Accessed 2026-08-30.