Gardens · design north facing entry garden
Design a North-Facing Entry Garden with Structure Before Flowers
Build a calm north-facing entry from evergreen form, layered foliage, repeated groundcovers, and a measured sequence of pale spring flowers.
Published Last updated
In this guide
- Read the space before drawing north-facing entry garden
- Put permanent structure ahead of seasonal color
- Map light, water, and movement on the same plan
- Compose repeated groups at mature size
- Use contrast to separate neighboring layers
- Leave deliberate room for establishment
- Edit the design as seasons replace one another
- Record the view that the next season must improve
- Design ideas
Read the space before drawing north-facing entry garden
Begin at the front walk, because the entry must work before it can decorate the house. Measure the route from public sidewalk or drive to the threshold, including steps, handrails, door swing, lights, numbers, utility meters, downspouts, windows, and snow-storage areas. NC State Extension recommends at least 4½ feet for two people walking side by side on a front path. Preserve that dimension at the wet-season foliage line, not merely between young pots.
A north-facing label predicts shade from the building, yet it says little about reflected sky light, morning or evening sun around corners, or seasonal change from neighboring trees. Observe the bed at several times on clear days in spring, midsummer, and autumn. Photograph bright and dark zones with the door in frame. University of Minnesota Extension distinguishes partial or light shade from dense shade and notes that plants beneath eaves or large trees may receive less moisture than the surrounding garden.
Check water after rain and thaw. Mark the dry wall strip, downspout discharge, low points beside steps, roof splash, compacted delivery routes, and any place ice regularly forms. Probe soil depth near the foundation and farther out because construction debris can create abrupt changes. Record prevailing winter wind as well. The final palette must fit the coldest exposed corner, the driest sheltered pocket, and the moist receiving area as separate planting conditions.
Put permanent structure ahead of seasonal color
Build the winter picture from the path line, one or two durable foliage masses, and the house façade. NC State describes simplicity and repetition as organizing principles and warns that mature height and spread must fit doors, windows, roots, and branches. Draw every structural plant at full width. A plant near a building should be centered at half its mature width plus at least 1 foot from the wall under NC State's spacing guidance.
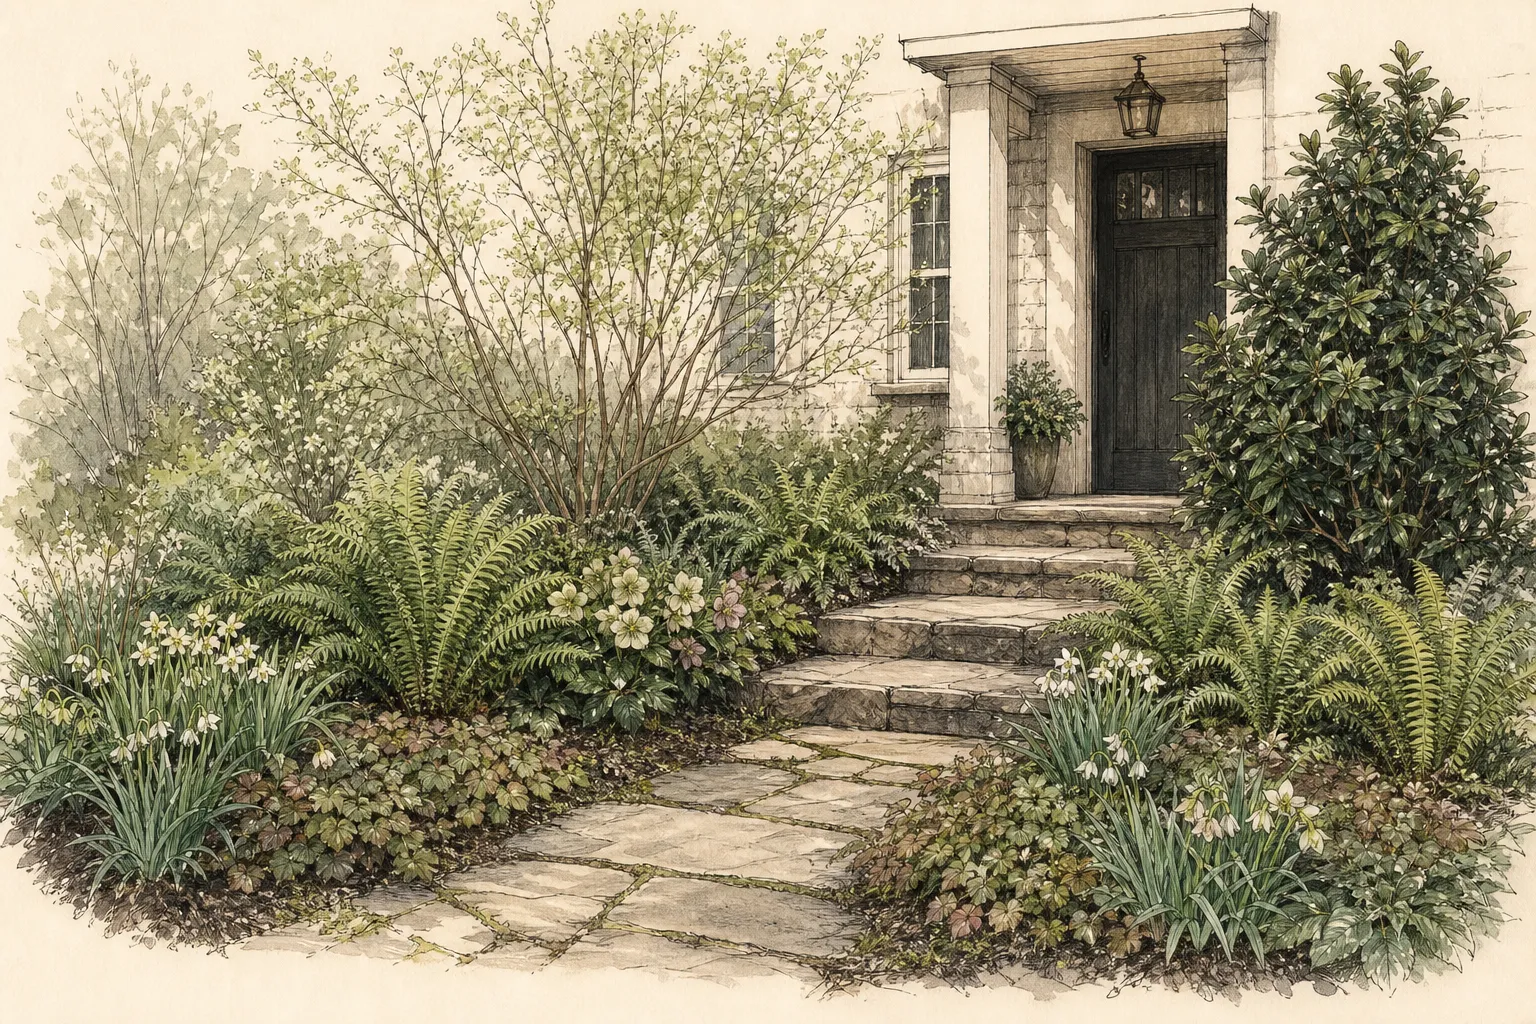
Stand at the street, at the first step, and just inside the closed door. From each point, the route should read immediately and the plants should frame the entrance at unequal heights. Keep one side visually quieter where deliveries, snow, or service access needs more space. Flowers then become timed accents within this framework. The entry still has shape when bulbs are dormant, perennials are cut back, and snow hides the bed edge.
Map light, water, and movement on the same plan
Trace the path and door geometry in a dark line, then add separate colored fields for light and moisture. The driest pocket often sits directly under the eave, while the brightest outer corner may receive roof runoff. A plant assigned by compass direction alone can therefore land in the wrong water zone. Pair each candidate's light requirement with its drainage and moisture range at the exact plotted center.
Show snow piles, salted pavement, hose routes, meter access, window cleaning, and the place a visitor pauses. These functions change through the year, so test the plan with winter coats, a parcel, and a shovel as well as with summer garden tools. Keep foliage beyond the handrail and step nosing. A 4½-foot approach can narrow quickly when arching leaves occupy both edges.
Reserve a service strip along the foundation and widen it at downspouts, taps, vents, and utility boxes. A stable surface or shallow mulch can make the strip read as intentional negative space. Keep plant crowns beyond the drip line of roof splash and keep finished soil below vulnerable wall details. Any grading or drainage alteration near the building belongs with qualified local advice.
Set empty nursery pots or cardboard circles on the proposed mature centers. Walk the route from both directions and view the arrangement through the door glass at night, when interior lighting changes contrast. Move circles until the planted sides balance the façade while retaining an open arrival. Only then convert each circle to an exact taxon and quantity.
Compose repeated groups at mature size
Use repeated masses to guide the eye toward the door. NC State links rhythm to repeated color and form and recommends groups of one plant over many isolated kinds in a small space. Let a foliage plant appear in two unequal drifts, then place a taller fern or perennial as a limited accent. This gives the two sides kinship while allowing the wider bed to carry more visual weight.
Plot quantity from mature spread. The RHS shade list states that its height and spread figures are approximate and can change with location, soil, and weather. Draw the listed circle first, then enlarge it when local trial or nursery evidence shows greater growth. Keep exact cultivar names on the planting schedule because a compact selection and the straight species may occupy very different areas.
Separate plants by cultural need as well as appearance. Dense shade near a wall may be dry, while a lower outer bed remains moist after storms. The Minnesota shade guidance emphasizes both the canopy's interception of rain and competition from established roots. Give these zones distinct irrigation checks and choose plants whose mature forms still create one composition across the boundary.
Use contrast to separate neighboring layers
Leaf size and outline carry a shaded entry longer than blossom color. Place an arching fern against a lower, rounder evergreen leaf, then use one silver or pale-green surface to lift the darkest pocket. Keep fine textures in broad groups so they remain visible from the street. A single coarse leaf can act as an accent near the pause, where it can be seen closely.
Connect the beds across the path through recurrence, not mirror symmetry. Repeat one ground-layer taxon on both sides and change its group length. Keep the taller structural group on the side with greater wall area, while the opposite side stays lower near numbers, lights, or a handrail. The door remains the focal point and the plants form a measured approach to it.
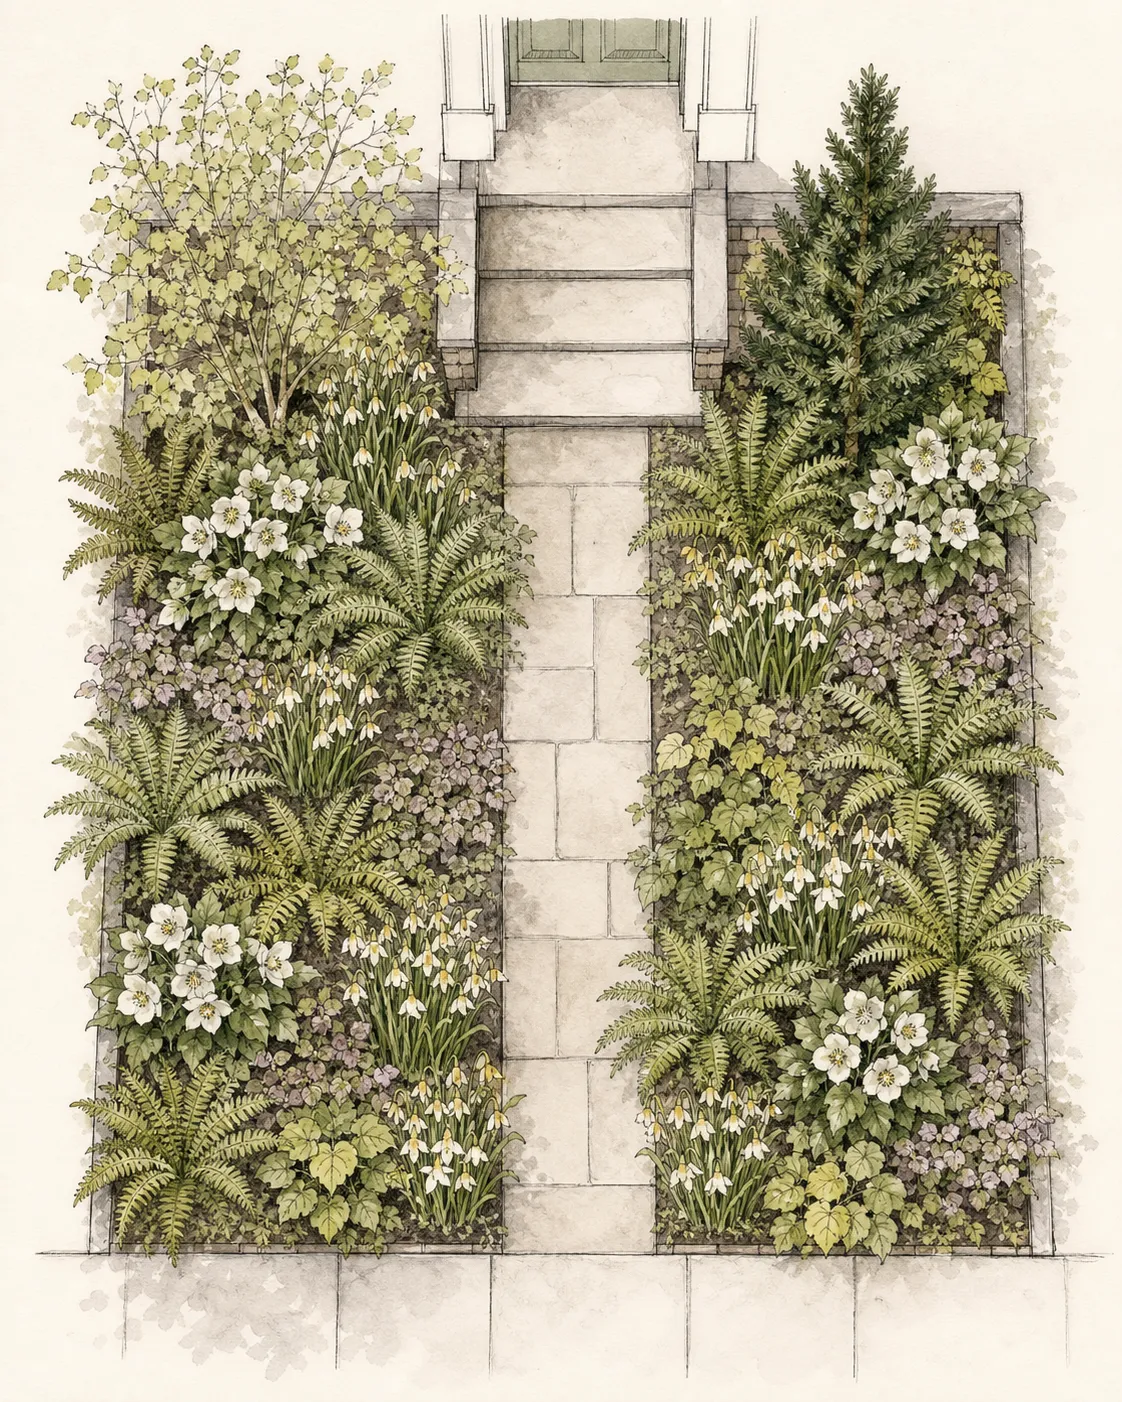
For a bounded example, use an 18-by-16-foot north-facing entry in a cool-temperate Upper Midwest climate. The design assumes frozen winters, bright reflected sky, a 4½-foot central walk, moist but freely draining outer soil, and a dry strip beneath a 24-inch eave. Two beds remain about 5¾ feet wide. Dimensions from the RHS list guide the drawing, while local Extension or nursery evidence must confirm hardiness and performance before purchase.
In the broader west bed, center three Dryopteris affinis 4 feet apart on a line 2½ feet from the wall. RHS lists this evergreen dry-shade fern at about 3 feet high and wide; the wall distance follows the half-spread-plus-1-foot building clearance. Place five Bergenia ‘Overture’ at 18-inch centers along the front arc, 15 inches back from the paving. Its 1-foot height, 18-inch spread, evergreen leaves, winter bronze-red color, and spring flowers provide the low permanent band.
In the east bed, set three Epimedium × versicolor ‘Sulphureum’ at 3-foot centers, with the nearest mature circle ending 12 inches from the path. RHS gives it a 1-foot height and spread up to 3 feet, reddish-copper foliage, pale yellow mid-spring flowers, and evergreen character. Add five Pulmonaria ‘Blue Ensign’ at 18-inch centers behind the landing for a 14-inch-high, 18-inch-wide spring accent. Tuck three groups of seven Galanthus nivalis between these established circles; its winter flowers reach roughly 4 to 9 inches, and its foliage needs a place that stays out of summer drought.
The ferns establish the tall dark framework, bergenia carries winter leaf color, epimedium links the two seasons, pulmonaria brightens spring, and snowdrops announce the earliest change. Omit any taxon that lacks dependable local hardiness, fits poorly with soil pH or moisture, or carries unacceptable local spread or pest risk. A substitute inherits the documented height, width, foliage persistence, and seasonal slot; matching flower color is optional.
Leave deliberate room for establishment
Install the structural plants first and leave their mature circles visible with stakes or a light sand line. Set crowns at their original grade and keep mulch thin at stems and fern crowns. The first season will show how far leaves arch toward the path and how the wall changes moisture. Delay small filler plants until that evidence is available; open ground can be weeded and monitored more easily than an overpacked bed.
Water each new root ball and the surrounding soil according to direct moisture checks. The eave line may remain dry during a general rain, while the outer edge can stay wet beside a downspout. Keep those checks separate. Improve persistent drainage or roof-water problems at their source before expanding the planting, and use a soil test when nutrient or pH questions arise.
Inspect the route during rain, after snow removal, and at full summer leaf. Lift foliage from step edges, maintain the handrail approach, and keep wall-service points visible. Weed young drifts before their leaves touch. Once the assigned plants occupy their circles, routine care becomes selective division, removal of seedlings or runners outside the boundary, and renewal of a thin surface mulch.
Edit the design as seasons replace one another
Photograph the entry after leaf fall, during the earliest bulb display, at spring foliage expansion, and near midsummer maximum. Use the same standing point and include both path edges. Winter exposes the structural balance; spring tests the sequence of pale flowers; summer reveals path clearance and water stress. Mark the outline of each drift on a printed image so movement across its boundary becomes obvious.
Read weak growth by location. Repeated dry margins under the eave point toward intercepted rain or root competition. Soft crowns at the outer low point suggest excess water or poor drainage. Pale growth limited to the darkest recess raises a light question. Inspect grade, roots, and moisture before changing nutrition. A single treatment across both beds can intensify the difference the plan was meant to accommodate.
Keep fallen leaves where a light layer protects soil and can be lifted easily from crowns, steps, and drains. Remove diseased material according to local guidance and keep the paved route clear. Spring cleanup should reveal emerging bulbs and evergreen foliage as a deliberate composition, while later fern expansion supplies height. This sequence makes bare periods readable as transitions, not as invitations for unrelated purchases.
When one group exceeds its circle, restore the designed boundary through division or relocation at a suitable time for that taxon. Preserve the unequal drift lengths and clear service strip. A plant that repeatedly needs clipping at the path is misplaced, even if it remains healthy. Replace it with a locally supported selection whose natural spread fits the available line.
Record the view that the next season must improve
Keep a planting schedule beside the scale plan. Record full names, source dimensions, centers, quantities, installation dates, and the local evidence used to accept each taxon. Map dormant bulb pockets. A later gardener should be able to distinguish intentional gaps from lost plants and identify a runner crossing the path before it becomes confused with the neighboring drift.
Measure path width at the tightest summer point and after a rain. Record the distance from structural crowns to wall, step, handrail, and utility access. Note how long the outer bed stays wet after storms and how quickly the eave strip dries. These values reveal whether annual maintenance is preserving the intended entry or compensating for an unsuitable placement.
Treat RHS dimensions as planning estimates tied to UK guidance. Their own note says site, soil, and prevailing weather influence final size. The Upper Midwest example therefore needs local confirmation of winter survival, foliage persistence, invasiveness, deer pressure, and summer moisture response. If evidence is weak, plant a small trial group in the correct zone and retain open mulch elsewhere for one full seasonal cycle.
Replace Dryopteris affinis with a locally hardy fern only when the alternative holds a roughly 3-foot structural circle and accepts the observed dry shade. A shorter deciduous fern changes winter mass and needs another evergreen layer. Replace Bergenia ‘Overture’ with a broadleaf ground layer that remains near 1 foot high and 18 inches wide, keeps winter value locally, and tolerates the measured edge conditions.
An epimedium replacement should stay low, spread predictably across the assigned 3-foot patch, and retain useful foliage beyond spring in the local climate. A pulmonaria replacement occupies the smaller spring-accent circle and must remain clear of the landing. Bulb substitutions require locally suitable chilling, moisture, toxicity, and foliage-ripening conditions; the early white note can be omitted where those requirements conflict with safe entry use.
Choose the next edit from a specific viewpoint and season. It may shorten a drift at the landing, open a downspout inspection pocket, strengthen one repeated foliage group, or remove a spring accent that lacks summer discipline. Date the change on a tracing overlay and judge it when the same seasonal condition returns.
Design ideas
- Style
- Layered botanical garden with restrained seasonal color
- Space
- a north-facing entry garden
- Climate
- The worked entry represents a cool-temperate Upper Midwest site with frozen winters, bright reflected sky on a north façade, a dry 24-inch eave shadow, moist but freely draining outer beds, and a 4½-foot central walk. RHS plant sizes supply approximate drawing envelopes, while local evidence must confirm cold hardiness, foliage persistence, soil response, and legal status. The Minnesota source notes that dense shade beneath a tree or overhang can remain unexpectedly dry because rainfall is intercepted and woody roots compete for moisture. Check that mechanism separately from low-site saturation during spring thaw and midsummer dry periods before assigning irrigation. Record both zones after comparable weather; separate moisture logs keep the apparently continuous shade bed from receiving one uniform irrigation schedule. Warmer humid climates, acidic woodland soils, deep evergreen shade, heavy clay, salt exposure, or concentrated roof runoff require a different palette within the same mature-width, path-clearance, and seasonal-role limits.
- 1Draw circulation first
Use the front walk as the entry's strongest line. Carry its full usable width through landings and turns, then shape bed edges to reinforce that movement. Keep a wider pocket on the latch side for visitors, parcels, and winter clothing. Let low foliage mark the path while steps, rails, and door hardware remain visually distinct.
- 2Choose the structural layer
Give the wider bed one tall evergreen-textured group and keep the opposite side below the handrail or window. Join them through a repeated low leaf, not through matching heights. The façade supplies the background plane, so additional woody masses are useful only where they solve a measured scale, screening, or winter-balance problem.
- 3Echo one leaf across the walk
Repeat a dependable ground-layer plant in one long drift and one short cluster on the opposite side. Leave their outlines unequal so the entrance feels balanced yet relaxed. The shared leaf shape carries the eye across paving, while distinct tall accents respond to different wall area and service needs.
- 4Match plants to gradients
Place the most drought-tolerant shade group beneath the eave and reserve moisture-loving selections for the outer receiving soil. Put a removable marker at the boundary between irrigation checks. Similar greens can make the two zones look continuous while their roots receive different care.
- 5Plan the declining season
Let winter foliage and fern form hold the longest view, then add small early-flower pockets where their ripening leaves stay out of foot traffic. A limited late accent may sit deeper in the bed if its summer mass fits. Label dormant positions so autumn division and spring cleanup protect the sequence.
- 6Edit from fixed views
Take matched photographs from the property edge and from behind the closed door. Use the threshold and a path joint as scale references. Mark where the eye loses the entrance, where wet leaves narrow travel, or where a bed looks empty after bloom. Alter one layer and revisit the identical frame during the corresponding season.
Related reading
Sources
- Gardening in the shade. University of Minnesota Extension. Source record · Accessed 2026-08-30.
- Shade planting: annuals, bulbs and perennials. Royal Horticultural Society. Source record · Accessed 2026-08-30.
- 19. Landscape Design. NC State Extension. Source record · Accessed 2026-08-30.