Tools · garden spade ornamental planting division
Choose a Garden Spade for Dividing and Planting Ornamentals
Select a garden spade by blade geometry, tread, shaft, handle, soil, user fit, and the precise cuts required for planting and dividing ornamental perennials.
Published Last updated
In this guide
- Define the cuts the garden actually needs
- Match blade geometry to the work
- Fit shaft and grip to the gardener
- Run a dry shop test before buying
- Test cutting and leverage safely
- Use the spade around living crowns
- Read soil resistance instead of fighting it
- Maintain the edge and retire unsafe tools
- Compare the cut, the fit and the upkeep
- Tool notes
Define the cuts the garden actually needs
Choose the spade by the narrowest important cut, the soil it must enter, and the user who will control it. A straight, sharp garden spade is useful for bed edges, planting cuts, and some crowded rootstocks. A smaller border spade trades capacity for access between established ornamentals. Neither should be selected as a general scoop for moving piles of loose compost, where a shovel shape is more efficient.
Walk the beds before comparing products. Measure the open space between crowns, the width of any gate or raised-bed bay, and the depth available above irrigation or lighting cable. Note stone, compacted subsoil, large woody roots, and permanent edging. A broad blade that looks productive on a display wall can be unusable beside a mature hosta, while a very narrow blade can make routine planting unnecessarily slow.
Separate cutting from lifting. The blade must enter the ground cleanly and define a root ball or division, but the gardener still has to raise and carry the load. Dense wet soil on a full-size blade can turn a comfortable downward cut into an awkward lift. If most work involves small perennials, bulbs, or gaps in a mixed border, controlled placement deserves more weight than soil volume per stroke.
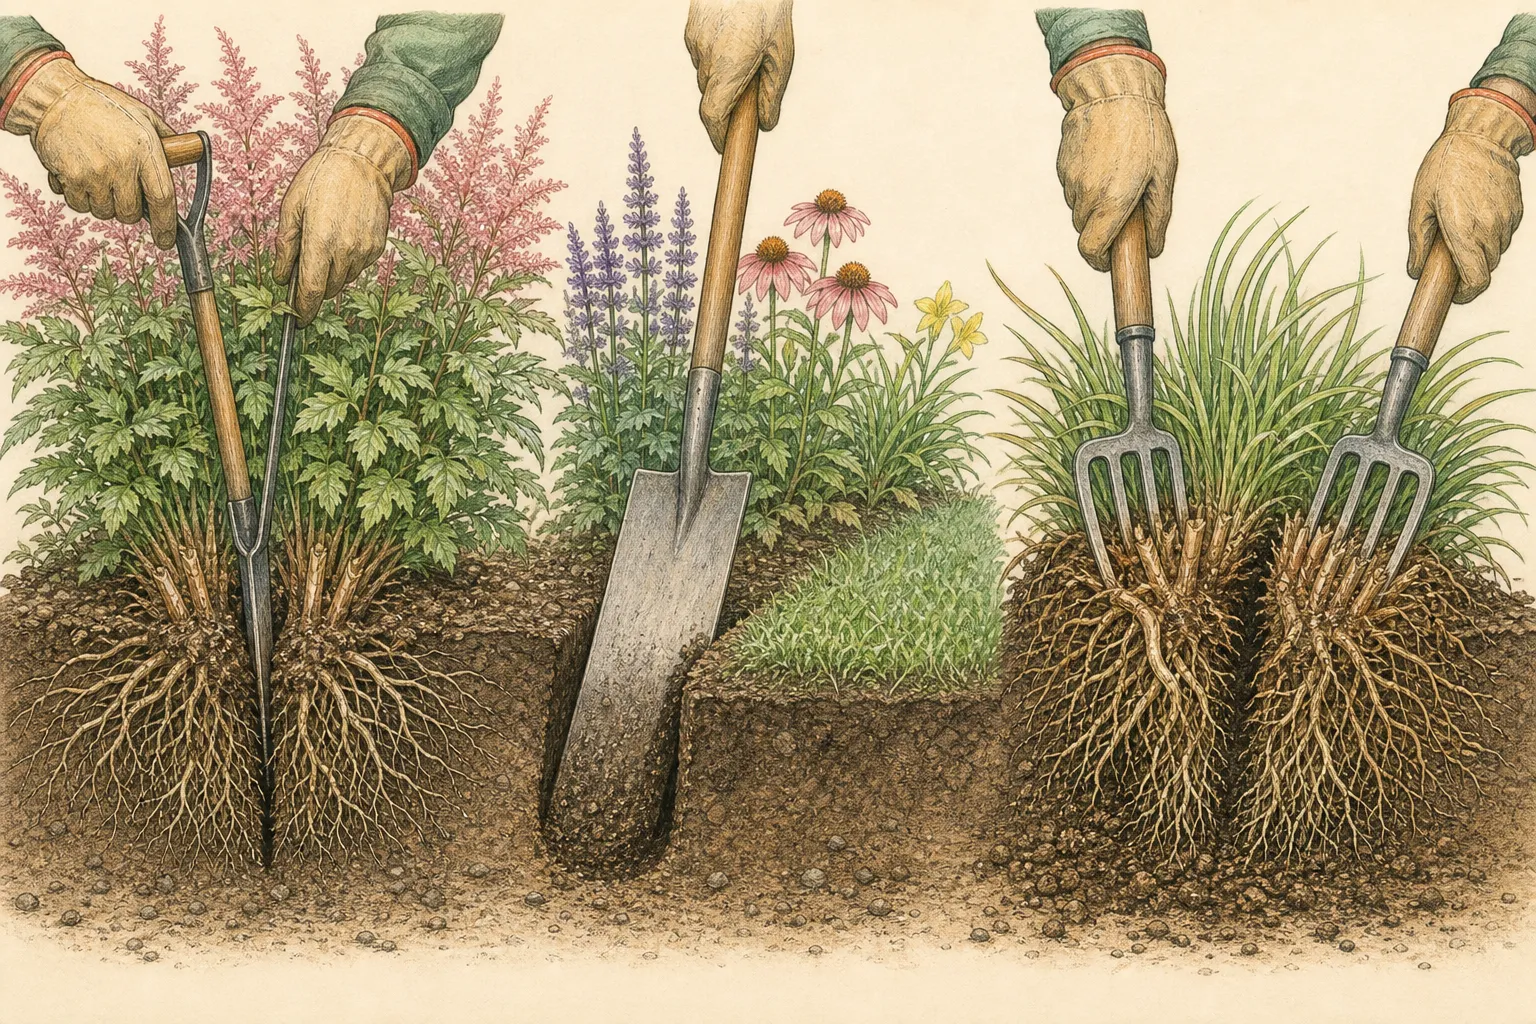
Make a job list with three columns: frequent work, occasional work, and work for another tool. Edging and straight-sided planting holes suit a spade. A garden fork is often gentler for lifting fibrous clumps, and the RHS recommends back-to-back forks for some large perennial crowns. A knife or suitable cutting tool may be better for a precise final split. The shortlist should cover recurring cuts without pretending one blade can replace the whole digging kit.
Match blade geometry to the work
Virginia Cooperative Extension distinguishes the flat, sharp garden-spade edge as useful for cutting sod, breaking apart crowded rootstocks, and making straight trench sides. That geometry also gives an ornamental gardener a readable cut line. Rounded or deeply dished shovel blades carry loose material well, but their curve is less precise when the aim is a vertical bed edge or a controlled slice beside a crown.
Compare a full garden spade with a border model by placing each blade inside a traced outline of the tightest working gap. The blade should clear neighboring stems and leave room for the shaft to remain close to vertical. A narrow blade reduces the amount lifted and can suit a smaller gardener, yet it requires more passes in an open bed. Select the smallest blade that completes the common job without multiplying every cut.
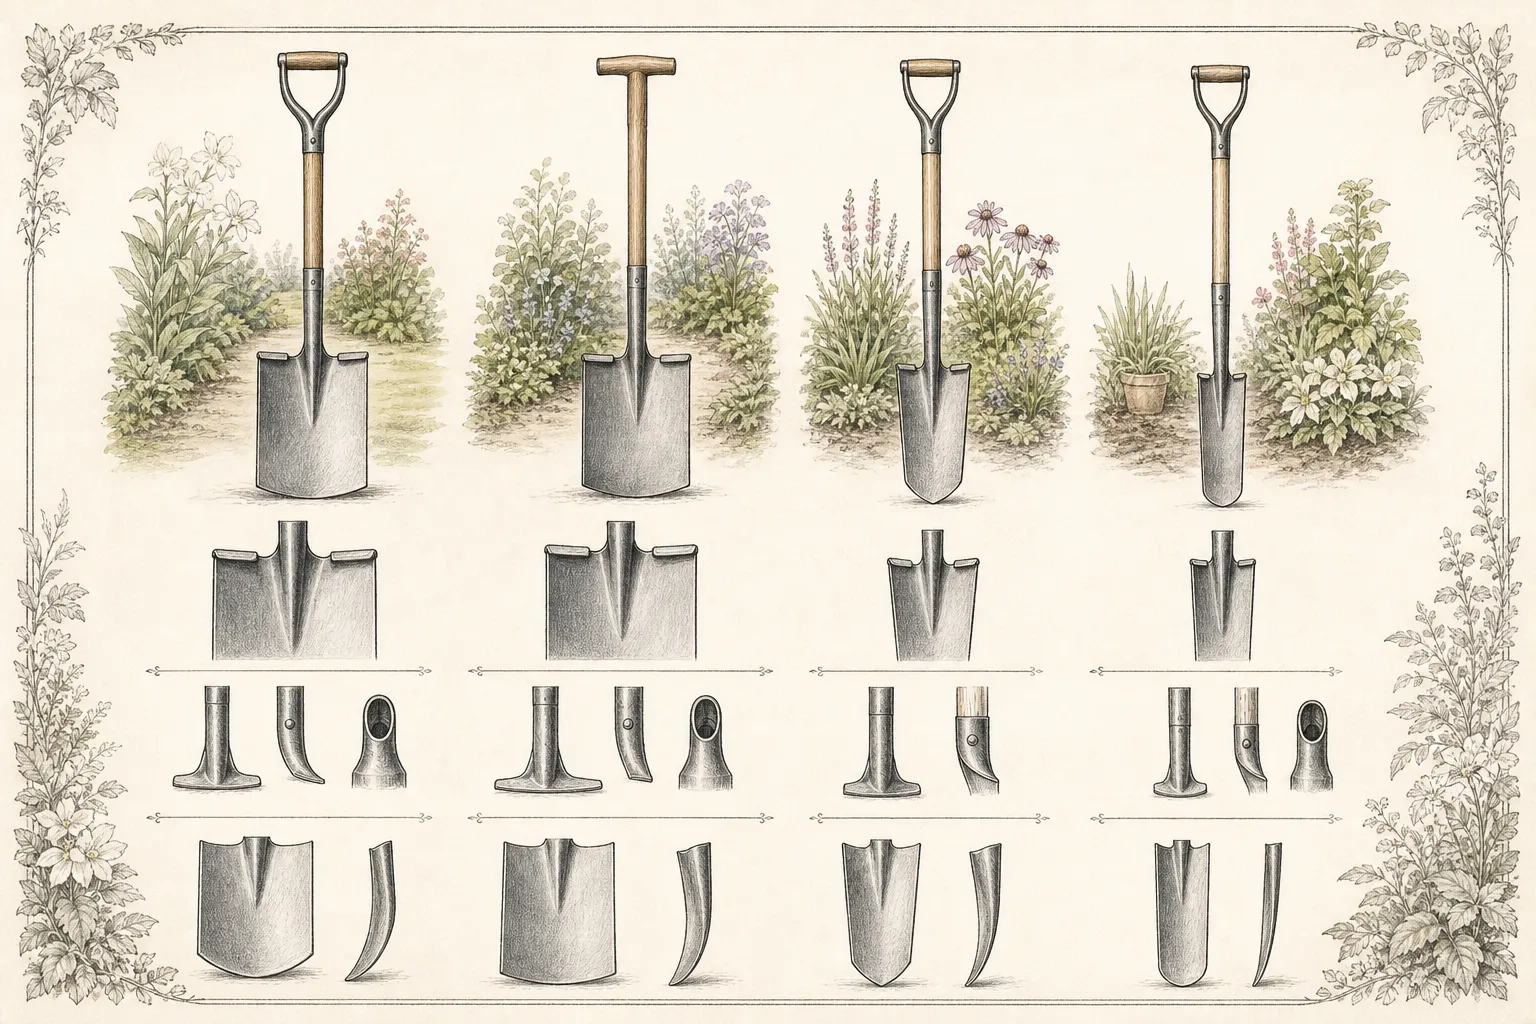
Examine the upper blade where the boot meets it. A usable tread has enough flat, nonslip area for the gardening footwear you actually wear. Rolled shoulders and added treads feel different underfoot, so test them rather than judging from photographs. The tread must not have a sharp burr, a bent corner, or a weld that interferes with a centered foot. Wet boots make a marginal tread easier to notice.
Inspect how the blade joins the shaft. A long socket, sound weld, secure rivets, and straight alignment matter more than decorative polish. Sight down the handle to see whether the blade twists away from the grip. Press only with modest hand force during a shop inspection; any rattle, visible movement, cracked grain, separated laminate, or uneven seam is a reason to reject that sample before soil amplifies the defect.
Fit shaft and grip to the gardener
Handle length is a fit question, not a prestige feature. Put on normal garden shoes, hold the grip with both hands, and mime a vertical cut without lifting the tool above a safe display height. The shaft should let you place the blade without excessive stooping or reaching. NC State advises choosing long-handled tools that minimize bending and checking whether the weight and size remain manageable for the user.
Try D, Y, and straight grips with gloves. Confirm that the opening admits the whole gloved hand, the wrist can stay close to neutral, and the second hand finds a comfortable position on the shaft. A grip that pinches bare fingers will become worse during repeated cuts. People with limited hand strength may benefit from a larger comfortable grip or an approved auxiliary handle, provided the attachment does not compromise the shaft.
Balance the tool at the usual lower-hand position. A light blade paired with a top-heavy shaft can feel harder to guide than a slightly heavier, better-balanced spade. Open and close the grip several times, rotate the blade to an edging position, and simulate setting it down. Reject a combination that forces the wrist sideways, pulls the shoulder forward, or requires a grip too large to close securely.
If two gardeners will share the spade, fit both people. The compromise model may suit neither, especially when their height, strength, or hand size differs. Two correctly sized basic spades can be safer and more useful than one premium tool that only one person controls. An adaptive tool or shorter border spade is a valid primary choice when it keeps the work close, visible, and within comfortable reach.
Run a dry shop test before buying
A useful shop test checks control without abusing merchandise. Ask permission, then place the clean blade flat on the floor and center a boot on the tread without loading it. Hold the shaft upright and move through the intended hand positions. The tread, grip, and shaft should line up naturally. If the foot slides toward an edge or the shaft pushes the knee aside, another geometry will be easier to use in soil.
Lift the spade empty from floor to a low carrying position ten times at an unhurried pace. This does not reproduce wet soil, but it exposes poor balance, a painful grip seam, and a shaft that is already tiring. Next, aim the blade at several marks on the floor. A blade that repeatedly lands off the mark will be difficult to place between bulbs or beside a valuable crown.
Check serviceability before price. Ask whether the handle, rivets, or fasteners are replaceable and whether the maker publishes care instructions. Look for a continuous edge, sound tread, straight shaft, and protected end grain. A warranty cannot make an uncomfortable tool fit, while an inexpensive spade with a replaceable handle may outlast a sealed design that becomes disposable after one joint fails.
Test cutting and leverage safely
Test a new spade first in an open, low-consequence patch of workable soil. Confirm utility locations and map irrigation, lighting cable, edging stakes, and known roots before the blade enters. Set the edge where it remains visible, place one boot squarely on the tread, and transfer weight gradually. Several controlled cuts reveal more about the tool than a jump that can slip, damage the shaft, or drive into an unseen obstruction.
Keep the shaft close to the cutting plane. Sideways twisting turns the blade and socket into a pry bar, which is not the job Virginia Cooperative Extension describes for a garden spade. When the edge stops abruptly, remove it and investigate. A digging fork, mattock, root saw, or professional utility location may be the correct next step, depending on whether the resistance is compacted soil, stone, woody root, or infrastructure.
Lift a small test section and let excess soil fall before carrying it. The user should be able to keep the load close and set it down without a sudden wrist correction. A blade that penetrates well but collects more wet soil than the gardener can control is still a poor match. Reduce the section size or exchange the tool before fatigue changes posture and placement accuracy.
Stop the trial at structural or body warnings. A loosening joint, new rattle, visible bend, splitting handle, slipping boot, numb hand, or sharp pain is evidence to end the test. Routine muscle effort is different from a tool forcing an unstable position. Virginia Cooperative Extension specifically emphasizes matching tools to user size and strength, maintaining posture, and replacing broken or worn parts.
Use the spade around living crowns
Division method follows the plant, not the tool purchase. The RHS recommends working outward from a crown with a garden fork to limit root damage and notes that small fibrous clumps may pull apart by hand. Tough fibrous roots, woody crowns, and some hostas can need a sharp spade or knife. Check the species guidance and growth stage before deciding that a blade should pass through the crown.
Prepare the receiving holes, labels, water, and shaded holding place before lifting anything. Cut a generous circle outside the active shoots, then loosen the clump from several sides. Raise only enough to see the roots and natural separations. A clean view prevents blind cuts through all buds or the entire root system and shows whether a fork, hands, knife, or spade will make the least damaging split.
Place the cleaned spade edge on the intended line and support the clump on firm ground. Use one controlled downward cut for tissue the species guidance permits cutting. Do not saw back and forth with a blunt blade or use a boot on an unstable loose crown. Each retained piece needs viable shoots and roots appropriate to that plant; universal division sizes are unreliable across ornamental genera.
Replant promptly at the original or species-specified depth and water the divisions in well, as the RHS advises. Keep exposed roots from drying during the operation. Record the cultivar label and number of viable divisions, then inspect establishment rather than cutting the clump again. The result tests both the timing and the tool: clean surfaces and intact roots support the choice, while crushed tissue and extensive tearing call for a sharper or different implement.
Read soil resistance instead of fighting it
Soil condition can make a suitable spade appear wrong. Saturated fine soil sticks, smears, and makes every lifted slice heavier. Very dry or frozen ground can stop the edge and transfer shock to the hands. When planting can wait, test again at workable moisture. If penetration improves and the blade sheds soil, the earlier failure belonged to timing rather than blade width.
Persistent resistance at one point needs inspection. Withdraw the blade and expose the obstruction with a small hand tool from a safe side. Stone, construction debris, irrigation, and large woody roots require different responses. Repeatedly driving harder can damage infrastructure or a tree root and says nothing useful about the spade's normal performance in the rest of the bed.
Track three failure signals during the first month: cuts that wander, soil loads that cannot be carried comfortably, and a joint that develops movement. Wandering may come from a dull or asymmetric edge; excessive load suggests too much blade for the user or soil; joint movement indicates a structural problem. Correct the identified cause, and return or retire the tool when fit or construction cannot be corrected safely.
Maintain the edge and retire unsafe tools
Maintenance begins before soil hardens on the blade. Brush or rinse it away without soaking a wooden handle or forcing water into a socket, then dry the entire tool. Inspect both faces of the edge because a hidden chip can pull the next cut sideways. Check the tread, welds, rivets, shaft, and grip while the tool is clean enough for a hairline crack or new rust spot to be visible.
Restore only the bevel specified by the maker, securing the spade before filing and protecting eyes and hands. The goal is a durable working edge, not a razor. A thin overheated edge deforms quickly in stony soil. Treat bare steel and wooden parts with products compatible with the manufacturer instructions, keeping oil and finish away from surfaces that must remain nonslip.
Store the dry spade on a secure rack with its edge out of traffic and no weight bending the shaft. Do not leave it standing in soil or hidden beneath foliage. Before spring work and after a hard impact, repeat the joint and alignment check. Tape, paint, or an improvised screw can conceal a crack but cannot establish that a load-bearing repair is safe.
A final purchase decision can wait until the trial season ends. Keep the model, blade width, soils used, recurring jobs, discomfort, sharpening frequency, and any joint movement in a short tool record. A good spade should remain controllable after ordinary maintenance and produce the cuts it was bought for. Chronic wandering, painful fit, repeated loosening, or permanent deformation justifies replacement with a different size or construction.
Compare the cut, the fit and the upkeep
For each candidate, record blade dimensions, shaft and grip fit, intended soil and cut, dry handling result, observed joint movement, any discomfort, edge maintenance and total cost. Keep a shop handling observation separate from a garden cutting trial. Choose only from candidates that remain controllable for the actual job; a low price or easy cut in one soil does not erase painful fit or a loose connection.
Tool notes
- Type
- Garden or border spade for ornamental planting, edging, and perennial division
- Purpose
- Make controlled vertical cuts and lift manageable soil or plant sections while preserving nearby crowns and safe body mechanics.
- Affiliate
- No commercial links
Maintenance
- After each use, remove soil before it dries. Rinse only as needed, dry the blade and socket thoroughly, and wipe fertilizer or deicing salts away before they start corrosion.
- Inspect the edge from both faces. Secure the blade before filing, wear eye protection, keep hands behind the file, and reproduce the manufacturer's working bevel without thinning it to a knife edge.
- Check blade alignment, tread, socket, welds, rivets, shaft grain, grip seams, and any auxiliary handle. Mark a suspected crack and remove the spade from use if the mark grows or the joint moves.
- Protect bare carbon steel and unfinished wood only with compatible products specified for those materials. Wipe off excess treatment and leave the tread, shaft, and grip clean and nonslip.
- When the spade contacts suspect diseased roots or soil, remove organic matter first and follow current plant-sanitation guidance for the identified problem. Dry the tool before returning it to the rack.
- Store the spade under cover on a support that does not bow the shaft. Keep the cutting edge away from doors and walkways, and lift the blade from damp soil as soon as work ends.
- At the start and end of the digging season, log sharpening, rust, joint movement, handle damage, and the jobs that caused strain. Replace a structurally unsound or persistently painful tool instead of carrying the defect into the next division.
Sources
- Perennials: Dividing for Vigour. Royal Horticultural Society. Source record · Accessed 2026-08-30.
- Hand Tools Safety: Lawn Care Training Guide Hand Tool Care and Safe Use. Virginia Cooperative Extension. Source record · Accessed 2026-08-30.
- Ergonomic Tools for Gardening. NC State Extension. Source record · Accessed 2026-08-30.