Plant problems · camellia flower bud drop diagnosis
Diagnose Camellia Bud Drop Before Bloom
Distinguish normal thinning from moisture stress, drainage trouble, temperature swings, freeze injury, site mismatch, and disease when camellia buds brown or fall unopened.
Published Last updated
In this guide
Map timing and bud condition
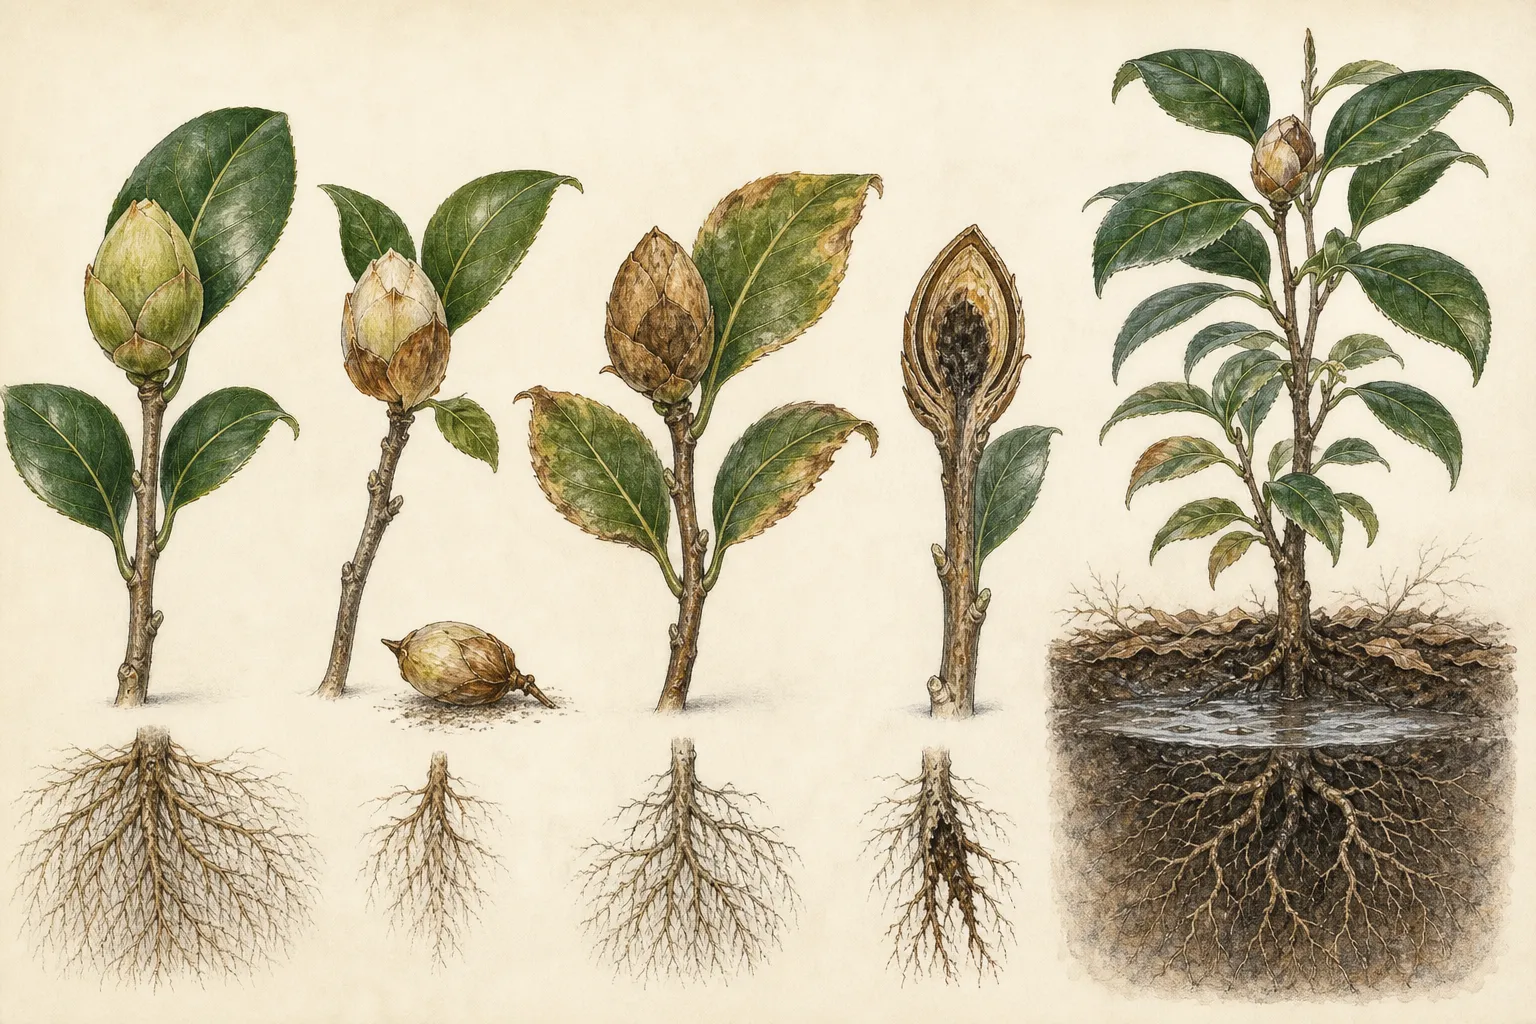
Begin by separating unopened-bud drop from damage to an open flower. Collect several fallen buds and flowers before cleanup, and compare them with buds that remain attached. Note whether a bud is firm and normally colored, browned only at the tip, soft at the base, or brown through the interior when cut lengthwise. Record the cultivar if known, the expected bloom season, and the dates of drought, heavy rain, unusual warmth, frost, or relocation. Timing is more diagnostic than the number of buds on the ground by itself.
A tight bud that drops as spring shoot growth begins fits a different pattern from a flower that opens, develops a small brown petal spot, and turns brown within two days. UF/IFAS describes late-blooming camellias in warm Florida conditions developing incomplete opening or dropping tight buds as vegetative growth starts. N.C. Cooperative Extension describes flower blight as a rapidly enlarging petal disease. Keep unopened buds and browned flowers in separate photographs and sample bags so two problems are not merged into one diagnosis.
Inspect roots, grade, and moisture history
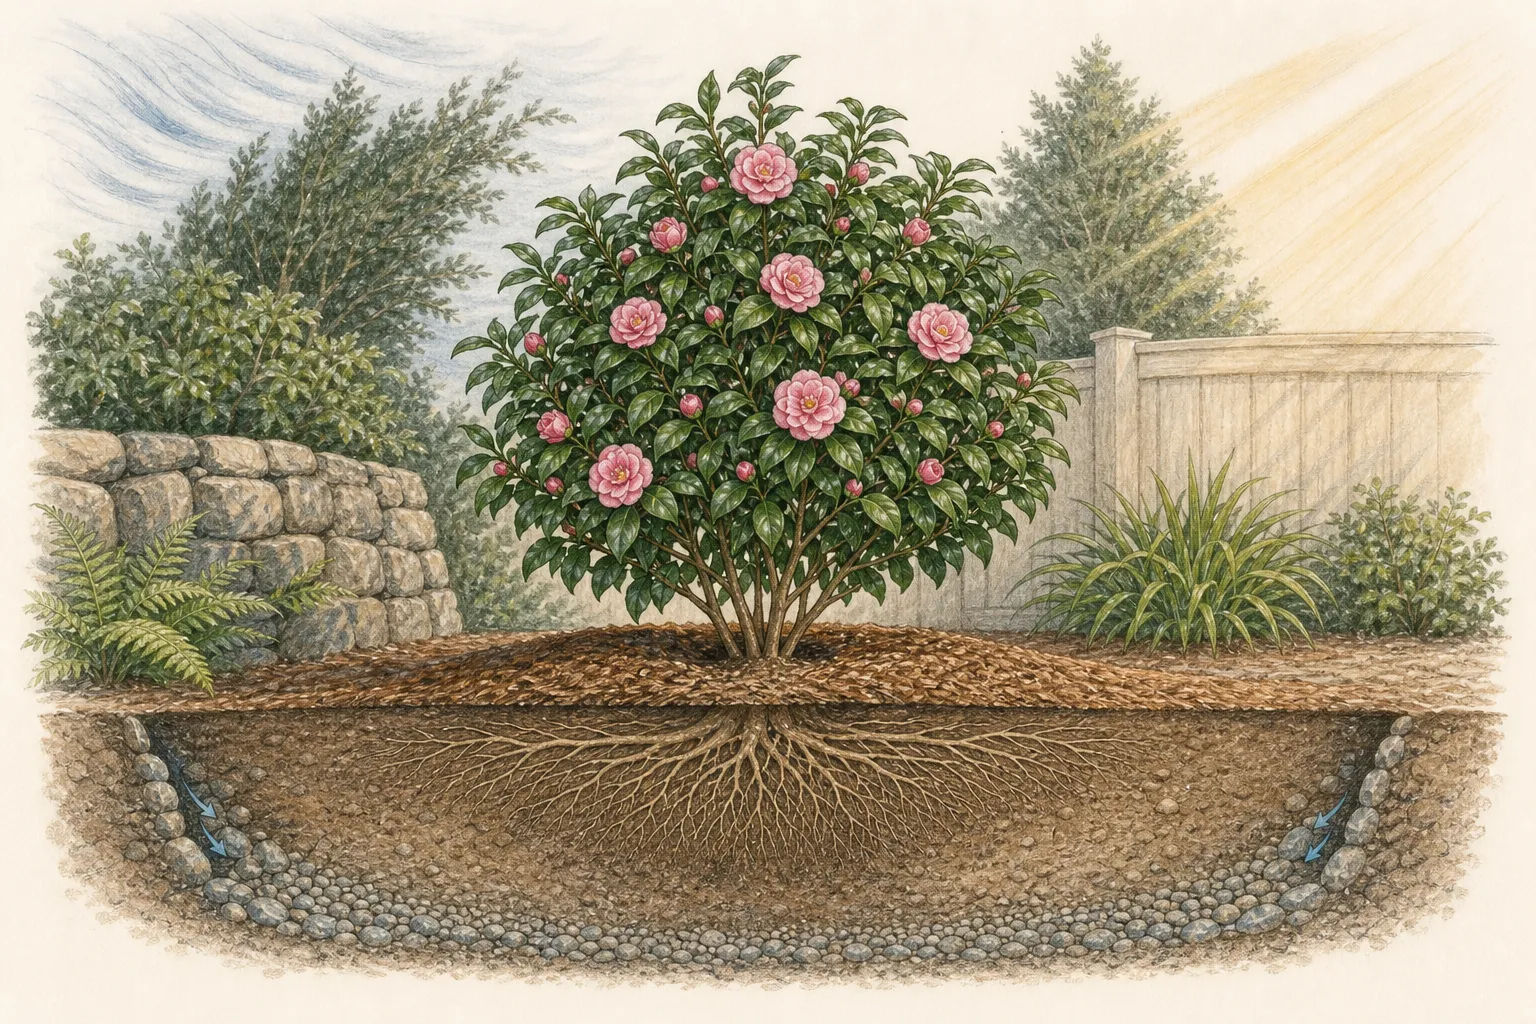
Camellia bud drop is commonly linked with moisture stress in either direction. Probe beneath mulch at several points under the branch spread, not only beside the trunk, and follow the moisture pattern after irrigation or rain. Dry pockets can remain beneath a briefly wetted surface; concentrated runoff can leave another zone saturated. Compare the current root zone with the weeks when buds were enlarging. Repeated dry-wet swings, an irrigation emitter that misses part of the root system, and a downspout that floods one side create distinct patterns on the shrub.
Check planting depth and drainage without digging through the shallow roots. UF/IFAS recommends setting the root ball slightly above the surrounding soil and keeping mulch off the root ball; a buried crown, deep mulch against stems, or settled planting can restrict oxygen. Water that remains in the planting hole after the surrounding ground drains is another warning. Yellow foliage, weak growth, wilting while soil is wet, or brown deteriorating roots shifts the concern from bud retention to root decline. N.C. Cooperative Extension notes that camellia root rot thrives in poorly drained sites and is difficult to reverse once established.
Nutrient deficiency is possible, but bud drop alone does not identify one. Look for a consistent foliage pattern, review fertilizer timing and rate, and test soil before adding an acid-forming product or micronutrient. Late-season fertilizer can stimulate tender growth vulnerable to early cold, while fertilizer applied to dry or injured roots adds another stress. Leave shallow feeder roots undisturbed during inspection. If the plant is otherwise vigorous and the root zone drains, do not excavate or repot it simply because one bloom cycle is disappointing.
Reconstruct temperature and exposure
Match the bud-drop date to actual weather at the planting. Freezing temperatures, large temperature swings, and extended heat are documented triggers. A warm interval can advance swelling buds, followed by a cold snap that kills their tender interior. University of Maryland Extension describes freeze-injured buds and young tissue as blackened and likely to drop. Cut several buds a few days after the event; uniform internal browning on the exposed side of the shrub supports cold injury more strongly than an isolated fallen bud.
Map the affected crown against the site. Buds beside a heat-reflecting wall may advance or dry sooner than those facing the garden. Low spots collect cold air, while open corners receive drying winter wind. A container on paving can experience sharper root and air-temperature changes than the same cultivar in the ground. If loss follows a clear boundary—upper crown, windward face, or wall side—correct that exposure before changing fertilizer or irrigation throughout the entire root zone.
Winter injury can involve water as well as temperature. Camellias are broadleaved evergreens; leaves continue losing moisture on sunny or windy winter days, while frozen soil may prevent replacement. Maryland Extension specifically lists Camellia among plants vulnerable near the northern edge of hardiness. Look for curled or scorched leaf margins together with bud loss. Moist but freely draining soil before a freeze is useful; permanently wet soil is not protection and can compound root injury.
Cultivar and region determine which temperature pattern matters. UF/IFAS notes that warm autumns can interfere with early-flowering varieties in Florida and that late varieties may collide with spring shoot growth. Farther north, a sheltered site and a cultivar whose bloom season fits local frost timing may be more important. Preserve the exact cultivar name when seeking advice. Moving an outdoor camellia into a heated room for a cold night can create another abrupt temperature and humidity change, so container protection should remain cool and stable.
Separate bud drop from flower blight and pests
Flower blight begins on petals, not as an otherwise clean unopened bud falling to the ground. N.C. Cooperative Extension describes small irregular brown spots that enlarge rapidly until nearly the whole flower is brown, often within forty-eight hours. The disease affects flowers while leaves and stems may remain normal. Examine several blooms for the direction and speed of browning. Old flowers that fade evenly or petals marked only after frost do not by themselves establish this fungal diagnosis.
When the flower-blight pattern is present, collect infected blooms and all fallen flower debris promptly. The fungus can persist with material beneath the shrub and produce spores in later bloom seasons. Keep diseased flowers out of camellia mulch and do not move their debris beneath another shrub. Refreshing mulch may be part of local management, but avoid piling new material over the root ball. Sanitation is useful only for the blight pathway; it will not correct drought, freeze injury, poor drainage, or a cultivar that blooms at the wrong time for the site.
Bud mites are listed by Alabama Extension among possible causes of bud drop, but a dropped bud does not confirm mites. Inspect retained and fallen buds with magnification for abnormal development and preserve a sample when the weather, moisture, roots, and flower-blight pattern do not explain the loss. Local Extension or a diagnostic laboratory can distinguish mites from normal bud scales, cold injury, or another disorder. Avoid applying horticultural oil or a miticide to swelling buds until the pest, host, season, and safe temperature range are confirmed on current local guidance and the product label.
Whole-branch wilt, cankers, widespread leaf yellowing, or progressive root decline changes the problem from flower-bud retention to plant health. Photograph the transition from sound to affected tissue and submit roots, stems, leaves, buds, and site history together. A petal sample alone cannot diagnose root rot, and a dead dry bud cannot reveal the earlier moisture pattern. Isolate container plants with spreading lesions, clean pruning tools between shrubs, and postpone fungicide until the disease and application site are identified.
Correct the supported site stress
For drought or irregular moisture, wet the existing root zone evenly and slowly, then let excess water drain. Apply a broad two-to-three-inch mulch layer where appropriate for the site, keeping it away from the trunk and off the top of the root ball. Check that irrigation reaches beneath the outer canopy rather than soaking one point. Do not answer a dry episode with continuous saturation; camellias need moisture and air together, and UF/IFAS warns that overwatered plants can succumb to root rot.
For concentrated runoff or slow drainage, divert the external water first. A raised position or transplant may be necessary where the planting hole functions as a sump, but amendments placed only in that hole can preserve a basin rather than repair the site. Protect shallow roots from trenching and compaction while drainage is evaluated. If roots are already brown and declining, seek a local diagnosis before attempting salvage; repeated fertilizer, irrigation, and pruning will not restore roots that remain oxygen-starved.
For exposure stress, add wind filtering or afternoon shade without wrapping the shrub in a permanently dark, stagnant enclosure. Camellia japonica generally performs in partial shade, while deep shade can reduce flowering and harsh afternoon sun can increase stress. Keep frost fabric from abrading buds and remove it after the event so heat does not accumulate. A container can be moved to a cool sheltered position, but frequent transfers between heated interiors and freezing outdoors make the bud environment less stable.
Pruning cannot repair bud drop and can remove the next crop. UF/IFAS advises grooming after bloom and notes that late-summer or autumn pruning removes flower buds. Limit immediate cuts to dead or broken wood whose condition is clear. Use soil-test results before correcting pH or nutrition. When cultivar timing or the site's drainage and exposure remain fundamentally incompatible, relocation during the locally recommended planting season is more credible than a yearly cycle of emergency watering, covers, and sprays.
Protect the remaining buds
Keep sound buds on a stable plant. Maintain even, freely draining moisture; avoid root digging, heavy pruning, and unnecessary fertilizer while the shrub is under stress. Before forecast cold, secure breathable frost protection above the canopy so it does not crush buds, and anchor it against wind. Follow regional advice for when to install and remove the cover. Water dry soil before the event only when it can drain normally. No treatment can restore a bud whose interior is already killed, so wait for later growth before deciding which twigs are dead.
Handle diseased and healthy material separately. Remove confirmed blighted flowers without shaking them through the canopy, gather those already on the ground, and clean tools or gloves before touching another camellia. Leave firm unopened buds in place unless a diagnostic sample is needed. Continue observing whether new petal lesions appear after wet weather or whether unopened buds keep dropping after the weather stabilizes. That distinction determines whether sanitation, site correction, or a cultivar decision belongs in the next season's plan.
Use the next flowering cycle as the test
Track one full bud cycle rather than judging the correction by replacement foliage alone. Note irrigation during dry weather, heavy-rain drainage, when buds become visible, autumn heat, winter minimums, frost dates, the start of shoot growth, and the number of flowers that open. Mark the crown side that was previously most affected. A moisture correction should improve bud retention across that root zone; a cold-air pocket should reproduce injury along the same exposure unless shelter or cultivar timing changed.
Read foliage and roots with the flowers. Firm new shoots, normal leaf color, and a root zone that moistens and drains evenly indicate that the plant can support another cycle. Continued yellowing, wilt in wet soil, cankers, or branch dieback warrants diagnosis even if a few flowers open. Repeated tight-bud loss at the same point in a warm spring may indicate bloom-season mismatch. Repeated loss after freeze on the exposed face points instead to microclimate or hardiness.
After bloom, make only the pruning needed for dead wood, access, or a clearly defined shape, preserving healthy foliage that supplies the next growth cycle. Keep mulch at the corrected depth and maintain the drainage path. If unexplained drop persists, submit fresh buds before they dry out along with the cultivar, photographs, weather record, and root-zone observations. That packet lets a local specialist evaluate mites, disease, and site stress without treating every possible cause at once.
Diagnosis
Several firm, normally colored buds fall, yet leaves and shoots remain healthy and other buds continue developing. The pattern recurs near the cultivar's usual bloom-to-growth transition rather than after a clear drought, flood, or freeze, and fallen buds lack expanding petal lesions.
- Check
- Count retained and fallen buds, cut representative buds lengthwise, and record cultivar, expected bloom season, shoot-growth stage, and repeated years of the same pattern. Confirm that foliage, roots, and stems remain sound and separate unopened buds from previously opened flowers.
- Cause
- Cultivar-sensitive bud shedding or bloom timing is limiting how many tight buds reach flower, particularly where a late bloom overlaps spring vegetative growth. The otherwise healthy shrub shows no evidence of root, stem, or petal disease, and the pattern repeats at a similar seasonal stage.
- Action
- Maintain stable culture through the current bloom and compare the next cycle before spraying or fertilizing. If healthy tight-bud failure repeats with the same cultivar timing, choose a locally adapted cultivar or relocate it to a microclimate better matched to its bloom season.
Buds loosen, brown at the tip, or abort after irregular irrigation or a dry period. Leaf margins may scorch, growth may weaken, and the root zone contains dry pockets even though the surface was recently wetted; loss can be greatest above the driest sector.
- Check
- Probe several points beneath the canopy before and after irrigation, review dry-weather watering, and inspect leaf scorch, soil pullback, root competition, and emitter reach. Compare the driest crown sector with bud loss, then confirm that corrective water reaches depth without ponding.
- Cause
- Drought during bud development or repeated swings between dry and wet soil have interrupted water supply. Shallow roots, competition, uneven irrigation, and thin or misplaced mulch can intensify the stress even when occasional watering occurs, causing buds to be shed before opening.
- Action
- Restore even moisture across the established root zone, correct emitter gaps and competition, and apply a broad shallow mulch layer kept off the trunk and root ball. Let excess water drain instead of compensating for drought with saturation, and verify depth moisture after watering.
Bud loss accompanies yellow foliage, weak growth, wilt in wet soil, persistent ponding, a buried root ball, or brown declining roots. One side may be worse where runoff or a downspout keeps soil saturated, and recovery remains slow after ordinary watering.
- Check
- Remove mulch from the root-ball surface, verify planting grade, and time how long water remains after rain. Inspect roots without severing shallow feeders, photograph yellowing or wilt, and seek diagnosis if roots are brown, soft, sparse, or sour-smelling.
- Cause
- Poor drainage, deep planting, compaction, or concentrated runoff has reduced oxygen around the shallow root system. Root dysfunction limits water and nutrient delivery to developing buds and may progress to root rot, persistent foliage symptoms, weak shoots, and whole-plant decline.
- Action
- Divert runoff, uncover a buried root ball, protect shallow roots from compaction, and correct the documented drainage failure. Seek diagnosis for declining roots; transplant during the locally suitable season if the site cannot provide moist, aerated soil without repeated emergency work.
Buds darken internally or fall soon after a warm spell followed by frost. Injury is strongest on an exposed crown face, in a cold-air pocket, or on buds that had advanced farther than protected buds; nearby leaves may also blacken or scorch.
- Check
- Match drop dates to local temperature records, compare exposed and sheltered crown faces, and cut several buds after the event for internal browning. Check evergreen leaves for concurrent wind or winter-desiccation injury and note whether damage respects an exposure boundary.
- Cause
- Freeze injury or a large temperature reversal damaged buds that had advanced during prior warmth. Cold wind and frozen soil can add desiccation stress to a broadleaved evergreen, especially near the cultivar's northern hardiness limit or in an exposed container.
- Action
- Use secured, breathable frost protection appropriate to the forecast, shelter from drying wind, and keep dry but freely draining soil moist before severe cold. Wait for spring growth before pruning uncertain tissue, because killed buds cannot recover but adjacent twigs may remain alive.
Tight buds fail during prolonged autumn or spring warmth, or opening coincides with new shoot growth. The cultivar's bloom season performs poorly in the site's heat, shade, reflected sun, or local frost pattern, while a differently timed camellia may flower normally.
- Check
- Confirm the cultivar and regional bloom calendar, note autumn heat and the start of spring shoots, and map afternoon sun, reflected heat, deep shade, and cold-air drainage. Compare another cultivar in the same site and ask local Extension about regional bloom performance.
- Cause
- The cultivar's bloom season or planting microclimate is mismatched with prolonged heat, reflected sun, deep shade, or recurring frost. Warm conditions may trigger shoot growth before late buds have opened fully, while a protected wall may advance buds too early.
- Action
- Reduce harsh reflected heat or afternoon exposure while preserving useful partial light, and select a bloom season matched to local autumn warmth and frost. Avoid heated indoor refuge for outdoor containers, abrupt relocations, and late pruning that removes already formed buds.
Opened flowers develop small irregular brown petal spots that enlarge rapidly until most of the bloom is brown. Affected flowers drop while leaves, stems, and unopened buds may initially appear normal, and fresh lesions continue during favorable moist bloom weather.
- Check
- Inspect newly opened flowers daily for the first petal spot and speed of spread, photograph darkened or expanding areas, and keep fallen flowers separate from unopened buds. Submit fresh blooms when frost, normal fading, and flower blight remain difficult to distinguish.
- Cause
- Camellia flower blight caused by a fungal pathogen is attacking petal tissue. Rapidly expanding brown lesions and premature fall of opened flowers distinguish this pathway from physiological loss of clean unopened buds, while infected fallen blooms perpetuate the local disease cycle.
- Action
- Collect and discard infected and fallen flowers, keep them out of camellia mulch, and clean handling tools before moving between shrubs. Follow local Extension and the current product label only if a confirmed diagnosis and disease pressure justify an additional registered treatment.
Sources
- The Culture of Camellias. Alabama Cooperative Extension System. Source record · Accessed 2026-08-30.
- CIR461/EP002: Camellias at a Glance. UF/IFAS Extension. Source record · Accessed 2026-08-30.
- Diseases of Camellias. N.C. Cooperative Extension. Source record · Accessed 2026-08-30.
- Winter Damage on Landscape Plants. University of Maryland Extension. Source record · Accessed 2026-08-30.