Grow · transplant dormant deciduous shrub
Move a Dormant Deciduous Shrub with Its Root System Intact
Plan, lift, and replant a dormant deciduous shrub while preserving a practical root ball, correct grade, and aftercare access.
Published Last updated
In this guide
- Use the biological cue for dormant deciduous shrub
- Prepare the destination before committing to the lift
- Read the site and the whole plant together
- Set a visible finish line before beginning
- Prepare the work while every part is still identifiable
- Carry out the central operation in a controlled sequence
- Protect roots, crowns, and new growth after the work
- Diagnose a weak response before adding another treatment
- Leave a record for the next seasonal decision
- Steps
Use the biological cue for dormant deciduous shrub
Move established shrubs during dormancy when species guidance allows, the ground is workable, and neither frozen soil nor saturated clay will prevent a clean lift. Closed buds and soil that crumbles from a squeezed handful are the field checks. Use the calendar to find a likely interval, then confirm that the species is still dormant and the destination can be prepared immediately. Waiting through a saturated week protects soil structure and keeps the future root ball from breaking apart under its own weight.
Trace the trunk flare, main stem spacing, current drip line, and recent shoot extension before deciding whether the shrub is healthy enough and small enough for a home-garden move. Inspect the crown from all sides for brittle unions, dead stems, and obstacles that would catch during lifting. Probe several points around the planned circle to find major roots and changes in soil resistance. Those measurements estimate a controllable ball more accurately than the shrub's height alone.
Large old shrubs, brittle multi-stem crowns, underground services, or a root ball too heavy to control turn the job into professional work. The limit should be set before roots are cut: calculate the intended ball dimensions, clear the travel route, and confirm enough people or rated equipment are available. If a trial spade cut smears or the planned ball cannot be supported from beneath, close the shallow test cut and reschedule. Shrinking the ball after lifting begins sacrifices the roots needed for establishment.
The useful dormant window shifts with frost depth, winter rain, soil texture, and the species; local Extension timing overrides a calendar rule. Treat the article date as one temperate example, then check bud stage, soil workability, and the species' regional transplant advice. Deciduous shrubs that break dormancy early may have a shorter safe interval than the weather calendar suggests. The move proceeds only when both sites and the plant meet the same window.
Prepare the destination before committing to the lift
Confirm that species, dormancy and workable soil support the move, then prepare the receiving hole and safe route. Lift and carry from beneath the root ball while preserving the flare reference. After resetting, inspect the original ball and surrounding soil as separate moisture zones. A correction to lean or settlement must not bury the flare.
Read the site and the whole plant together
Measure the destination first, including mature spread, overhead clearance, drainage, reflected heat, and the route needed to carry the root ball without breaking it. Walk that route with an empty tarp or sling and mark narrow turns, steps, utilities, and soft ground that need boards. At the new site, compare soil texture inside and outside the intended hole and observe where rainwater moves. A suitable hole at the end of an unsafe route is not yet a workable destination.
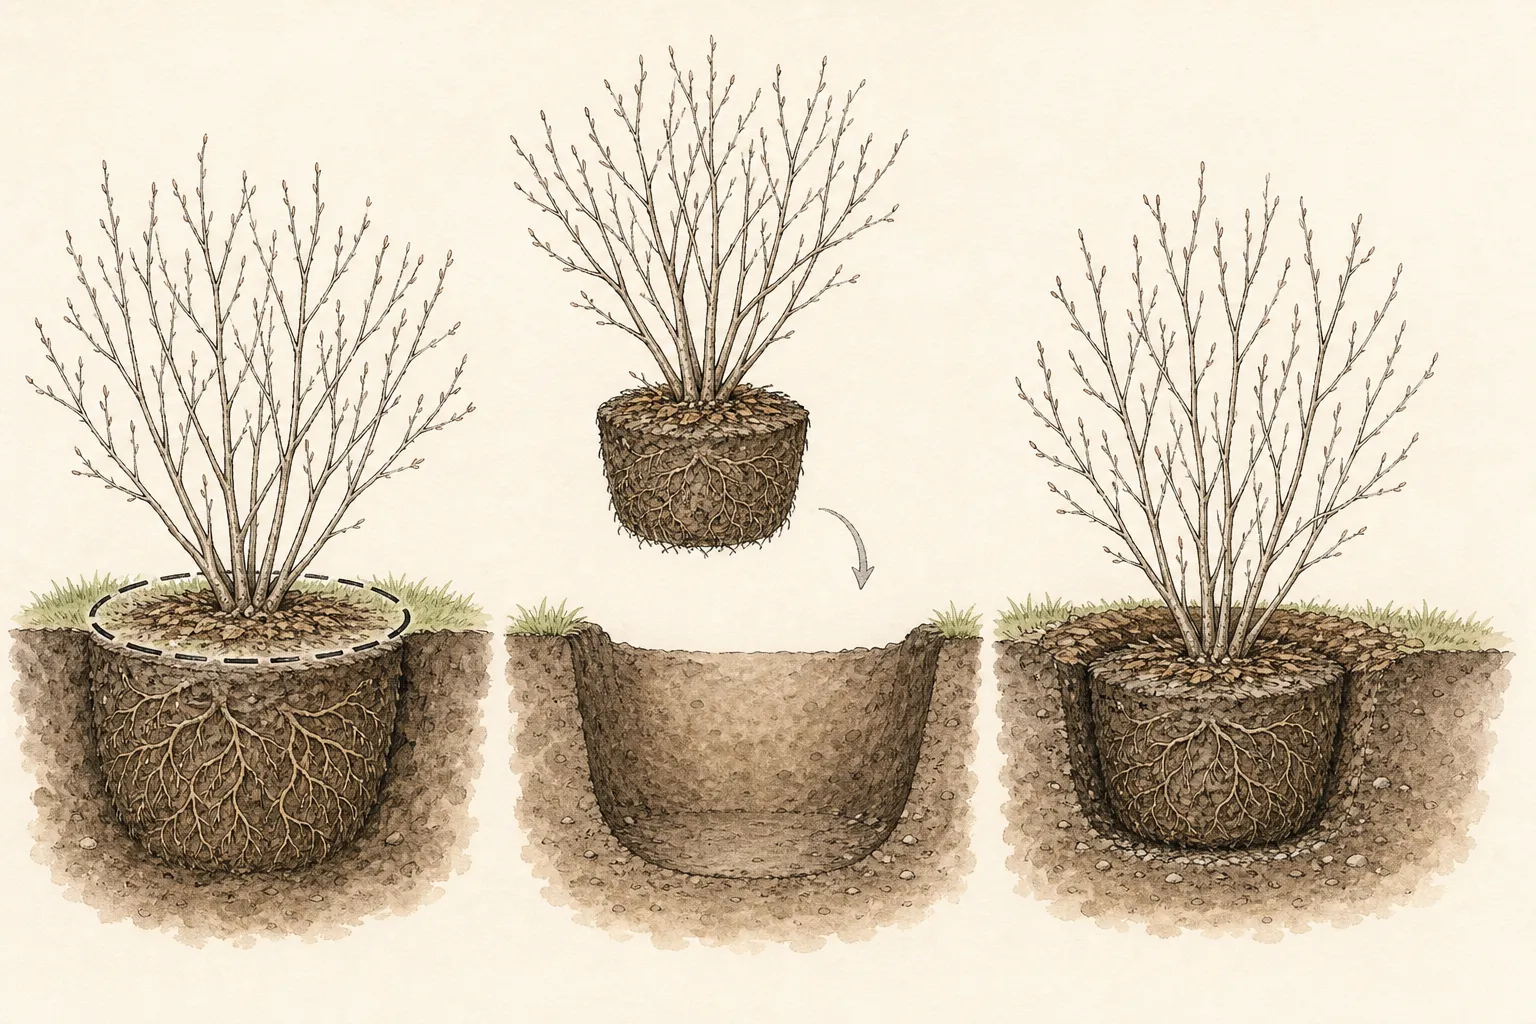
Read the shrub's architecture before tying branches. Mark the root flare, note the direction of the strongest framework stems, and photograph any pre-existing lean or deadwood. Probe around the proposed ball at several compass points; a wall-side root pattern may differ sharply from the open side. That asymmetry affects where the sling can pass and how the ball must be supported during the turn.
The finished move should return the root flare to grade, keep the crown in its planned orientation, and seat the ball uniformly on firm soil without burying the stem bases. Verify flare height with a straight board spanning the hole before backfilling. Check the crown from two viewpoints and confirm that the ball does not rock when nudged gently. These visible checks define completion before mulch hides the soil line.
Plot the mature canopy and root competition at the new site, leaving watering and pruning access around the whole crown. A currently dormant shrub can quickly block a path, window, or smaller neighbor once leafed out. Compare its labeled mature spread with the actual clearance and reflected heat from nearby paving. If the relocation merely recreates the original space conflict, select a different site before the first root is severed.
Set a visible finish line before beginning
Record four acceptance points before digging: the root flare at final grade, the crown retaining its marked orientation and framework, uniform support beneath the ball, and open stem bases after backfill. Photograph the original flare beside a ruler and mark north on a durable label. Repeat both views after planting. The paired record makes later settling or rotation detectable even when loose soil and irrigation temporarily change the appearance.
A multi-stem shrub may have an uneven crown and an off-center root mass that are entirely sound. Keep those structural features when they reflect established growth, and correct only broken roots, damaged stems, or an unstable seat. Heavy pruning to make the crown look balanced does not replace the lost root system. The transplant is finished when it is correctly supported and graded, not when every stem is symmetrical.
Set explicit stop points for weight and control. Professional help is needed if the planned ball cannot be lifted from below, the crown contains unions likely to split under tying, buried services cross the cut line, or machinery is required on soft ground. End the attempt before progressively reducing the root radius to make the load manageable. Leaving the shrub intact for a later plan preserves roots that an undersized, partly severed ball would lose.
Decide whether this is a direct move or a root-pruning project months in advance. A small dormant shrub with a manageable ball can move in one operation; an established specimen benefits from root pruning in the season before transplanting so feeder roots form inside the future ball. If the calculated soil mass cannot be supported by the available people and equipment, the correct next step is professional help or replacement, not a smaller damaging ball.
Prepare the work while every part is still identifiable
Water a dry shrub a day ahead, tie branches loosely inward, mark north on the crown, prepare the destination hole, and keep wrapping material ready. Stage the sling beside the planned undercut and place water, backfill tools, and mulch at the new hole. Measure both the ball and hole while roots remain intact. This order minimizes the time between undercutting and supported replanting, when fine roots are most exposed to drying.
Use a sharp spade that can make a clean root cut at the planned radius and a shovel wide enough to support soil during undercutting. A tarp can contain a modest ball but is not a lifting handle unless rated for the load. Change to mechanical or professional assistance when leverage bends the tool, tears bark, or requires pulling on stems. Tool choice must preserve control of both soil mass and crown.
Keep the cultivar label, mark north on the crown, and mark the original soil line at the root flare before digging. Measure the intended root-ball radius and depth, then repeat those dimensions at the prepared destination. Orientation is secondary to matching the correct site, but the marks prevent a rotated multi-stem crown and loose backfill from hiding that the shrub was planted too deep.
Prepare the entire travel route before roots are cut. Protect steps and neighboring crowns, lay boards over soft soil, and position a tarp or sling beside the shrub. The destination hole, water, and mulch must already be ready. Each minute spent widening a route or finding help after lifting lets exposed roots dry and increases the chance that a heavy ball will split.
Carry out the central operation in a controlled sequence
Cut the measured circle in stages, undercut progressively, slide support beneath the ball, and move it directly to the prepared hole. After the first quarter is undercut, confirm that the soil mass holds together and the planned sling path remains accessible. Continue around the circumference only while the crown and ball can be controlled. This staged check catches a collapsing soil texture or unexpected major root before the shrub is fully detached.
Keep the root flare and original soil line uncovered during lifting, transport, and backfill. Use the mark to set the ball on firm undisturbed soil at its previous depth, then view it across a board spanning the hole. Backfill can settle around the shoulders of the ball while the stem base remains visible. Mulch begins outside that flare zone so the reference is still available at later inspections.
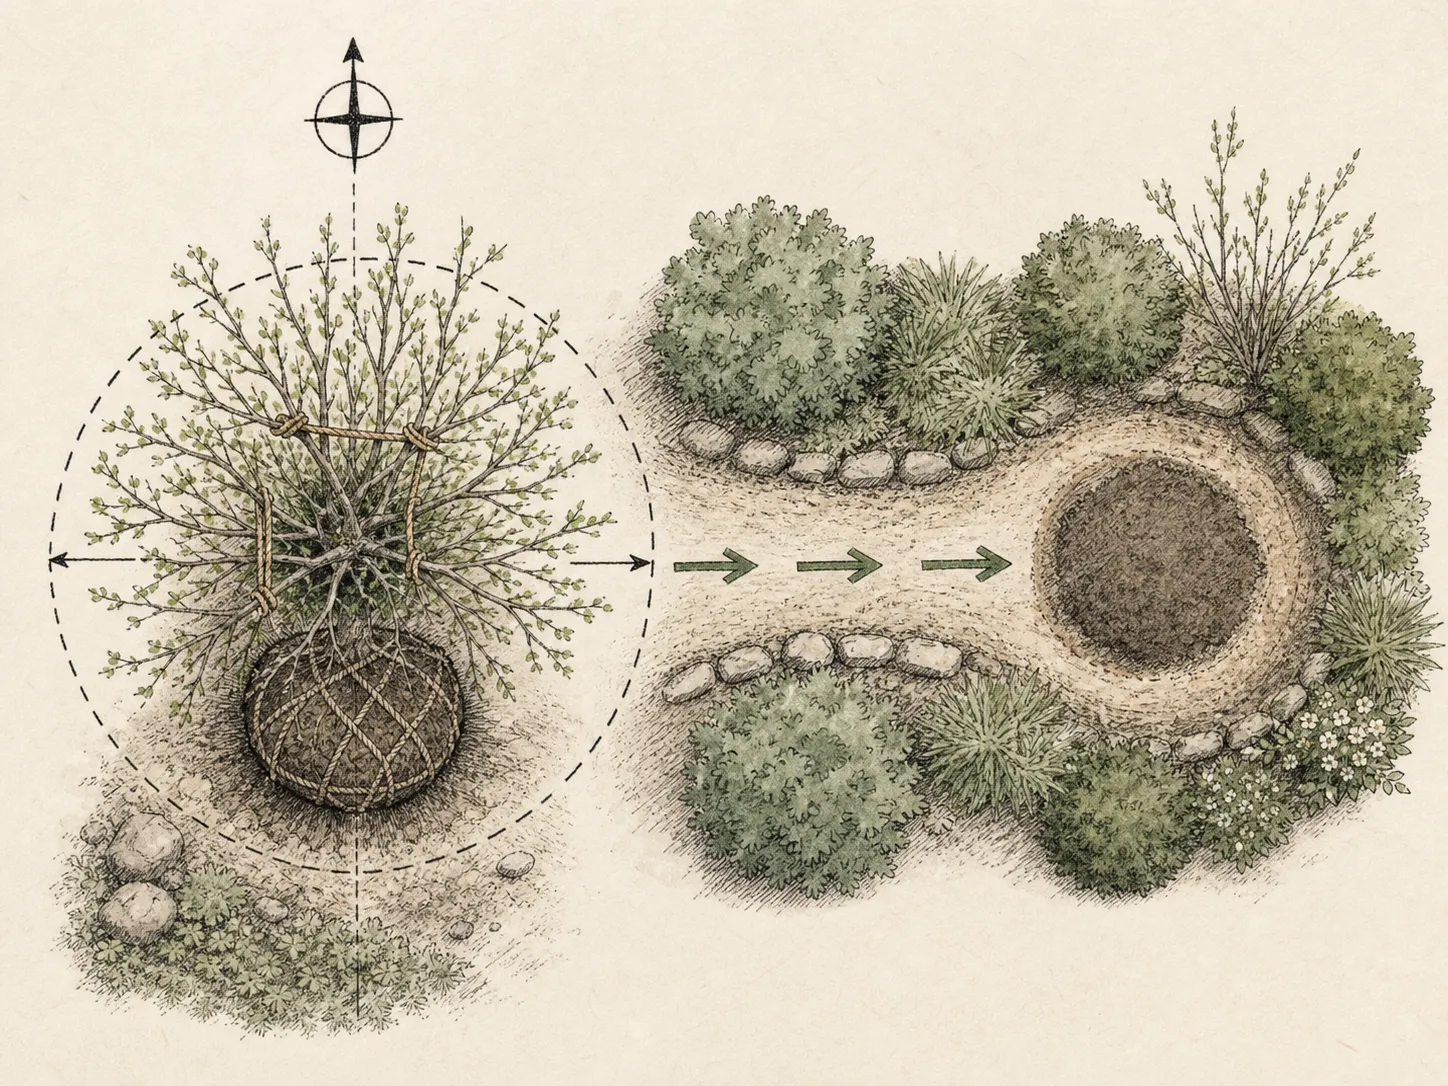
Watch for cracking across the ball, bark tightening beneath branch ties, soil smearing on the spade, or a load that shifts away from the sling. Any of those signs ends hand lifting until support or conditions change. If water pools in the prepared hole, resolve drainage suitability before the roots are exposed longer. Proceeding faster through a control failure can split the crown or leave too little root mass to recover.
Lower the ball onto firm undisturbed soil so the flare returns to finished grade, then backfill with site soil in layers and use water to settle voids. Keep feet off the ball and the stem base above finished grade. If stability is inadequate, correct support beneath the ball before finishing; stake only when the ball cannot remain seated on its own.
Protect roots, crowns, and new growth after the work
Water the original ball and surrounding soil, apply broad shallow mulch, remove branch ties, and support the plant only when the root ball cannot remain stable on its own. Before leaving, expose the flare, test for rocking, and open a clear inspection point at the edge of the original ball. Shape the surface so irrigation reaches the root zone without collecting against stems. Keep mulch shallow and pulled back from every trunk in the crown.
Prioritize even moisture and soil oxygen during establishment. Fertilizer cannot restore roots lost in lifting, and strong top growth may increase demand before new roots enter surrounding soil. Add nutrients later only when a soil or plant assessment identifies a need and active growth can use them. Initial care is measured watering, stable grade, and protection from further root disturbance.
Inspect after the first soaking rain and first strong wind. Backfill may settle below the flare or open a gap beside the original ball, while saturated soil can allow the shrub to lean. Correct the supporting soil without piling material against stems. Check moisture inside the original ball and in surrounding soil separately; either zone can be dry while the other remains wet.
After soaking, confirm that the root flare remains at grade, the crown matches its orientation mark, and the ball is supported without rocking. Once those conditions persist through the first rain and wind, leave the root zone undisturbed between scheduled moisture checks. Repeated probing or re-leveling can break roots beginning to cross the ball edge. Stability over time is better evidence than constant manual testing.
Diagnose a weak response before adding another treatment
Recheck grade, lean, ball moisture, and new shoot extension after the first soaking rain and through the first full growing season. Pair the flare-height mark with a same-angle crown photograph to detect settling or rotation. Compare moisture 4–8 inches deep inside the original ball with the adjacent backfill, because one can be dry while the other is saturated. New shoot extension matters only after those structural and moisture checks remain sound.
A transplanted shrub may leaf out from stored reserves before new roots extend. Diagnose weak growth by checking grade, ball moisture 4–8 inches deep, drainage, stem damage, and root-ball stability. Fertilizer and compensating top pruning are poor substitutes for diagnosis. A dry original ball needs targeted water; a saturated ball in a wet hole needs drainage assessment, and both can occur while the surrounding surface looks normal.
Bud break can draw on stored reserves before roots leave the ball, so early leaves alone do not prove establishment. Track shoot extension, persistent leaf turgor, and moisture demand through the growing season while keeping the flare visible. A stem that fails to leaf may still show live tissue at buds, whereas a whole crown wilting over a rocking ball points to anchorage or moisture trouble. Wait for that evidence before removing a major stem or declaring the move successful.
Stop adding water, fertilizer, or support when the shrub continues to decline without a clear diagnosis. Preserve a healthy stem and an undisturbed soil comparison, document grade and moisture in both zones, and ask a local Extension or qualified plant professional to assess persistent dieback, drainage failure, or structural instability. A ball that cannot be made safe after settling belongs with an experienced contractor rather than repeated home adjustments.
Leave a record for the next seasonal decision
Close the transplant record with the move date, root-ball dimensions, original and final grade, crown orientation, first irrigation, and any support-removal date. Through the first growing season, add lean, moisture in both soil zones, shoot extension, watering, and support changes. Photograph the shrub from a fixed path marker after soaking rain and strong wind; those paired measurements reveal settling and recovery that a general garden photo cannot. Routine records can end once the shrub holds grade and resumes normal extension without exceptional watering.
Note branches retained without compensating top pruning, roots left intact inside the ball, and any area outside the ball deliberately left undisturbed. These are establishment choices, not omissions. The record prevents a later attempt to balance root loss with crown reduction or to cultivate through the new root zone before extension growth shows recovery.
Revisit the regional assumption that the dormant window shifts with frost depth, winter rain, soil texture, and species. Compare the actual digging condition, bud stage, and establishment response with the local Extension recommendation. If saturated soil delayed the move, plan a better-drained interval or prepare earlier; if buds opened first, the species may need an earlier dormant slot. Keep weather-driven delay separate from problems caused by ball size or planting depth. The recorded evidence should lead to one specific next action: continue establishment watering, correct settling, remove temporary support, or seek diagnosis.
Steps
- Level
- moderate
- Time
- One focused session, followed by scheduled checks
- Tools
- Sharp transplanting spade, Digging fork, Tarp or root-ball sling, Measuring tape
- Materials
- Mulch, Soft branch ties, Water for settling the root zone
- 1Choose a dormant workable window
Move while leaves are off and buds remain closed, after frost leaves the ground and before wet soil smears. Confirm the species tolerates the regional timing. A large or long-established shrub needs root pruning months in advance or professional help, preserving the root-ball size required for a viable move.
- 2Prepare the destination and route
Match light, drainage, soil, mature spread, and overhead clearance before digging. Prepare a hole at least wider than the intended root system, roughen glazed sides, and leave firm soil beneath the final ball. Clear a stable route, protect neighboring crowns, stage a tarp or sling, and locate utilities at both sites.
- 3Mark the flare and gather the crown
Expose and mark the root flare and original soil line, label the cultivar, and mark north on the crown. If soil is dry, water several days before lifting so the ball holds together. Tie flexible branches loosely inward without binding the stems, and place water and mulch at the destination before cutting roots.
- 4Lift from beneath the root ball
Cut the planned circle with a sharp spade, undercut progressively, and slide a tarp or sling under the intact ball. Lift only from beneath the ball, keep it shaded, and move directly to the prepared hole. Stop if it cracks, cannot be controlled, or exceeds the safe load for the people and equipment available.
- 5Reset the flare at finished grade
Place the ball on firm soil with the flare at its original grade. Orient the crown, backfill with site soil, and use water to settle voids rather than heavy tamping. Remove branch ties, apply a broad 2–3 inch mulch layer clear of stems, and stake only when the ball remains unstable after proper support.
- 6Monitor the ball through year one
Check moisture within the original ball and adjacent soil, especially after rain, because they dry differently. Correct settling or lean without burying the flare. Track bud break and shoot extension, remove temporary support when stable, and continue establishment watering according to rainfall, soil, and local Extension guidance rather than a fixed calendar alone.
Sources
- How to Transplant Deciduous Shrubs. Iowa State University Extension and Outreach. Source record · Accessed 2026-08-30.
- Planting and transplanting trees and shrubs. University of Minnesota Extension. Source record · Accessed 2026-08-30.
- Planting trees and shrubs. Royal Horticultural Society. Source record · Accessed 2026-08-30.