Grow · ornamental perennial root cutting propagation
Take Root Cuttings from Suitable Ornamental Perennials
Propagate selected dormant ornamentals from healthy root sections by confirming suitability, preserving orientation, using clean medium, and protecting the parent plant and new shoots.
Published Last updated
In this guide
Confirm that the plant belongs to the method
Root cuttings work only on plants able to form adventitious shoots from root tissue. The RHS lists Acanthus, Japanese anemones, Echinops, oriental poppy, Phlox, Primula denticulata and Verbascum among suitable herbaceous subjects. The presence of a thick root is not proof of suitability, and ordinary crown division is a different method. Confirm the exact taxon in a current propagation reference before exposing any roots.
Keep the cultivar name and propagation rights with the decision. RHS guidance warns that root cuttings from variegated plants produce plain leaves because the desired shoot mutation may not be present in root tissue. University of Georgia Extension also notes that patented plants and plants sold while a patent application is pending cannot be propagated without permission in the United States. Choose an unrestricted, correctly labeled parent whose defining traits are known to transmit by roots.
Choose root cuttings for a reason that division or stem cuttings cannot meet. The method can yield vigorous plants from dormant roots and, as the RHS notes, avoids carrying foliar pests and pathogens that remain on leaves and stems. It does not remove systemic or root-borne disease, and it is not automatically safer for the donor. A clump that divides cleanly with several rooted crowns may recover faster from division; a plant that roots readily from shoots may be multiplied without excavating its root zone.
Timing depends on the plant and source scope. The RHS method for its listed garden perennials uses mid-to-late autumn or early winter, when plants are dormant. North Carolina State Extension likewise places root collection in dormancy, when stored carbohydrates are high, but gives different handling dimensions for larger and smaller roots. Follow the exact species protocol, wait for workable unsaturated soil and avoid interrupting active flowering or recent transplant establishment.
Use a vigorous established parent without unexplained wilt, soft crown tissue, root lesions or severe recent stress. The RHS limits removal to no more than one-third of the root system and calls for prompt replanting of the parent. That is a maximum, not a target. Take only the few young roots needed for the planned pots, and postpone the job when the clump is small, newly planted, rare or already recovering from division.
Prepare a clean labeled workflow
Prepare pots, labels, a clean draining tray, clean water and propagation medium before lifting the plant. RHS suggests a cuttings compost such as equal parts peat substitute and gritty sand or perlite. Pre-moisten it evenly, then let excess drain. A saturated mix encourages rot; a dusty dry mix draws moisture from fresh root surfaces while the operator is still cutting.
Clean and sharpen the knife or secateurs and decide the orientation code before making the first section. Use a horizontal cut for the crownward end and an angled cut for the distal end, matching the RHS convention. Put the parent name, cultivar, collection date and root type on every pot. Do not rely on memory after straight and slanted pieces from several taxa accumulate on the bench.
Set a clean shallow tray or damp wrap beside the work to hold roots briefly. Keep them cool, shaded and identified, but never leave them soaking or sealed warm. Arrange the workflow so a root moves from the parent to sectioning and into prepared medium within the same session. If weather, fading light or missing supplies will interrupt that sequence, restore the parent and postpone collection.
Take only healthy suitable roots
For a clump that tolerates lifting, work outward with a fork, lift during dormancy and wash enough soil away to identify roots without scrubbing the crown. Select young vigorous roots about pencil thickness for the standard RHS method. Cut them close to the crown with a clean tool, remove thin fibrous laterals and keep the crownward end recognizable. Leave structural roots and most of the feeding system with the parent.
Some plants with long taproots resent lifting. RHS advises exposing only part of the root system from the side and taking a few accessible roots; its alternative for container plants is to set the pot over a sand layer, then sever roots that grow into the sand later. Do not wrench up a taprooted Eryngium or Pulsatilla merely because the genus appears in another division list.
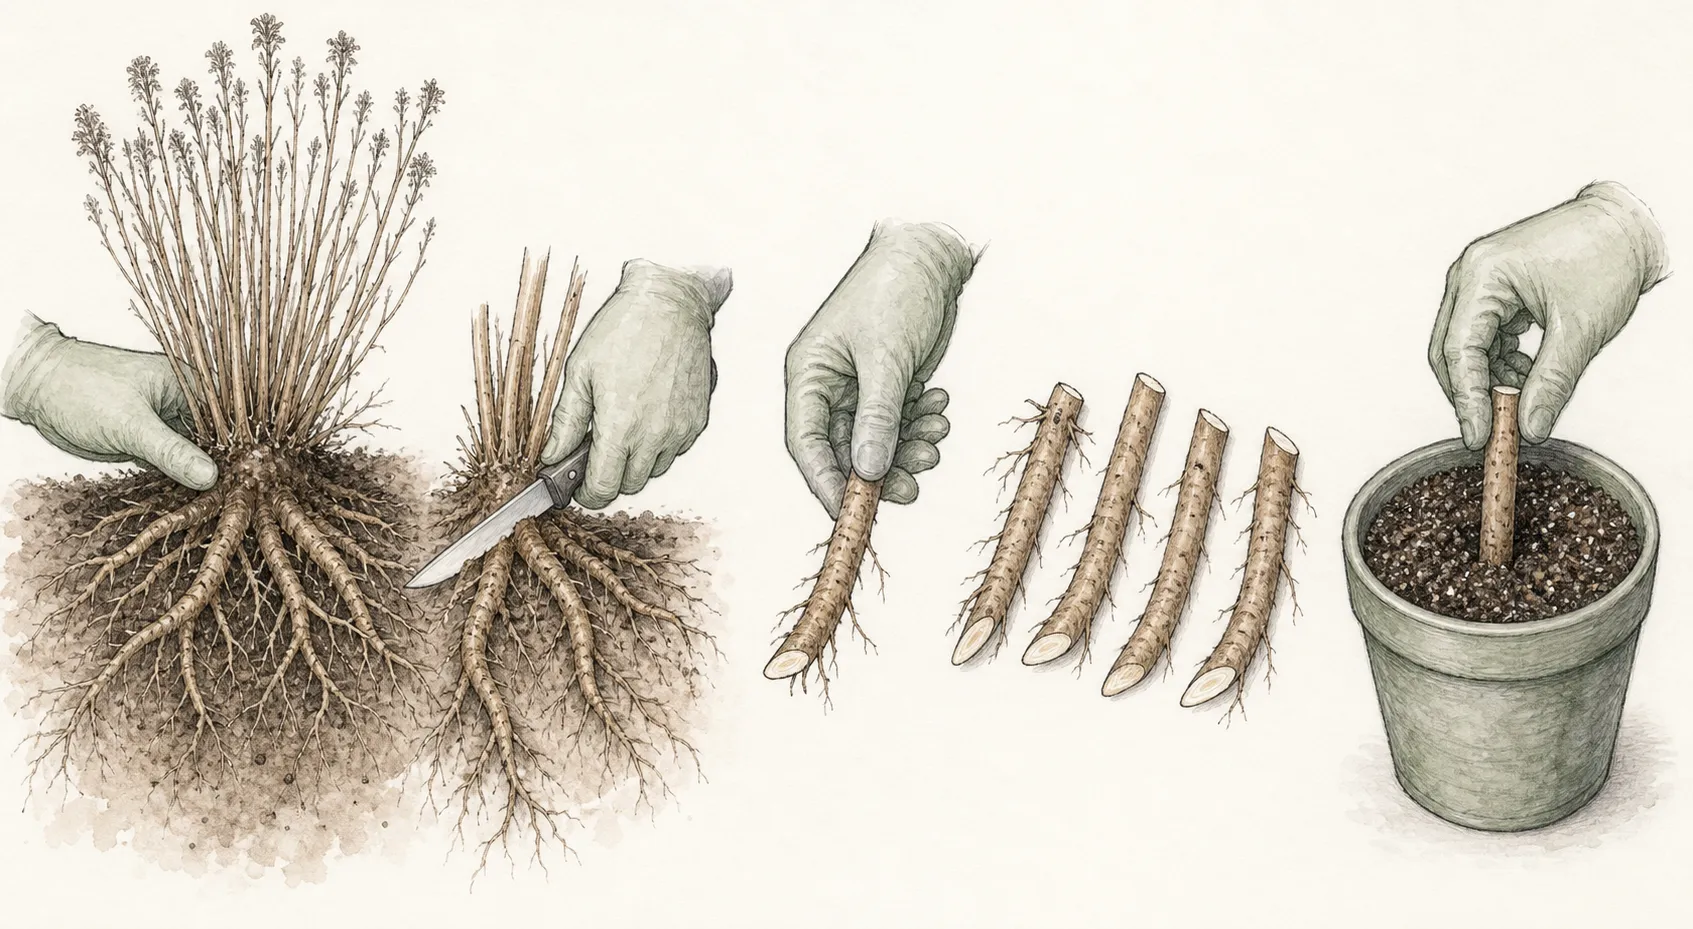
Reject blackened, hollow, soft, foul-smelling, badly scarred or desiccated roots. Do not use propagation to rescue material with an unresolved rot or regulated disease concern. Keep suspect roots and their soil away from the clean bench, disinfect tools after the parent and request a diagnostic opinion when decline is unexplained.
Replant the parent immediately at its previous crown depth, firm soil around retained roots and water only as soil and weather require. Label the disturbed side and protect it from heaving or drying. A propagation batch is not successful if the donor clump loses anchorage, is left too deep or sits in a water-filled excavation.
Match orientation and depth to root type
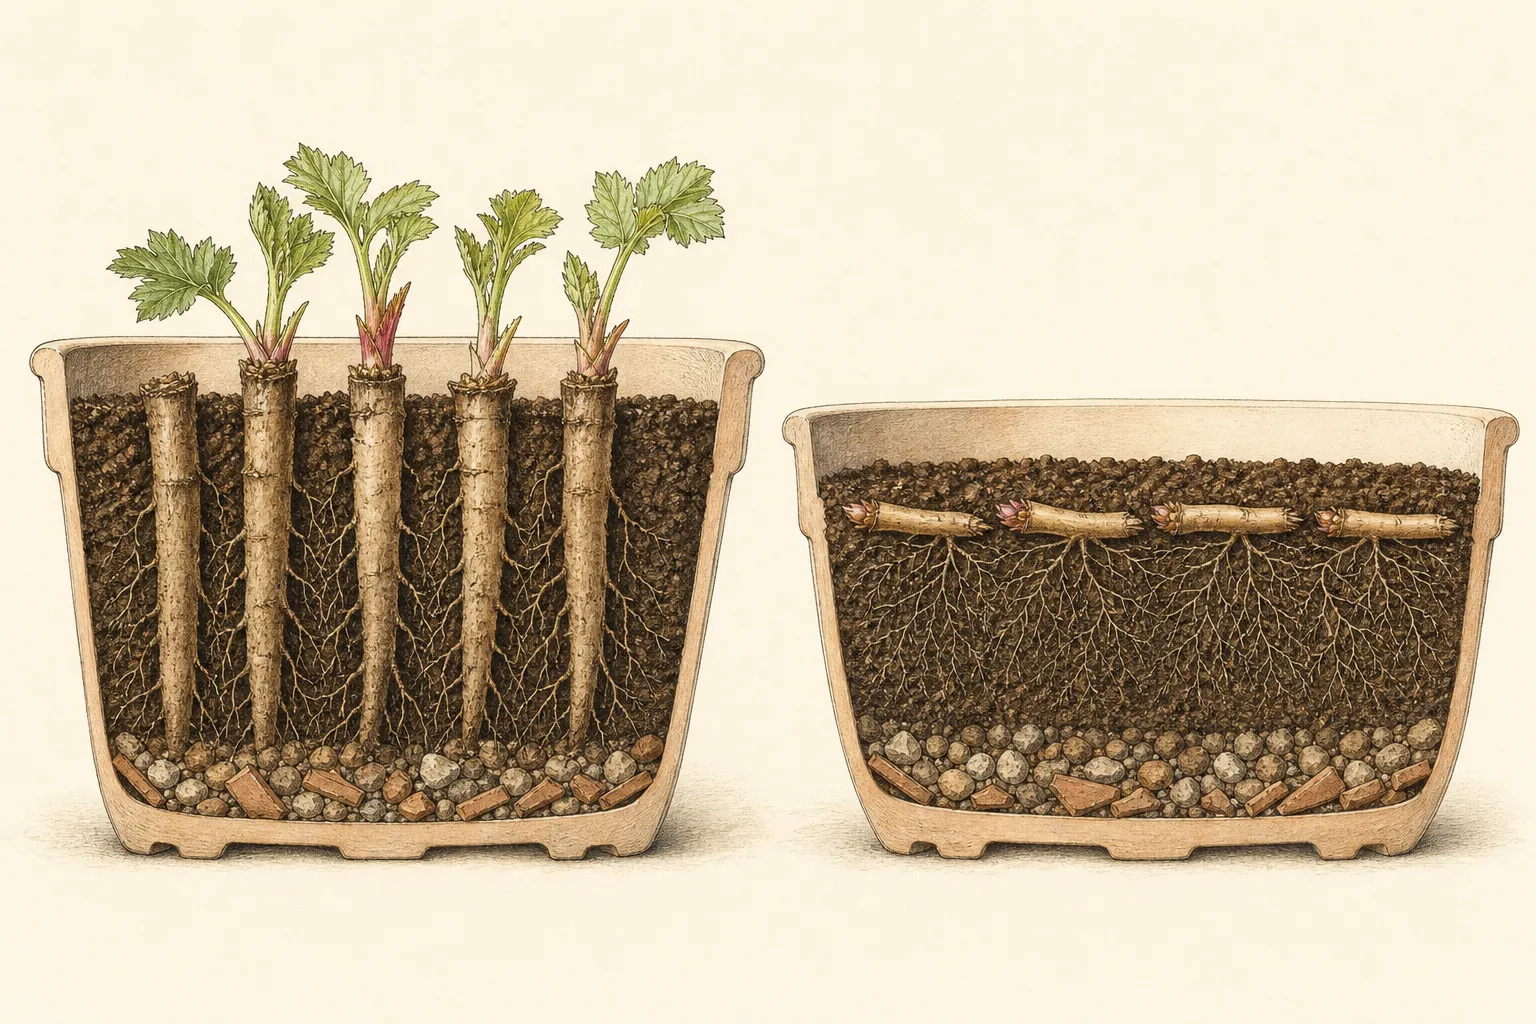
For pencil-thick roots, RHS specifies sections 5–10 cm (2–4 in) long. Make the upper horizontal cut and lower angled cut in sequence so every section keeps its crownward direction. Insert them vertically about 4 cm (2 in) apart with the horizontal top just below the compost surface, then apply about 1 cm (3/8 in) of grit. The top is shallow; the root is not buried at an arbitrary pot depth.
Thin-rooted Japanese anemones, Campanula and Phlox need more stored reserve per piece. RHS specifies longer sections, 7.5–12.5 cm (3–5 in), laid horizontally about 2.5 cm (1 in) apart, covered with 1 cm (3/8 in) of compost and top-dressed with grit. Keep them separate from vertical thick-root pots so watering and emergence can be interpreted correctly.
North Carolina State Extension gives a different large-root outdoor method: 2–6-inch sections retain polarity, receive short cool storage in moist material, and are planted with the proximal end shallowest. It treats small-diameter roots as 1–2-inch horizontal pieces beneath about 1/2 inch of medium. Keep those values with that protocol and use the RHS dimensions above for its listed perennials, with one recipe assigned to each pot.
Space pieces so one decaying root does not touch the entire batch. Firm medium gently enough to make contact without crushing air space, water lightly once and let the pots drain. Recheck the pot label against the cutting map before moving anything to storage. A reversed or unidentified root cannot be corrected after shoots appear.
Hold dormant cuttings in stable conditions
Place RHS-style autumn and winter pots in a cold frame or comparably cool protected setting. The goal is protection from hard exposure without forcing top growth in a warm living room. Keep the medium only slightly moist while roots are inactive. Check pot weight, drainage and the surface below the grit rather than watering on a weekly ritual.
Guard against saturation, hard freezing beyond the chosen species' and facility's protection, rodents and rapid drying. Group pots so labels remain readable and drainage holes remain open. A closed cover on a bright day can warm sharply, so ventilate a cold frame as conditions require while keeping heavy rain from filling the pots.
Do not dig through the medium looking for callus. New root initials and shoots are easily broken, and repeated excavation removes the only evidence of which orientation worked. Remove an obviously decaying section with a clean tool only when it can contaminate neighbors; isolate a pot if several pieces collapse or mold spreads beyond one wound.
Record holding location, temperature range, watering dates, first emergence and losses by taxon and root thickness. These observations explain whether failure followed wrong timing, poor orientation, insufficient reserves or rot. A note that says only no shoots is not enough to improve the next batch.
Respond correctly when shoots appear
When shoots emerge, give the pots brighter light while keeping the transition cool enough to prevent soft stretched growth. Increase water only as leaves and new roots use it, and keep the shoot bases above the medium. Do not pull each shoot away from its root section. RHS waits until growth is visible and the cutting is well-rooted before individual potting.
Inspect foliage for identity and health. Plain green shoots from a variegated parent are the expected limitation of root propagation, not a cue to add fertilizer. Remove mislabeled or off-type plants from a cultivar batch and do not distribute them under the parent's name. Isolate distorted, collapsing or diseased-looking growth until the cause is understood.
Read a failed pot before discarding it. Sound firm sections with no shoots may still be within the taxon's normal emergence period, while soft brown pieces and sour-smelling medium indicate decay. Failure across only the vertical pots suggests orientation, depth or root condition should be reviewed; failure across every pot points back to parent suitability, collection timing, holding temperature or moisture. Keep one intact section for diagnosis instead of repeatedly unpotting the entire batch.
Begin feeding only after independent rooted growth and the chosen species protocol justify it. Use a measured dilute program appropriate to the potting medium rather than treating slow emergence as deficiency. Separate vigorous pots before they shade later ones, but leave dormant sound pots undisturbed through the documented emergence period.
Pot and plant only established divisions
Pot each new plant when a shoot has enough roots to separate with minimal damage. Keep a portion of its original root section attached, use a draining potting mix and preserve the batch label. The RHS advises potting well-rooted cuttings individually in spring, growing them on and planting out the following year. A newly visible shoot is therefore an emergence marker, not proof that the cutting is ready for the garden.
Harden young plants gradually to outdoor light, wind and temperature. Protect small pots from complete dry-down, standing water and late freezes. A shoot that survives one warm week is not yet a garden-ready perennial; wait for active roots, sturdy species-appropriate growth and a root ball that can be handled without falling apart.
Prepare final sites from the exact plant's mature size, light, soil and moisture needs. Set the new crown at its proper grade, water through establishment and keep propagation stock away from valuable plantings until health is clear. Retain the original cultivar and parent record through every container move.
Evaluate the method after the first full growing cycle. Count true-to-type established plants, not initial shoots, and compare that yield with root removed, donor recovery, losses, bench space and labor. If the parent was weakened or most pieces rotted, reduce collection or choose division, seed or stem cuttings where those methods suit the species better.
Steps
- Level
- advanced
- Time
- 45–90 minutes, followed by a cool dormant holding period
- Tools
- Sharp clean knife or secateurs, Hand fork, Clean pots and tray, Waterproof labels, Small scoop
- Materials
- Fresh propagation medium, Fine grit where appropriate, Clean water, Damp clean wrap for temporary root holding
- 1Verify suitability and timing
Confirm the exact taxon forms shoots from root cuttings, the cultivar is not variegated, propagation is legally permitted and the donor is healthy and established. Use the documented dormant-season window; for the RHS-listed perennials this is mid-autumn to early winter. Postpone in active growth, saturated soil or after recent transplant stress.
- 2Prepare everything first
Clean and sharpen tools, pre-moisten a draining cuttings mix, fill pots and write parent, cultivar and date labels. Reserve a clean tray for brief root holding. Adopt a horizontal crownward cut and angled distal cut before collection so orientation remains visible from the first section to final potting.
- 3Expose roots carefully
Lift a tolerant dormant clump from outside the crown or expose only one side of a disturbance-sensitive plant. Select a small number of young vigorous roots near pencil thickness, preserve structural roots and remove no more than one-third of the root system. Reject soft, blackened, hollow, desiccated or suspicious material.
- 4Mark and section
For standard thick roots, cut 5–10 cm (2–4 in) pieces with the straight end crownward and angled end distal. For thin-rooted taxa such as Phlox or Japanese anemone, prepare the longer 7.5–12.5 cm (3–5 in) sections specified by RHS. Keep each taxon and root class in its labeled tray.
- 5Place by root type
Insert thick pieces vertically about 4 cm (2 in) apart with the straight top just below the mix surface, then add roughly 1 cm (3/8 in) of grit. Lay thin pieces horizontally about 2.5 cm (1 in) apart, cover with about 1 cm of mix and top-dress. Never reverse or deeply bury the sections.
- 6Settle and drain
Firm gently for root-to-medium contact, water lightly and let every pot drain. Recheck that labels match the cutting map. Replant the donor immediately at its former crown depth, settle retained roots and mark the disturbed side. Keep harvested roots shaded and moist only for the short preparation period.
- 7Hold cool and inspect sparingly
Place pots in a cold frame or equivalent cool protected setting, keep the medium slightly moist and guard against hard exposure, rodents and saturation. Do not excavate to check progress. Record temperature, watering, first emergence and decay; isolate a pot when collapse spreads beyond one damaged section.
- 8Grow on before separation
Give emerging shoots brighter cool light and wait until they are independently well-rooted before potting. Preserve identity, remove off-type green shoots from variegated batches and harden plants gradually. Grow them to sturdy, handleable plants; for the RHS method, plan final planting after the following grow-on period rather than rushing first shoots outdoors.
Sources
- Cuttings: Root. Royal Horticultural Society. Source record · Accessed 2026-08-30.
- Perennials: Dividing for Vigour. Royal Horticultural Society. Source record · Accessed 2026-08-30.
- 13. Propagation. North Carolina State Extension. Source record · Accessed 2026-08-30.
- Starting Plants From Cuttings for the Home Gardener. University of Georgia Cooperative Extension. Source record · Accessed 2026-08-30.