Grow · start snapdragons indoors
Start Snapdragons Indoors for Stocky Cool-Season Transplants
Surface-sow fine snapdragon seed, manage light and moisture precisely, and grow compact transplants for an early ornamental display.
Published Last updated
In this guide
- Use the biological cue for snapdragon seedlings
- Plan from the transplant window back to the tray
- Read the site and the whole plant together
- Set a visible finish line before beginning
- Prepare the work while every part is still identifiable
- Carry out the central operation in a controlled sequence
- Protect roots, crowns, and new growth after the work
- Diagnose a weak response before adding another treatment
- Leave a record for the next seasonal decision
- Steps
Use the biological cue for snapdragon seedlings
Count back roughly eight to ten weeks from the intended transplant window, then adjust for cultivar, indoor temperature, light, and regional spring conditions. The useful sowing date leaves a cool indoor interval and produces plugs before hot weather compresses flowering. Confirm that adjustable lights, cell space, and time for a two-week hardening period are available through that interval. A late start may still make useful bedding plants, but crowding a long-season series under weak light to meet a printed date produces poorer transplants.
Snapdragon seed is extremely small and is sown on or very near the surface, so even emergence depends on close seed-to-mix contact and steady surface moisture. Check several cells across the center and edges of a flat because lamp heat and air movement dry them at different rates. A dry edge with a moist center calls for tray placement or watering correction, while random empty cells may reflect seed distribution. That map is more informative than judging the whole sowing from one dense patch.
Deep covering, a drying surface, standing water, weak light, and prolonged heat can reduce emergence or produce seedlings that collapse after transplanting. The first warnings are displaced seed, a glossy saturated surface, green algae, or stems lengthening toward the lamp. Test water delivery on one empty cell before misting the seeded flat, and adjust light height as soon as emergence begins. If the bench cannot provide close bright light and drainage, keep the seed packet dry until those conditions are ready.
In mild climates snapdragons may be planted in autumn or winter, while cold regions use protected starts for spring; heat shortens their best display. Treat the article date as a temperate example and anchor the actual sowing to the local transplant window and the chosen series. Mississippi State's production range and Minnesota's regional schedule differ because climate and crop use differ. The plug's root fill, internode length, and hardening response remain the final readiness tests.
Plan from the transplant window back to the tray
Choose the intended outdoor window before assigning a sowing date, allowing for the crop's indoor growth and hardening stages. At emergence, change the humidity-cover routine and provide the cooler, brighter growing conditions described below. Keep young plants protected from freezing during acclimation. The usable endpoint is a suitably hardened plug, not the earliest possible germination.
Read the site and the whole plant together
Use a clean seed-starting position with strong adjustable light, gentle air movement, and temperatures that do not drive soft stretched growth. Observe the shelf at lamp level, tray level, and the watering edge: heat can collect near a ballast, a fan can desiccate one row, and a low corner can retain drainage. Mark those zones before sowing so flats can be rotated for a measured reason. Keep the route to the sink clear enough to carry a level tray without splashing seed or bending young stems.
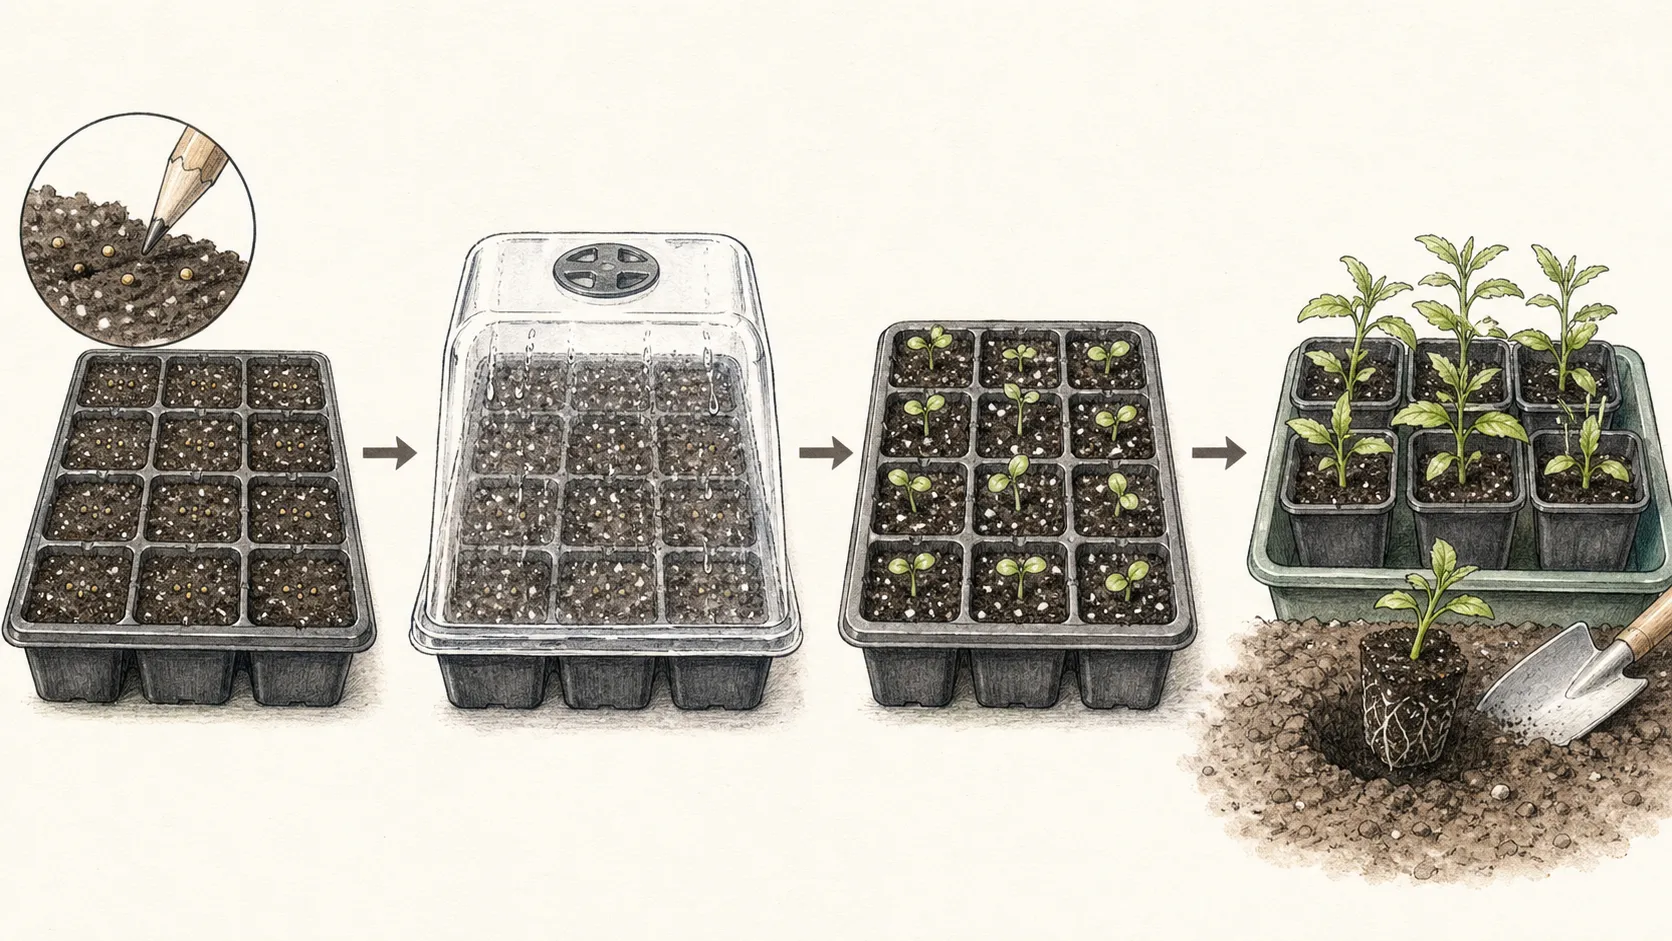
Read germination as a pattern across labeled cells. Even emergence and upright cotyledons indicate useful seed contact and moisture; a crusted edge, algae patch, or repeated gap reveals a local handling problem. Compare the same rows at the same time each day for the first two weeks. A single late seedling needs patience, while a whole warm row of elongated seedlings requires immediate light or temperature correction.
Transplants are ready when internodes remain short, roots knit the plug without circling, leaves are normally colored, and the flat has completed gradual outdoor exposure. Lift one edge plug to view root fill, then return it gently; use stem spacing and leaf posture for the rest of the flat. This combination prevents tall foliage from being mistaken for maturity. End indoor production while plugs still separate cleanly and can establish without root tearing.
Match the flat to its final use before seedlings need thinning. Dwarf edging types, medium bedding series, and tall cut-flower cultivars have different spacing and support needs, while a single-stem florist crop may remain unpinched. Reserve bed area and support for the labeled mature height now. A site too hot, shaded, or cramped for that series should receive a different cultivar rather than an overgrown plug.
Set a visible finish line before beginning
Set four transplant checks before sowing: short internodes, a cohesive uncircled root plug, normal leaf color, and completion of hardening while plants are still young. Photograph a representative side profile beside a ruler each week and record the lamp height. Those measurements reveal gradual stretch that memory misses. A plug meeting the four checks is finished even if seedlings within the series differ slightly in leaf angle or branching.
Uniformity matters most where it affects handling. Thin direct competitors so each selected seedling has light and root room, but retain ordinary size variation among healthy plugs. Correct a leaning tray, an overly dense cell, or a stem rubbing the dome; leave harmless differences in cotyledon angle alone. The aim is a manageable crop with intact roots, not a flat whose tops form an artificial level line.
Emergence suffers when fine seed is buried or allowed to dry, while saturated cells, weak light, and prolonged heat leave seedlings prone to collapse. Pause the sequence if seed has washed into piles, several cells remain flooded after drainage, or seedlings cannot stand when the dome is removed. Keep unused seed dry and preserve an unaffected row while correcting the bench condition. Resume only after the water path, light distance, or airflow has been tested on an empty cell.
Sow a thin, countable population that accounts for the seed’s tiny size without creating a dense carpet. Mississippi State recommends surface sowing because light is required, with germination commonly taking 7–14 days at 70–75°F. Wait through that supported interval before reseeding empty-looking cells. A second sowing made too soon creates mixed-age plugs that cannot be thinned, fed, or transplanted on one useful schedule.
Prepare the work while every part is still identifiable
Pre-moisten sterile mix, fill shallow cells evenly, label cultivar and date, and arrange bottom watering or a fine mist that will not displace seed. Mount and test the lights before opening the packet, and confirm that every cell drains on the waterproof tray. Fold a clean sheet of paper into a narrow chute for controlled sowing and close each packet as soon as its labeled row is complete. Tweezers can place pellets, but raw seed is better divided into small measured portions than chased individually across wet mix.
Label cultivar or series, sow date, and expected mature height. Dwarf, medium, and tall snapdragons need different final spacing and support, and some florist series are managed for one strong unpinched stem. Keep pellets or raw seed from different lots separate; flower color is unavailable when crowded seedlings first need thinning.
Use a clean tray on a waterproof bench, with lights and timers mounted before the surface-sown seed is exposed. Keep fans gentle and traffic away from the tray so dry seed is not blown or splashed into clumps. Arrange bottom watering where excess can drain fully, and give each flat enough space to move without brushing fragile stems against neighboring lights.
Carry out the central operation in a controlled sequence
Distribute seed thinly, press it into the surface, maintain humidity only until emergence, then remove covers and bring light close without heating foliage. Sow one labeled row and inspect it from the side before continuing; individual seed or pellets should remain visible rather than sitting in furrows. Test the chosen mist or bottom-water depth on that row's unseeded margin. Once water spreads without moving seed, repeat the same sowing motion and volume across the remaining rows.
Keep the seed surface visible through germination. A fine light-permeable vermiculite dusting may slow evaporation, but a layer that hides every seed is too heavy for this light-requiring crop. After emergence, keep the crown at the original mix line when thinning or potting on. Supporting a plug by its root ball protects the narrow stem and shows whether added mix is creeping above the seedling base.
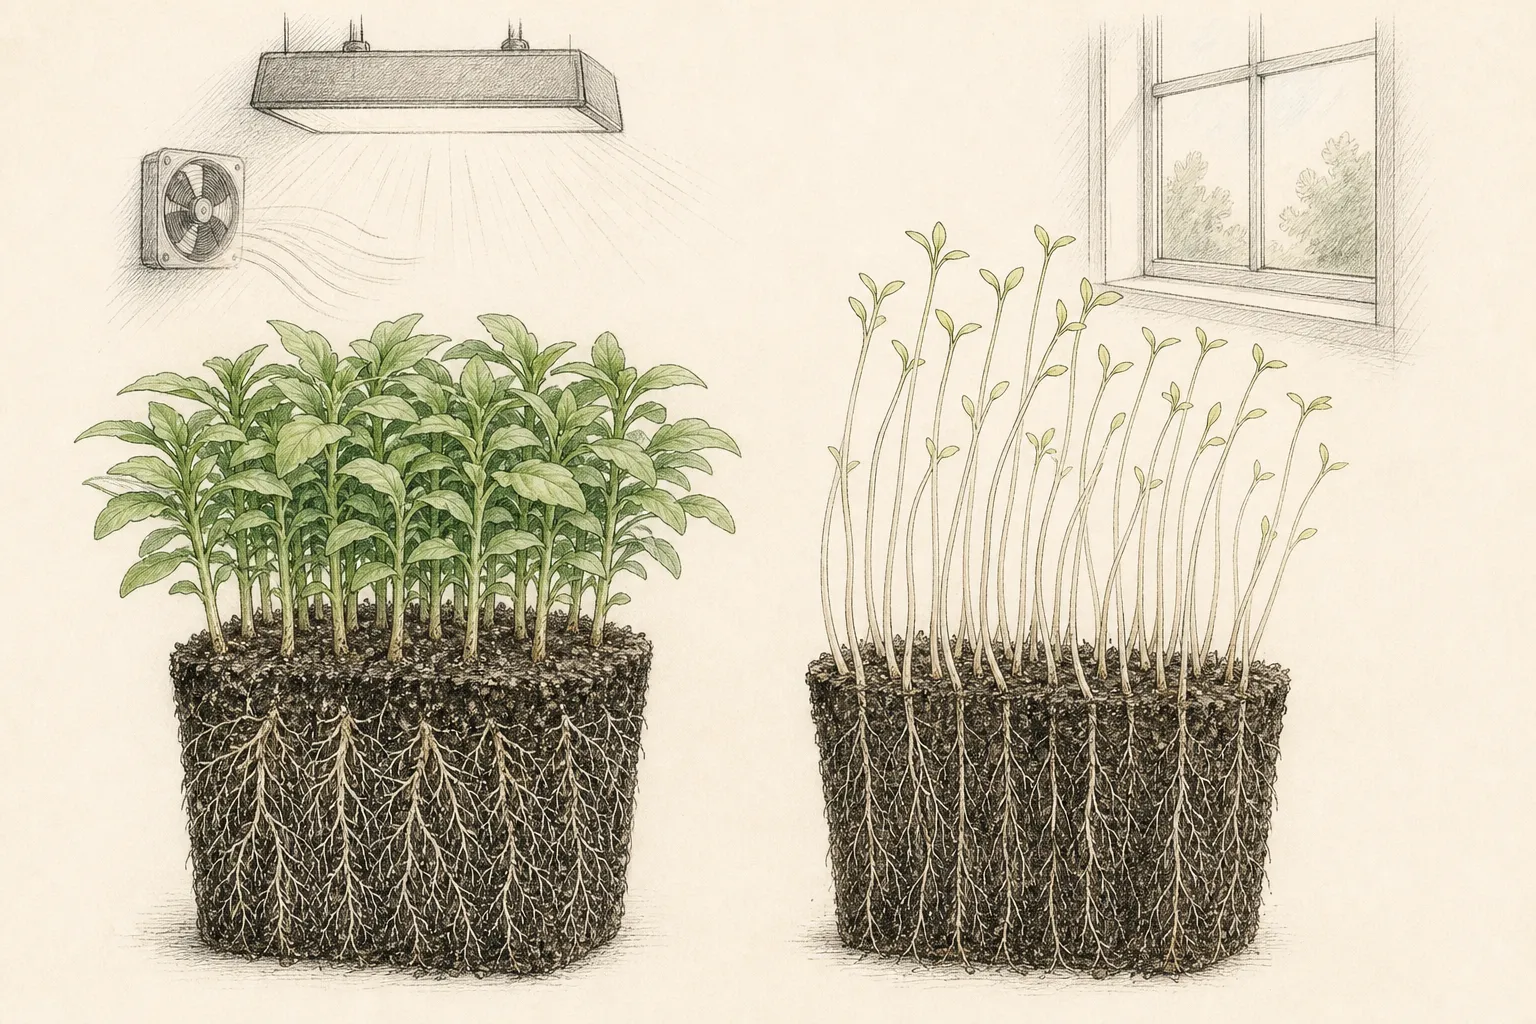
Watch for seed collecting at a cell edge, water standing beneath the flat, or cotyledons leaning away from heat and weak light. Each pattern has a different correction: level the tray and reduce droplet force, drain the reservoir, or adjust the fixture and temperature. Work row by row so a useful comparison remains while the change is tested. Applying every correction to the whole flat at once can obscure which condition caused the response.
Press seed into the pre-moistened surface without burying it. A very fine vermiculite layer may conserve moisture while admitting light, but a heavy cover defeats germination. Bottom-water or mist gently enough that seed stays in place, then drain the tray. Remove a humidity cover as soon as seedlings emerge so stale saturated air does not become the permanent method for keeping the surface moist.
Protect roots, crowns, and new growth after the work
Thin crowded cells, water from below when useful, begin gentle feeding only after true growth warrants it, and harden plants over several days. Remove cut seedlings and spilled mix from the flat so air reaches the remaining stems. Drain every watering tray fully and return labels to the same end after rotation. These small resets make crowding, root fill, and new collapse visible at the next inspection.
Feed only after true leaves and active roots show that seedlings can use nutrients. Pale growth in a saturated cell first requires drainage, sanitation, and a check of light and temperature; fertilizer cannot repair oxygen-starved roots. When feeding is appropriate, use a dilute product labeled for seedlings and record the application so the next watering decision is based on known inputs.
Indoor seedlings need an intentional transition to spring weather. Minnesota Extension recommends about two weeks of hardening, beginning with short shaded, wind-sheltered periods and increasing outdoor time and light. Bring flats in before freezing nights. A hardened snapdragon tolerates cool conditions better than many bedding plants, but a plug moved directly from still indoor air can still scorch, wilt, or snap.
End daily indoor adjustments when plugs remain short-jointed, hold together at lifting, and recover promptly from progressively longer hardening sessions. Continue checking moisture, but handle one sentinel plug for root inspection rather than pulling every cell. Young snapdragon roots tear easily when repeatedly tested. Stable leaf posture after a cool outdoor session is the better evidence that the crop is ready to plant.
Diagnose a weak response before adding another treatment
Measure stem spacing and root fill weekly, rotating trays only when the light pattern requires it and correcting stretch before it becomes irreversible. Pair a ruler reading at the internode with a root view from one edge cell. Short new growth with white roots signals progress, while increasing stem length above a sparse plug points to insufficient light or excess warmth. Repeating those two observations gives a clearer diagnosis than reacting to color alone.
Read the pattern before changing inputs. Uniformly tall thin seedlings need stronger or closer light and cooler growing conditions; isolated collapsed patches point toward excessive moisture, poor sanitation, or damping-off, not a general nutrient shortage. Pale seedlings in saturated cells should not be fed. Thin crowding, drain trays, correct light and temperature, and retain a small unaffected comparison before applying any treatment.
After emergence, distinguish a late seedling from a failed cell by waiting through the supported 7–14 day germination interval. Remove a collapsed seedling only when its stem is constricted or decayed, and lift it with minimal disturbance to neighboring roots. Healthy cotyledons may pause while roots establish, but a seedling that continues to elongate under close light needs a temperature review. Root fill and true-leaf development determine transplant timing, not the first green appearance.
End repeated misting, feeding, or warming when collapse continues to spread through adjacent cells. Isolate the affected flat, retain a sound labeled row as a comparison, and photograph the moisture pattern before changing sanitation or airflow. A local Extension diagnostic service is appropriate when damping-off is suspected or losses continue after drainage and hygiene are corrected. Keep that flat away from younger sowings while the cause is unresolved.
Leave a record for the next seasonal decision
Close the crop record with weekly internode measurements, a root-fill score from the same edge cell, lamp height, and any tray rotation. Add sowing, emergence, true-leaf, pinching, hardening, and planting dates for each cultivar. Side photographs taken beside the same ruler reveal stretch and branching more accurately than an overhead image. Next season, those records show whether density, temperature, light distance, or sowing date deserves adjustment.
Record any unpinched single-stem group and the cultivars intentionally pinched for branching. Keep one stable light and temperature treatment while diagnosing a problem elsewhere. Those comparisons explain different silhouettes and prevent a helper from pinching a florist series or moving every tray farther from the lights because one warm shelf stretched.
Revisit the regional assumption that mild climates may plant snapdragons in autumn or winter while cold regions use protected spring starts and summer heat shortens display. Compare planting date with hardening weather, root fill, and the onset of heat for each series. If plugs were ready too early, shift sowing later or slow the bench; if heat arrived before flowering, an earlier regional window may be needed. Attribute the change to that measured limit, not to the month label alone.
Record sowing, emergence, first true leaves, any pinch, start of hardening, and planting date by cultivar. Compare internode length and root fill at transplant. The next decision may be to sow earlier for a cool window, move lights closer, reduce density, or omit pinching on a cut-flower series. Stop routine indoor checks once hardened plugs establish outdoors.
Steps
- Level
- moderate
- Time
- One focused session, followed by scheduled checks
- Tools
- Fine seed tray or cell flat, Plant labels, Adjustable grow light, Fine mister or bottom-watering tray
- Materials
- Snapdragon seed, Sterile seed-starting mix, Clean water
- 1Count back 8–10 weeks
Use the local transplant window and cultivar program, not a national calendar. Mississippi State supports sowing 8–10 weeks before last frost for outdoor production, while Minnesota’s schedule is about 10–11 weeks in its climate. Confirm that adjustable lights and cool growing space will remain available for the entire plug period.
- 2Pre-moisten and label the flat
Fill clean draining cells with sterile seed-starting mix and moisten it before sowing. Label cultivar, date, and mature height. Mount lights on adjustable chains, put them on a timer, and separate electrical connections from watering trays. Arrange gentle airflow without aiming a fan at uncovered seed.
- 3Surface-sow thinly
Distribute the fine seed across the surface and press it into contact without covering it with mix. If used, apply only a fine light-permeable vermiculite layer. Mist gently or bottom-water so seed does not migrate. Cover to retain humidity during germination, then inspect daily and remove the dome at emergence.
- 4Remove the dome at emergence
Expect germination in roughly 7–14 days under the supported warm germination range. As seedlings appear, remove the cover and place lights about 2–4 inches above them for 12–16 hours daily, following Minnesota guidance. Drain excess water and keep seedlings cooler after emergence so stems remain short-jointed.
- 5Thin and grow cool
When true leaves appear, cut surplus seedlings at mix level and leave intertwined roots undisturbed. Pot on only when a plug outgrows its cell. Begin dilute feeding after several true leaves, not during germination. Pinch only cultivars and uses that benefit from branching; a tall single-stem cut-flower program may require a different choice.
- 6Harden for about two weeks
Begin with a few sheltered afternoon hours in shade, increase outdoor time and light gradually, and bring plugs in before freezing nights. Plant on a cloudy day or late afternoon once local conditions suit the hardened crop. Handle plugs by leaves or root balls and keep pressure off the fragile stem.
Sources
- Starting seeds indoors. University of Minnesota Extension. Source record · Accessed 2026-08-30.
- Snapdragon (Antirrhinum majus) for the Farmer Florist. Mississippi State University Extension Service. Source record · Accessed 2026-08-30.
- Snapdragon. North Carolina State Extension. Source record · Accessed 2026-08-30.