Grow · strawberry renovation
Renovate a June-Bearing Strawberry Bed After Harvest
Renovate a mature June-bearing strawberry matted row immediately after harvest: identify the right planting, protect crowns while mowing, narrow and thin the row, then water for recovery.
Published Last updated
In this guide
Renovate the right planting at the right moment
Renovation is the annual reset for an established June-bearing strawberry planting grown as a matted row. It removes the old leaf canopy, restores a defined row, reduces crowding, and creates space for healthy daughter plants. Those jobs prepare the perennial crowns for another bearing season; renovation is not simply a severe haircut performed because harvest has ended.
Use this procedure only on a mature June-bearing matted row. A June-bearing bed in its planting year still needs the original plants and their first daughters to build the row, so it stays outside this mowing routine. Day-neutral strawberries are commonly managed as individual plants or annuals, and everbearing or day-neutral hill systems normally have their runners removed. Mowing those plantings would copy the appearance of renovation while missing its production logic.
The timing matters because next year's crop begins before winter. June-bearing plants initiate flower buds in late summer and early autumn; they need time after harvest to replace leaves, root useful daughter plants, and build the crown tissue that carries those buds. Opening a dense canopy also improves sunlight penetration and air movement, while removing diseased old foliage can reduce the amount of infected leaf tissue beside the new canopy.
Begin when the last useful berries have been picked, normally in late June or July depending on cultivar and climate. Illinois Extension puts completion within about one week to ten days of the final harvest and warns that later mowing removes new growth. A missed window is not a reason for a lower or more aggressive cut. Keep the planting watered and weeded, and ask local Extension guidance whether late-season management should omit mowing.
Decide whether to renovate or replace the bed
Renovation preserves a productive stand; it cannot make every old planting young again. Iowa State notes that a well-maintained June-bearing bed may remain productive for about four or five years, while berry size and numbers eventually decline. A bed that has produced a reasonable crop and still contains many firm, vigorous crowns is a good candidate. A bed with sharply declining yield, large dead areas, or very few healthy plants may justify replacement instead.
Inspect before the leaves are removed. Walk both sides of each row and mark the strongest younger rooted plants, obvious gaps, dense weed patches, and crowns that appear dead or collapsed. Leaf removal can reduce foliar disease carryover, but it does not cure a failing crown or reconstruct a stand dominated by perennial weeds. Replacement may be less work than preserving scattered weak plants and then fighting the same gaps and weeds all summer.
Clear the work area before bringing in a mower or cultivator. Mark irrigation tubing, row markers, edging, stones, and any crown that sits unusually high because soil has eroded. Choose the strip of plants you intend to retain while the canopy still shows where vigorous growth is concentrated. That short survey prevents the machinery from making the important selections for you.
Mow above the crown
Find several crowns before setting the cutting height. The crown is the short, compact stem at soil level where leaves emerge above the roots. Push foliage aside and locate that solid center in both high and low spots. A mower setting measured from leaf tips tells you little; the safe reference is the highest crown that the blade could cross.
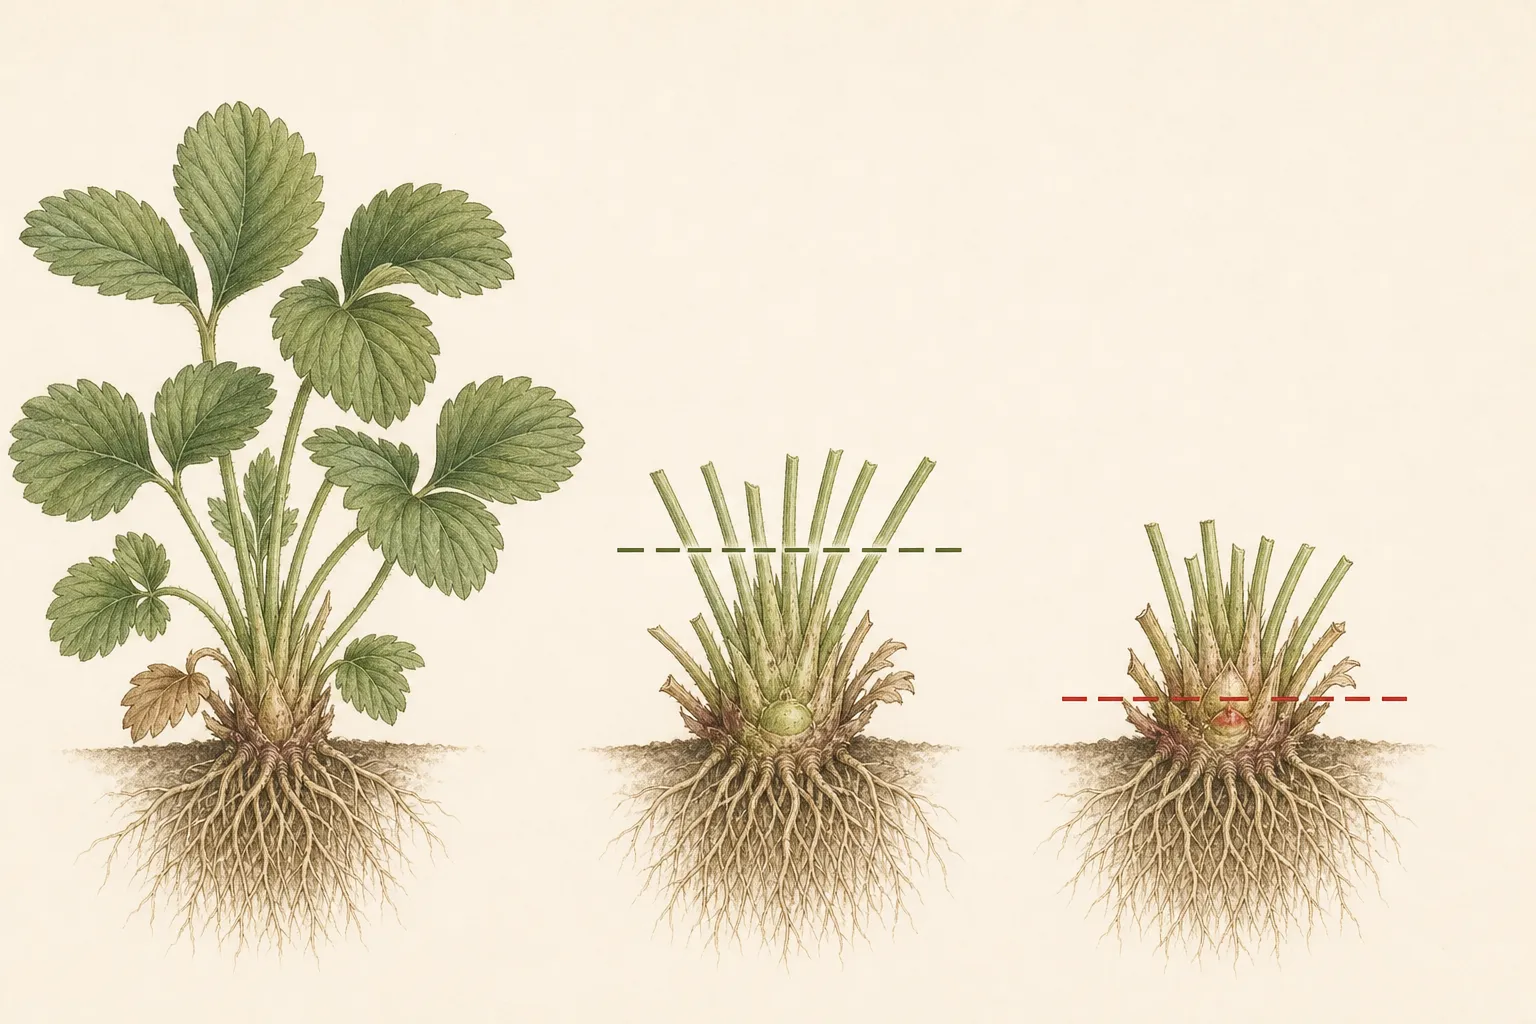
Clip or mow the leaves about one inch above the crowns, raising the cut wherever uneven soil makes that margin uncertain. A small bed, irregular row, or planting with exposed crowns is often safer to clip with shears. The goal is to remove old leaf blades and petioles while leaving every crown intact. A blade that enters crown tissue has removed the plant's growing structure, not merely its foliage.
Use a bagger where practical or rake the cut leaves out of the row after mowing. This matters most when old leaves show spots or other foliar disease, because packed debris beside emerging leaves keeps the discarded canopy in the new growth zone. Keep the rake shallow and lift debris gently away from crowns. Follow local guidance for diseased material; it does not belong as immediate mulch on the same bed.
Stop and inspect the row after the first short pass. Intact crowns should remain anchored, with cut petiole stubs above the compact center. If you see sliced crown tissue, exposed roots, or soil scalped from a high point, raise the machine and finish the irregular portion by hand. One careful correction protects more plants than completing the row quickly at the wrong height.
Reopen a narrow row
A mature matted row often spreads until the aisle disappears. Remove plants from both sides with a hoe, spade, or shallow cultivator, keeping the vigorous strip selected during inspection. Published starting widths vary because the intended finished rows vary: Minnesota guidance allows a row to be cut back to about six inches so daughters can rebuild a 12- to 14-inch canopy, while Iowa home-garden guidance commonly leaves an 8- to 12-inch strip that may finish closer to two feet wide.
Treat those measurements as parts of their respective systems, not competing universal rules. Preserve the row center and the aisle spacing established for the bed, then choose a starting width that local guidance expects to refill before autumn. Iowa describes retained strips about three feet apart; many matted-row plantings were originally laid out on three- to four-foot centers. The practical result is the same: the living row has two visible edges and a usable aisle, not one continuous carpet of plants.
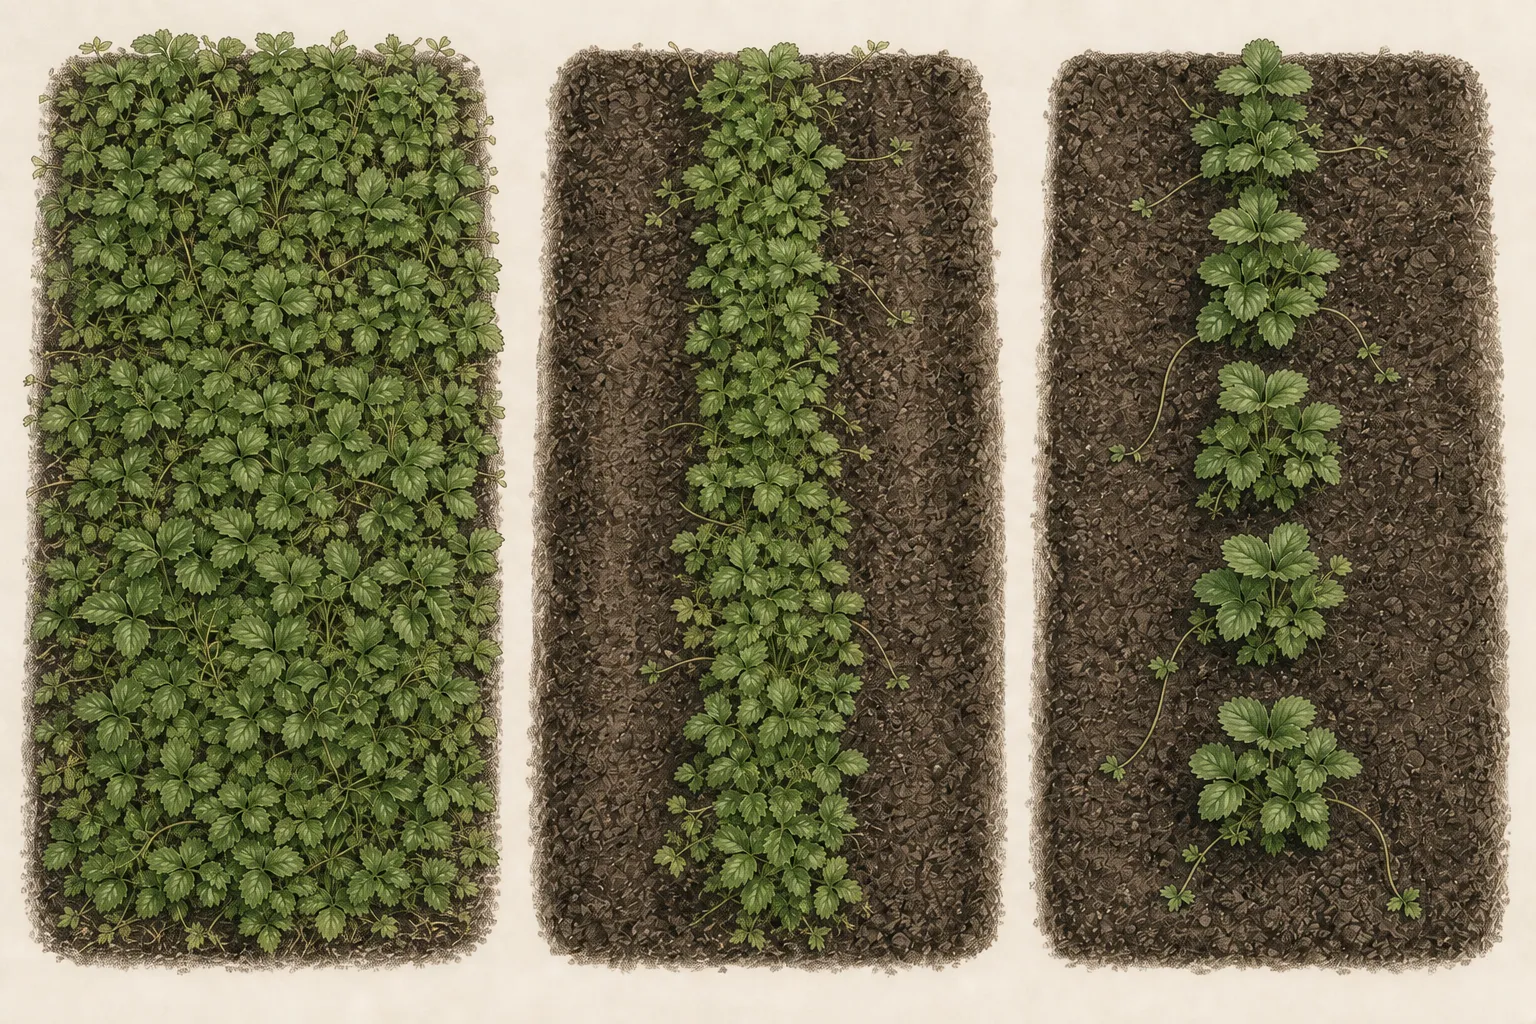
Cultivate only the surface beside the retained plants. Iowa State recommends working about one to two inches deep for weed control so strawberry roots are not severed unnecessarily. Inside the strip, remove weak or redundant crowns where they remain tightly packed and favor younger vigorous rooted plants. Illinois spaced-row guidance keeps daughter plants at least about four inches apart; a renovated matted row can use that distance as a warning against immediate recrowding, not as a demand for ruler-perfect spacing.
Older crowns sometimes stand above the surrounding soil as the stem lengthens. Iowa State recommends drawing roughly an inch of loose cultivated soil around those elongated crowns to improve rooting and winter protection. Cover the exposed sides while keeping the crown center uncovered. Once the row has been shaped, stop adding soil; repeated hilling can introduce more weed seed and obscure the level at which leaves and roots meet.
Feed by evidence, not habit
Post-renovation growth needs adequate nitrogen, but a fertilizer rate only makes sense in its original context. Minnesota recommendations change with soil organic matter, bearing year, and leaf analysis, while Iowa gives home-garden examples based on bed area or row length. Copying either number into a different soil, fertilizer analysis, or planting history can supply too little nitrogen or far more than the bed needs.
Use a recent soil test, a foliar test where it is available, and local Extension guidance to choose the product and rate. A balanced fertilizer is not automatically helpful: Minnesota specifically cautions that excess phosphorus and potassium can be harmful. Count fertilizer already applied and nutrients supplied by compost or other amendments as part of the calculation; renovation does not reset them to zero.
If fertilizer is recommended, measure the actual row length or bed area and convert the local rate before opening the bag. Apply it evenly over the intended root zone, follow label precautions, and irrigate as the recommendation directs. Keep the fertility decision separate from mowing depth and row width; a precisely renovated bed can still be damaged by an improvised nutrient dose.
Water for recovery and flower-bud formation
Water soon after renovation when the soil is dry. The plants have lost most of their leaf area and must produce a new canopy, while any applied fertilizer also needs moisture to move into the root zone. Both Minnesota and Iowa guidance use about one inch of total water per week from rain and irrigation as a useful summer target. It is a planning amount, not an instruction to irrigate automatically every seven days.
Measure rainfall and check the soil before supplying the remainder. A rain gauge or straight-sided container can show what an irrigation session actually delivered. Sandy soil and hot, windy weather may require the weekly amount to be divided, while heavier soil may hold moisture longer. Apply water slowly enough to enter the root zone and limit runoff through the newly opened aisles.
Summer moisture supports more than visible leaves. Renovated June-bearing plants form runners and daughter plants, then initiate much of next year's flower crop in late summer and early autumn. A prolonged dry spell during that period can interrupt the recovery the mowing was meant to encourage. Set selected daughters onto moist soil inside the row so they can root, and clear surplus runners from a dry aisle.
The one-inch target does not call for permanently wet soil. Include rainfall, pause after soaking rain, and investigate water that remains ponded before the next application. The useful checkpoint is steady new growth in moist, aerated soil. Wilting in wet soil or crowns that continue to decline after watering calls for diagnosis, not another irrigation cycle.
Keep the row open as runners return
The same warm weather that drives strawberry recovery also drives weeds. Hand-pull close to crowns and cultivate the aisle only at the shallow depth needed to sever small weeds. Repeated deep cultivation damages strawberry roots and keeps bringing buried weed seed to the surface. Work before weeds set seed, when the open post-renovation canopy makes them easiest to see.
Select enough daughter plants to rebuild the intended row, position them on bare soil inside its edges, and remove or redirect runners that cross the aisle. Very vigorous cultivars can refill space quickly. Saving every daughter simply recreates the dense mat that limited light and air before renovation. The row width chosen earlier remains the boundary through the rest of summer.
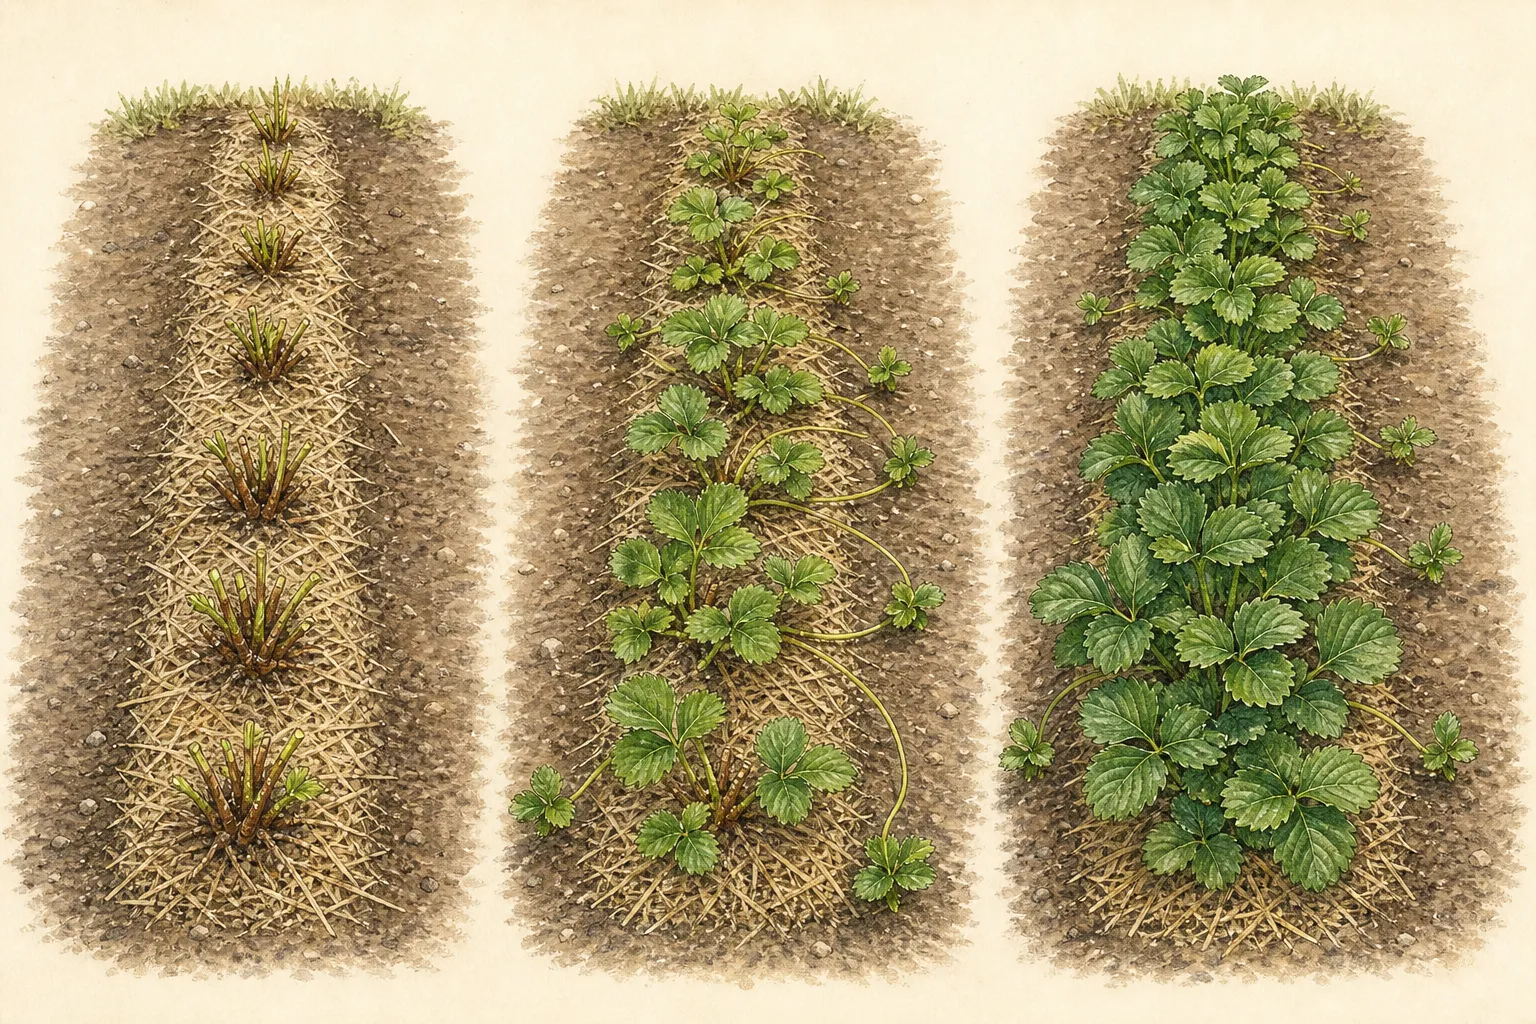
Read recovery as a sequence. First, intact crowns produce clean new trifoliate leaves. Next, retained runners root daughter plants within the strip. By late summer, foliage should form a defined row with visible edges and open access between rows. Sparse crowns that fail to replace their leaves, expanding dead patches, or a row that closes into a solid mat show that the annual task is not complete and the stand needs reassessment.
Carry the renewed bed into autumn
Renovation is a same-day cutting and row-shaping job followed by a season of observation. Continue weed control, moisture checks, and runner placement while the canopy develops. Leave the new leaves intact after they emerge. Their job is to support rooted daughter plants and the flower buds that will carry the next crop.
In cold-winter regions, follow local timing for winter mulch after plants have acclimated in autumn. Iowa recommends a protective straw mulch in mid-fall to limit temperature injury and drying by winter wind, then removal when growth resumes in spring. That winter step is separate from renovation, but a renewed row with clear edges is much easier to cover evenly and uncover while keeping runners untangled.
Judge the result at the next harvest as well as at the end of summer. A renewed bed should remain navigable and produce a worthwhile crop of usable berries. If fruit size and number continue to decline after consistent annual care, or healthy plants have become too sparse to rebuild the row, use that evidence to plan a replacement planting; annual renovation has reached its useful limit.
Steps
- Level
- moderate
- Time
- One working session immediately after the final harvest
- Tools
- Mower or hand shears, Rake, Hoe, spade, or shallow cultivator
- Materials
- Irrigation water, Fertilizer only when locally recommended
- 1Confirm the system, timing, and value of the stand
Proceed only with an established June-bearing matted row immediately after its last useful harvest. Exclude first-year June-bearing beds, day-neutral plantings, and everbearing hill systems from this mowing routine. Check whether vigorous crowns still occupy enough of the row to justify another season; continuing decline in berry size and number after several years favors replacement over automatic renovation.
- 2Mark obstacles and set the cut from the crowns
Locate crowns in both high and low parts of the row, then mark irrigation lines, stones, edging, and exposed plants. Set the mower or shears to remove foliage about one inch above the highest crowns. Raise the cut or work by hand on uneven ground; no blade should enter the compact crown tissue.
- 3Remove old leaves and inspect the cut
Bag or rake away the cut foliage, especially when old leaves carried disease. Inspect the first completed section for intact anchored crowns, uncut growing centers, and soil that has not been scalped. Correct the cutting height before continuing; a damaged crown cannot be repaired by the later steps.
- 4Restore a locally appropriate row width
Remove plants from both sides with shallow cultivation, retaining a vigorous strip within the original row center. Local systems may begin near six inches or retain an 8- to 12-inch strip because their intended late-summer widths differ. Favor strong younger rooted plants, preserve clear aisles, and keep work shallow beside the strawberry roots.
- 5Thin, adjust exposed crowns, and feed by evidence
Remove weak or tightly crowded plants inside the retained strip. Draw a small amount of loose soil around the sides of elongated older crowns while leaving the crown centers visible. Apply fertilizer only when its analysis and rate are supported by a test or local recommendation; account for nutrients already supplied.
- 6Restore moisture and measure the weekly total
Water the renovated row when soil is dry, then aim for roughly one inch per week from rain and irrigation while leaves, runners, and flower buds develop. Measure delivery and let soil and weather set the schedule. Pause when soil remains wet or water ponds around the crowns.
- 7Manage the rebuilding row through late summer
Control weeds with hand pulling and shallow cultivation. Root selected daughter plants inside the planned strip, redirect or remove runners that enter the aisle, and keep both row edges visible. The successful endpoint is a healthy new canopy in a defined row—not a return to one continuous mat.
Related reading
Sources
- Strawberry end-of-season renovation. University of Minnesota Extension. Source record · Accessed 2026-08-18.
- Renovation of June Bearing Strawberries. Iowa State University Extension and Outreach. Source record · Accessed 2026-08-18.
- Growing Strawberries. University of Illinois Extension. Source record · Accessed 2026-08-18.
- How long can I expect my June-bearing strawberry planting to be productive?. Iowa State University Extension and Outreach. Source record · Accessed 2026-08-18.