Grow · prune summer flowering spirea early spring
Prune Summer-Flowering Spirea Before New Growth Takes Over
Thin, shorten, or renew summer-flowering spirea in early spring according to stem age, shrub vigor, and the role it must fill.
Published Last updated
In this guide
- Use the biological cue for summer-flowering spirea
- Choose thinning or rejuvenation after confirming summer bloom
- Read the site and the whole plant together
- Set a visible finish line before beginning
- Prepare the work while every part is still identifiable
- Carry out the central operation in a controlled sequence
- Protect roots, crowns, and new growth after the work
- Diagnose a weak response before adding another treatment
- Leave a record for the next seasonal decision
- Steps
Use the biological cue for summer-flowering spirea
Confirm that the shrub flowers in summer before assigning it an early-spring pruning date. Iowa State names Japanese spirea among shrubs that bloom on the current year’s growth and recommends late winter or early spring. The cut can therefore shape the shoots that will carry this summer’s flower clusters, provided it is completed before those shoots have invested in substantial extension.
A bridal-wreath type that flowers in spring follows a different cycle because its display is carried on older wood. Use a label, cultivar record, or a dated bloom photograph to settle the identity. When the only evidence is the word ‘spirea,’ preserve the live framework through one bloom season and record when and where flowers appear.
On a verified summer bloomer, look for viable buds, dead tips, thin shaded twigs, coarse old canes, and last year’s flower stems. These features separate routine shortening from basal thinning. A compact shrub with evenly spaced live stems may need only deadwood removal, while a straggly crown with weak interior growth can benefit from a more deliberate renewal pass.
RHS guidance uses early to mid-spring for late-flowering deciduous shrubs and cautions that winter pruning can expose new shoots to frost damage. Adjust the day to local bud movement and weather, especially in an exposed bed. Once green shoots have lengthened, postpone optional structural work and protect the growth already committed to this season’s bloom.
Timing alone does not set the cutting height. Iowa State establishes why verified summer bloomers can be pruned before growth, while the RHS supplies a routine method: return the previous year’s flowering stems to one or two buds above older wood and remove weak growth. Read those as two linked decisions. First confirm the flowering cycle; then choose cuts from stem condition and shrub habit. A calendar entry that skips either decision can turn a healthy Japanese spirea into a sheared mound or remove the pending display from a spring-flowering look-alike.
Choose thinning or rejuvenation after confirming summer bloom
First verify that the spirea belongs to the summer-flowering group addressed here. Select thinning or rejuvenation for a stated purpose, locate sound cut points and leave basal buds open. Keep spring-flowering shrubs out of the same treatment. Compare new growth, flowering and clearance afterward to decide whether the chosen cut system actually suited that plant.
Read the site and the whole plant together
Circle the crown and trace the strongest stems to their origins. Note where old canes crowd the base, where snow has split a fork, and where thin shoots disappear into shade. Then view the shrub from the path or window it serves; this reveals whether a single wayward branch causes the conflict or the cultivar’s full spread exceeds the allotted space.
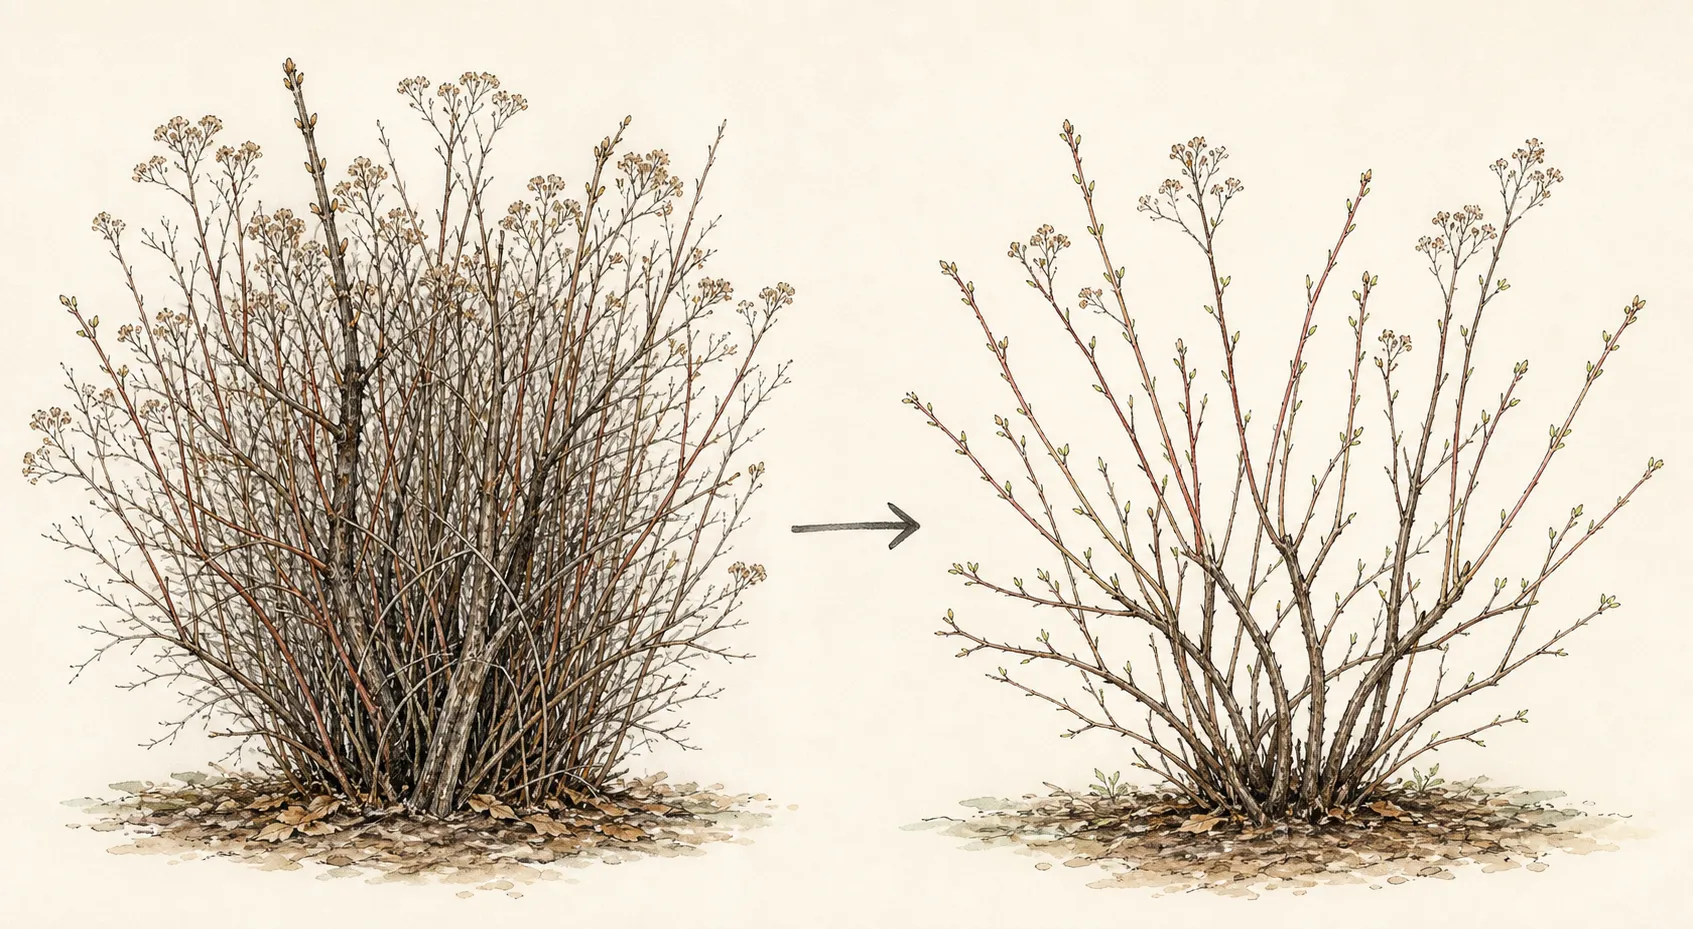
Judge stem distribution at the base, not just the leafy outline left from last year. A dense outer shell can conceal dead twigs and an empty center, while a naturally open cultivar may look sparse before leaf-out yet carry sound buds along each arch. Flag dead, weak, crossing, and oldest stems in separate colors so a size cut is not mistaken for a health cut.
Inspect the soil surface and companion plants before stepping into the bed. Soft thawing ground compacts around a shallow woody root system, and emerging bulbs can be hidden beneath the twiggy skirt. Set the working position and debris route from firm ground; pruning quality declines quickly when the gardener must balance over the crown or drag brittle stems through new shoots.
Set a visible finish line before beginning
Choose among three finishes: a light annual shortening, selective basal thinning, or a cultivar-specific renovation. For routine RHS group 6 pruning, the previous year’s flowered stems are shortened to within one or two buds of the older woody framework, with thin, weak, and dead growth removed. Mark that older framework before shortening begins.
Basal thinning suits a crown whose oldest canes exclude younger growth. Select only enough origins to open working lanes and retain well-spaced vigorous stems around the shrub. The finished outline can remain uneven in dormancy because outward buds and retained laterals will determine the new canopy; a rounded silhouette is not the measurement of success.
A total low reset is a separate renovation decision and needs guidance for the identified species or cultivar. Keep that option off young, newly planted, drought-stressed, or poorly identified shrubs. When mature size repeatedly blocks a path after correct thinning, replacement with a smaller selection offers a durable answer that annual severe cutting cannot provide.
Different stems in one crown can receive different cut types without creating a mixed objective. Remove a coarse cane at ground level when its origin crowds vigorous replacements, return a flowered shoot to the older framework when its buds are well placed, and leave a balanced young stem intact. Count each category before work so size reduction does not quietly consume every young shoot. The completed shrub should contain live buds at several positions and open lanes through the base, not identical stem lengths.
Prepare the work while every part is still identifiable
Attach the cultivar label or bloom note to the shrub, photograph the uncut crown, and transfer the colored stem flags to a simple sketch. Mark the older framework separately from stems selected for removal. That map keeps an outward bud or useful lateral available when the branch is shortened from inside a dense crown.
Clean and sharpen the cutting tools before entering the shrub. Missouri Extension assigns hand shears to branches up to about 3/4 inch, loppers to roughly 3/4 to 1 1/2 inches, and pruning saws to larger wood. Those ranges are practical control limits; stem access and tool condition still decide whether a clean cut is possible.
Place a tarp beyond the removal side and cover bulbs or perennial crowns close to the spirea. Lift each cut cane clear by its basal end so brittle twigs stay away from emerging neighbors. Keep the crown uncovered throughout the pass, since dropped fragments can hide a missed dead stem or a tall basal peg.
Plan separate tool cleaning for wood that shows cankers, unusual discoloration, or dieback. Finish healthy stems first, then sample suspect tissue with a sanitized blade. Follow the disinfectant label for concentration and contact time, and keep the solution out of the soil around the crown.
Carry out the central operation in a controlled sequence
Remove dead, split, and unmistakably weak growth first. Follow each stem to its origin and cut it at ground level or back to sound live wood, keeping healthy basal buds intact. Clearing these stems reveals the true density and may reduce the amount of live framework that still needs alteration.
For selective thinning, take a marked old cane at ground level with a clean cut that leaves no prominent peg. For shortening, follow the flowered shoot back to the older framework and retain one or two healthy buds as RHS describes. Missouri Extension places a heading cut about 1/4 inch above a healthy bud facing the desired direction of new growth.
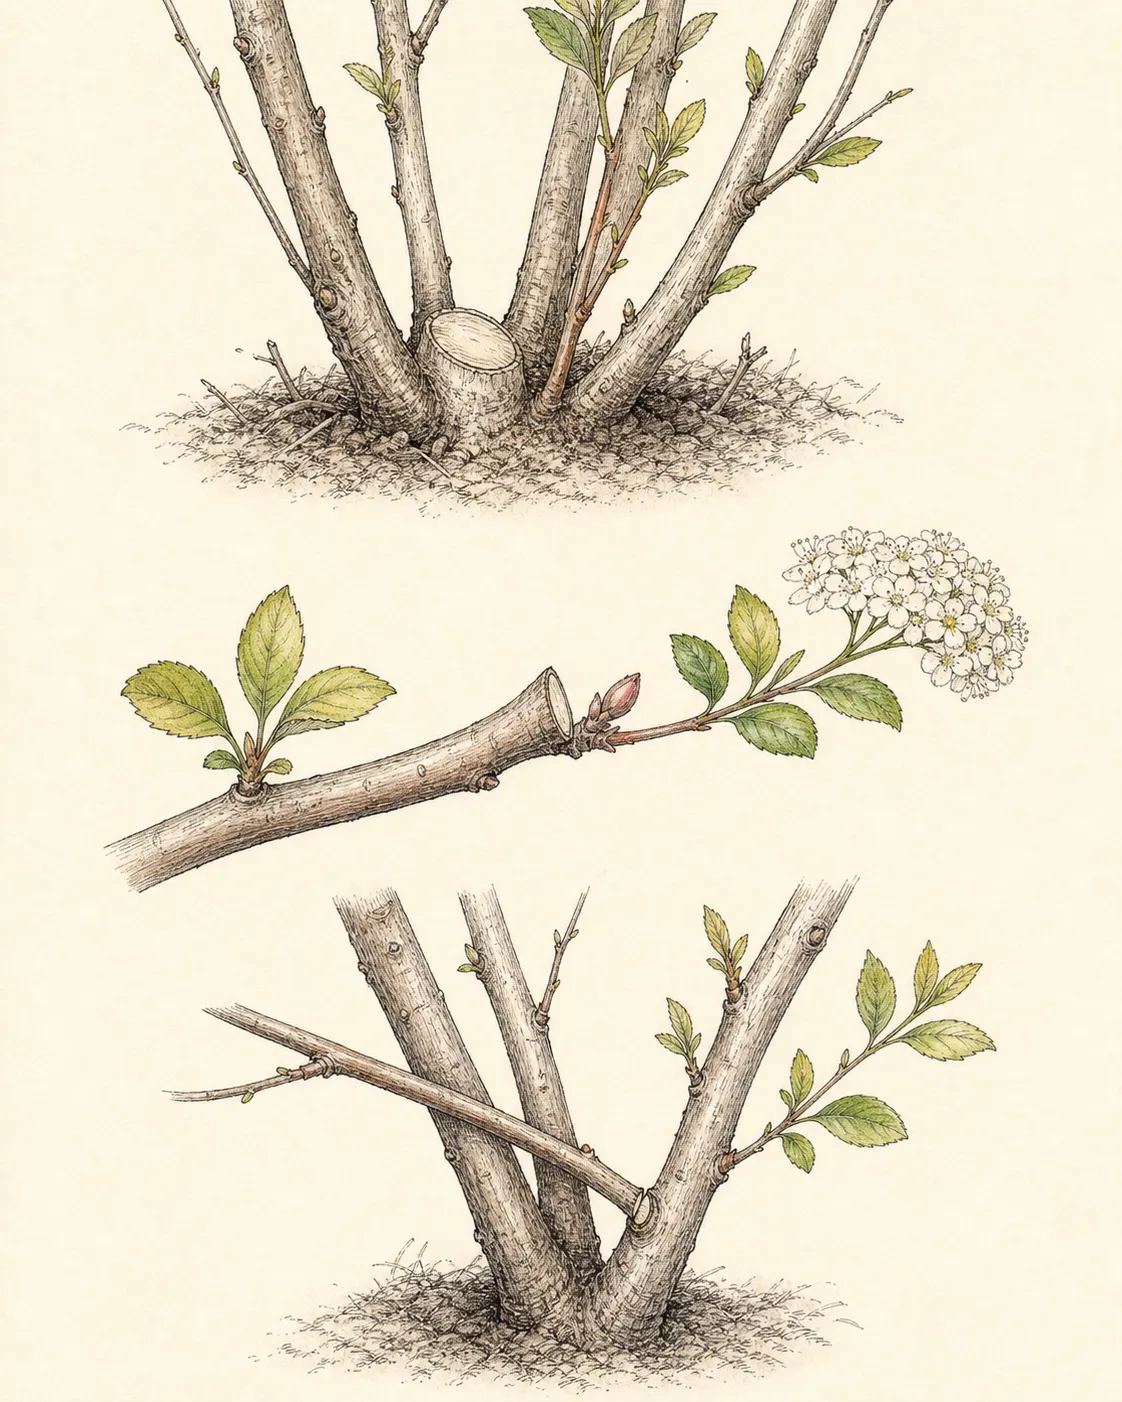
Step outside the shrub after several live cuts and compare the flagged plan with the remaining crown. Strong stems should be spaced through the base, outward growth points should face useful open space, and the older framework should remain legible. A flat perimeter of equal-height tips indicates shearing, which stimulates another dense surface while leaving congestion underneath.
At a fork, decide whether the whole stem or only its extension causes the problem. A thinning cut follows the unwanted member back to its origin and transfers growth to the retained branch; a heading cut activates buds below the cut and is useful only where new branching is wanted. Keep the blade close enough to the selected bud to avoid a dead stub while preserving the bud itself. This distinction is especially important inside a spirea, where many small headings can create more interior shoots than the original congestion contained.
Protect roots, crowns, and new growth after the work
Rake twig fragments from the crown and spread mulch over the surrounding root zone while keeping cane bases visible. Settle any companion plant disturbed during access. RHS guidance includes mulching and feeding after spring pruning; choose a locally appropriate product and rate only when the site’s soil and existing fertility call for it.
Monitor the retained buds as leaves expand. A late freeze may blacken the newest tips while lower buds remain alive, so mark the affected shoots and wait for a clear live boundary before recutting. During a dry spring, check moisture beneath the mulch and water the root zone deeply enough to support new extension without keeping the crown wet.
Remove labels and stem flags only after every planned cut and retained comparison section has been photographed. The open base should stay visible until the first flush confirms which buds carried growth. A second round of cosmetic trimming at leaf-out would erase that evidence and can recreate the dense shell the structural pass was meant to relieve.
Diagnose a weak response before adding another treatment
At leaf-out, count vigorous shoots in the center and around the perimeter. Growth only on the outermost tips suggests that interior congestion remains, while an even flush from retained buds shows the framework is functioning. Check each sector against its pre-pruning photograph before deciding that a naturally open side represents dieback.
Sparse growth calls for a timing and vigor review. Confirm the summer-blooming identity, examine the root zone for drought or saturation, and compare exposed shoots with sheltered ones for freeze injury. A weak crown gains little from another reduction in the same season; preserve its leaf area and correct the limiting site condition.
Poor bloom on strong new shoots may reflect deep shade, an immature plant, an unsuitable cultivar response, or cuts made after flower-bearing growth had developed. Flowers appearing early on retained old wood reveal a mistaken spring-blooming identity. Update the label and shift future structural pruning to the appropriate post-bloom window.
Inspect unusual lesions, continued tip death, and one-sided wilt separately from ordinary pruning response. RHS lists bacterial canker, coral spot, bracket fungi, and Verticillium wilt among problems to watch after shrub pruning. Photograph the boundary, isolate suspect debris, and seek local diagnosis before cutting into additional healthy stems.
Leave one representative section lightly pruned when the shrub’s identity or vigor was only recently confirmed. Compare its shoot length, flower-cluster count, and interior density with the more strongly shortened section at summer bloom. The comparison is useful for the next spring only if both sections share the same light and moisture. A strongly flowering control with weak response elsewhere points toward excessive cutting; uniformly weak performance directs attention to site conditions, winter injury, or root health.
Leave a record for the next seasonal decision
Record the botanical or cultivar identity, bloom season, pruning date, and whether the pass used flower-stem shortening, basal thinning, or a documented renovation method. Add the number of old canes removed and a same-position photograph. This makes next spring’s job a continuation of observed stem history instead of another guess from the dormant outline.
Repeat the photograph after leaf expansion and during peak bloom. Note shoot density at the base, flower coverage across the crown, path clearance, and any frost- or disease-affected sector. The bloom image also confirms whether this shrub truly flowers on current growth, which is the premise for returning in early spring.
Schedule the next action from that record. A balanced, flowering crown may need only deadwood attention; continued crowding may justify another small basal thinning; weak regrowth calls for a recovery year. Reserve a more severe renovation for an identified cultivar whose direct guidance supports it, and replace a repeatedly oversized plant when site dimensions are the persistent problem.
Steps
- Level
- moderate
- Time
- One focused session, followed by scheduled checks
- Tools
- Bypass pruners, Loppers, Pruning saw for old canes, Disinfectant when disease is suspected
- Materials
- Tarp for cut stems, Mulch if the existing layer is thin
- 1Verify a summer-blooming identity
Use the cultivar label or a dated flower photograph to confirm a current-season bloomer such as Japanese spirea. Schedule the work for late winter or early spring before shoot extension. An uncertain plant keeps its live framework until one flowering cycle reveals whether it belongs to the spring or summer group.
- 2Choose thinning or rejuvenation
Choose routine shortening when the older framework is sound, basal thinning when coarse canes congest the crown, or a cultivar-specific renovation when direct guidance supports it. Keep young, newly planted, drought-stressed, and weak shrubs on the lightest path. Flag dead, weak, oldest, and path-conflicting stems separately.
- 3Clear the crown and size tools
Cover emerging companions, spread a tarp beyond the shrub, and clean the tools. Missouri Extension’s approximate ranges are hand shears through 3/4 inch, loppers from 3/4 to 1 1/2 inches, and a saw above that. Remove dead and split wood first while every basal origin remains visible.
- 4Make basal or bud-directed cuts
Take selected old canes at ground level and remove each piece from the tarp side. Shorten last year’s flowered shoots to one or two buds above the older framework, placing a heading cut about 1/4 inch above a healthy bud aimed into open space. Check the base after several cuts for even stem distribution.
- 5Leave the basal buds open
Lift all cut twigs from the crown and restore mulch beyond the cane bases. Apply any spring feed according to local soil need and product directions. Track bud survival through late cold, water during dry conditions, and keep new shoots clear of foot traffic while the framework fills.
- 6Review at leaf-out and bloom
At leaf expansion, count new shoots in the center and perimeter and map frost injury or continued dieback. At summer bloom, photograph flower distribution and measure path clearance. Record the exact cut system so next spring can use stem response, bloom timing, and crown vigor to choose light maintenance, further thinning, or recovery.
Sources
- When should I prune summer-flowering deciduous shrubs?. Iowa State University Extension. Source record · Accessed 2026-08-30.
- Shrubs: pruning summer- or autumn-flowering. Royal Horticultural Society. Source record · Accessed 2026-08-30.
- Pruning Ornamental Shrubs. University of Missouri Extension. Source record · Accessed 2026-08-30.