Grow · pot bare root perennials before planting
Pot Bare-Root Perennials When the Garden Soil Is Not Ready
Hold bare-root perennials in individual pots when beds are frozen or saturated, keeping crowns identifiable, roots spread, and growth cool.
Published Last updated
In this guide
- Decide whether the perennial needs a pot at all
- Choose a pot only when the plant needs a holding stage
- Read the site and the whole plant together
- Inspect and rehydrate immediately before potting
- Carry out the central operation in a controlled sequence
- Keep roots cool while shoots stay compact
- Plant out as soon as the destination is workable
- Use the holding record to improve the next order
- Steps
Decide whether the perennial needs a pot at all
Potting is a holding measure, not the automatic next step for every bare-root perennial. Plant a sound root directly when its permanent site is prepared, unfrozen, and free of standing water. Use a temporary pot when the destination soil smears under a trowel, remains frozen at root depth, or cannot be finished before exposed roots would dry. The aim is to bridge that specific delay with one controlled root disturbance.
Plant size also changes the choice. RHS sends good-sized bare-root clumps, typically more than 3 inches across, straight into a ready border. It recommends potting smaller clumps and roots for growing on in a cold frame or sheltered garden position. A large healthy crown gains little from a container detour when its bed is ready, while a small sparse root system can be easier to establish under closer observation.
For a brief delay before either route, Iowa State advises cool non-freezing storage at about 40°F with the original packing kept damp like a wrung sponge. That option preserves dormancy while a short weather problem passes. Potting becomes useful when storage conditions cannot be maintained, growth has started, or the calendar suggests the bed delay will outlast a safe dormant hold.
Keep each plant attached to its botanical label from the moment the package opens. Crown depth, light, moisture, mature spacing, and cold tolerance differ across a mixed perennial order. A temporary pot can protect roots while still setting the wrong plant at the wrong depth. Read the supplier’s taxon-specific planting line first and use the general depth guidance only when that instruction is absent.
Choose a pot only when the plant needs a holding stage
Plant sound bare roots directly when their permanent site and season are suitable. If a holding pot is needed, match it to the roots, preserve the taxon's crown level and provide the required temporary growing conditions. Reinspect before roots circle or shoots outgrow the station. The eventual garden move still depends on workable soil and suitable acclimation.
Read the site and the whole plant together
Choose a container deep enough for the longest sound roots to descend naturally. Partly fill it, form a low cone or channel of mix, and spread the roots over that support with the crown upright. The potting sequence should leave every root in contact with mix while preserving the labeled crown as the depth reference. Folding long roots upward creates a bend that remains when the temporary root ball reaches the garden.
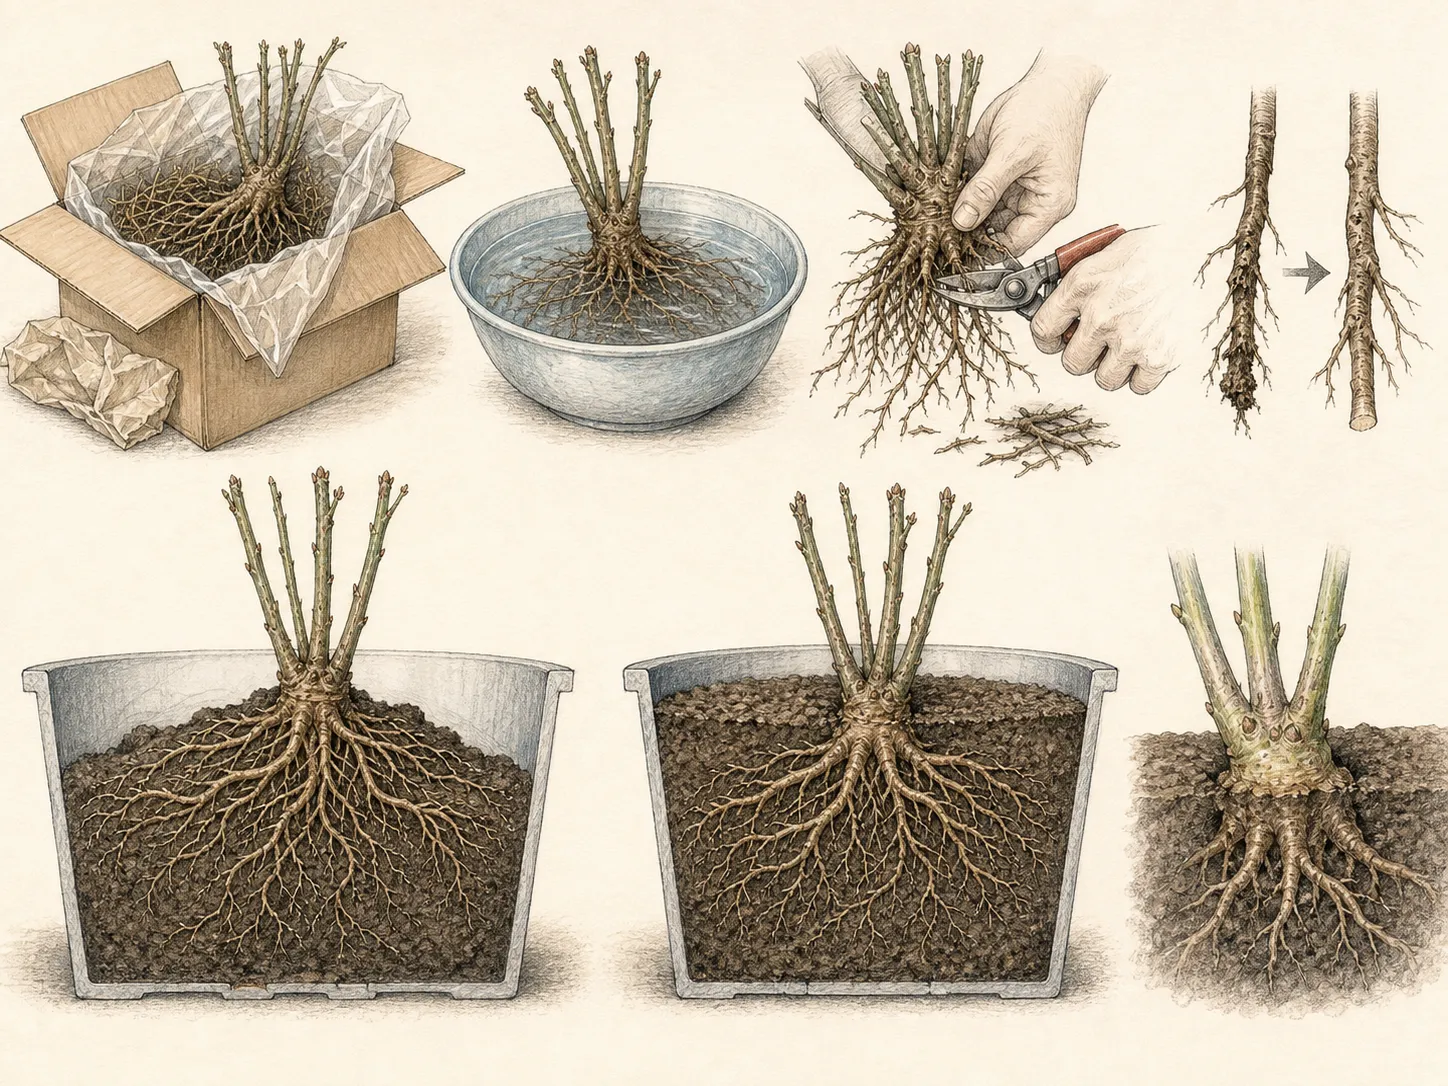
Width should accommodate the spread root system with a modest margin, not months of empty wet mix. Every pot needs open drainage holes and fresh porous medium. A shallow pot forces roots sideways; an oversized vessel stays wet longer around an inactive crown. Set each empty pot beside its plant and label before soaking begins so container choice and identity remain paired.
Reserve a cool bright holding area outdoors, in a cold frame, or in another sheltered space suited to the plant’s hardiness. Protect containers from drying wind and hard freeze because their entire root mass is exposed above grade. Heated indoor rooms encourage shoots before the recently handled roots can supply them. The holding location should keep growth compact and allow drainage after every watering.
Plan the route from potting bench to shelter before filling the containers. Wet pots become heavy, and spilled mix can cover a crown mark or detach a label. Group plants by protection need while maintaining an individual tag in every pot. Leave enough space between crowns to inspect moisture, new shoots, and drainage holes without moving the whole collection.
Inspect and rehydrate immediately before potting
Open and inspect the package on arrival even when planting must wait. Iowa State describes good material as firm and heavy, with roots that are neither dry nor brittle, firm green growing points, and packing that is damp but not dripping. Mushy roots, a foul odor, extensive mould, numerous breaks, or evident freezing damage justify isolation and a prompt conversation with the supplier.
Schedule rehydration for the potting session. Iowa State gives 30–60 minutes in clean water before planting. That interval makes dry firm roots flexible enough to arrange while limiting time in an oxygen-poor bucket. Keep separate cultivars in labeled containers, and return no soaking water to household or food-use vessels.
Remove only roots that are broken, dead, or irreparably damaged. A long healthy root earns a deeper pot; trimming it simply to fit discards the plant’s stored structure. Find the crown and the direction of emerging buds before adding mix. Where the supplier gives no depth, Iowa State’s general perennial reference places the crown no more than 1–2 inches below the surface.
Protect roots that are waiting their turn at the bench. Keep them inside the damp original packing or under a clean damp cloth, with the labeled crown visible for identification. Work one taxon-sized batch from soak to finished pot before opening the next. Iowa State emphasizes that bare roots, especially the root system, must stay moist during a delay; an hour of exposed dry air can undo careful storage. Move each rehydrated plant directly into mix while the roots are flexible and the selected depth is still recorded beside it.
Carry out the central operation in a controlled sequence
Add mix beneath the root support until the crown reaches its required level. Fan flexible roots outward and downward, turning the plant only enough to distribute them around the pot. Hold the crown steady while working mix between the roots with fingers or a narrow scoop. Keep buds visible until the final grade can be checked against the supplier’s instruction.
Fill in stages, tapping the pot lightly after each lift of mix. Water once until excess exits the drainage holes, then allow the container to drain fully before moving it to the prepared shelter. Recheck the crown after settling; add mix beneath a plant that sank, and uncover a crown that finished below its supported depth. The cool holding location is now part of the procedure, not an afterthought.
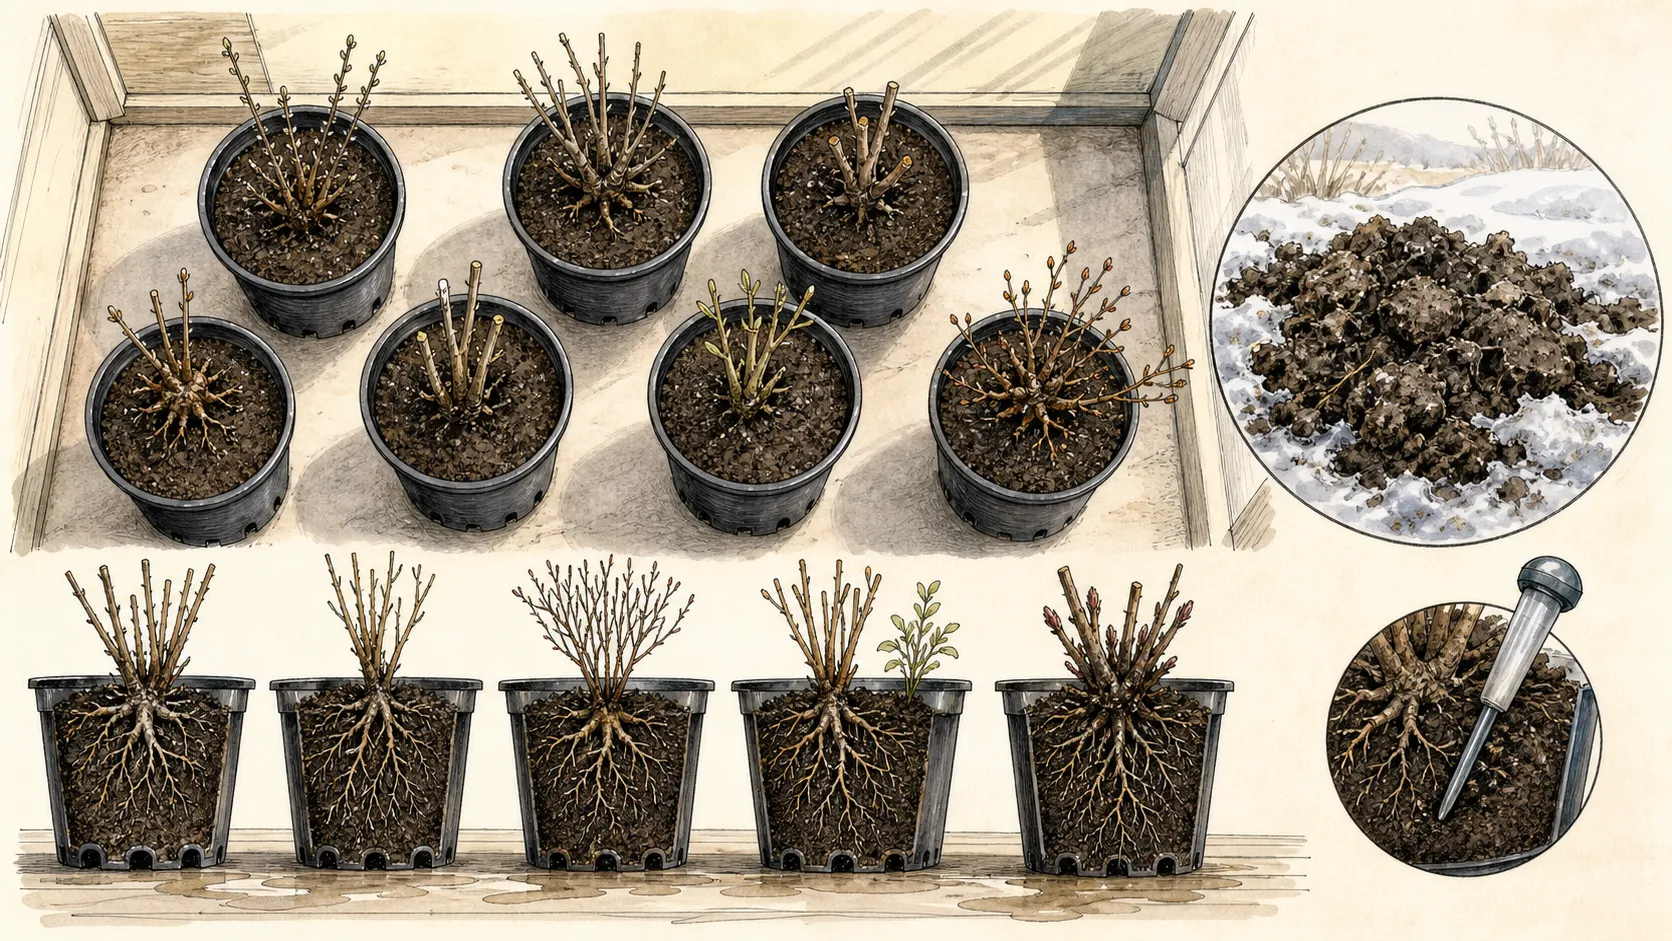
Write the potting date and actual crown depth on the label or map. A line drawn at the finished mix level makes later settling easy to see. Keep the original supplier tag with the plant because permanent planting may require a different final depth or site. Mixed orders should retain separate trays even when their pots look identical.
Finish by confirming three physical conditions: roots are enclosed without sharp folds, water has left the pot, and the crown is firm at the selected grade. A container that rocks may hide a large air void; settle more mix around that root system by hand. A pot that remains saturated needs its hole cleared or its medium corrected before it enters the holding group.
Keep roots cool while shoots stay compact
Check moisture at root depth with a finger or wooden label, then water until the first drainage appears. The upper surface may dry while the lower pot remains wet, especially before active roots fill the mix. Empty collection trays after watering and move pots out of runoff from roofs. Firm crowns in fresh-smelling mix indicate adequate aeration; sour mix and soft tissue call for immediate drainage inspection.
Watch forecasts for the container root zone, which cools faster than the same plant in open ground. Shift vulnerable pots into the cold frame or another sheltered non-freezing position for a hard freeze, then return them to bright cool conditions. Indoor household warmth produces long pale shoots and increases the gap between top demand and root establishment.
New shoots can use stored reserves before the pot has many functioning roots. Look for white root tips at drainage holes or at one carefully exposed pot edge before treating top growth as full establishment. A firm dormant crown may need more time; a rapidly elongating shoot with no visible new roots needs cooler light and close moisture control.
The temporary period ends before roots coil densely around the wall. If the garden delay truly continues, inspect one representative plant and move the batch one size larger while roots still separate cleanly. Repeated small upgrades add disturbance, so choose a sufficiently deep first container and revisit the bed’s workability on a set schedule.
Plant out as soon as the destination is workable
Test the destination at full planting depth. Soil is ready when a trowel opens it cleanly and a squeezed sample breaks apart with light pressure; frozen layers, standing water, or a smeared shiny wall mean the root environment is still short of air. Confirm the species’ sun, moisture, and mature spacing at the same visit so temporary care does not deliver a healthy plant to an unsuitable permanent site.
Acclimate tender new top growth gradually to the bed’s wind and sun. Water the pot, slide out the root ball with the crown supported, and loosen only roots that have begun to circle. Set the plant at its taxon-specific depth. RHS’s general perennial method buries the roots while leaving stem bases or spring shoots above ground, and Iowa State keeps an unspecified crown within 1–2 inches of the surface.
Water thoroughly after backfilling to settle the surrounding soil. RHS uses a 2–3 inch mulch layer with a 4-inch clear gap around stem bases; that open ring keeps the crown visible and limits constant dampness against shoots. Iowa State advises checking new plantings once or twice weekly during establishment and waiting at least four weeks before fertilizer reaches tender new roots.
Leave a marker over the permanent crown while the top is still small. Iowa State gives 2–4 weeks as a general emergence period, with weather and soil conditions controlling the pace. During that interval, judge moisture at the root zone and keep the marked spot free of cultivation. A quiet surface is expected from some dormant perennials. If the supported emergence window passes, review arrival condition, crown depth, soil temperature, and moisture record before exposing a small edge of the root zone for diagnosis. Retain the marker through early shoot expansion, when a small perennial can still be mistaken for a gap. Record the first firm shoot beside the planting date so later orders can be timed from local evidence.
Use the holding record to improve the next order
For each plant, retain the arrival condition, storage period, soak time, pot date, crown depth, first shoot, first visible new root, and permanent planting date. The record shows whether the container solved a weather delay or merely added labor. It also preserves the supplier’s depth direction for a later gardener who sees only a filled pot.
Review failures by symptom. Brittle roots point back to dry packing or delayed unpacking; a sour soft crown points to excess water and low aeration; long pale shoots point to warm dim holding; tightly circling roots show that planting out or potting on came late. Match the next correction to that evidence instead of changing every part of the method.
Order timing can then follow the site’s recurring constraint. A garden with predictably late frozen soil may benefit from later regional shipping or a prepared cold-frame space. A site that drains early may send good-sized clumps directly to the border. Keep temporary pots available for the exceptions, sized by the actual root systems that arrive.
Steps
- Level
- moderate
- Time
- One focused session, followed by scheduled checks
- Tools
- Deep nursery pots, Clean bucket, Potting scoop, Weatherproof labels
- Materials
- Bare-root perennials, Fresh draining potting mix, Clean water
- 1Choose direct planting, storage, or a pot
Open the parcel at once and keep every root with its label. Send a sound clump larger than about 3 inches directly to a ready border under the RHS method. Use brief storage near 40°F with damp packing for a short delay. Choose a temporary pot for small stock or when the permanent root zone is frozen, saturated, or smearing.
- 2Inspect and rehydrate the sound roots
Confirm firm heavy roots, firm growing points, and damp unsaturated packing. Isolate mushy, foul, badly moulded, or freeze-damaged material. Immediately before potting, soak sound roots for Iowa State’s 30–60 minute general interval and remove only broken or dead sections. Keep cultivars in separate labeled vessels throughout the soak.
- 3Match the container to the roots
Select a clean pot deep enough for the longest healthy roots and wide enough to spread them with a modest margin. Clear every drainage hole and add fresh porous mix. Form a low cone or channel to support the root system, then place the matching plant and its permanent label beside the container.
- 4Spread roots and hold the crown level
Arrange flexible roots outward and downward over the support. Hold the crown at the supplier’s taxon-specific depth; without that direction, Iowa State’s general ceiling is 1–2 inches below the surface. Work mix between roots, tap the pot lightly, water until drainage begins, and recheck the crown after the mix settles.
- 5Maintain a cool bright holding area
Move drained pots to a cold frame or sheltered outdoor position appropriate to their hardiness. Check moisture below the surface, empty collection trays, and protect the exposed container root zone during hard freezes. Keep labels visible and watch for compact shoots plus white new root tips; warm pale growth signals a poor holding environment.
- 6Transfer before the roots circle
Retest the garden at full planting depth and wait for cleanly crumbling soil. Acclimate tender shoots, water the container, and move the intact root system to its permanent taxon-specific grade. Water the backfill, mulch with a crown-clear ring, and monitor once or twice weekly at first. If the delay persists, pot on while roots still separate easily.
Sources
- Perennials: planting. Royal Horticultural Society. Source record · Accessed 2026-08-30.
- How to Plant Bare Root Perennials. Iowa State University Extension and Outreach. Source record · Accessed 2026-08-30.
- Dividing perennials. University of Minnesota Extension. Source record · Accessed 2026-08-30.