Grow · plant ranunculus corms spring
Plant Ranunculus Corms for a Cool Spring Flower Display
Orient, pre-sprout when appropriate, and plant ranunculus corms into cool, draining conditions that support roots before heat arrives.
Published Last updated
In this guide
- Choose a route that fits the winter and the remaining cool season
- Choose the cool-growing route before preparing corms
- Read the site and the whole plant together
- Keep each preparation batch traceable
- Carry out the central operation in a controlled sequence
- Use moisture and airflow to hold compact growth
- Read uneven emergence before changing irrigation
- Close the season with a regional storage decision
- Steps
Choose a route that fits the winter and the remaining cool season
Ranunculus asiaticus needs a long, cool run from rooting to flower. A mild-winter gardener can use an autumn planting only where corms and young growth receive suitable winter protection in freely draining soil. A cold-winter gardener usually waits for the locally recommended late-winter or spring window, or starts corms under cool protection for a later move outdoors. Pick one route from local winter lows and the amount of cool weather left before summer heat.
The source schedules describe different climates and systems. NC State places garden planting several weeks before the last frost in its region. RHS places container corms from September through December in a cool greenhouse or cold frame. Utah State reports November planting under field insulation or high-tunnel cover, with field planting as early as workable spring soil permits. Copy the method whose protection and climate resemble the site at hand.
Heat sets the other boundary. The Utah field work treats Persian buttercup as a cool-season annual and reports flower production ending near 80°F in that trial region. That figure is a production observation, not a universal death temperature, but it explains why a late spring start can yield leaves and few flowers. Estimate whether the chosen route leaves enough cool weeks for roots, foliage, buds, and bloom.
Build the schedule around three local markers: the date soil normally becomes workable, the last damaging cold expected for emerged leaves, and the period when daytime heat regularly approaches the Utah trial’s flowering limit. Then write where each phase will occur. A protected tray may handle rooting and early shoots, while the border carries later growth and bloom. If no protected space can stay bright, cool, and ventilated, direct planting at the supported regional date is the more controllable plan. This simple timeline also exposes a late order that has too little cool season left for the promised display.
Direct planting is the simplest choice when the bed drains promptly and the forecast fits the regional schedule. A protected start earns its extra handling when outdoor soil is frozen, saturated, or exposed to damaging cold. Pre-sprouting also requires a cool medium, clear labels, and a ready destination; swollen roots are easily broken if the outdoor delay continues. Keep dry corms stored cool until those conditions can be supplied.
Choose the cool-growing route before preparing corms
Match Ranunculus asiaticus to a regional planting route that provides the required cool growing interval. Keep batches labeled and reject unsound material before potting or planting. When emergence is uneven, assess a representative corm and its moisture conditions before increasing irrigation everywhere. Firm delayed growth and decayed tissue call for different responses.
Read the site and the whole plant together
A dry Persian buttercup corm has a small crown above a cluster of claw-like roots. Plant with the crown uppermost and the claws pointing into the soil. Both NC State and RHS support about 2 inches of cover for their described methods. Set one corm in a shallow test hole, measure from the finished surface, and confirm the orientation before opening the rest of the row.
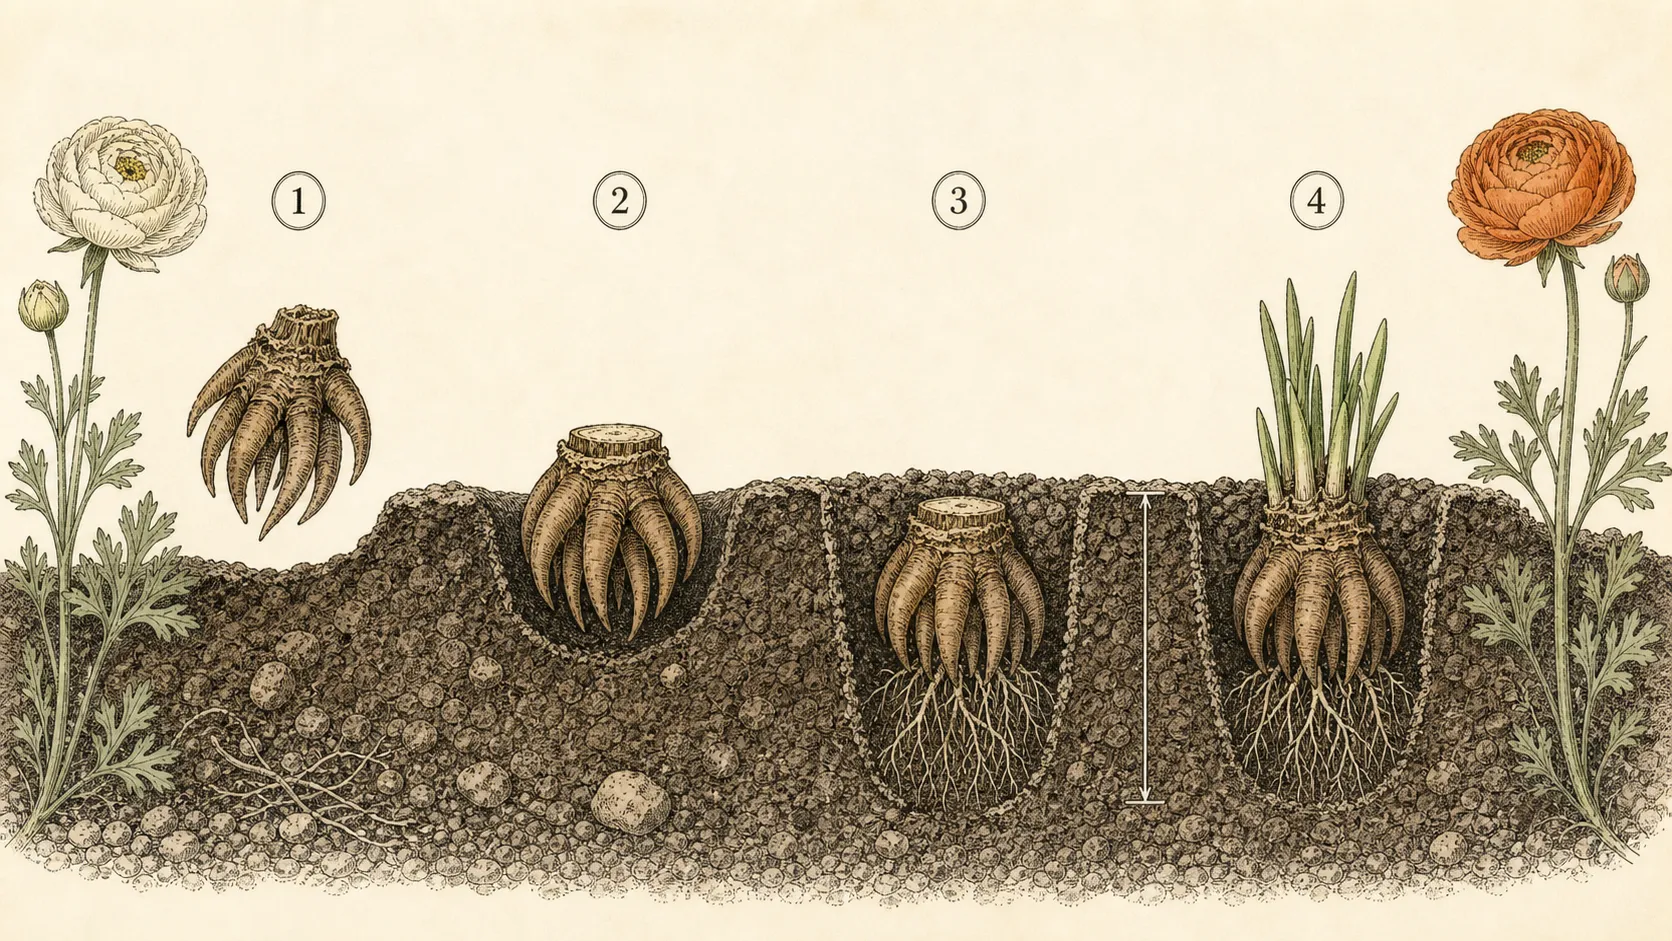
Full sun during the cool season and rapid drainage are the useful site traits. NC State specifically warns that wet, poorly drained soil can lead to root rot, while RHS uses a loam-based container compost amended with 20 percent horticultural grit. Inspect the intended bed after rain, including low pockets beside edging. Standing water over the planting zone disqualifies that pocket until grade or drainage is corrected.
Leave a dry walking line beside the planting area. Corms sit shallowly, and later trips for covers, support mesh, cutting, and deadheading can compress their root zone. If the bed can be reached only by stepping through wet soil, use an established path or a load-spreading board from outside the planted rows. The soil surface should remain open enough for water to enter and excess water to leave.
Spacing depends on the setting. NC State gives 6–8 inches for garden planting; RHS uses 4 inches in containers. The closer RHS interval belongs to managed pot culture with a specified gritty mix, not automatically to heavy border soil. Mark the chosen centers before digging so the finished row preserves air movement and leaves room to cut stems without leaning across neighboring crowns.
Keep each preparation batch traceable
Open the order while labels still match the bags. Firm, dry corms with intact crowns and claws belong in the planting batch. Isolate pieces that are soft, leaking, extensively moldy, or crushed through the crown. Size variation alone is less informative than tissue condition, so keep small sound corms separate for observation instead of mixing them with decayed material.
Preparation instructions are method-specific. RHS calls for a one-day soak before its autumn-to-winter container method; other regional and supplier protocols may specify another duration or direct planting. Write the actual treatment on each label, including dry-planted, soaked, or pre-sprouted. A trial row with separate labels lets emergence reveal whether a preparation helped under local conditions without committing the entire order to an uncertain routine.
For a container or protected start, prepare the draining medium before corms are hydrated. RHS specifies peat-free loam-based compost with 20 percent horticultural grit for its container method. Moisten the mix uniformly, let free water drain, and fill trays to a consistent level. A warm saturated tray encourages decay at exactly the stage when no foliage is present to show trouble.
Place cultivar labels at both the row and the map. Flower color is unavailable during emergence, and a displaced stake can turn a mixed order into guesswork. Note the preparation date and planned outdoor destination as well. That small record becomes useful when one cultivar emerges slowly, one pocket stays wet, or a protected batch must wait longer than expected.
Carry out the central operation in a controlled sequence
Work along the marked centers and open holes only as fast as they can be filled. Place every crown level and every claw cluster downward. Cover to the selected 2-inch reference, then check the first three positions with a ruler because a fluffy bed can settle unevenly. Draw soil gently between the claws; forceful tamping can snap the dry roots or leave a dense pocket around the crown.
Water the completed row once with a soft flow until the soil contacts the corms and drainage is visible at the bed edge or container holes. Return after settling and restore any exposed crown to the measured depth. A row that remains glossy or puddled has already received enough water. Mark that location for drainage repair while the corm positions are still known.
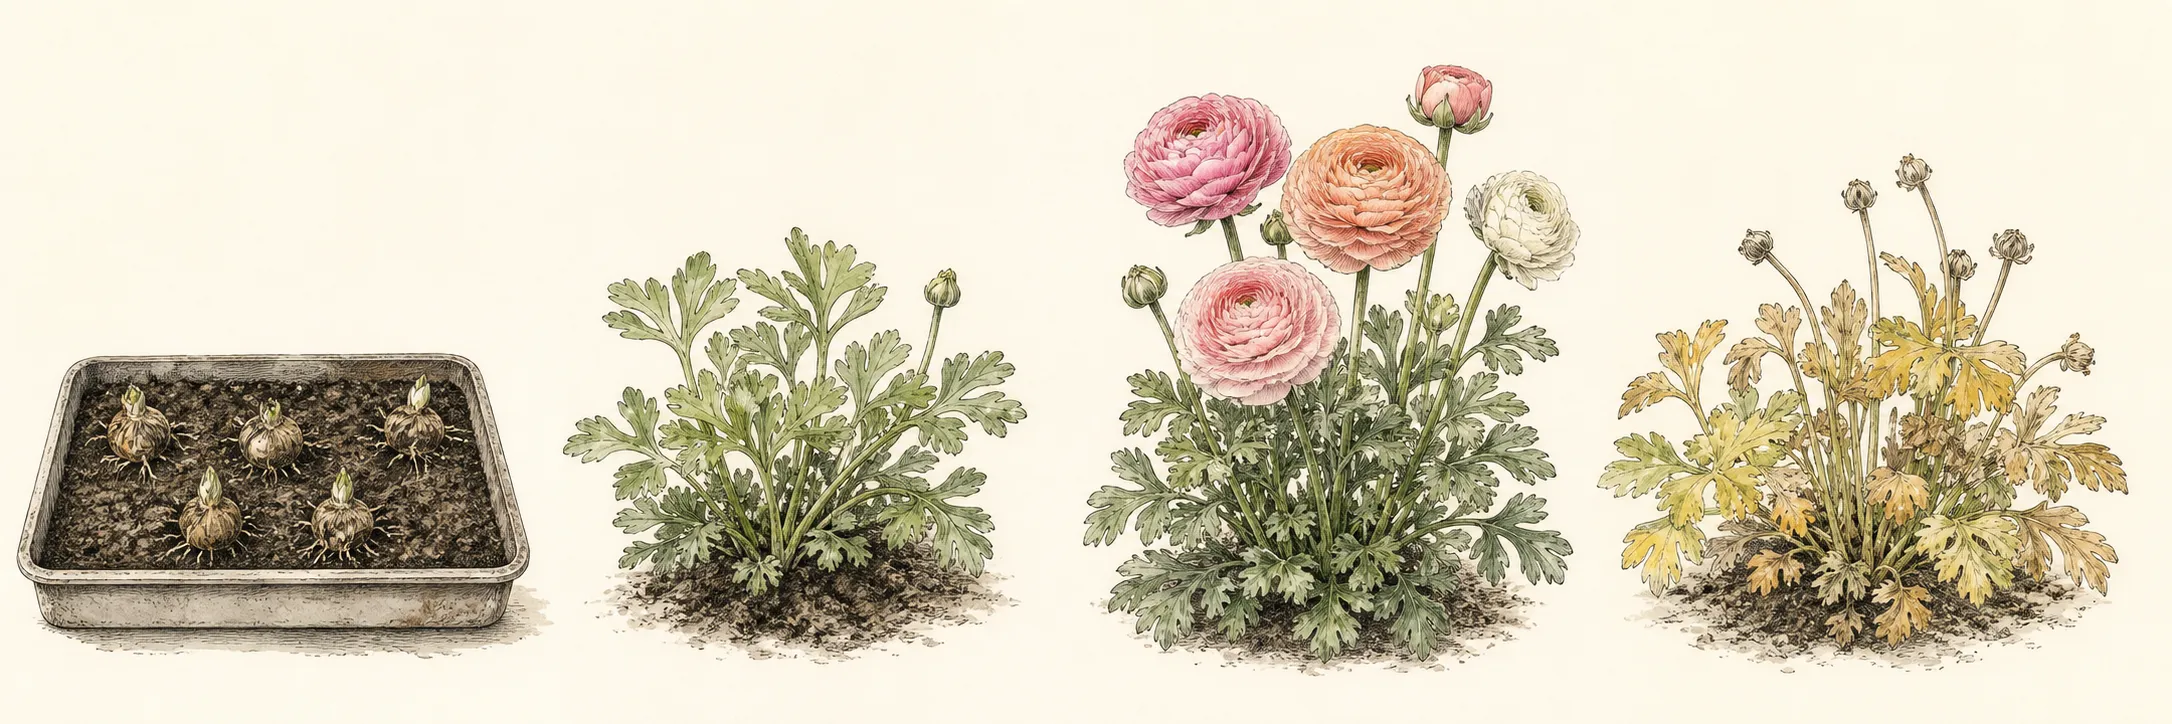
Use the forecast to protect emerged tissue, not to keep the bed continuously covered. NC State reports injury below 28°F under its regional conditions. Choose protection rated for the expected low, anchor it outside the row, and vent or remove it during mild daylight. Covers that press against wet foliage or trap still humid air add a separate disease risk.
Install low support mesh before stems lengthen in a windy cutting bed. Keep the mesh high enough for divided leaves to expand through it and the grid wide enough for flower stems to be harvested cleanly. Early placement protects the shallow crowns from later stakes and footsteps; a sheltered container display may need no support at all.
Use moisture and airflow to hold compact growth
During active growth, keep the rooted layer moist while preserving air in the soil. RHS advises damp but unsoggy conditions for young plants, and NC State links poorly drained soil with root rot. Check below the surface before irrigating because a dry crust can cover a wet crown zone. Container saucers should be emptied after drainage, and border watering should stop once the root depth is evenly moist.
Protected plants grow best in bright, cool, moving air. RHS reports compact growth below 15°C (59°F) in its cool-house method and emphasizes ventilation against grey mould. Pale stretched leaves indicate excess warmth or weak light; grey growth and collapsing petioles point toward stagnant humidity. Adjust temperature, spacing, and airflow before adding more water.
Harvest cut flowers before they fully open if vase life is the goal; RHS gives 10–12 days as an expected vase period for stems cut at that stage. For a garden display, remove spent flowers to support further bloom. Make clean cuts above healthy foliage and keep the remaining leaves intact while they are green.
As warm weather arrives, expect the display to shorten. Utah State observed flower production ending around 80°F in northern Utah, and NC State describes summer dormancy. Yellowing foliage at that point is not corrected by extra irrigation. Let it complete its decline, then reduce water around the dormant crown so the storage organ is not held in warm wet soil.
Read uneven emergence before changing irrigation
Map emergence by cultivar, preparation batch, and bed position before changing care. A whole labeled row that lags may reflect cultivar or preparation timing. A failed patch at the low end of several rows points toward drainage. Scattered gaps can come from damaged corms, orientation errors, or uneven cover. These patterns lead to different checks and make blanket watering a poor first response.
If the answer changes management, expose one corm at the edge of a failed patch. A firm crown with sound claws may still be delayed; restore it at the measured depth and keep the soil evenly moist. Soft, translucent, foul, or collapsing tissue is consistent with decay. Remove that corm and inspect drainage around the gap before water reaches the unaffected row again.
Separate cold injury from crown rot by looking at both top and below-ground tissue. Frost can blacken emerged foliage while the buried crown stays firm. Rot begins around the corm or roots and often accompanies persistently wet soil. Give a firm crown time to reshoot under suitable temperatures; discard decayed tissue and correct the wet pocket that supported it.
A leafy plant can still underperform if the cool flowering window was missed. Compare planting date, first emergence, bud formation, and the week sustained warmth arrived. When foliage remains healthy but buds are sparse across the bed, the next trial may need an earlier regional start. When only compacted or wet pockets fail, timing is less likely than local soil structure.
Close the season with a regional storage decision
Once the foliage is fully yellow, choose the end-of-season route supported for the climate. NC State describes lifting the tuberous roots, removing the tops, and storing them cool and dry for another season. RHS treats Persian buttercups as annuals in its general guidance. Leaving corms in place is reasonable only where local experience confirms both winter survival and dependable drainage through dormancy.
Lift with a fork placed outside the root cluster, shake off loose dry soil, and keep cultivars separate. Store only firm uninjured corms after surface moisture has dried. A breathable labeled container in a cool dry place fits the NC State storage direction; sealed damp packaging recreates the conditions associated with rot.
Record the route, preparation treatment, planting date, emergence date, first flower, and the approximate temperature period when bloom stopped. Add the failed wet pockets to the bed map. Next season’s choice can then be concrete: repeat a successful autumn planting, advance a protected spring start, improve drainage, or buy fresh corms after poor storage.
Steps
- Level
- moderate
- Time
- One focused session, followed by scheduled checks
- Tools
- Hand trowel, Shallow pre-sprouting tray when used, Plant labels, Watering wand
- Materials
- Firm ranunculus corms, Free-draining medium, Low support mesh if needed
- 1Choose the climate route
Match the planting method to winter lows and the remaining cool season. Use autumn only with locally proven winter protection and free drainage. In colder gardens, choose a late-winter or spring date supported by regional guidance, or prepare a bright cool protected start. Confirm that summer heat will arrive after a realistic rooting and flowering interval.
- 2Triage and label every batch
Retain firm corms with intact crowns and claws; isolate soft, leaking, crushed, or extensively moldy pieces. Put the cultivar, preparation date, and treatment on two labels. If using the RHS container method, its soak is one day. For another method, follow its direct regional or supplier instruction and move hydrated corms promptly into prepared cool medium.
- 3Prepare drainage and spacing
Select cool-season sun and inspect the bed after rain. Repair low saturated pockets before corms enter them. Mark garden centers 6–8 inches apart under the NC State home-garden method; reserve the RHS 4-inch interval for its managed container system. Pre-moisten container mix and verify that water exits every drainage hole.
- 4Set the crown above the claws
Place each claw cluster downward with its crown level. Cover with about 2 inches of soil or compost, measuring the first three positions after the surface is finished. Fill gently around the claws, water the row once to settle it, and restore any exposed crown. Stop irrigation when puddling or slow drainage appears.
- 5Hold cool, bright growing conditions
Check moisture beneath the surface and water the rooted layer while leaving air in the soil. Vent protected plants and use locally rated frost cover for emerged growth; NC State reports injury below 28°F in its conditions. Add low support early in exposed beds, harvest or deadhead cleanly, and preserve all healthy green foliage.
- 6Diagnose gaps and finish dormancy
Map gaps before altering irrigation. Check one edge corm only when its condition will change the plan: restore a firm delayed corm, and remove soft decayed tissue while correcting the wet pocket. After foliage yellows fully, lift and store sound corms cool and dry where that regional route is used, or replace them annually under the chosen guidance.
Sources
- Persian Buttercup. North Carolina State Extension. Source record · Accessed 2026-08-30.
- Ranunculus. Royal Horticultural Society. Source record · Accessed 2026-08-30.
- Ranunculus Cut Flower Production in Utah. Utah State University Extension. Source record · Accessed 2026-08-30.