Grow · layer ornamental shrubs
Propagate an Ornamental Shrub by Simple Layering
Root a flexible low stem while it remains attached to the parent shrub, then separate it only after a firm root system has formed.
Published Last updated
In this guide
- Use the biological cue for simple layering of an ornamental shrub
- Let the buried bend stay attached until roots are ready
- Read the site and the whole plant together
- Set a visible finish line before beginning
- Prepare the work while every part is still identifiable
- Carry out the central operation in a controlled sequence
- Protect roots, crowns, and new growth after the work
- Diagnose a weak response before adding another treatment
- Leave a record for the next seasonal decision
- Steps
Use the biological cue for simple layering of an ornamental shrub
Use simple layering on a shrub that has a healthy young outer shoot able to bend to ground level. The shoot stays connected to the parent while roots form at a buried bend, so its leaves continue receiving water and carbohydrates through the original stem. That connection makes layering useful for woody ornamentals that are reluctant to root as detached cuttings.
RHS schedules layering in spring or autumn. Deciduous shrubs can respond in either season, while evergreen shrubs generally respond better in spring. Select timing that leaves the stem flexible and gives the buried section a season of workable soil and reliable moisture. Frozen, saturated, or drought-hardened ground cannot hold the close, aerated contact needed around the wounded portion.
Match the method to the plant's architecture. Forsythia, azalea, boxwood, honeysuckle, rhododendron, wax myrtle, magnolia, hazel, Cotinus, and several flowering Cornus are among the examples in the retained sources. A stiff upright branch that must be pulled hard to reach soil belongs to another propagation method, such as air layering, because continuous tension can lift the peg or split the shoot. Simple layering buries one middle section and keeps the tip above ground. Tip layering buries the shoot end, while compound layering alternates several covered and exposed sections; their rooting points and eventual division cuts differ.
Let the buried bend stay attached until roots are ready
Use a healthy shoot that can bend into a suitable rooting pocket without damage. Maintain contact and moisture while it remains attached to the parent. At the check, sparse roots mean the attachment period continues. Separate only after the bend has developed the root system described below, with the receiving position ready for the new plant.
Read the site and the whole plant together
Follow several candidate shoots from the crown to their tips. Choose an undamaged, vigorous branch on the outside of the shrub, with enough length to reach the soil in a broad curve. RHS places the wound about 30 centimeters, or one foot, behind the tip. Virginia Tech and NC State keep the final six to twelve inches above the soil and train that end upright.
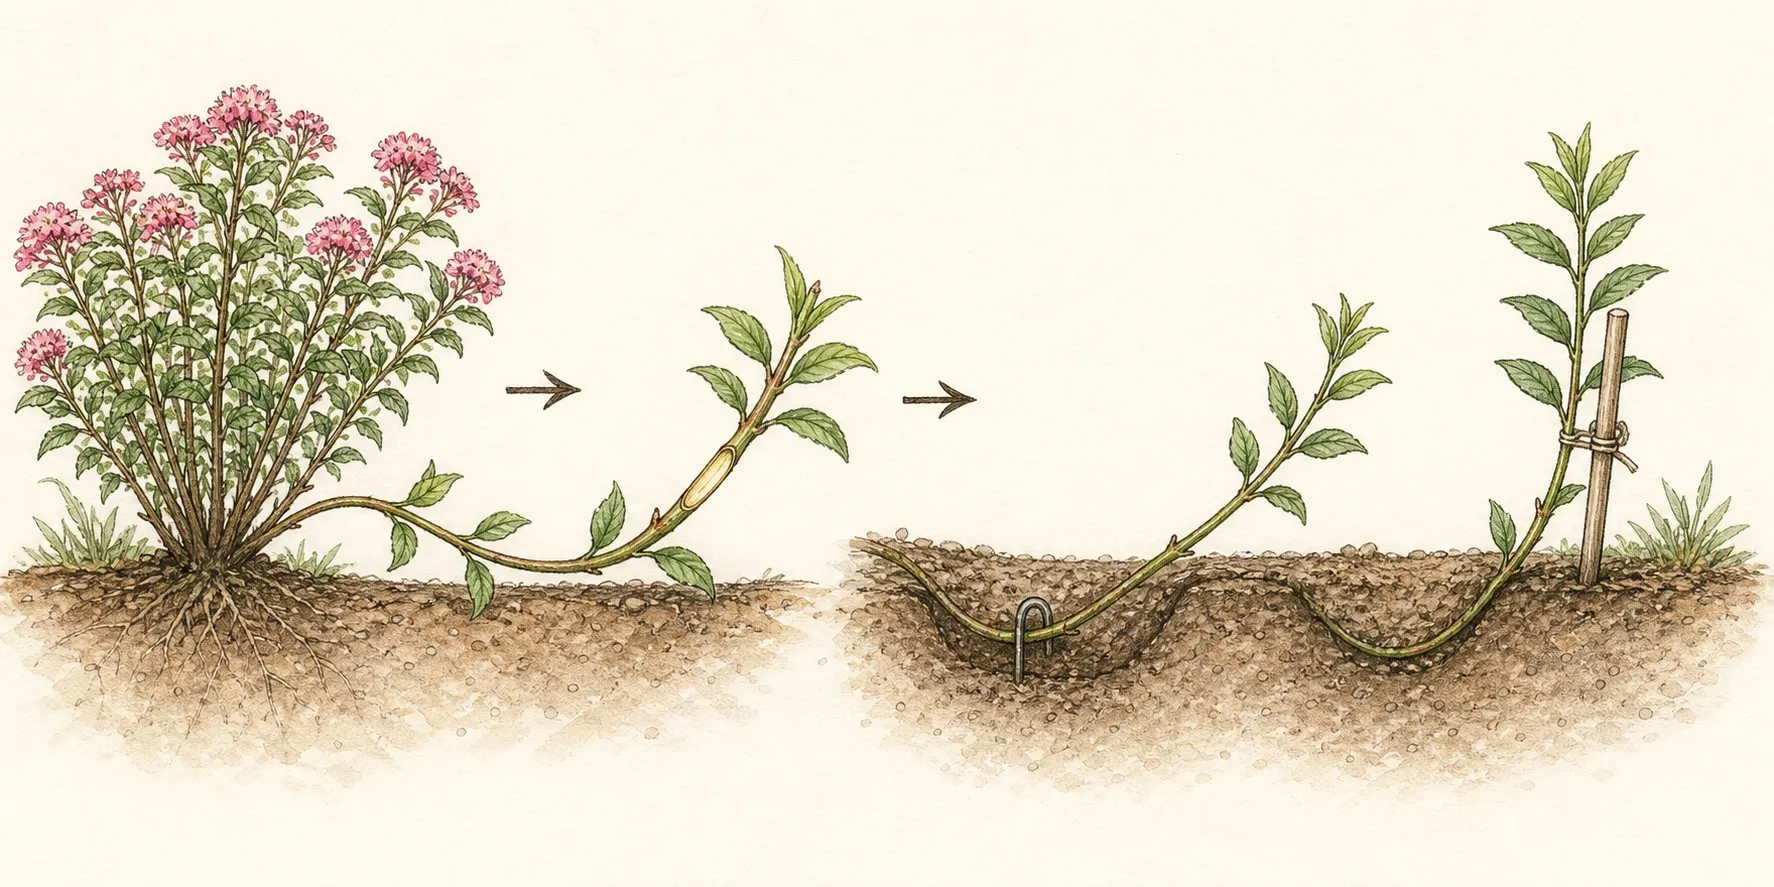
Test the receiving pocket before opening a trench. Virginia Tech specifies a rooting medium that supplies both aeration and constant moisture. A compacted hollow that holds water deprives the buried tissue of air; a dry bank interrupts root initiation. Look for friable soil within reach of routine watering, plus space for a peg, an upright stake, and later access to the rooted section.
Consider how the bent shoot changes the parent shrub for the coming year. Reserve enough foliage above the buried bend to keep the layer active, and leave neighboring framework uncrowded. Position the emerging tip where it can grow vertically in light. A layer routed across a path, lawn edge, or cultivation line is vulnerable to feet, mowers, edging tools, and accidental pruning.
Set a visible finish line before beginning
Define success by roots, not by a green shoot. The parent can keep an unrooted layer leafy for months, so top growth alone cannot authorize separation. RHS expects roots within twelve months and directs severing only after a good root system has formed. Plan to confirm a root mass that holds its surrounding medium before cutting the connection to the parent.
Set the buried geometry in advance. The RHS procedure uses a trench 10 to 15 centimeters, or four to six inches, deep. Its prepared wound lies near a leaf bud about 30 centimeters behind the tip. The Extension procedures describe the same basic arrangement by outcome: one section under the rooting medium and a six- to twelve-inch tip exposed and staked vertically.
Limit the project to shoots that can remain attached for a full season and possibly through dormancy. One carefully labeled layer is more useful than several branches competing for the same watering pocket. If the candidate carries cankers, damaged bark, weak growth, or uncertain cultivar identity, leave it connected and select sound propagation material elsewhere on the shrub.
Prepare the work while every part is still identifiable
Gather a hand fork or trowel, a sharp clean knife, a thick-wire loop or landscape staple, a bamboo cane, soft tie, watering can, and weatherproof label. Choose a peg long enough to resist the branch's spring tension. Test the tie around the exposed tip so it holds the shoot upright while leaving room for stem thickening.
Mark the place where the flexible branch naturally touches the ground. Loosen the planned trench to the RHS depth and break compact clods into a crumbly rooting medium. Preserve drainage and native soil continuity; a small workable pocket is sufficient. Water dry ground before wounding so the prepared stem can be pinned and covered immediately.
Remove the leaf at the selected wound site if the shrub is in leaf, while retaining foliage on the exposed tip. Under the RHS method, prepare a 2.5- to 5-centimeter incision along the stem through the leaf-bud area, then hold the resulting tongue slightly open with a small sliver of wood. Rooting compound can be applied to those cut surfaces.
Write the botanical or cultivar name, parent location, date, and method on the label before the branch enters the trench. Place a second visible marker beside the peg. A summer canopy can hide both the low connection and the new upright tip, and the record protects them during weeding, mowing, and seasonal pruning.
Carry out the central operation in a controlled sequence
Lower the branch in its natural arc and settle the prepared section at the bottom of the trench. Keep the incision open and in contact with the rooting medium. Drive the wire loop across the stem into firm soil on both sides. The peg should immobilize the wounded area while the branch enters and leaves the ground in smooth curves.
Bring the remaining tip upward beside the bamboo cane and fasten it with the soft tie. Virginia Tech and NC State leave six to twelve inches exposed; the RHS method locates the wound about one foot back from the tip. Confirm that foliage and the terminal bud remain above grade and that the tie places no backward pull on the buried wound.
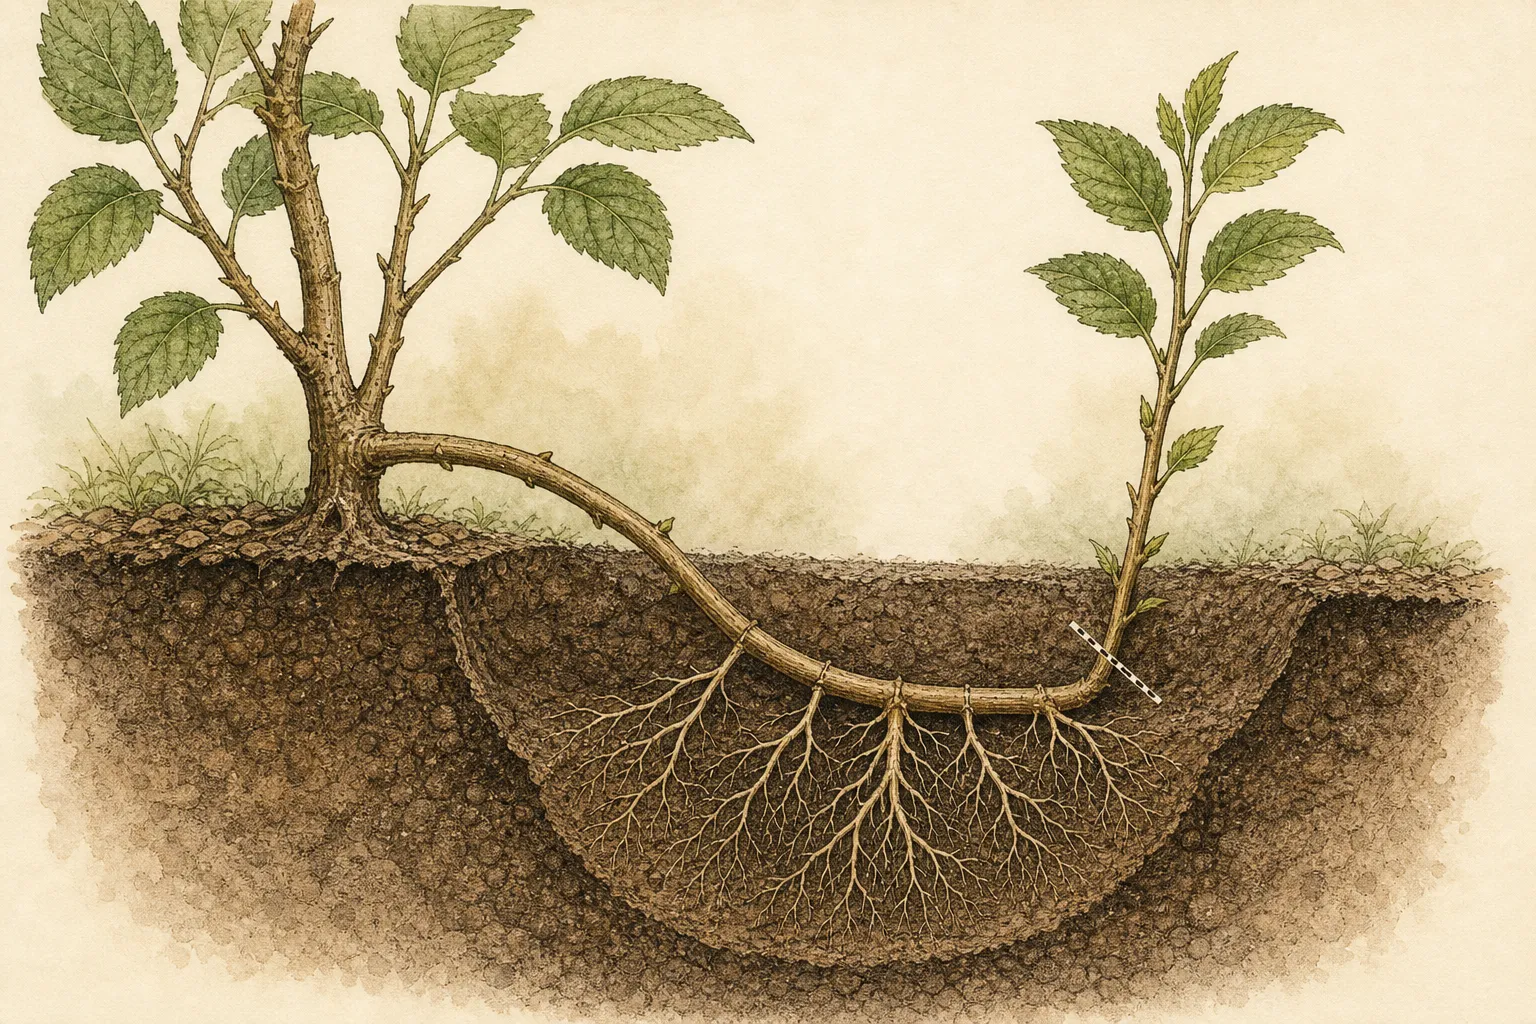
Refill the trench with the loosened soil, work it gently around the stem, and firm the surface enough to remove large air pockets. Retain the site's normal grade over the finished trench. Water when the soil is dry, as RHS directs, and watch the first application enter the pocket. Ponding reveals a drainage problem that needs correction before root initiation.
Check the peg after watering. A rising loop, rocking branch, or tilting cane breaks the close contact on which the method depends. Reset the hardware in undisturbed soil and retie the vertical tip with slack for growth. Finish by placing the label where it identifies the layer while remaining visible above mulch and summer foliage.
Protect roots, crowns, and new growth after the work
Maintain steady moisture through the first growing season while preserving air in the rooting medium. RHS identifies dry soil as a direct cause of failure, and Virginia Tech pairs constant moisture with aeration. Feel the soil beside the trench, then water when that sample begins to dry. Saturated soil calls for a longer interval and a check of surface drainage.
Inspect the hardware after heavy rain, wind, garden cultivation, or vigorous shoot growth. Restore eroded soil to the marked grade, reseat a loose peg, and adjust the soft tie before it constricts the upright tip. Keep mulch clear of the label and cane. These visible components show that the buried section still occupies its intended position.
Protect the connection from hoes, string trimmers, pets, and foot traffic. The low parent-side stem can resemble a stray branch, especially after surrounding foliage fills in. A short marker at each end of the trench makes its route legible. Carry out normal care for the donor shrub while preserving the selected shoot and its developing roots.
Leave the parent connection intact through the expected rooting interval. Seasonal leaf fall on a deciduous shrub is not evidence of failure, and an evergreen layer may retain foliage before roots are substantial. Plan the first root confirmation near the end of the species-appropriate season, with the RHS twelve-month range serving as a practical outer expectation for many simple layers.
Diagnose a weak response before adding another treatment
A vigorous exposed tip with little root hold usually means the parent is still carrying the shoot. Check the label for elapsed time, then inspect moisture records and peg stability. If the species remains inside a reasonable rooting period, keep the connection and correct surface care. Severing at this stage converts a supported branch into an unrooted cutting.
Dry, crumbly soil beside the wound points to interrupted moisture. Rewet the pocket gradually and establish a regular check during rainless periods. A peg visible above the original mark suggests that branch tension broke contact. Press the stem back into prepared medium, secure the loop in firm ground, and reset the timing record from that repair.
Dark soft bark, an unpleasant odor, or a waterlogged trench indicates excess moisture and poor aeration. Open the surface enough to assess drainage while leaving sound parent tissue attached. Improve runoff from the pocket and select a new healthy shoot later if the prepared section has decayed. A second wound in the same damaged area adds no useful rooting surface.
Confirm roots by opening a narrow inspection edge beside the buried bend late in the expected interval. Look for several roots extending into and holding the medium, then replace the soil if the system remains sparse. Once a cohesive root mass is present, the layer has the structural evidence required for separation. Top growth can support the decision but cannot substitute for that inspection.
Leave a record for the next seasonal decision
Record the parent plant, exact shoot, start date, season, wound treatment, trench depth, exposed-tip length, and each moisture or hardware correction. A simple diagram locating the cane and parent-side connection is valuable after labels fade or foliage hides the route. Include a photograph of the original bend so later root checks return to the correct point.
At the first planned inspection, note whether roots are absent, beginning, or dense enough to hold a small soil mass. Keep sparse systems attached and write the next review date on the label. For a layer begun in spring, that may mean another check in autumn or the following spring. An autumn layer may need the next growing season before separation.
When a good root system has formed, cut the stem on the parent side of the rooted section with clean pruners. Lift a generous plug around the new roots. Pot it for further growth or transfer it to a prepared final position at the same rooted grade. NC State notes that a newly separated layer needs attentive care while its root system develops further.
Review the parent after severing and remove the remaining stub at an appropriate branch junction. Keep the new plant labeled with its propagation date and parent identity. Its first-season record should cover water, shoot growth, and establishment. That history distinguishes a successful simple layer from a temporarily green branch that was detached too soon.
Steps
- Level
- moderate
- Time
- One focused session, followed by scheduled checks
- Tools
- Hand fork, Clean knife, Wire peg or landscape staple, Small stake
- Materials
- Flexible shrub stem, Loose soil or propagation medium, Weatherproof label
- 1Choose a layerable shoot
Select a healthy young branch on the outside of a correctly identified shrub. Bend it in a broad curve to test whether it reaches workable soil with six to twelve inches of tip remaining above grade. Schedule deciduous shrubs for spring or autumn; use spring for evergreen subjects. Mark the natural contact point and release the shoot until the trench is ready.
- 2Prepare an aerated pocket
Place a bamboo cane at the contact point and open a trench 10 to 15 centimeters deep toward the parent. Loosen compact clods so the medium holds moisture and air, then water dry soil. Set out a thick-wire loop, soft tie, knife, label, and watering can. Keep the future peg and upright tip clear of paths, mower edges, and routine cultivation.
- 3Prepare the rooting point
Measure about 30 centimeters behind the tip and remove the leaf at that point. For the RHS method, cut a 2.5- to 5-centimeter tongue along the stem through the bud area, prop it slightly open with a small wood sliver, and apply rooting compound to the cut surfaces. Write the plant identity, date, and treatment on the weatherproof label.
- 4Peg the bend and raise the tip
Lower the wounded section into the trench and drive the wire loop into firm soil across it. Fasten the exposed six- to twelve-inch tip upright beside the cane with a loose soft tie. Refill with loosened soil, firm around the branch, and restore the original grade. Water a dry pocket, then reset any peg that rises or allows the stem to rock.
- 5Maintain contact for the season
Feel the soil beside the trench during dry weather and water as it begins to lose moisture. Keep the rooting medium aerated and check the peg, cane, tie, and grade after storms or cultivation. Protect the low parent connection with visible markers. Leave the stem attached while roots develop, allowing as much as twelve months under the RHS guidance.
- 6Confirm roots and separate
At the planned seasonal check, open a narrow edge beside the buried bend and look for several roots holding a cohesive medium. Replace the soil and extend the attachment period when roots remain sparse. Once a good system is present, cut on the parent side, lift a generous plug, and pot or plant the layer at its rooted grade. Continue attentive watering during establishment.
Sources
- Layering. Royal Horticultural Society. Source record · Accessed 2026-08-30.
- Propagation by Cuttings, Layering and Division. Virginia Cooperative Extension. Source record · Accessed 2026-08-30.
- 13. Propagation. North Carolina State Extension. Source record · Accessed 2026-08-30.