Grow · norfolk island pine winter houseplant care
Keep Norfolk Island Pine Healthy Through Winter
Hold a Norfolk Island pine through winter with bright light, cooler air, root-zone drainage, and enough humidity to prevent needle loss and branch decline.
Published Last updated
In this guide
- Read the plant as an indoor conifer, not a disposable holiday tree
- Separate winter needle loss from a failing growing station
- Build the winter room around light, temperature, and humidity
- Water by root-zone oxygen, not by sympathy
- Protect the branching framework while the tree is indoors
- Diagnose winter stress before it becomes whole-tree decline
- Use spring as the exit from winter pressure, not as a rescue fantasy
- Keep a winter station log that explains next December
- Choose one stable winter station and improve it
- Steps
Read the plant as an indoor conifer, not a disposable holiday tree
Norfolk Island pine is sold in winter because it resembles a miniature evergreen, but the plant behaves nothing like a cut Christmas tree and very little like a drought-tolerant tabletop conifer. It is a living tropical-subtropical araucaria that must spend winter indoors in most temperate homes. That means its health is decided by light, root aeration, and the quality of indoor air over several months rather than by a few festive weeks of appearance.
Begin by deciding whether you are trying to keep a small decorative specimen alive for one season or grow the plant well enough that it can remain part of the houseplant collection for years. A temporary holiday placement beside a front window may be acceptable for a fortnight, but the same dim corner becomes a slow decline by February. Winter care only works when the tree is moved from display logic to plant logic before the short days and dry indoor air have done cumulative damage.
The plant's shape also deserves to be protected deliberately. Norfolk Island pine grows in whorled tiers that do not recover neatly from rough handling, cut leaders, or repeated branch breakage. Once the main framework is distorted, later light and watering improvements cannot recreate a perfectly symmetrical young tree. A healthy winter routine therefore aims at both physiology and structure: keeping needles green while preserving the layered architecture that made the plant worth bringing indoors.
Separate winter needle loss from a failing growing station
Read where foliage is changing before altering care. Check the root zone, light and heat-source exposure together, preserving healthy branching tiers while the cause is assessed. An attractive holiday display position is not automatically a suitable growing station. Stabilize that station first and reserve major interventions for the plant's appropriate active-growth period.
Build the winter room around light, temperature, and humidity
The brightest practical indoor station is the first non-negotiable. University of Minnesota places Norfolk Island pine among medium-light houseplants, while Illinois and Iowa both stress bright light for best performance. In winter, that usually means an unobstructed east, south, or bright west exposure with the tree close enough to the window to benefit from the short day but not pressed against cold glass. Dim background light keeps it alive less reliably than many gardeners assume.
Temperature matters because the plant resents both furnace-level warmth and cold drafts. A cool room with ordinary living conditions is useful; a tree wedged between a heat register and a leaky exterior door is not. Choose a position where the plant experiences stable indoor air, free circulation, and a real night drop rather than a hot afternoon spike followed by cold shock against glass. Winter care becomes much easier when the room itself is not forcing constant correction.
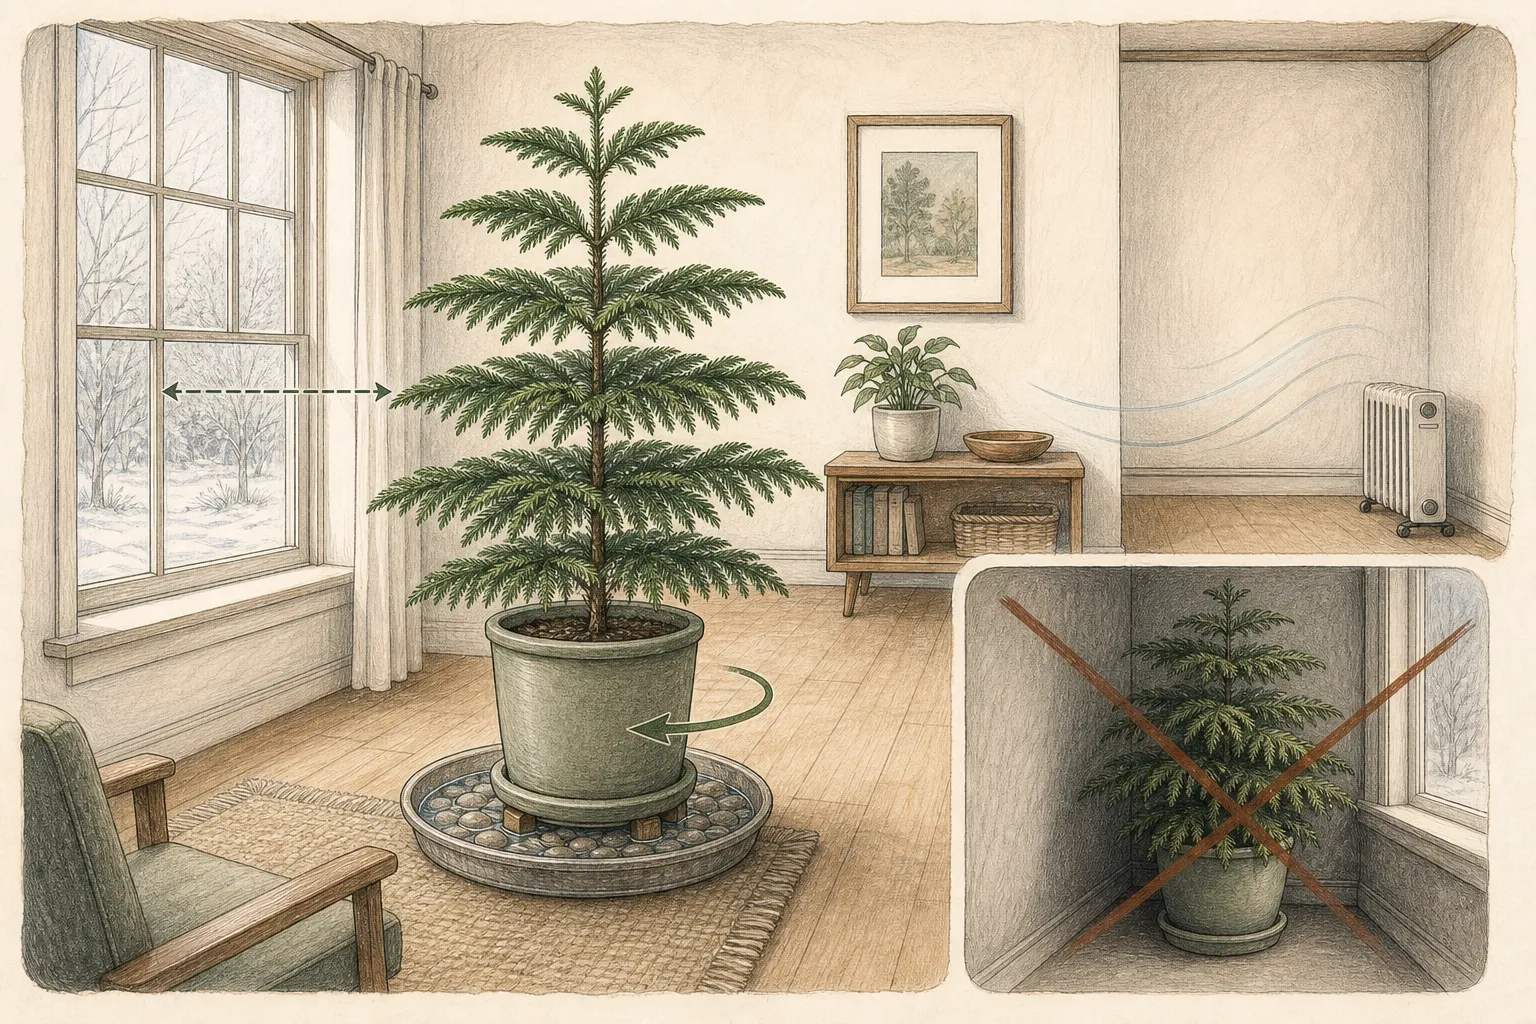
Humidity belongs to the same station decision. Heated winter rooms often dry the air faster than a Norfolk Island pine can comfortably tolerate, which is why Penn State and Illinois both steer growers toward higher humidity and away from direct heat. A pebble tray or room humidification can help, but only if the pot remains above the water line and the air around the branches stays open. Humidity that becomes hidden standing water at the pot base solves one problem by creating another.
Water by root-zone oxygen, not by sympathy
A Norfolk Island pine should never be treated like a cactus in winter, but it is equally unsafe to keep the root ball continuously wet because the house is dry. The useful middle ground is evenly moist, draining media with oxygen still in the pore space. Let the upper portion of the mix dry enough to signal that water is needed, then water thoroughly and allow the container to finish draining. The wetting event should be complete; the wet interval should not be endless.
Lift the pot and look below it every time. Decorative sleeves, foil wraps, and cachepots are among the most common winter failures because they hide the fact that drainage water never actually left the system. A tree can show browning inner needles from waterlogged roots while the room feels dry enough to make the owner water again. Root-zone oxygen, not indoor sympathy, decides whether the branches stay functional through the darkest part of winter.
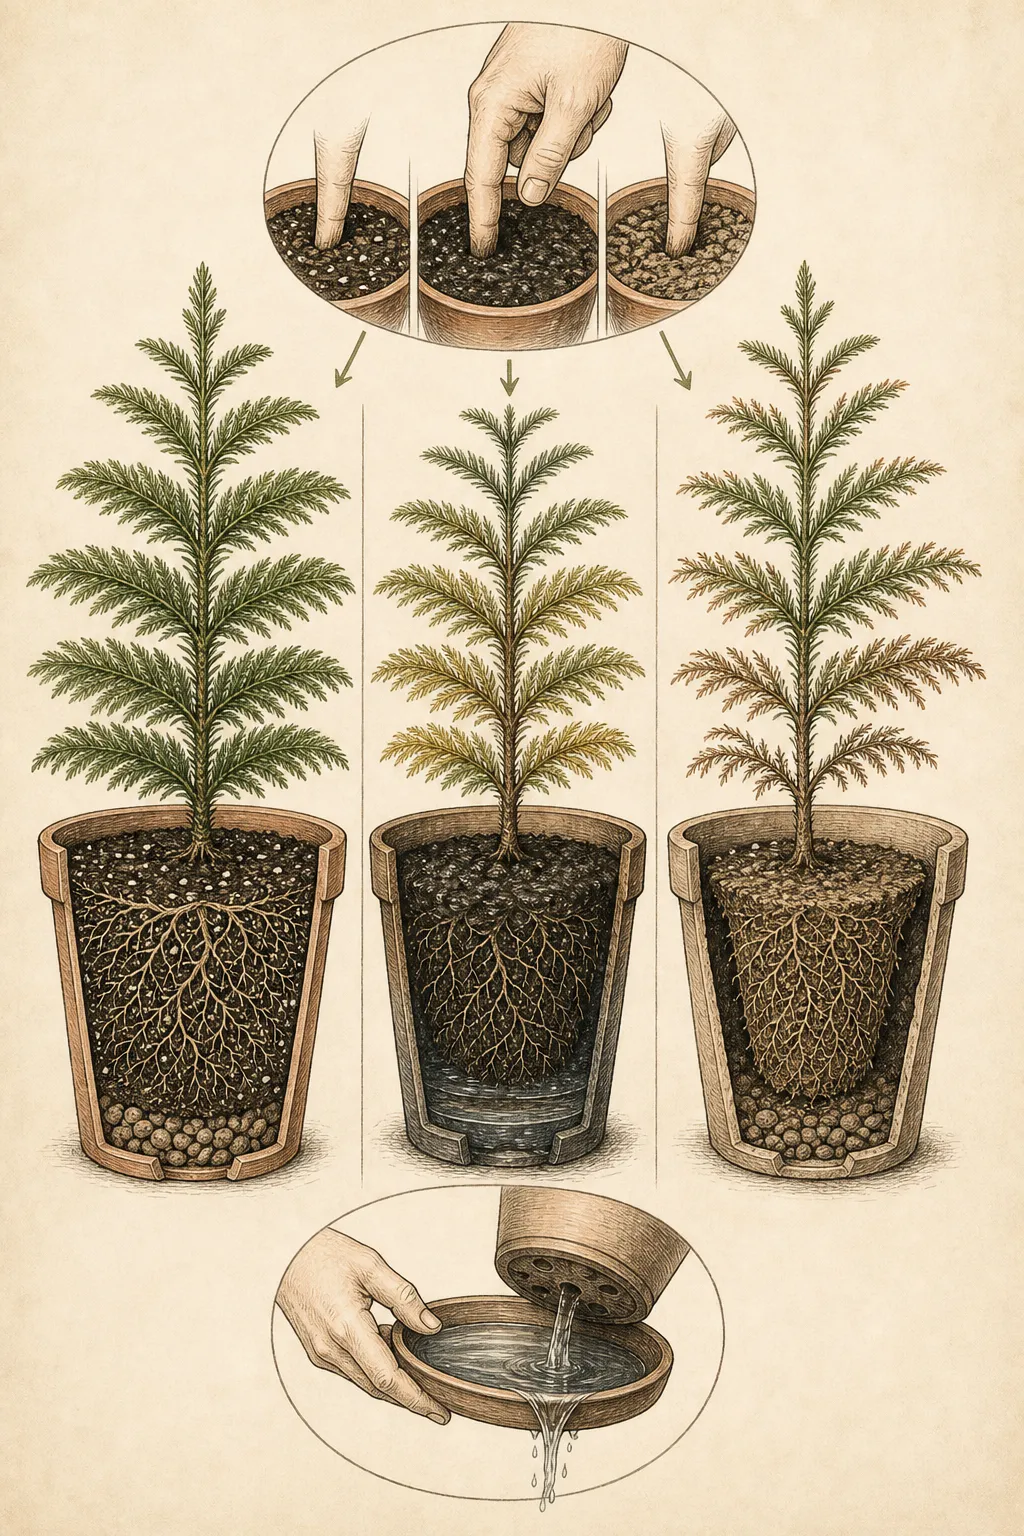
Use the plant's tempo as the schedule. In a bright but cool room the tree may dry more slowly than it would near a heater, and a larger pot takes longer to shift than a small nursery container. Needle drop after watering is not proof that the plant wanted more. It may be the sign that the root ball stayed wet too long. Winter success comes from consistent observation of the mix, the pot's weight, and the hidden drainage path rather than from a fixed day-of-week routine.
Protect the branching framework while the tree is indoors
Indoor Norfolk Island pines often lose their shape through crowding and casual contact long before they become severely unhealthy. Give the tree room on all sides so tiers are not bent flat against curtains, neighboring plants, or a wall. If the plant must sit near a passage, rotate household traffic around it rather than asking the lowest branches to survive repeated brushing. Branches that stay bent for months rarely look right again even after the plant returns to better light.
Rotate the container modestly and deliberately, not constantly. One quarter-turn every week or two can help the tree hold a more even outline if light clearly comes from one direction. Daily turning prevents the plant from orienting at all and makes it harder to read whether the station is adequate. Rotation is a corrective tool, not a substitute for an underlit location. If every tier leans despite rotation, the room needs more light or the plant needs to move closer to the window.
Avoid topping or shortening the leader just because the plant has reached an awkward holiday height. Removing the central leader interrupts the natural architecture and usually produces a less graceful tree, not a compact one. Long-term size management belongs to future repotting, light decisions, and eventual placement, not emergency winter pruning. The framework is part of the plant's stored value, and winter is the season to keep that framework intact rather than reshape it aggressively.
Diagnose winter stress before it becomes whole-tree decline
Some needle drop is easier to reverse than other kinds. A few older interior needles yellowing late in winter may simply show that the tree is adjusting to lower light. Broad browning at branch tips, branchlets that turn crisp, or entire lower tiers that dry quickly point more strongly toward a mismatch in watering, light, heat, or humidity. Read the pattern of loss before acting. A uniform whole-tree fade usually has a different cause than one drying side near a vent or cold pane.
Separate dry-air stress from root trouble. When the tree sits near a heater or very dry airflow, branch tips may brown while the root ball still behaves normally. When the container remains heavy, the mix smells stale, and needles dull or drop from several tiers, root stress is more likely. A humidity response should leave the root system unchanged. A watering response should not be chosen until the drainage path and pot weight have been checked. The plant gives enough evidence if you read all of it together.
Pest or mechanical problems need their own lane. Webbing, stippling, or fine-scale mottling can signal mites in winter rooms, while sudden breakage is sometimes nothing more mysterious than a plant shoved into a crowded corner. Do not blame every symptom on humidity. Inspect the undersides of branchlets, the leader, and the potting surface in good light. A Norfolk Island pine kept clean, bright, and open is far easier to diagnose than one left dusty in a dark display spot until March.
Use spring as the exit from winter pressure, not as a rescue fantasy
Winter care should carry the plant into spring in working condition, but it does not erase every mismatch instantly. When days lengthen, keep the tree in its brightest indoor station until outdoor temperatures are consistently mild enough for a gradual transition if you choose to summer it outside. A plant that barely held on in winter should not be rushed from underlit indoor air to direct outdoor sun. Recovery still depends on a staged change, not a dramatic one.
Repotting belongs to a healthy transition, not to a panic over February needle drop. If the winter review showed exhausted mix, roots spiraling densely, or a pot that has become too unstable, wait until active growth resumes and the light environment improves. Use a container with reliable drainage and a mix that can stay evenly moist without remaining airless. The repot is meant to support the next cycle of growth, not to punish a plant that already struggled through midwinter.
Decide what the tree's long-term home should be while you still remember the winter failures. If the house cannot provide enough winter light for dense growth, note that now rather than buying a larger Norfolk Island pine next December. A successful winter routine is not only a list of corrections. It is evidence about whether this exact plant and this exact room are still a good match. The best future care often begins with that honest fit assessment.
Keep a winter station log that explains next December
A Norfolk Island pine rewards records because so much of its winter stress comes from repeated small conditions rather than one dramatic mistake. Note the room, the window orientation, the distance from glass, whether a humidifier or pebble tray was used, and how often the pot actually needed water in that station. A short note about when browning began is often more helpful than a memory that the tree 'looked worse after the holidays.'
Record the structural observations too. Did one side lean toward the glass, did a lower tier keep catching coats, or did the tree stay remarkably even with one weekly quarter-turn? Those details tell you whether the next winter needs a better physical location, a different rotation rhythm, or simply the same successful setup repeated. A plant with good winter form is not an accident; it is usually the result of a room that suited the tree well enough that constant intervention was unnecessary.
That station log turns winter care into a repeatable system. The essential elements are simple: the brightest practical light, cooler and steadier indoor air, useful humidity without standing water, careful root-zone watering, and enough space to protect the branching tiers. When those pieces are recorded and repeated, Norfolk Island pine stops behaving like a fragile seasonal prop and starts acting like the long-lived indoor conifer it actually is.
Choose one stable winter station and improve it
Select the brightest practical station away from heating blasts and cold door drafts, then improve that station with measured changes. Use a thermometer near the foliage, check the mix below the surface, and group humidity-sensitive plants if the room is dry. Stability is more useful than moving the tree among temporary holiday locations.
Read the pattern before changing care. Dry tips concentrated on an exposed side suggest localized heat or dry air; yellowing with persistently wet mix suggests root-zone stress; a one-sided lean suggests directional light. Correct the cause gradually and preserve healthy branches because old bare sections do not reliably refill.
Decorate lightly with cool-running lights and no heavy ornaments. Remove ties before they constrict stems, and avoid foliage shine or artificial snow. After display, return the tree to its stable station rather than making another abrupt environmental change.
Reassess repotting in spring only after active growth begins. Increase container size modestly when roots and drainage justify it. Move outdoors only in reliably suitable temperatures, acclimating the foliage to brighter light and sheltering it from harsh sun and wind.
Use fallen branch tips as a diagnostic record rather than trimming the tree into symmetry. Note whether damage began beside a vent, windowpane, traffic route, or wet pot edge. Correct that local condition and wait for healthy new growth before concluding that the whole station has failed. Photograph the same branch tier monthly in winter light; a fixed view distinguishes continuing decline from old damage that has merely become more noticeable. Record the date as well.
Steps
- Level
- moderate
- Time
- One winter station setup, then routine checks through the season
- Tools
- A bright window or supplemental light setup, A draining pot and saucer, A humidity tray or room humidifier if needed, A simple watering and placement log
- Materials
- Norfolk Island pine in a draining container, Open floor or stand space with room for the full branch spread, Fresh potting mix only if spring inspection shows repotting is needed
- 1Move the tree from display logic to plant logic
After the holiday period, relocate the Norfolk Island pine to the brightest practical winter station with room around the branches. Keep it out of hot supply air, repeated traffic, and cold contact with window glass.
- 2Stabilize the room first
Choose a position with bright light, cooler indoor air, and enough humidity support that the branches are not baking beside a heater. If you use a pebble tray, keep the pot above the water line.
- 3Water by the root zone, not by the calendar
Let the upper mix dry somewhat, then water thoroughly and let the container drain completely. Empty every sleeve, saucer, or cachepot so the tree never stands in collected water.
- 4Protect the branching tiers
Give the tree full branch clearance and rotate only modestly if one-sided light is obvious. Do not top the leader or compress branches against curtains and walls.
- 5Read the pattern of needle loss
Use the location and character of browning to separate dry-air stress, low light, wet roots, pests, and physical damage. Check the pot's weight and drainage path before watering again.
- 6Hold major interventions for active growth
Save repotting and any larger correction for spring, when the light improves and active growth resumes. Winter care is meant to preserve the plant cleanly through the difficult season, not to force a dramatic rescue in poor conditions.
- 7Write the station down for next year
Record the room, light direction, humidity support, watering rhythm, and any structural issues so the next winter starts with evidence instead of guesswork. Include the distance from the window and heat source, the usual interval between moisture checks, and which side first showed dry tips or yellowing. Photograph one representative branch tier from the same angle each month and note the date. At winter's end, keep the station if growth stayed balanced; if it did not, change the single most likely environmental cause first rather than moving, repotting, feeding, and watering differently at the same time.
Sources
- How do I care for a Norfolk Island pine?. Iowa State University Extension and Outreach. Source record · Accessed 2026-08-19.
- Grow a living Christmas tree, Norfolk Island pine. Illinois Extension. Source record · Accessed 2026-08-19.
- Winter Holiday Plant Care Insights. Penn State Extension. Source record · Accessed 2026-08-19.
- Lighting for indoor plants and starting seeds. University of Minnesota Extension. Source record · Accessed 2026-08-19.