Grow · snowdrop division after flowering
Divide Snowdrops After Flowering Without Losing the Drift
Lift snowdrops while foliage still carries the bulb’s location, separate naturally rooted groups, and replant promptly at the original depth.
Published Last updated
In this guide
Choose a clump that is ready to divide
Divide when flowering has ended and foliage begins yellowing but remains easy to locate. Fully green leaves still replenish bulbs. Schedule the work when flowering has ended and leaves are still visible but beginning their natural decline. Confirm the choice by inspecting fading flowers, yellowing foliage, intact bulbs and roots, and the original soil mark on each group. The safe finish is reached when small rooted groups return promptly to compatible soil at their previous depth.
Select a congested clump or one needed for a planned extension. Young sparse colonies gain little from disturbance.
Confirm ownership and nursery origin. Digging snowdrops from wild or protected places is unacceptable and may be illegal. In this case, success means small rooted groups return promptly to compatible soil at their previous depth. Let the next inspection test whether small rooted groups return promptly to compatible soil at their previous depth; the workday shows only the starting condition.
Healthy snowdrop clumps can remain undisturbed for several years. Divide a clump when congestion reduces flowering, bulbs rise toward the surface, or a known cultivar needs to be increased. Work after flowers fade while foliage remains green, the period recommended by RHS, North Carolina, and Wisconsin sources. The leaves should still be functioning and roots must not be allowed to dry. Keep a nursery or garden provenance label with the clump and use nursery- or garden-propagated plants.
Snowdrop increase comes from bulb offsets and, more slowly, seed. Wisconsin Extension notes that seedlings can take about four years to flower, so a dense old clump is usually the result of several quiet seasons. Divide only enough to relieve congestion or extend the drift, leaving part of a healthy colony intact. Some cultivars multiply slowly and should be kept in larger groups. Count flowering stems before lifting and compare the next two winters, while allowing small offsets more than one season to bloom.
Prepare the destination first
The destination controls how long a lifted snowdrop group remains functional. Select a deciduous-shade site with spring moisture, summer conditions compatible with the parent clump, and drainage that keeps bulbs from sitting wet. A very dry root-filled slope and a saturated hollow are both poor matches. Check the view from a winter path because small flowers disappear visually when placed behind evergreen groundcover or far from access.
Existing woody plants set the limits of the drift. Major tree and shrub roots stay intact, so available spaces may produce an irregular pattern with wider pauses than the sketch. That irregularity is preferable to root damage. Later-emerging perennials can occupy nearby areas when their roots and foliage leave the snowdrop groups enough spring light and moisture. Mark each receiving area before lifting, and retain cultivar names where more than one snowdrop is grown.
Source and timing are part of destination readiness. Use nursery- or garden-propagated bulbs, and plan the move for the post-flowering green-leaf period supported by the retained sources. All receiving positions, labels, and water should be ready before the parent clump is disturbed. Begin lifting only after every selected group has a compatible named destination.
Summer irrigation at the destination should follow the receiving soil and companion roots, because snowdrops are dormant but still vulnerable to prolonged saturation and extreme drought. Compare candidate pockets after a useful rain and during a dry interval. A pocket beneath a dense evergreen may stay too dark in spring, while an exposed slope may lose moisture before foliage finishes. Choose the site that most closely matches the successful parent clump and leave unsuitable pockets empty. Where labels identify a slow-multiplying cultivar, allocate a larger intact group and a marker that will remain visible after leaf decline.
Lift a compact block and read its natural divisions
Insert a fork outside the foliage ring and lift from several sides. Preserve the central root mass, not levering through bulbs. Separate seasonal timing from cosmetic urgency. The useful window is when flowering has ended and leaves are still visible but beginning their natural decline.
Set the clump on a damp tray and remove only enough soil to see bulb groups. Washing exposes roots unnecessarily. Compare that setting with fading flowers, yellowing foliage, intact bulbs and roots, and the original soil mark on each group.
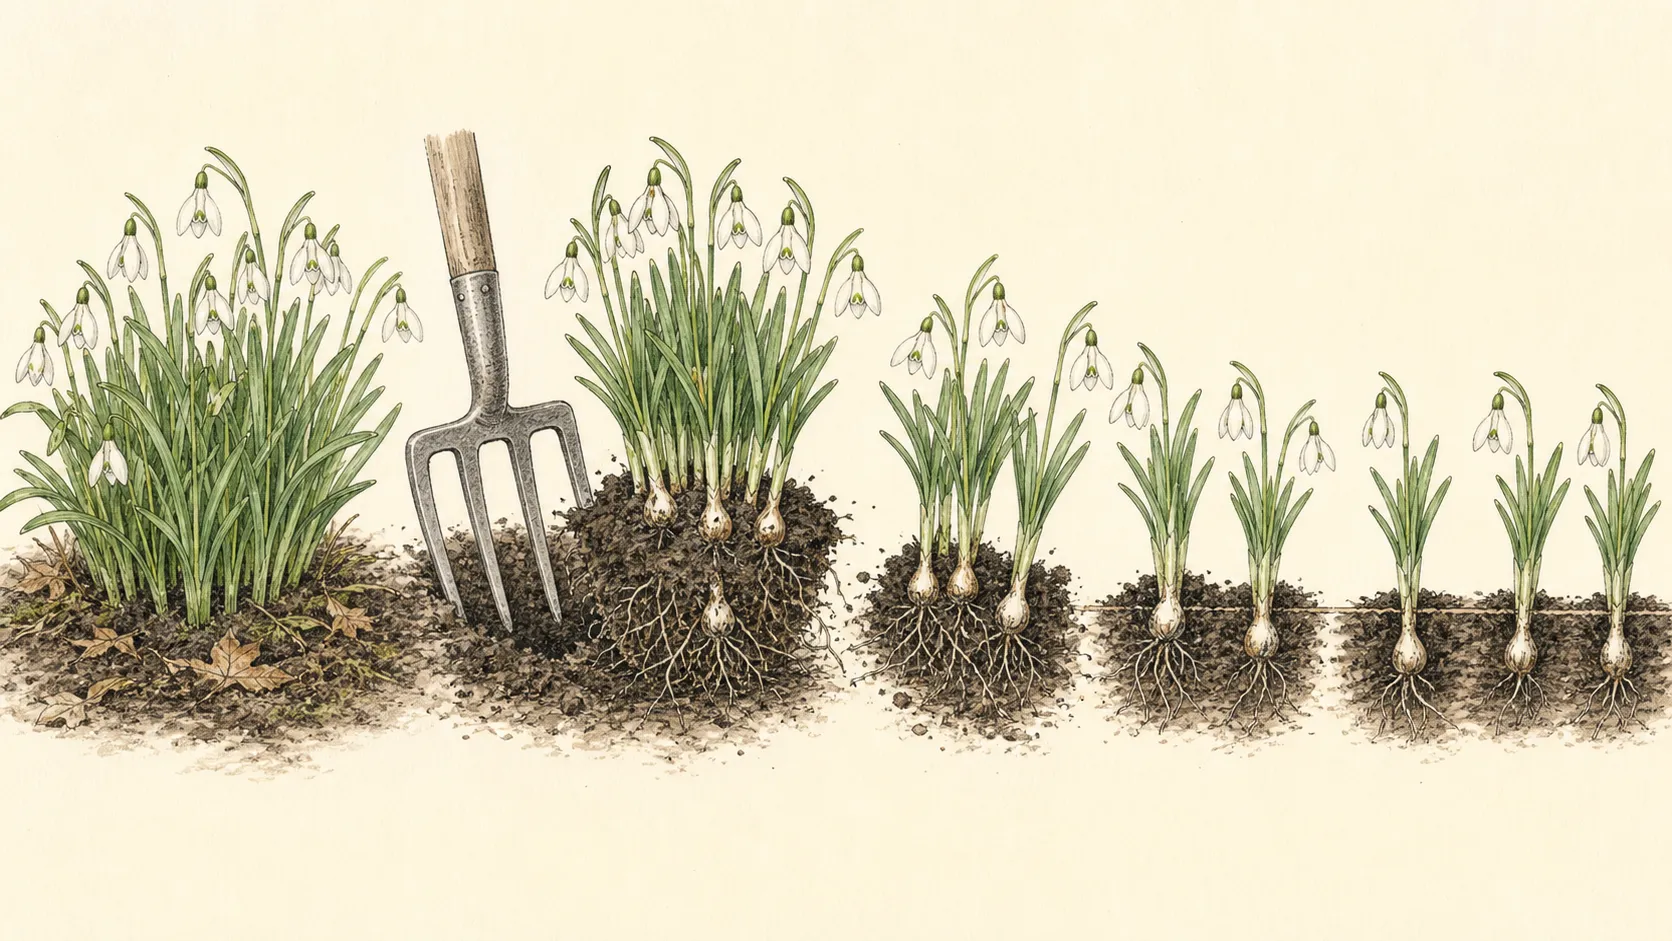
Ease apart naturally separable groups with several bulbs, leaves and roots. Single bulbs are slower to make visual drifts. Stop once small rooted groups return promptly to compatible soil at their previous depth.
A successful lift retains green leaves, live roots, and naturally connected bulb groups.
Insert a fork beyond the leaves and lift a compact block from beneath. Pulling by foliage can detach leaves or bulbs and loses the old soil-depth mark. Place the block on a damp tray in shade, then ease away only enough soil to see natural bulb groups. Sound bulbs feel firm and carry live roots; soft, wounded, or discolored bulbs should be isolated. Retain small clusters, not reducing every offset to a bare individual bulb.
Bulb clusters often show several generations of offsets around a larger mother bulb. Keep naturally connected small offsets with a larger rooted group unless congestion is severe. This preserves more roots and makes the new drift visible sooner. Count and label unusual cultivars before separating them, because flower characters are no longer available after bloom.
Keep bulbs and foliage functional
Retain every sound green leaf and keep roots shaded and damp. Tying or cutting foliage reduces the bulb’s remaining photosynthesis. Divide only after flowering while leaves are still green, and keep roots damp from lift to replanting. Small rooted groups recover more reliably than bare bulbs left exposed to air.
Remove only soft, damaged or clearly diseased bulbs and keep them separate. Ordinary staining is not proof of rot. Record fading flowers, yellowing foliage, intact bulbs and roots, and the original soil mark on each group before the work begins.
Label special cultivars before groups are mixed. Flower details disappear once division season arrives.
Recheck keep bulbs and foliage functional after the first settling rain or growth flush. Changes in fading flowers, yellowing foliage, intact bulbs and roots, and the original soil mark on each group reveal whether the correction is holding or the original site constraint is still active.
Green leaves continue photosynthesis after flowering and help replenish the bulb. Keep them attached, untied, and exposed to light until they yellow naturally. Tying or cutting them for tidiness reduces useful leaf area. Fine roots also remain active, so cover or mist them while groups wait a few minutes for planting. If the work cannot be completed promptly, return the clump to soil, and keep leafy bulbs in moist soil.
Keep the damp tray beside the receiving area, not in sun at the edge of the bed. Finish one clump completely before lifting another so roots and leaves remain functional.
Replant at the previous depth
Use the old soil mark and leaf bases to recover planting depth. Spread roots downward without curling them into a shallow hole. Use the old soil mark to restore depth and spread the attached roots downward. The green leaf bases remain above soil, and intact foliage continues feeding the bulbs until natural yellowing.
Firm soil around each group and water to close fine gaps. Wait for workable soil that supports footing without compaction. Use fading flowers, yellowing foliage, intact bulbs and roots, and the original soil mark on each group to decide whether the task is corrective, preventive, or unnecessary. That distinction controls timing and scale.
Keep crowns and leaves above the surface while roots are covered continuously. Deep burial delays or prevents recovery. Water each pocket after replanting and mark it before the foliage disappears. Nursery provenance and cultivar labels matter because wild collection is unacceptable and different snowdrops multiply at different rates.
Use the previous soil line on the leaves and bulbs to restore depth. Spread the roots downward into the pocket, cover them continuously, and keep the green leaf bases above the finished surface. A pocket that forces roots to curl is too shallow or too small. Firm gently and water once to remove large air spaces. Keep heavy mulch away from the necks while allowing a light woodland leaf layer between groups.
After watering, check whether any group floated upward or exposed a bulb shoulder. Reset it immediately to the old soil mark while roots remain damp.
Rebuild the drift as groups, not a grid
Place several small groups with varied intervals that echo the parent colony. Straight rows reveal the intervention for years.
Leave open ground for offsets and seedling increase. Instant carpet density creates competition and repeated disturbance.
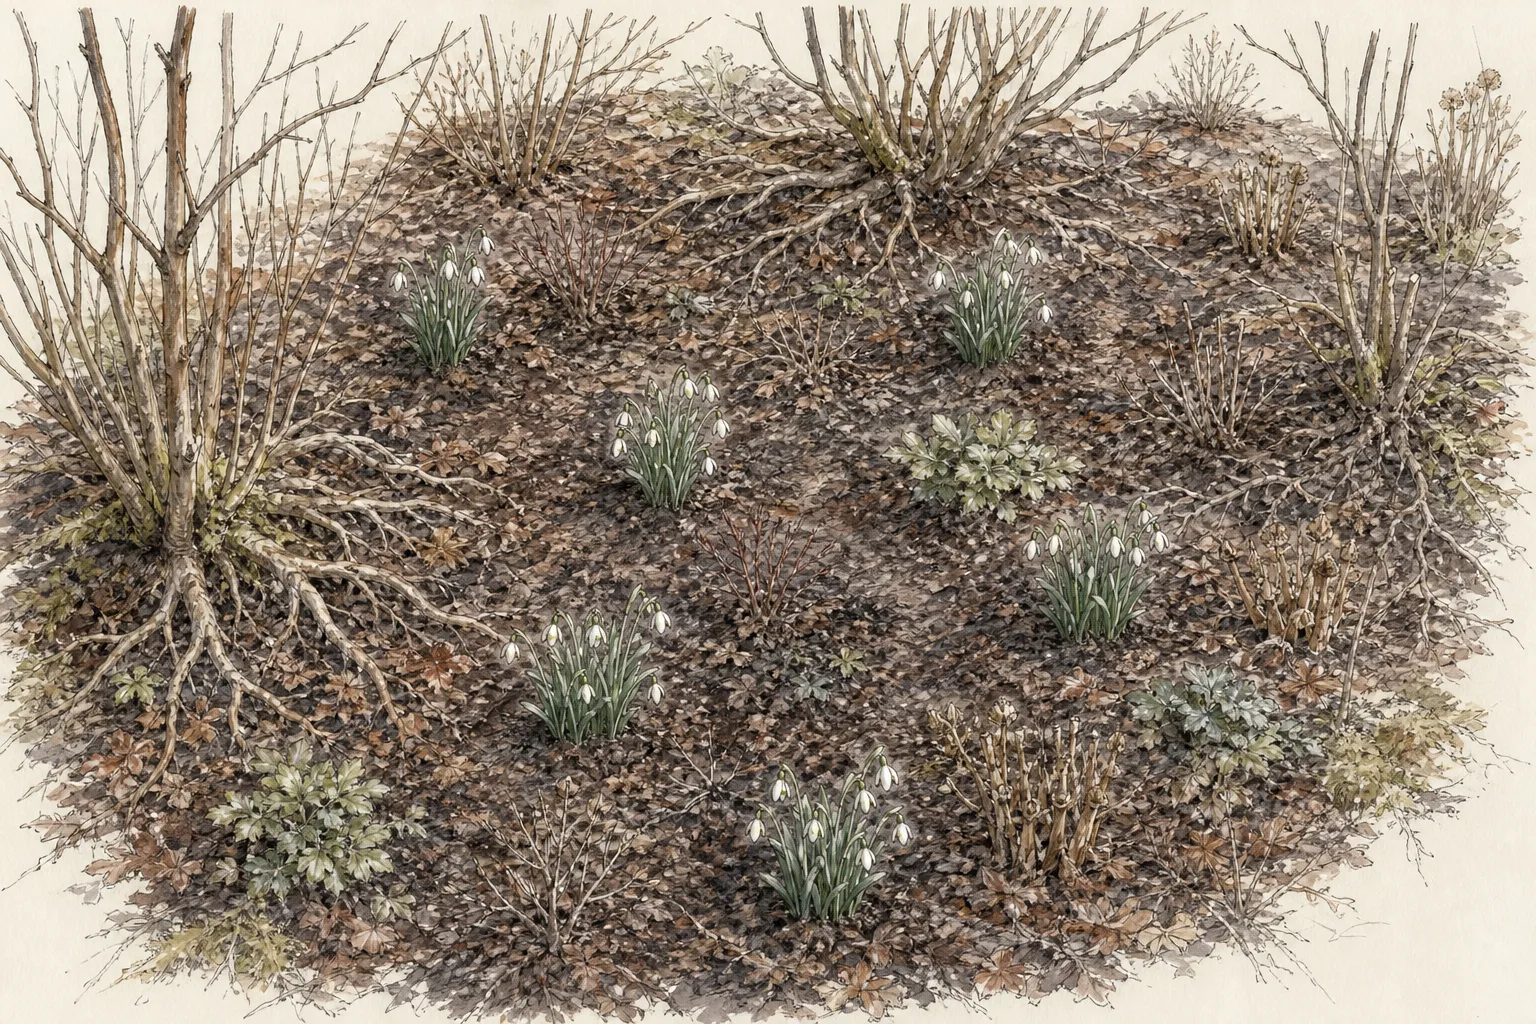
Use later-emerging companions to carry the bed after foliage fades. Their crowns must not cover the snowdrop bulbs. Include fading flowers, yellowing foliage, intact bulbs and roots, and the original soil mark on each group.
A convincing drift is made from small irregular groups with varied distances, not single bulbs on a grid. Leave enough room for offsets and seed to build the colony over several years. Combine snowdrops with later-emerging companions whose roots and foliage will not smother the bulbs. Mark each group discreetly because the entire display disappears in summer, and retain cultivar names where mixed collections would otherwise become impossible to distinguish.
Avoid placing every group at equal intervals. Scatter a few closer clusters and wider pauses, then let offsets and seed soften the pattern naturally over subsequent years.
Let the foliage finish
Continue moisture only when the soil and weather require it. Constant saturation after division can rot bulbs. Track fading flowers, yellowing foliage, intact bulbs and roots, and the original soil mark on each group.
Allow leaves to yellow and detach naturally before clearing. Their disappearance marks dormancy, not failure.
Mark the new groups discreetly so summer cultivation misses them. Update the plan with cultivar and division date.
After replanting, let the foliage yellow and collapse on its own. Keep soil evenly moist during that remaining green period, then follow the normal summer moisture of the site, and let the bulb bed follow its normal summer moisture. Keep dormant marks free from cultivation and new companion planting. The next winter's emergence tests depth and establishment; flowering can vary by cultivar and the size of the divided groups, so assess the drift over more than one cycle.
The first post-division check occurs while leaves are still green: they should remain upright enough to photosynthesize, and soil should stay evenly moist. Later yellowing is normal dormancy, not a reason to resume irrigation or dig again. Leave markers through summer and autumn. When shoots return, look for heaving, exposed bulbs, and uneven emergence. Reset only clearly displaced groups. Flower count, leaf vigor, and gradual widening over two cycles provide a fairer assessment than the first winter after division.
Review the divided drift while leaves are green, again after dormancy, and at the next flowering. Green leaves should remain intact while roots settle; dormant markers should stay undisturbed through summer work; winter emergence should follow the restored depth without exposed bulbs. Count flowering stems by group over two seasons because small offsets may not bloom immediately. If one pocket declines, compare its drainage, summer moisture, and tree-root competition with successful groups before moving every bulb. Keep unusual cultivars labeled so later division does not erase their identity.
Steps
- Level
- moderate
- Time
- 30–60 minutes per clump
- Tools
- border fork, hand fork, narrow trowel
- Materials
- damp cloth or tray, labels, water
- 1Open receiving pockets
Prepare several irregular spaces in compatible moist, draining soil before the parent clump is lifted. Keep woody roots and later companion crowns intact. Prepare irregular pockets before lifting so divided bulbs spend only minutes out of soil. Match the parent site's deciduous shade, humus-rich drainage, and summer moisture while keeping major woody roots undisturbed.
- 2Lift outside the leaves
Work a fork around the clump and raise a compact block from beneath. Set it immediately on a damp shaded tray. Insert a fork outside the leaves and loosen the clump from several directions. Lift a soil block from beneath, set it on a damp shaded tray, and protect the fine living roots from sun and wind.
- 3Find natural groups
Ease soil only enough to see separations, then split into small rooted groups with sound bulbs and attached foliage. Ease soil away only until natural bulb groups become visible. Separate small clusters that retain roots and green leaves; single bare bulbs dry faster and create a thin, easily lost display.
- 4Preserve the green leaves
Keep foliage untied and uncut while it yellows naturally. Remove only confirmed soft or damaged bulbs with clean tools. Keep all healthy green leaves attached and untied until they yellow on their own. Remove only soft, damaged, or diseased bulbs, using clean tools and keeping questionable material out of new pockets.
- 5Match the old depth
Use the previous soil mark, spread roots and firm compatible soil around them. Keep leaf bases and crown tissue correctly exposed. Follow the old soil line on the leaves and bulbs, spread roots downward, and cover them continuously without burying the green necks. Firm gently so roots contact soil but the pocket still drains.
- 6Water and mark
Settle the pockets once, then manage moisture from conditions. Mark each group and record cultivar, source and division date. Water immediately, then keep soil evenly moist while foliage finishes and roots settle. Mark the dormant location and record cultivar and source so summer work does not disturb the bulbs.
Sources
- How to Grow Snowdrops. Royal Horticultural Society. Source record · Accessed 2026-08-30.
- How to Grow Bulbs. Royal Horticultural Society. Source record · Accessed 2026-08-30.
- Dividing Perennials. University of Minnesota Extension. Source record · Accessed 2026-08-30.
- Time for Snowdrops. North Carolina Cooperative Extension. Source record · Accessed 2026-08-30.
- Snowdrops, Galanthus spp.. University of Wisconsin Extension. Source record · Accessed 2026-08-30.