Grow · divide siberian iris early spring
Divide Siberian Iris Before the New Fans Become Tall
Lift and split an overcrowded Siberian iris clump in early spring, keeping firm rhizomes and roots attached to each replanted fan.
Published Last updated
In this guide
- Use the biological cue for overcrowded Siberian iris clump
- Read the site and the whole plant together
- Set a visible finish line before beginning
- Prepare the work while every part is still identifiable
- Carry out the central operation in a controlled sequence
- Protect roots, crowns, and new growth after the work
- Diagnose a weak response before adding another treatment
- Leave a record for the next seasonal decision
- Steps
Use the biological cue for overcrowded Siberian iris clump
Use early spring only where it is a locally suitable Siberian iris division window. Iowa State University Extension supports lifting when new growth has just begun to appear, then making sections with several growing points and a good root system. The fans should still be short, and the soil should release a clump cleanly. Fully elongated leaves create a heavier, more easily bent top while the roots are out of the ground.
Seasonal advice changes by region. University of Minnesota Extension places fleshy-rooted Siberian iris in its fall group and asks for four to six weeks before the ground freezes in cold northern gardens. The RHS profile for I. sibirica gives midsummer through early autumn in the United Kingdom. Iowa also offers late summer. Treat the article’s spring method as one evidence-backed option, then use local Extension guidance and establishment weather to choose between those windows.
The two Iowa methods use different top-growth cues. Its spring sequence begins as the first shoots appear and returns unshortened young fans to soil immediately. Its August sequence cuts established foliage to six to eight inches, then keeps several fans and a good root system in each promptly replanted section. Minnesota’s northern fall exception adds a rooting deadline before freeze. These details keep a late-season instruction from being imported into the spring operation and give gardeners with two locally valid windows a concrete way to prepare the plant for the season actually chosen. Across both Iowa sequences, receiving holes must be ready because immediate replanting is part of the instruction.
Divide for visible congestion, not merely because the clump is old. Iowa lists declining vigor, crowding, and a solid ring with a bare center as useful triggers and notes that Siberian iris needs division less often than bearded iris. A full, flowering center with room at its edge can remain intact. Mark the hollow center and the strongest outer fans before digging so the renewal goal stays clear.
Read the site and the whole plant together
Examine the clump as a ring of connected fans. The first editorial image follows an outer section from intact growth through separation, preserving several growing points over a substantial root mass. Compare the vigorous perimeter with the center. Sparse shoots only on the shaded side may reflect light, while an evenly empty middle within a dense outer ring fits the renewal pattern described by Iowa State.
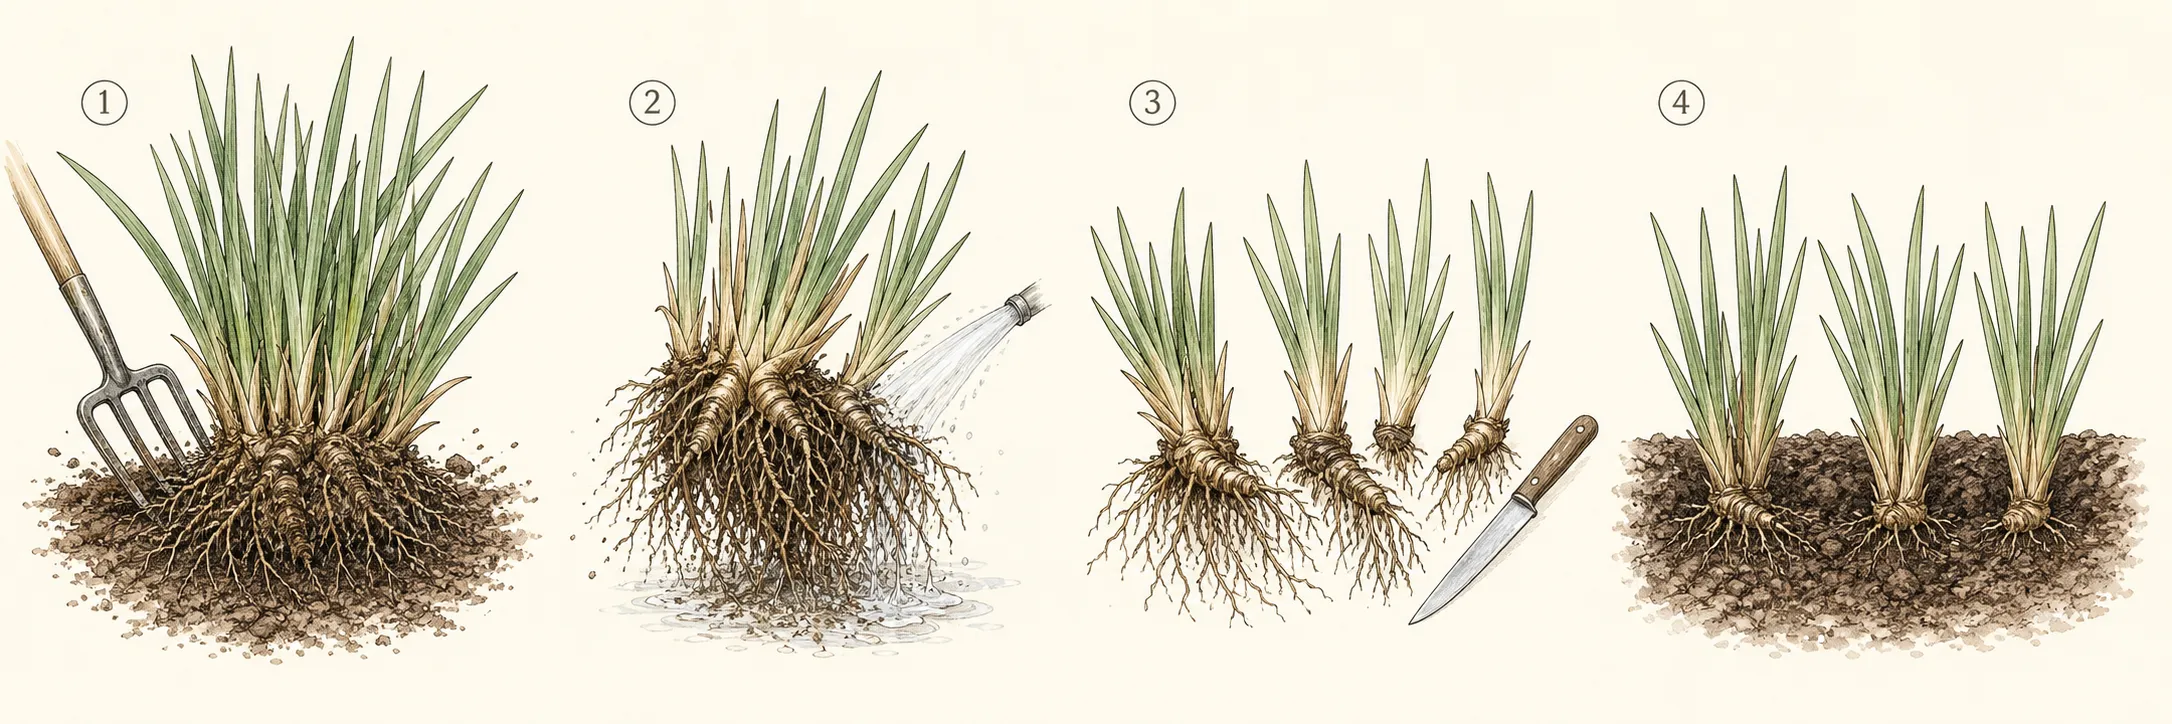
Prepare destinations in full sun or partial shade with dependable moisture. Iowa says Siberian iris prefers moist, fertile soil and suits pond or stream edges while also growing in average moist, well-drained ground. The RHS narrows its profile to moist but freely draining soil and cautions against waterlogging. A rain garden shelf that drains after inundation is different from a sealed hollow that remains anaerobic.
Reserve mature space before the divisions look large. The RHS species profile gives I. sibirica a spread range of 0.1 to 0.5 metre and a two- to five-year path to maturity under UK conditions. Cultivars can differ, so use the named plant’s expected width for centers and place several related fans as one future clump. Keep access for establishment watering at the pond edge or back of the border.
Set a visible finish line before beginning
Each accepted piece carries several growing points and a good root system, the standard in Iowa State’s Siberian iris directions. Minnesota’s broader perennial guidance uses three to five vigorous shoots plus healthy roots as a useful working size. Keep substantial outer portions and leave tiny root-poor fragments out of the planting plan. The objective is a few capable clumps, not the largest possible division count.
Use the original soil stain as the replanting reference and keep the fan junction visible while backfilling. The roots should fit downward into loosened soil, and the group should remain upright after watering. Exact grade can vary with the root form and prepared bed, so the observed former level is safer than borrowing the exposed-rhizome rule used for bearded iris.
Match the number of cuts to the ready holes. Iowa calls for immediate replanting in both early spring and late summer, and Minnesota keeps divisions shaded and moist until they return to soil. Stop separating once every prepared destination has a strong piece. An intact remainder can be reset in the original hole or given to another gardener with its label.
Prepare the work while every part is still identifiable
Choose an overcast, cool work period when possible. Minnesota Extension recommends cloudy conditions for perennial division and suggests watering dry soil a day ahead. Spring ground still needs to crumble under the tool; glossy smears and standing water indicate a poor lifting surface. Check the forecast for enough mild time to monitor moisture after planting.
Open the receiving holes first and place a damp cloth in the shade beside the parent plant. Label every destination with cultivar and fan count. Newly divided Siberian irises can look alike before bloom, and a switched label defeats later comparisons of height, color, and vigor. Mark neighboring bulbs and crowns along the route between clump and holes.
Use a garden fork or spade to lift and a clean soil knife or sharp spade to separate dense sections. Set a tarp or low board on firm ground for the root mass. Keep a bucket of clean water available for moistening the covering, not for leaving divisions submerged. Stage the tools so exposed roots can stay shaded throughout the short cutting interval.
Plan how the heavy clump will leave the hole. Loosen all sides before levering, keep the load close to the ground, and split an unmanageable mass into larger sections in place. Siberian iris roots can form a tight network that retains wet soil. A smaller controlled lift protects the gardener’s footing and keeps adjacent plants from being dragged out with the clump.
Carry out the central operation in a controlled sequence
Dig beyond the living outer fans and work around the full circumference. Ease the root mass upward from several directions, preserving long roots where practical. Remove only enough loose soil to reveal groups of growing points and sound connecting tissue. Lay the clump on the board with the roots covered as soon as its arrangement has been read.
Separate a perimeter group with several fans and an abundant root share. Insert the knife or spade through the connecting tissue between groups, using one firm vertical cut. The second editorial image shows the intended section in profile: upright fan bases, the original soil mark, and roots arranged into the receiving hole. Check that complete unit before making the next cut.
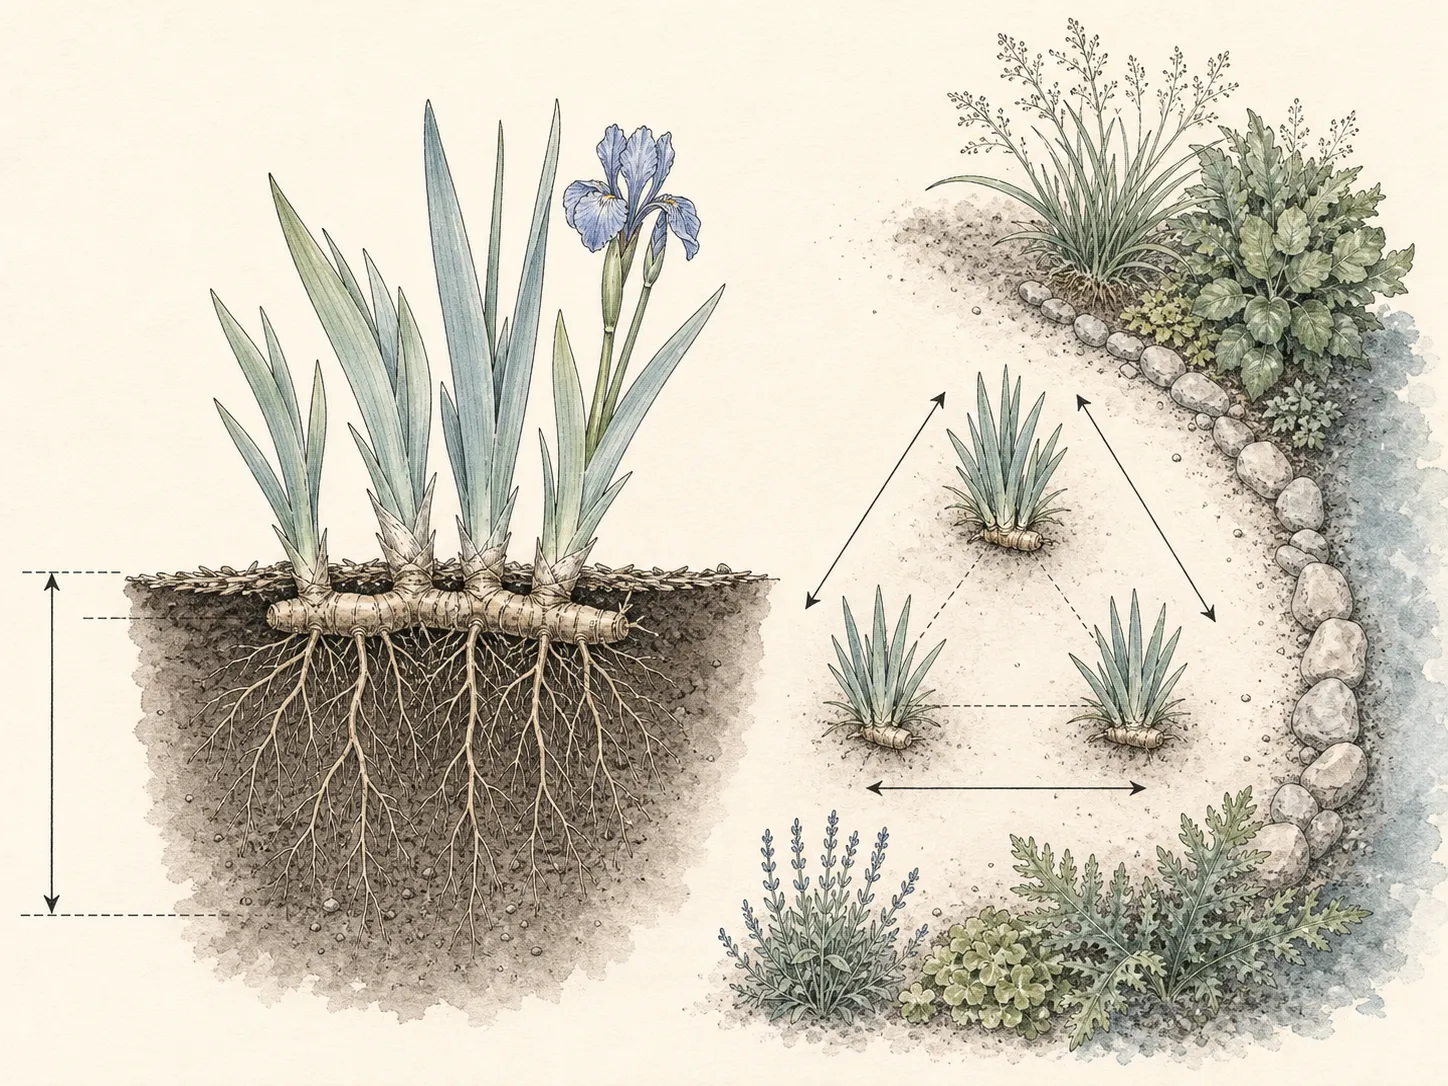
Carry the accepted piece to its label and plant at the former soil line. Guide the roots downward and outward through loose soil, fill among them by hand, then water to settle contact. Recheck the fan junction after drainage and add soil only where roots remain exposed. The clump should stand on root support, not on a compacted pedestal beneath the center.
Protect roots, crowns, and new growth after the work
Keep the root zone evenly moist through establishment. This species is adapted to moist sites, yet the RHS distinguishes moisture from waterlogging. Check below the surface after rain or irrigation: damp, aerated soil supports new roots, while a hole that remains filled calls for a drainage correction or a better position. Pond-edge placement belongs above the permanently submerged zone unless the named cultivar is documented for it.
Apply organic mulch around the planted group where the bed uses it, leaving the fan junction and soil line observable. The RHS recommends organic matter in drier soils and a spring surface layer. That material can moderate water loss, but it cannot substitute for moisture checks while severed roots re-establish. Keep labels upright and irrigation access open.
Inspect after the first drying wind and the first heavy rain. Crisp tips across every new piece suggest that roots and weather demand attention; exposed roots after runoff need soil restored around them. A stable group producing even new leaves can stay undisturbed. Repeated lifting breaks the contact that the planting water just settled.
If the job shifts to late summer, use the seasonal method supported by Iowa State: shorten the foliage to six to eight inches, retain several fans and good roots in every section, and replant promptly. In cold northern regions, complete fall work four to six weeks before ground freeze according to Minnesota Extension. Those leaf-cutting and frost-buffer details belong to the late-season option, not to short spring shoots.
Diagnose a weak response before adding another treatment
Compare a weak section with a vigorous one from the same parent. Fan count, attached roots, sun, soil moisture, and planting level are the first useful differences. A three- to five-shoot piece has a different starting reserve from a marginal fragment, so equal height is not an immediate expectation. Firmly emerging leaves and an anchored base are better early signs.
Probe moisture on both sides of the root zone. Dry soil beneath a damp-looking mulch calls for a thorough watering; persistent saturation in a sealed hole calls for improved drainage or relocation. The species accepts heavier, wetter ground than bearded iris, according to Iowa, but the retained sources still describe a functioning moist root zone rather than indefinite stagnation.
Read light and competition when every new group grows weakly. The species performs in full sun to partial shade. A darker relocation can reduce bloom, while a dry, root-filled position may fail to supply the moisture expected at establishment. Compare the new destinations with the original successful site before applying fertilizer or making another division.
Escalate when tissue becomes foul, soft, or rapidly discolored, or when decline spreads beyond one planting error. Those signs exceed a routine establishment adjustment. Keep suspect material separate from healthy divisions, photograph the crown and site pattern, and consult a local plant diagnostic service before moving more pieces around the garden.
Leave a record for the next seasonal decision
Record why the parent clump was divided: bare center, reduced vigor, crowding, or propagation. Add the chosen regional window, new-growth stage, soil condition, and weather. A photograph of the marked outer fans before lifting connects the finished pieces to the strongest part of the original ring.
Map each destination with cultivar and starting fan count. Note the former soil line, planting date, and first irrigation. At the next check, record whether the group remains upright, whether roots are exposed, and how long the bed stays wet after rain. Those facts distinguish planting settlement from a chronically poor site.
Review the seasonal choice after establishment. An early-spring division can be compared with Iowa’s just-emerging cue; a northern fall division can be checked against Minnesota’s four-to-six-week rooting interval; a UK schedule can follow the RHS midsummer-to-early-autumn window. Keep the regional source attached to the date so another climate’s calendar does not replace it later.
End with a single action tied to the record: continue moisture checks, restore soil around exposed roots, improve a waterlogged destination, or leave an anchored clump to mature. The RHS gives I. sibirica two to five years to reach mature size under its conditions. Evaluate renewed density over seasons, then divide again only when the plant repeats a real congestion signal.
Steps
- Level
- moderate
- Time
- One focused session, followed by scheduled checks
- Tools
- Garden fork, Sharp spade or knife, Bucket, Weatherproof labels
- Materials
- Mulch, Water, Prepared planting soil
- 1Match new fans to the regional division window
Confirm that local guidance supports early-spring division, then start as new fans first appear in workable soil. Mark crowding, loss of vigor, or a bare-centered ring as the reason for renewal. Choose a fall or late-summer window where regional guidance gives that season the establishment advantage.
- 2Choose drained sites for the outer fans
Select strong outer fans and assign them labeled positions in full sun or partial shade. Prepare moist, fertile soil that drains after rain, and space centers for the named cultivar’s adult width. Keep new holes above persistent standing water and within easy reach of establishment irrigation.
- 3Prepare holes before lifting roots
Water dry ground the day before work, open every receiving hole, and set cultivar labels in place. Clean a fork, spade, and soil knife. Arrange a low board plus damp covering in shade so the lifted root mass can be divided promptly and each accepted section can move straight to soil.
- 4Cut rooted sections from the clump perimeter
Loosen the whole circumference, lift the clump in controlled sections, and expose connections between fan groups. Cut one perimeter piece carrying several growing points and a healthy root supply. Cover remaining roots, inspect the first division against that standard, and make only the number of pieces that have ready destinations.
- 5Reset the fan junction at its former depth
Set each group at the soil stain carried from the parent clump, arrange roots downward through loosened earth, backfill by hand, and water thoroughly. Recheck the fan junction after drainage. Apply the bed’s organic mulch around the group while leaving its grade and label visible for inspection.
- 6Check root coverage, moisture and fan stability
Check after drying wind and heavy rain for root exposure, persistent saturation, loose fans, and dry tips. Log soil moisture, starting fan count, and irrigation. Restore contact around exposed roots or improve a waterlogged site, then leave an upright, evenly growing division in place to establish.
Sources
- Transplanting and Dividing Iris. Iowa State University Extension. Source record · Accessed 2026-08-30.
- How and when to divide perennials. University of Minnesota Extension. Source record · Accessed 2026-08-30.
- Iris sibirica. Royal Horticultural Society. Source record · Accessed 2026-08-30.