Grow · hardy geranium spring division
Divide Hardy Geraniums in Spring by Their Root Habit
Identify whether a hardy geranium clumps, creeps, or has a compact rootstock, then divide sound rooted sections and rebuild the border at mature spacing.
Published Last updated
In this guide
- Confirm hardy Geranium, not Pelargonium
- Identify the cranesbill before dividing its roots
- Prepare destinations while shoots are short
- Lift beyond the active crown
- Divide along the root habit
- Replant the border at mature mound width
- Support establishment without forcing growth
- Record habit and future maintenance
- Steps
Confirm hardy Geranium, not Pelargonium
Use botanical labels and perennial return history. Common naming confuses hardy cranesbills with tender bedding geraniums. Schedule the work when new growth is visible but stems remain compact and weather supports rooting. Confirm the choice by inspecting rootstock form, growing points, spring shoot vigor, original crown depth and mature spread. The safe finish is reached when each division retains roots and growing points at original grade with room for its documented habit.
Identify clumping, creeping, compact-rootstock or tuberous habit. Division method follows underground structure.
Divide for crowding, decline or design need. A vigorous well-scaled plant can remain intact. In this case, success means each division retains roots and growing points at original grade with room for its documented habit. Let the next inspection test whether each division retains roots and growing points at original grade with room for its documented habit; the workday shows only the starting condition.
A same-angle photograph makes confirm hardy geranium, not pelargonium measurable. Record rootstock form, growing points, spring shoot vigor, original crown depth and mature spread now, then repeat the view after weather or active growth shows whether each division retains roots and growing points at original grade with room for its documented habit.
Hardy cranesbills belong to Geranium; the tender bedding plants commonly called geraniums belong to Pelargonium and are not handled by this perennial-division method. Once identity is secure, examine the below-ground habit. Some hardy geraniums make compact fibrous crowns, others creep with rhizomes, and a few resent frequent disturbance. Division is justified by a thinning center, lost vigor, boundary conflict, or a need for named plants, not by a universal interval.
Root habit also predicts future maintenance. A compact clump can remain in place for years, while Geranium macrorrhizum-type rhizomes can form a broad groundcover and need an edge. Some taprooted or tuberous species are poorer candidates for routine division. Use the botanical name and inspect how stems meet roots before cutting. If the name is missing, take fewer, larger divisions and retain part of the parent clump untouched until flowering and mature habit confirm the plant.
Identify the cranesbill before dividing its roots
Confirm a hardy perennial geranium and its root habit before using this division method. Choose useful rooted sections, prepare positions for the exact plant's mature spread, and preserve the original grade at replanting. Keep the name with every division through flowering. A tender bedding geranium or an unidentified root system needs its own propagation guidance.
Prepare destinations while shoots are short
Mark final centers from mature cultivar spread. Nursery divisions expand beyond their spring footprint.
Choose compatible light and drainage for the named species. Rock-garden geraniums differ from woodland types. Identify rootstock form, growing points, spring vigor, original crown depth, and mature spread before cutting. Use this method only for healthy identified hardy Geranium with a divisible root habit.
Open receiving holes before lifting. Fine roots and new shoots dry quickly. The finished work must allow each division retains roots and growing points at original grade with room for its documented habit. Weather and new growth can clarify rootstock form, growing points, spring shoot vigor, original crown depth and mature spread during a measured pause.
Prepare every destination before lifting. Spring shoots are small enough to reveal crown positions, while cool soil reduces water demand during re-establishment. Measure the mature mound or rhizome spread from the exact species or cultivar and mark neighboring bulb foliage. Soil should be workable, not saturated, and a dry parent clump benefits from watering the previous day. Keep labels, shade, water, and clean cutting tools beside the bed so roots remain exposed for the shortest possible time.
Lift beyond the active crown
Use a fork from several sides and preserve outer roots. Loosen the clump from several outer positions before lifting beneath it. Separate seasonal timing from cosmetic urgency. The useful window is when new growth is visible but stems remain compact and weather supports rooting.
Set the clump in shade and identify natural growing points. Remove only enough soil to read them. Compare that setting with rootstock form, growing points, spring shoot vigor, original crown depth and mature spread.
Separate neighboring bulbs or weed roots before cutting. Remove hidden perennial weeds before replanting or sharing divisions. Stop once each division retains roots and growing points at original grade with room for its documented habit.
Insert a fork outside the active crown and loosen the root zone from several directions. Lifting only beneath visible shoots can shear away the roots that support them. Raise the clump onto a shaded tray or nearby sheet, retaining enough soil to keep fine roots moist. Look for natural gaps, firm growing points, perennial weeds, and soft tissue before cutting. If the clump is entwined with woody roots, make fewer divisions and protect the established tree or shrub.
Retain moist soil around fine roots and expose only enough crown to identify growing points. Retaining some moist soil reduces drying, and natural gaps can usually be read after the clump is laid on its side.
Return any unused healthy portion to soil promptly. A shaded damp tray protects roots only for the brief inspection and separation period, not for extended storage.
Divide along the root habit
Pull creeping rhizomes into rooted sections with several shoots. Cut only where fibers resist. First separate hardy Geranium from tender Pelargonium, then identify whether the plant forms a compact crown, fibrous clump, or creeping rhizome. Each root habit determines where a sound division can be made.
Slice compact rootstocks cleanly so every piece retains buds and roots. Tiny blind fragments are not useful. Record rootstock form, growing points, spring shoot vigor, original crown depth and mature spread before the work begins.
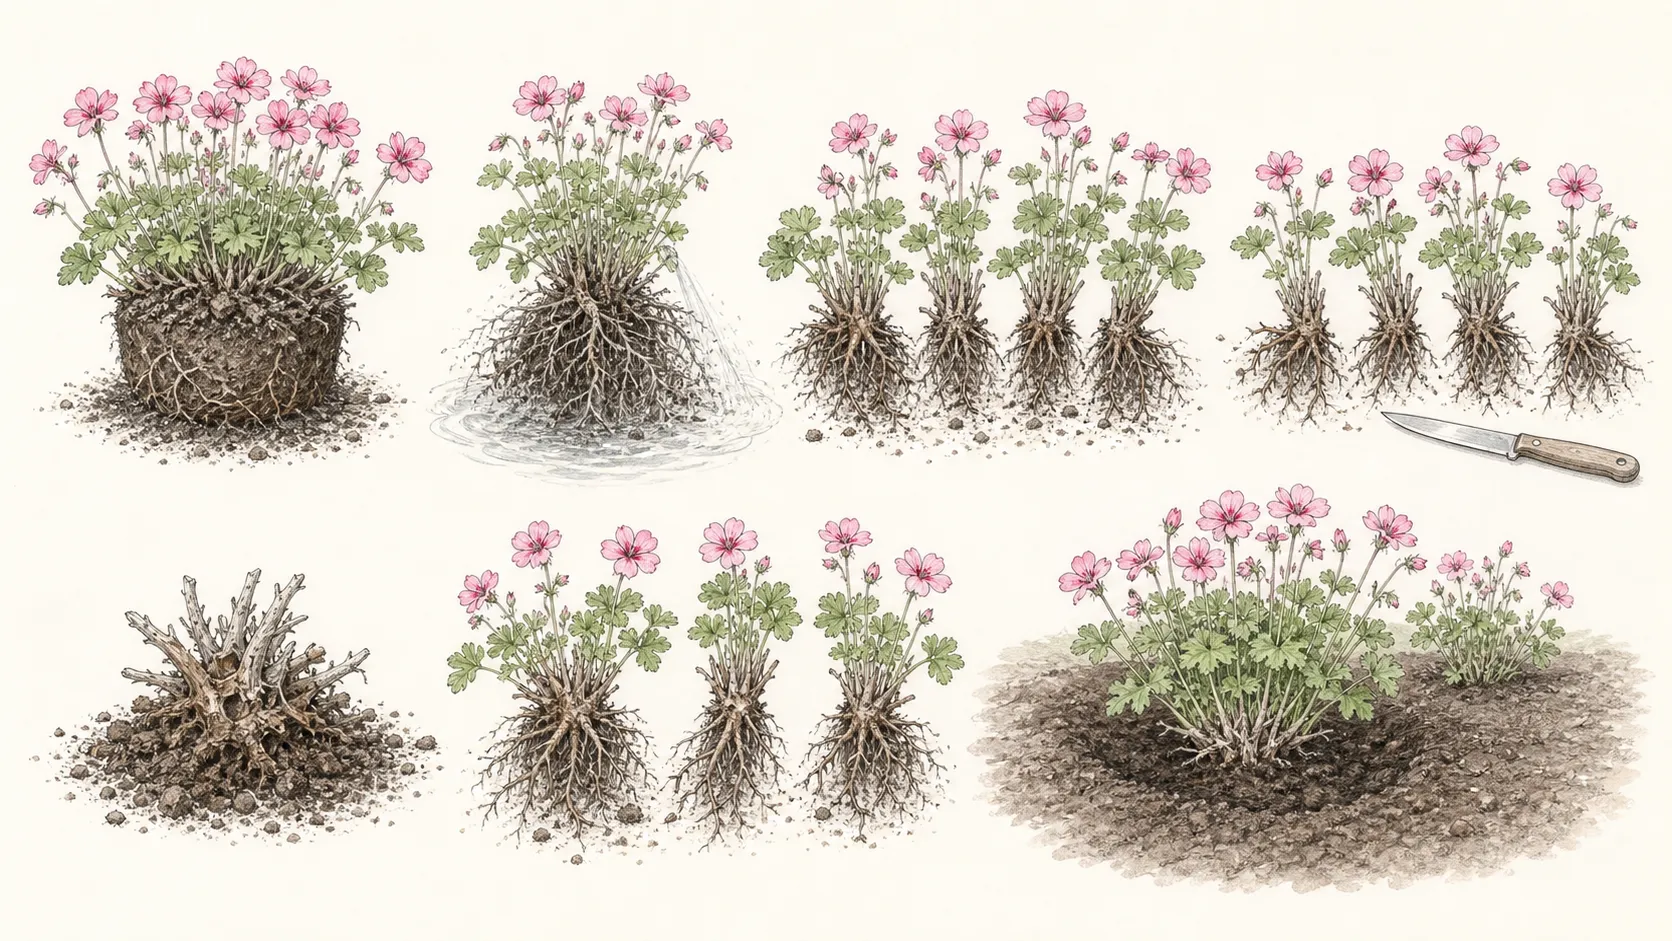
Retain sound central tissue and discard only confirmed dead or diseased parts. Old does not automatically mean dead.
A creeping geranium can often be separated into rooted rhizome sections, while a dense fibrous clump may need two forks or a clean knife. Every piece requires living roots and one or more clear growth points. Large divisions re-establish faster; very small ones demand closer moisture control. Remove embedded weeds completely and discard sections with unexplained rot. Tuberous or otherwise unusual species should follow species-specific propagation advice, and receive a propagation method suited to their roots.
Keep enough foliage on each division to identify the piece and support recovery, but remove leaves crushed during lifting. Match shoot number to root volume; a top-heavy fragment loses water faster than its damaged roots can replace it. Place finished divisions in shade until every receiving hole is ready.
Replant the border at mature mound width
Set crowns at the previous soil relationship and spread roots. Buried shoots decline. Return every piece to its former crown relationship and allow the named geranium's mature mound or creeping habit to determine spacing. Packing pieces tightly invites root competition and erases room for spring bulbs.
Repeat divisions in a rhythm that supports shrubs, bulbs and path edges. Leave visible temporary gaps. Use rootstock form, growing points, spring shoot vigor, original crown depth and mature spread to decide whether the task is corrective, preventive, or unnecessary. That distinction controls timing and scale.
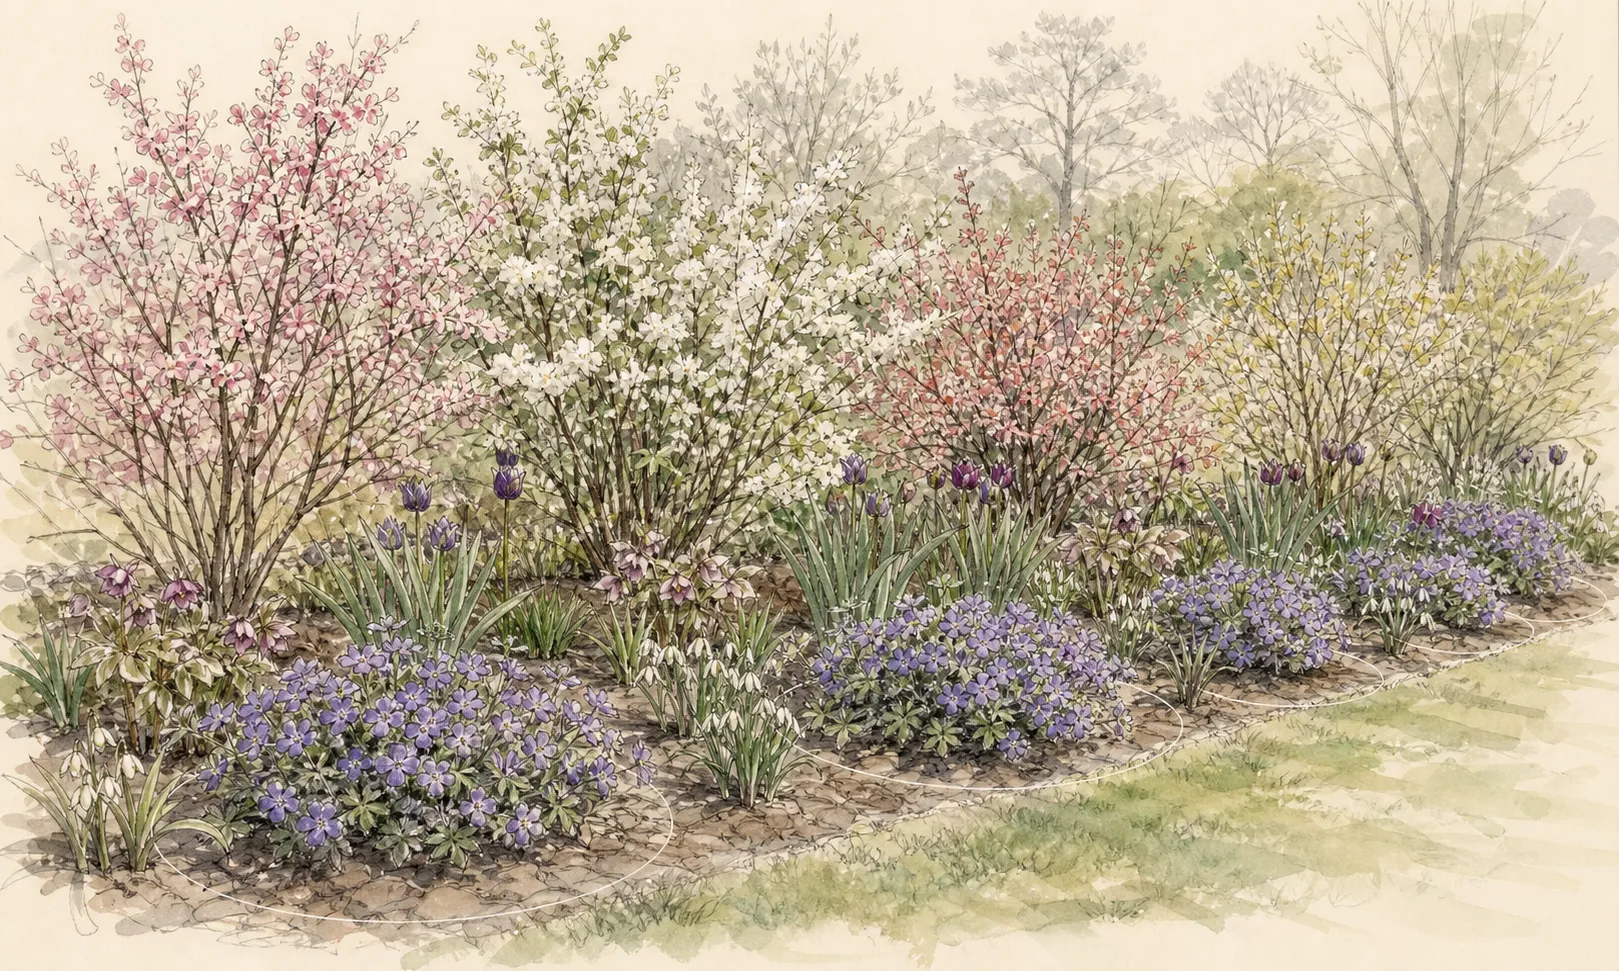
Firm gently, water to settle and keep mulch off crowns. Mark plants until foliage closes. Settle soil around roots with one thorough watering and keep the crown uncovered. Hold back any division that lacks growing points, carries perennial weeds, or shows soft tissue until its identity and health are clear.
Recheck replant the border at mature mound width after the first settling rain or growth flush. Changes in rootstock form, growing points, spring shoot vigor, original crown depth and mature spread reveal whether the correction is holding or the original site constraint is still active.
Set each division at its former crown depth and spread roots into the surrounding soil. Deep planting can cover growing points, while a high crown dries quickly. Firm gently, water to settle fine voids, and leave mulch outside the crown. Space for the mature mound, and leave establishment gaps between divisions. Later foliage will close planned gaps, and bulbs or low companions need enough light to complete their own seasonal cycle.
Hardy geranium foliage often overlaps spring bulbs, paths, and low shrubs. Set centers so the mature leaves can shade soil without covering bulb foliage before it yellows or spilling across paving. A creeping species needs a physical or regularly inspected edge; a mound-forming cultivar needs air around the crown. Keep mulch thin and outside growing points. This spatial decision usually has more effect on the next division date than the size of each piece cut today.
Support establishment without forcing growth
Manage moisture from soil and weather through the first active period. Waterlogging is harmful to many species.
Delay cutting back new divisions for shape. Leaves rebuild roots.
Watch for wilt, crown softness or failed sectors. Diagnose before replanting another piece in the same spot. Include rootstock form, growing points, spring shoot vigor, original crown depth and mature spread.
During the first weeks, keep soil evenly moist but aerated. Firm leaves and new extension indicate that roots are functioning; constant saturation, fertilizer, or repeated cutting does not speed that process. Remove only damaged leaves that no longer contribute and leave sound foliage to feed recovery. If a section wilts while others remain firm, compare crown depth, root size, sun, and moisture before changing the entire planting's care.
Flowering may be reduced in the division year because the plant is rebuilding roots. Preserve healthy leaves and avoid forcing bloom with soluble fertilizer. Once new growth is firm, species that normally respond to post-bloom shearing can receive that separate treatment, but it should not be combined automatically with division. Check watering at the root depth, especially beneath overlapping foliage. A wilted piece beside healthy divisions points to root size, depth, or localized moisture, not a need to water the whole bed daily.
Record habit and future maintenance
Note how quickly each cultivar closes its allotted space. That sets the next division need. Track rootstock form, growing points, spring shoot vigor, original crown depth and mature spread.
Use post-flowering cutback only for species that respond and plants already established. Division year is different.
Share only labeled healthy material and current regional guidance. Creeping habits need explicit boundaries.
Follow the divisions through flowering and full summer spread. The habit may reveal that a plant was mislabeled or that a creeping cultivar needs a stronger edge than expected. Record survival, bloom, mound width, and interaction with neighboring plants. Share only healthy, accurately named material. Future division should respond to vigor and available space, while simple edge trimming may be enough for a clump that remains healthy at its center.
Keep one labeled division in the original bed when identity is uncertain. Its mature habit and flowers provide the reference for all moved pieces later in the season.
Evaluate divisions at three stages: firm new leaves, first flowering, and full mound spread. Early wilt calls for a depth, root-volume, or moisture check; sparse bloom in the division year can reflect normal root rebuilding. At mature spread, decide whether a creeping rhizome needs an edge or a mound simply needs more time to close. Remove perennial weeds before foliage hides them and keep labels until flowers confirm identity. Future division should respond to a dead center or boundary conflict, while healthy outer growth can often be managed by a smaller edge edit.
Steps
- Level
- moderate
- Time
- 30–75 minutes per clump
- Tools
- garden fork, soil knife, hand trowel
- Materials
- labels, water, light mulch
- 1Identify root habit
Confirm hardy Geranium and determine whether it clumps, creeps, forms a compact rootstock or needs a species-specific method. Confirm that the plant is a hardy Geranium and retain its cultivar name. Exclude tender Pelargonium and unusual tuberous species from this method, then examine whether roots form a crown, fibrous clump, or creeping rhizome.
- 2Plan mature centers
Prepare compatible receiving holes from documented spread and preserve neighboring bulb, shrub and path access. Use the mature width and growth habit on the label to prepare receiving holes before lifting. Protect emerging bulbs and reserve enough access to weed and water while the divisions recover.
- 3Lift broadly
Work a fork around the crown, raise roots from beneath and move the clump into shade for inspection. Work a fork around the drip line and loosen the clump from several sides. Lift from beneath the root mass, place it in shade, and keep exposed roots damp during inspection.
- 4Separate useful sections
Follow natural divisions or make clean cuts so every piece carries sound growing points and an adequate root system. Pull loose fibrous or rhizomatous sections apart by hand and use a clean knife only where tissue resists. Every retained piece needs sound roots plus visible buds or shoots; discard soft crown tissue and embedded weeds.
- 5Set at original grade
Spread roots, hold crown depth, firm compatible soil and water to close fine voids without saturation. Set each crown at its former depth, spread roots naturally, and firm the surrounding soil lightly. Water thoroughly, then let excess water drain so cut roots receive both moisture and air.
- 6Keep temporary gaps
Respect mature mound width and protect spring bulb foliage, and retain gaps for mature coverage. Leave the open space required by the mature mound or creeping stem pattern. Later foliage can cover gaps; overcrowding at planting makes future division arrive sooner and can bury neighboring bulb leaves.
- 7Monitor and label
Track recovery, habit and spread through flowering, retaining correct names when divisions are shared or moved. Watch for firm new leaves and stable crowns during the first weeks. Retain labels through flowering because leaf shape, spread, and bloom provide a better identity check than small spring divisions alone.
Sources
- How to Grow Geraniums. Royal Horticultural Society. Source record · Accessed 2026-08-30.
- How and When to Divide Perennials. University of Minnesota Extension. Source record · Accessed 2026-08-30.
- Introducing Geraniums. Royal Horticultural Society. Source record · Accessed 2026-08-30.
- How to Divide and Transplant Perennials. Iowa State University Extension and Outreach. Source record · Accessed 2026-08-30.