Grow · cut back epimedium before bloom
Cut Back Epimedium Before New Flowers Thread Through Old Leaves
Remove weathered evergreen epimedium foliage before flower stems rise, protecting the low crown and retaining any healthy new growth.
Published Last updated
In this guide
- Use the biological cue for old epimedium foliage
- Read the site and the whole plant together
- Set a visible finish line before beginning
- Prepare the work while every part is still identifiable
- Carry out the central operation in a controlled sequence
- Protect roots, crowns, and new growth after the work
- Diagnose a weak response before adding another treatment
- Leave a record for the next seasonal decision
- Steps
Use the biological cue for old epimedium foliage
For an epimedium that still carries last year’s foliage, complete cleanup in late winter before the new display rises through it. University of Washington Botanic Gardens uses flowering time as the deadline for its Epimedium plantings, which places the work in late winter in Seattle. Missouri Botanical Garden gives the same before-new-growth cue for E. sempervirens. The plant stage is the working signal; a fixed date would travel poorly between regions.
Identify the foliage habit first. The Royal Horticultural Society describes Epimedium as deciduous, semi-evergreen, or evergreen, and North Carolina State Extension notes a broad tendency for Asian species to be deciduous and Mediterranean plants evergreen to semi-evergreen. A deciduous clump may leave almost nothing to cut. A winter-green clump can provide useful color until the late-winter cleanup window arrives.
E. sempervirens shows why species and climate belong in the decision. For this species, Missouri Botanical Garden records evergreen foliage in warm-winter climates and semi-evergreen to deciduous behavior north of USDA Zone 7. Its surviving winter leaves are removed before spring growth. That example supports the timing for the named species while the genus sources explain why another epimedium may reach the same season with a very different amount of foliage.
Look for new growth before putting any leaf inside the cutting path. Epimedium flowers stand on slender branched stems, and fresh leaves can emerge with red or bronze coloring. Those traits are normal, not signs that the new material belongs in the cleanup. Early flowers can suffer late-frost damage according to North Carolina State Extension, so a poor display after a cold event cannot automatically be attributed to leaf cutting.
Read the site and the whole plant together
Approach from the planting edge and locate every clump before stepping into the bed. The genus profile from North Carolina State Extension describes a shallow-rooted rhizomatous perennial that can compete with tree roots. That same Washington account delays cutting partly because bare winter beds invite people to walk over plants that are about to emerge. A path or board at the perimeter keeps the concealed crowns legible. The first editorial image contrasts the old canopy with revealed spring stems.
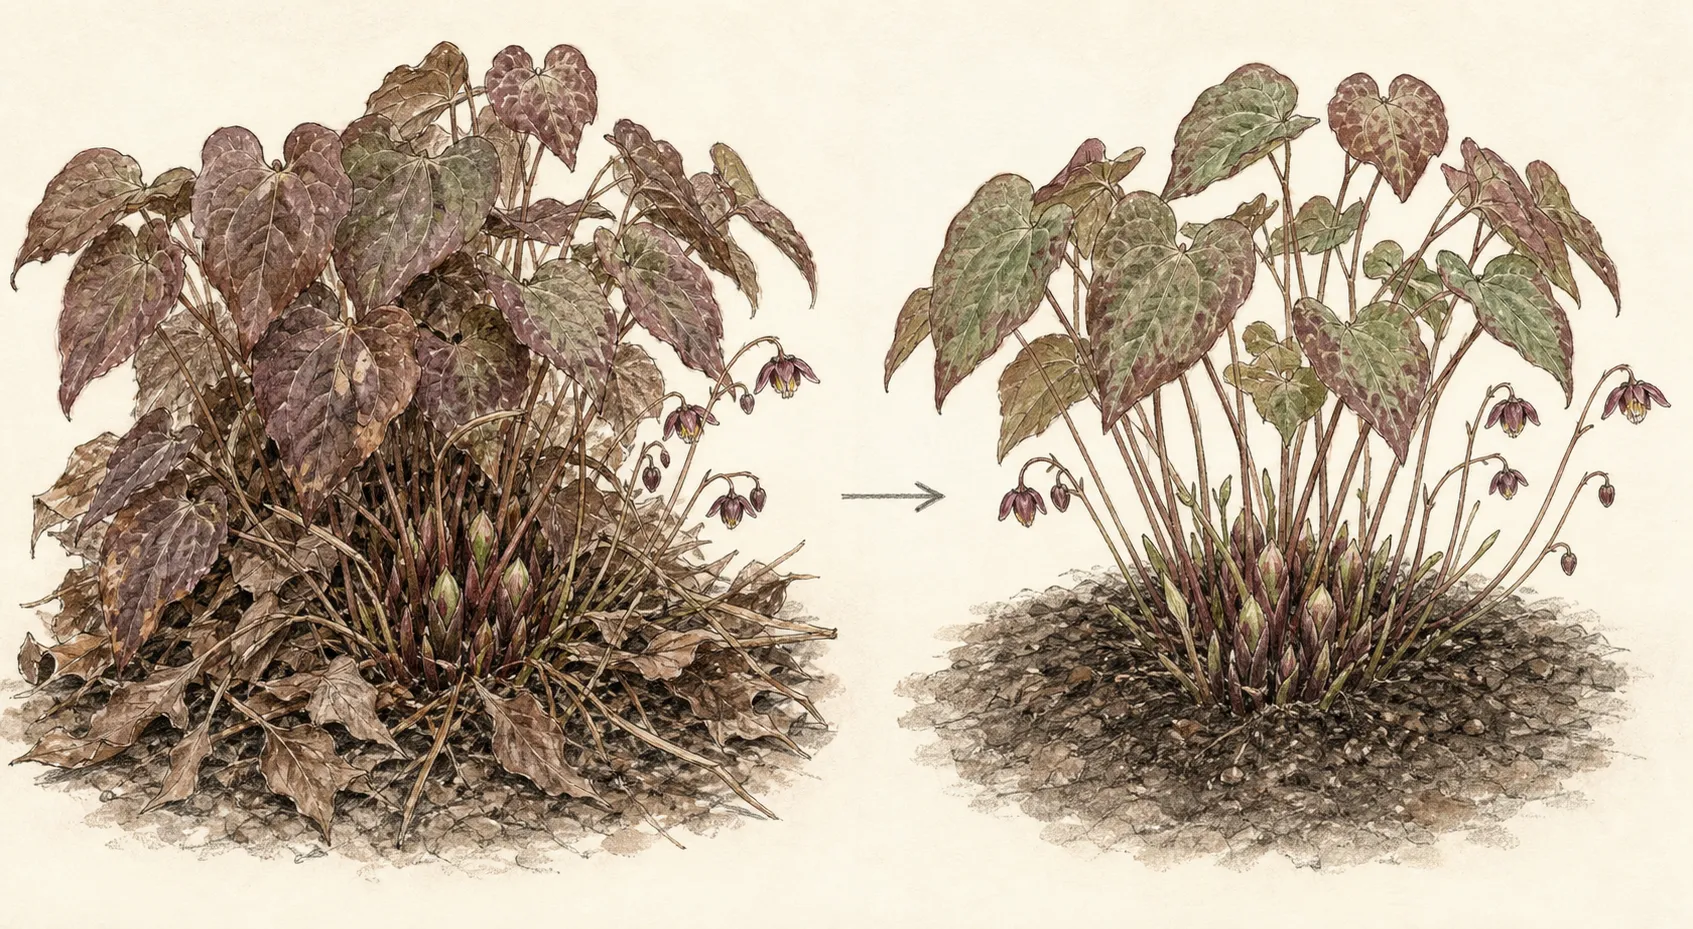
Judge the winter foliage by identity and timing, not by one standard of tidiness. The Washington collection retains epimedium leaves while they remain attractive groundcover or carry good winter color, then removes the foliage by flowering time. Leaves that already look bedraggled can be cut earlier there, but the staff weighs that choice against making the hidden planting vulnerable to traffic. This is a regional management example, not a universal November instruction.
Read soil moisture separately from leaf appearance. The RHS says some epimediums need moist, freely draining ground while others accept drier conditions. Established plants can tolerate deep shade and drought among shallow tree roots according to North Carolina State Extension. Recently established plants still need consistent moisture in that source. Check the labeled taxon and the soil profile before turning a late-winter foliage task into a change in irrigation.
Keep root work outside this session. Leaf cleanup prepares the view of spring flowers and foliage; propagation divides the rhizomatous plant. For propagation, North Carolina State Extension favors late summer and suggests a three- to four-year interval for vigor. The E. sempervirens profile from Missouri Botanical Garden lists early spring or fall. Those different recommendations call for a named-plant plan, separate tools, and a separate day.
Set a visible finish line before beginning
Define completion as removal of the previous year’s canopy with the new flowers and leaves still intact. The retained sources set no universal cutting height, stub length, or crown measurement for the genus. Use visibility as the limit: each old leaf goes into the blade path only after fresh growth beside it has been located. The finished surface may be uneven because this is selective close work around an emerging perennial.
End broad cutting when flower stems have already threaded through the old canopy and their bases cannot be distinguished. The evidence-backed window has passed at that point. A few remaining old leaves are a clearer result than an improvised sweep through hidden flowers. Record the incomplete area and use the plant’s next late-winter stage to schedule an earlier visit.
Leave the soil and rhizomes in place. Shallow roots are a named genus trait in the North Carolina profile, while that source and Missouri Botanical Garden both treat division as a separate propagation operation. The cleanup ends at foliage removal. Exposed roots, a lifted rhizome, or a loosened crown shifts the job beyond its intended scope and calls for the appropriate planting guidance.
Prepare the work while every part is still identifiable
Use a clean hand-cutting tool that lets the operator see the old leaf and all adjacent spring growth. A broad mechanized pass loses that close view once flower stems are present, so reserve it for a locally documented method completed before emergence. Check the tool’s action, follow its manufacturer’s instructions, and position the cut material container at the bed edge.
Keep the species or cultivar label at the clump. Record whether the plant entered late winter bare, partly leafy, or evergreen, and photograph the stage of the new shoots. Those observations explain how much work the same plant may need next year. They also keep the E. sempervirens zone example from being applied to an unidentified member of a varied genus.
Mark the crowns and approach from a path or firm perimeter. The Washington guidance identifies trampling as a reason to retain winter foliage until late winter, and North Carolina State Extension places the plant’s roots near the surface. Set tools and removed leaves outside the colony. Clear access lets the gardener work across the planting while each next clump remains visible.
Carry out the central operation in a controlled sequence
Start where the old foliage can be raised enough to reveal the spring growth beneath it. Separate a small group of previous-year leaves, confirm that every visible flower and fresh leaf stem remains outside the blade path, and make a controlled cut at the old leaf bases. Remove that group from the bed before selecting the next one. This incremental route keeps the timing decision visible throughout the job.
Treat the second editorial image as an orientation drawing, not a measured cutting-depth rule. It shows old petioles above a shallow rhizomatous crown with new shoots beside them. The sources support removing old foliage before emergence, but they supply no number for the cut. Choose the lowest clearly visible point that leaves the crown and all fresh stems outside the tool’s path.
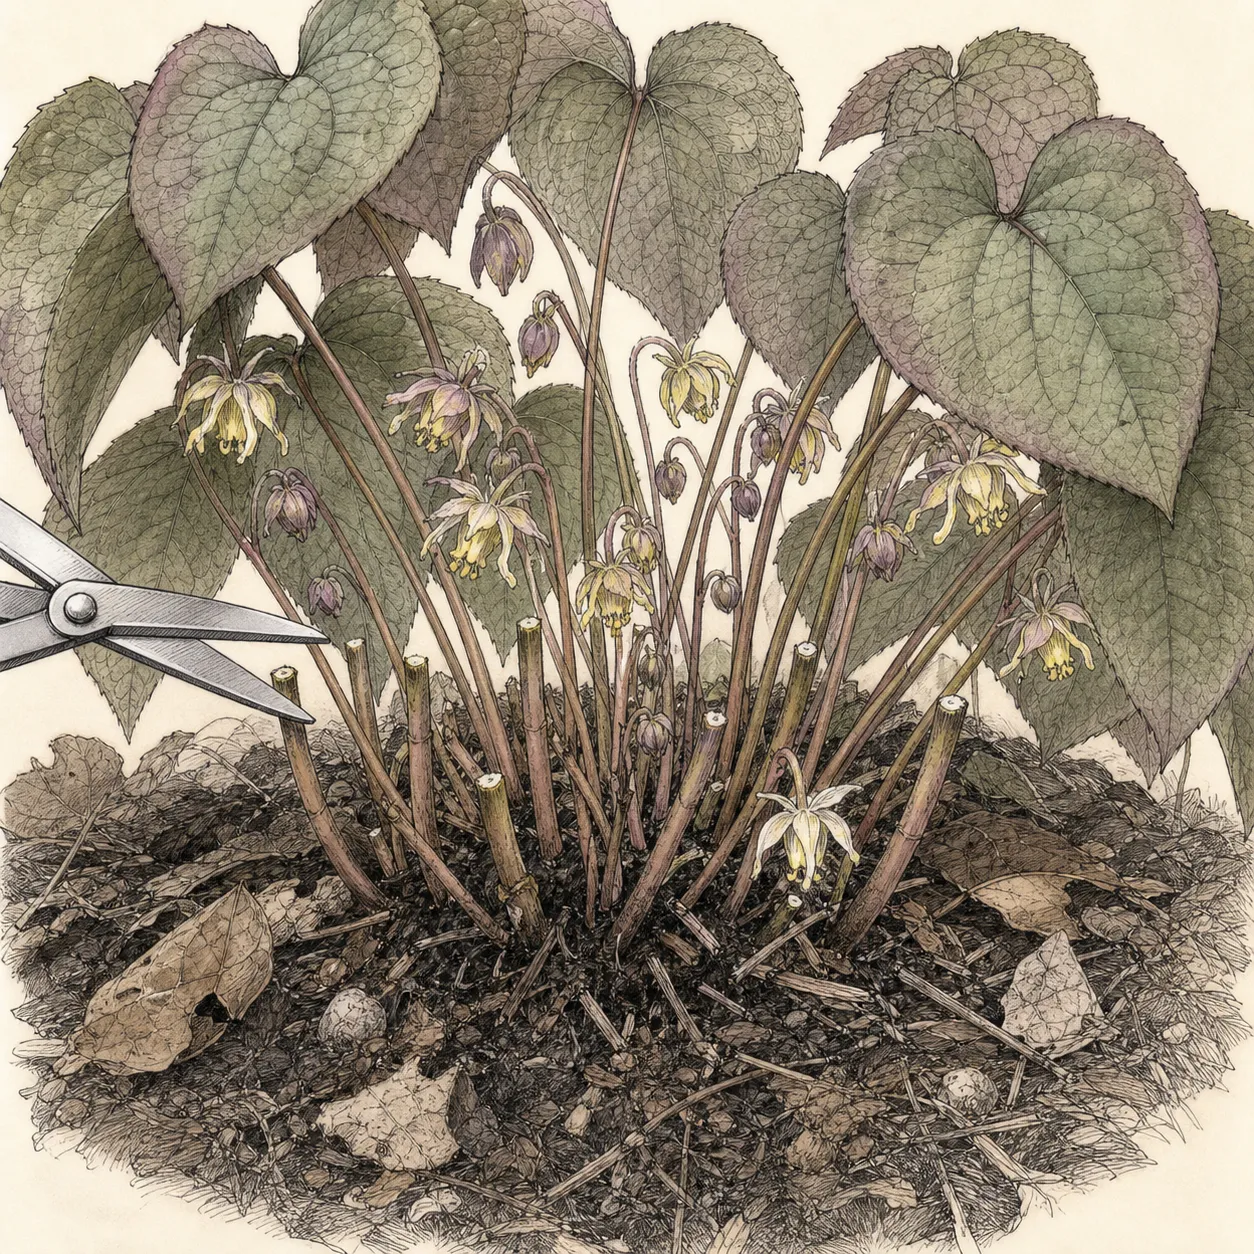
Remove the previous year’s foliage even when some leaves stayed green through winter, once the chosen regional cleanup window arrives. In the Washington collection, attractive leaves provide winter value before the Epimedium foliage is cut by flowering time. Surviving E. sempervirens leaves are likewise removed before new growth in the Missouri profile. Preserve the red- or bronze-tinted material only when it is identifiable as the current season’s new foliage.
Clear one clump before moving tools across the colony. Gather the severed leaves, recheck for concealed spring stems, and stop if the remaining old canopy cannot be separated visually. The next plant may be deciduous and require only debris pickup, or evergreen and require a full pass. Re-read its label and growth stage instead of carrying the previous clump’s volume or pace forward.
Protect roots, crowns, and new growth after the work
Remove the cut canopy from above the shoots and leave the root zone at its existing grade. Then return to the moisture regime for the labeled plant. The RHS distinguishes epimediums that need moist, freely draining soil from those suited to drier ground, and North Carolina State Extension limits strong drought tolerance to established plants. Check actual soil and rainfall before adding water.
Skip a special fertilizer application made solely because leaves were cut. At the Washington collection, epimediums are described as minimal-care perennials that need no routine dividing, staking, or fertilizing. That observation fits this limited foliage task, while a known soil problem or a different local program remains a separate decision. New bareness is not evidence of nutrient deficiency.
Note any freeze that arrives as flowers emerge. Late-frost injury to early blooms appears in the North Carolina State Extension profile even though the genus is generally frost tolerant. The retained sources establish the risk but give no universal covering or post-freeze cutting protocol for all epimediums. Let visible injury become clear, then follow current local guidance for the named plant.
Keep feet outside the colony after the foliage comes off. The Washington account specifically warns that early clearing can make soon-to-emerge plants easier to trample, and the North Carolina profile places roots shallowly among tree competition. Maintain the marked route until new leaves outline the clumps. This access control is the main immediate aftercare created by the cleanup itself.
Diagnose a weak response before adding another treatment
If flowering is sparse after cleanup, first record two events that the sources identify: whether flower stems were already present during cutting and whether a late frost followed emergence. That chronology can narrow the question, though it does not prove a cause. Compare with an untouched clump of the same taxon where available and keep further cutting out of the investigation.
Review plant identity, light, and moisture when the entire planting lacks vigor. The genus generally favors shade or partial shade, but its soil-water range varies. Its E. sempervirens profile specifically reports foliage burn in full afternoon sun and intolerance of alkaline soil. Keep those Missouri Botanical Garden details attached to that species while using the broader RHS and North Carolina guidance for an unidentified Epimedium.
Both the North Carolina State Extension and Missouri Botanical Garden profiles list mosaic virus as a possible problem. Their plant pages do not provide a symptom-based diagnosis or a treatment program. Unexplained mottling, distortion, or decline therefore falls outside a routine foliage-cutting article. Photograph the plant, retain its label, pause propagation, and take the case to a local diagnostic service.
Check whether the apparent problem is simply normal variation. The North Carolina profile gives the genus a range of about eight to ten inches in height and twelve to eighteen inches in width, while the RHS examples span broader dimensions by species and cultivar. A slowly spreading clump can be healthy. Compare current growth with its own label and past record before scheduling division or changing the site.
Leave a record for the next seasonal decision
Record the plant name, foliage habit, cleanup date, and stage of the new stems. A photograph from the same viewpoint should show how much previous-year canopy remained and whether flowering had begun. Next winter, that record will distinguish a naturally deciduous selection from an evergreen one and place the task by growth stage.
Note any clump left partly uncleared because new growth obscured the cut line. The practical correction is earlier timing next year, using the Washington flowering deadline and the named plant’s emergence record. Leave an uncertain late cut out of the schedule. That conservative note protects the current display and turns a missed window into a specific future cue.
Keep division in its own record. For continuing vigor, North Carolina State Extension recommends late-summer propagation and a three- to four-year interval; Missouri Botanical Garden gives early spring or fall for E. sempervirens. Record which source matches the identified plant and region before moving rhizomes. The foliage cleanup itself supplies no new reason to divide.
Close with one sourced next decision: wait for the next late-winter foliage window, monitor an early display after frost, or plan a separately researched division at the appropriate season. The garden may need no further action once flowers and new leaves rise cleanly. A short decision tied to species and stage keeps this annual check from becoming unnecessary root disturbance.
Steps
- Level
- moderate
- Time
- One focused session, followed by scheduled checks
- Tools
- Small bypass shears, Gloves, Kneeling board, Low debris tray
- Materials
- Thin leaf-mold mulch if needed
- 1Find new stems before removing old leaves
Visit the labeled planting in late winter and find the current season’s stems before cutting. Use flowering time as the completion deadline, following the University of Washington example, and the before-new-growth cue for E. sempervirens. A deciduous plant with no old canopy needs no cutting; tangled emerging stems mark the end of broad cleanup.
- 2Identify the taxon and its winter foliage
Confirm whether the taxon is deciduous, semi-evergreen, or evergreen, and note how much winter color remains. Mark every shallow-rooted clump from the bed edge, choose a firm perimeter route, and keep traffic off concealed growth. Record soil moisture separately because species needs range from moist, draining ground to established dry shade.
- 3Prepare a visible hand-cutting route
Clean and test a hand-cutting tool, put on gloves, and set the leaf container outside the colony. Keep the Epimedium label fixed beside its rhizomes and photograph the new-growth stage. Follow the tool maker’s directions, and position each hand where the blade, old foliage, and adjacent shoots stay visible.
- 4Clip old leaves clear of new stems
Raise a small group of previous-year leaves, locate all new flower and leaf stems beneath it, and keep those stems beyond the cutting path. Clip the visible old leaf bases at a point that leaves the shallow crown untouched. Remove the severed group, inspect the newly opened area, and repeat only while the distinction remains clear.
- 5Clear debris without disturbing shallow roots
Carry cut leaves out of the bed and leave soil over the shallow roots undisturbed. Recheck the labeled plant’s moisture conditions and recent rain before watering. Add no special fertilizer for this foliage task; the University of Washington collection treats established epimedium as a low-input perennial once site needs are met.
- 6Check flowering and adjust next year’s timing
Return as flowers and fresh leaves expand. Record whether late frost occurred, whether any old canopy remained because the cut line was hidden, and when this taxon reached flowering stage. Put the next cleanup earlier by that biological cue. Schedule division separately and only from guidance matched to the identified plant.
Sources
- Epimedium. Royal Horticultural Society. Source record · Accessed 2026-08-30.
- Epimedium. North Carolina State Extension. Source record · Accessed 2026-08-30.
- Epimedium sempervirens. Missouri Botanical Garden. Source record · Accessed 2026-08-30.
- When and Why to Cut Leaves Off Epimediums and Hellebores. University of Washington Botanic Gardens. Source record · Accessed 2026-08-30.